To avoid these ads, REGISTER NOW!

What did you do "IN" your garage today?

To avoid these ads, REGISTER NOW!

Flat Thunder Channel

Well-known member
Joined
May 4, 2020
Messages
402
Location
Ohio
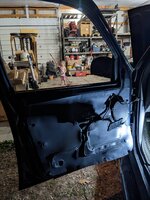
Long time since my last post.....I spent the evening trying to manually roll up my power window on my Mercury Mountaineer.

A year or so ago I replaced the driver's side window switch because the passenger side would not function properly. I opted for CCS version; Cheap Chinese Sheet. Flash forward to yesterday I smell electrical burning and my driver's side window had no roll up. The board fried......

I ordered a new more expensive one; really the only none obvious China copy available. Hopefully this one fares better. I also ordered a new window motor in case it was part of the issue. Luckily I used my power source Maxwell house coffee can to manual power it up

IMG_20230415_071015 (1).jpg IMG_20230415_071015 (2).jpg

IMG_20230415_071015.jpg IMG_20230415_071015 (4).jpg
 

Attachments

  • IMG_20230415_071015 (3).jpg
    IMG_20230415_071015 (3).jpg
    208.7 KB · Views: 40

four.cycle

Well-known member
Joined
Oct 19, 2015
Messages
29,331
Location
Tacoma, Washington
BlakeTheCarGuy said:
"Today at work was a typical Frid......."
Your Service Manager neglected to inform the customer beforehand that there was an additional $200.00 Change Order Service Fee once the vehicle was up on the lift?
What's wrong with that guy?

Be very careful opening the glove compartments on customers' cars.
Buddy of mine runs a U-Haul dealership and regularly finds glass pipes and used hypodermics (along with countless BIC lighters) left behind (mostly from one-way rental drop-offs.)
 

Brent T

Well-known member
Joined
Sep 29, 2018
Messages
459
Location
Arizona, USA
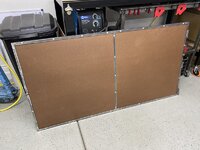
Finally finished building this door for my workbench. Now I'm gonna take it back apart so I can paint it. Black frame with grey panels. I've learned a lot building this stupid door. A couple lessons. I built my own hinges from round tube and round stock. Who knew there's an upside down and a right side up way to hinge a door? Now I know. Also learned next time to build the entire door and install the panels before building the hinges and latch. If fit great until I installed the panels, then nothing lined up. Live and learn. I probably have 20 hours ******* in this damn thing and the only purpose it has is to hide clutter.
52819491459_39e875596b_c.jpg
 

ambenz

Well-known member
Joined
Dec 12, 2010
Messages
4,237
Location
NW Chicago Suburbs
80F here today to I put the top down in the garage and took the Mustang for a decent spin around the area. Noticed some ominous clouds in the west so I parked her back in the garage at 2:25pm and at 2:30, it started raining. 2:40 downpour and lightening for 5 minutes...and then sunny.
Just made it back in time that I don't have to rewash it!
 
Last edited:

PassnThru

Well-known member
Joined
Jan 5, 2010
Messages
6,512
Location
Bowling Green KY
New stabilizer bar end links for the Taurus. Sadly that wasn't the issue but I kinda knew that anyway. Makes noises going over speed bumps. Not clunking sounds like you would normally associate with end links but squeaking sounds. I suspect the front struts but at only 84K miles I was hoping for an easier fix.
Now I just have to decide if I'm going to farm it out or do it myself. I hate working on the car - it's tough to place jack stands since it's a unibody so I end up mostly holding it up with the jack but with one jack stand in a place with a little pressure on it that I hope holds if the jack fails. Back in 21 I put new coil overs front and rear on my Explorer with no issue - but I just don't like to deal with the car.
 

HPRifleman

Member Emeritus
Joined
Nov 18, 2019
Messages
767
Location
Wayne, IL
Debated in my head whether to take the 50 year old Chevy out for a spin since it was supposed to start raining at 1:00. Realized that we don't get many Saturdays like this in Chicagoland, so I went out for over an hour and it was great. After I got back it still wasn't raining so I pulled the tractor out of the garage and pushed some dirt around. After that it still wasn't raining so I took out the spreader and put down some grass seed which is just wishful thinking on my property.

We wound up getting some sprinkles but nothing like the afternoon of rain that my phone predicted.
 

MerlinsBeard

Well-known member
Joined
Mar 27, 2020
Messages
398
Location
MD
Did the pushmower maintenance, spark plug, air filter, grass cleanout, bolt tightening. 2nd year doing my own blade sharpening and balance. Had some considerable grinding to do, since I have a habit of mowing my neighbor's grass when it gets high and last year I forgot yet again about the exposed ground rod that I blitzed over.

Had to borrow my father-in-law's grinder since I don't have one yet. Worked through the damage in the blade. Then did several passes with a flap disk. Once things were looking good, started the balance portion.

Mounted the balancer to a 2x4" leaning against the bench with some angle aluminum and clamps. Used a level to make the 2x4" vertically aligned. Pulled the mag bearing to the blade and saw rotation when I let go. I marked the heavier side with painter's tape to know which side to flap disk. Did several passes, rinse and repeat. Was able to get the blade balanced. Would love to design something more clever to mount the balancer to the workbench, but takes up less space.

Noticed that the operator presence bar is not springing back as much as it did in the past. Lawnmower still stops but looks like I have something to try to figure out.
 

Attachments

  • blade balance.jpg
    blade balance.jpg
    291.5 KB · Views: 47

Motorman55

Well-known member
Joined
Apr 10, 2016
Messages
2,650
Location
South Jersey
I finished the built in garden tool cabinet, with the exception of painting the trim, which I've yet to decide depending on the color scheme I use for the rest of the shop side of the garage. The overhead door slide lock just clears the upper hinge of the cabinet. Next, I'll get started on the wall and shelving area to the right of the cabinet.

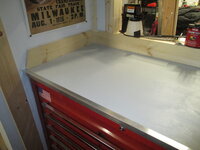
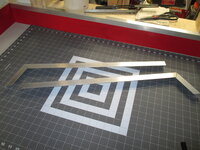
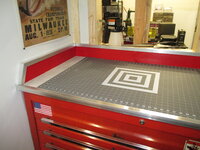
Meanwhile, I painted the new top on the large tool cabinet a light gray and added the aluminum metal edging. More work yet to come on this particular project.1681611633620.jpeg1681611609577.jpeg1681611556707.jpeg 1681611403119.jpeg1681611379226.jpeg
 
To avoid these ads, REGISTER NOW!

bugnut

ALLIANCE MEMBER
Joined
Jul 14, 2012
Messages
4,004
Location
Central Ohio
Rework on a tackle box. Picked up for a couple bucks last fall and immediately realized the issue was the lid holder was destroyed. So I made a repair from a couple wire loop ends and rivets, came out nice, box cleaned up and room for more fishing supplies!
 

Attachments

  • 20221031_123553.jpg
    20221031_123553.jpg
    355.8 KB · Views: 36
  • 20221031_123603.jpg
    20221031_123603.jpg
    482.8 KB · Views: 31
  • 20221031_123628.jpg
    20221031_123628.jpg
    667.1 KB · Views: 30
  • 20221031_123645.jpg
    20221031_123645.jpg
    385.3 KB · Views: 29
  • 20221031_123654.jpg
    20221031_123654.jpg
    408.4 KB · Views: 32

BonzoHansen

Well-known member
Joined
Jun 24, 2005
Messages
1,742
Location
NJ
The spring yard projects continue. Not sure if that counts.

Apparently continuing a trend here. Friday I put the take off wheels and tires that I picked up last weekend onto my avalanche. My oe wheels are all boogered up and I needed tires

Like new OE knockoffs off the same wheels I had, and brand new Bridgestones. $850, score. Even had new TPMS.

I need to get my new bilsteins in. The fronts are a small pain, need a spring compressor

20230408_102458.jpg
 

Jim_No_Garage

Well-known member
Joined
Jan 15, 2011
Messages
3,322
Location
Millington NJ
So I was pretty busy today. I cut and installed the the felt lining for the Pilliod machinist chest I have been cleaning up for Mrs No_Garage to use as a Jewelry box.

IMG_0628.jpeg

The mirror and felt on the lid are propped in place for this pic as I am working on wrapping the handle in leather and need to reattach the handle before finishing the inside of the lid. The

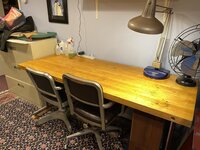
I also got sick and tired of the offset/crack in my butcher block table worktop so I did a fast and dirty fix. I chiseled out the plugs, loosened the thru bolts, aligned the top and re-tightened the bolts. Down the road I can re-glue it if it shifts but if it stays aligned it will never be touched again. It was broken when I got it several years ago but it was my son's bench so it didn't bother me. Now that I use it it was time to fix it.

IMG_0633 (1).jpeg

I also made a lot of headway on a walking stick for Mrs No_Garage. We had a 100 year old Ash tree taken down last year so we saved a branch/small limb and let it dry (for a year . . .). I had purchased 2 drawknives and a spokeshave last year Garage/Estate/Antique sales and with the nice weather recently I started work on it. I stripped the bark, sanded the knots off and have it pretty much ready for a final sanding and a handle. I will post a picture when it's done. . .

Cheers

Jim
 

npp

Well-known member
Joined
Dec 6, 2012
Messages
296
Today at work was a typical Friday….slammed lol. Non stop from 7:30am-4:30pm except our hour lunch break. At least got the last 30 minutes to clean up lol. One car I waited almost 2 hours for oil. Customer wanted Mobil 1 0W-16 but had a certain price range so we had to check at every single parts store. Got it from Auto Zone which was like $3 cheaper than another place. They didn’t specify they wanted Mobil 1 till we got it up in the air and the oil already draining the advisor went over the multipoint with them and said they freaked because we wrote down the Toyota 0W-16. They said has to be Mobil 1 and has to be from a bottle. We stock 5W-20 and 5W-30 Mobil 1 but that’s it’s as the rest of the oil is bulk or we have Toyota bottles for retail sale. If they would have specified beforehand we would have waited to do it till after the oil arrived.

Done that and helped out with more oil changes which is fine. A couple sets of tires. We had give someone a discount because I opened their glovebox to search for a wheel lock key and replace the cabin filter and a bottle of grape Bootlegger fell out and bounced and hit the floor and shattered. That was a weird one to explain to my boss he thought it was pretty funny. It was a Tacoma glovebox so there is no like actual box attached to the lid the lid is separate if you get what I’m saying. Everything was crammed in there I opened it and out that came lol. They got $90 worth of filters free haha. The air filter was $40 and cabin $50 so $90 total they agreed to buy then when that happened my boss is like yeah we will take care of the filters for you. So yeah interesting day there haha.
At the dealership I worked at ( 47 years) it was Cluster F**k Fridays
 

Blue Chips

Well-known member
Joined
Jan 25, 2012
Messages
199
Location
Maine
I received the 1/2" NPT-thread Ingersoll Rand ARO filter and regulator that I ordered for my new compressor and connected them, using mostly pieces of pipe that I already had on hand. I added a union and a quarter-turn ball valve to make future servicing or relocating of the air lines easier.

I constructed a simple diagonal brace from a threaded rod, a pipe hanger bracket, and a piece of steel angle to secure the filter/gauge assembly and prevent it from turning and loosening up. The new compressor works great. It's a touch quieter than my old compressor, and it can keep up with my small bench-top blasting cabinet (I'm using a relatively small nozzle) which is one of my most air-hungry pneumatic tools. I've started routing the new air line to my retractable hose reel. So far, so good.

compressor-connection.jpg
 

LeeG

Well-known member
Joined
Nov 29, 2012
Messages
1,531
Location
Phoenix, AZ
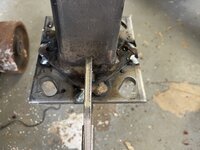
Finally got around to installing the new casters on my metal remnants cart. The previous set was polyurethane and were rated for 275lbs each. These are cast iron, rated for 1,200 lbs each. It rolls much easier now, though it still takes a good pull to overcome inertia. These casters are from McMaster. I welded new mounting plates to the old ones, and bolted the new casters on.

My HF lift cart just fits between the wheels.


Lee
 

fishwatcher

Well-known member
Joined
Jan 26, 2023
Messages
759
Over the last week, I lightly sanded several inexpensive tool handles and put a Minwax walnut wood finish on them. So far, for three of them I also put satin gloss poly urethane on them to protect the handles.

I had it on hand and didn’t know ahead of time that BLO is the preferred treatment for wood handled tools. Its not like they are heavy use tools: a rubber mallet, a duster and a file, so I think they’ll be fine.

I have a vintage Craftsman USA-made mallet that I have not put the poly on.. and I’m thinking again.. it would be fine. Any reason I should go and spend money on BLO for this more valuable tool?
4AB9140B-098B-4008-8238-B834F59AB5D4.jpeg
 
To avoid these ads, REGISTER NOW!
Top Bottom