To avoid these ads, REGISTER NOW!

What did you do "IN" your garage today?

To avoid these ads, REGISTER NOW!

CudaChick1968

Member Emeritus
Joined
Jul 1, 2011
Messages
1,800
Location
Northwest Tennessee (38230)
The historic 32-pound cast iron Hotel Morton sign is finished in my "best guess on originality."

It's definitely rustic and extremely old. All original issues and defects when it was cast remain, including the scribe marks depicting the layout of the lettering and the small mark showing exact center at 10 1/2".

Research is still underway. My latest fork in the road led to the Berwick, Pennsylvania Historical Society. Its rep forwarded my message and photos to the Executive Director and I await their input. When I learn more I'll share it. The only photo of the hotel I can find came from Pinterest.

2dc41c03-3d67-42f2-8c69-92dafe9ece3fphoto.jpeg5c00772e-18ce-43f7-a91a-250e7472a238photo.jpeg20230525_144719.jpg20230525_144916.jpg20230525_144945.jpg20230417_165745.jpg
Hotel Morton Berwick, PA Postcard.jpeg.jpg

Regardless of its lineage it was still a really cool piece to restore.
 

Shiftless

Well-known member
Joined
Mar 9, 2014
Messages
14,576
Location
East Bay SFO
For drying out boots, don't use heated air or next to a fire, it can crack the leather - you are better off with a small fan for air movement and ambient room temp air.
Outlaw has it right. Once the leather is cracked, there is no fixing it. Well made leather boots and shoes will last a lifetime if well cared for. I have a pair of boots and a pair of dress shoes that are each 50 years old (they still fit) and they look and feel great. Use shoe trees.
 

Mikeske

Well-known member
Joined
Apr 28, 2017
Messages
2,131
Location
Washington State
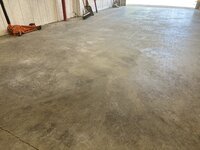
Well had one of those days in the shop today. I was changing the oil on my 2018 Chevy Equinox and not paying an attention and the oil catch pan was not centered under the drain plug. I proceeded to loose a good bit of the oil on the cement floor of my shop. I grabbed my kitty litter and spread it out on the oil slick. Afterwards I ended up playing foot drag on the kitty litter and then shoveled up the oil mess into my 5 gallon bucket then spread some more fresh kitty litter on the floor and clean up the remainder of the oil that started to soak into the cement. Oh well life in this retirement. Since I have no interest in epoxy coating the floor at least I will not slip on any of the oil spots.

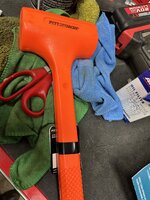
The next thing I discovered is I can break a hammer (or at least a dead blow hammer) so off to Harbor Freight and I exchanged the broken hammer with a new one under the lifetime replacement warranty. IMG_6857.jpegIMG_6858.jpeg
IMG_6856.jpeg
 

Mike65

Well-known member
Joined
Mar 7, 2007
Messages
3,102
Location
Horse Pasture, Va.
@Mikeske The shop floor looks good for having oil spilled on it, do you have the floor sealed? When my wife & I had our garage built after the concrete cured I sealed the floor for instances like this.
 

ZRX61

Well-known member
Joined
Aug 15, 2006
Messages
28,716
Location
Solar Blight Valley, SoCal
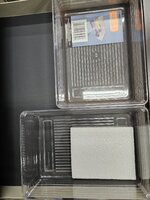
I turned a rusty/corroded body file into this:

IMG_20230528_110812664.jpg


Still need to replace one screw that was bent & clean the recess in the handle. It all looked like fried poop when I started. I knew I had a spare file at home. Don't think the rusty one is worth messing with, the other side is full of bondo & just as rusty, Even the backer plate was a rusty mess. Thought I had a *before* pic...
 

Mikeske

Well-known member
Joined
Apr 28, 2017
Messages
2,131
Location
Washington State
@Mikeske The shop floor looks good for having oil spilled on it, do you have the floor sealed? When my wife & I had our garage built after the concrete cured I sealed the floor for instances like this.
All that was done to the shop floor was when the concrete was a sealer was initially sprayed on by the concrete finishing guy.
 

SRU1436

ALLIANCE MEMBER
Joined
Apr 1, 2017
Messages
571
Location
Bay Area, CA
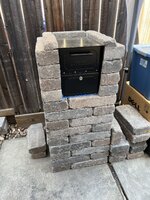
I’m putting in a new mail so I wanted to cut everything and fit it together before actually “Putting in” the new Mailbox. Still need to find the right cap for it, and pour the pad and such. Fist time cutting stone like this, I cut tile before and wasn’t too great at it. I really tried to take my time and adhere to the measure twice and cut one, I’m usually a cut twice after measuring once type of guy.
IMG_8589.jpeg
 

Mike65

Well-known member
Joined
Mar 7, 2007
Messages
3,102
Location
Horse Pasture, Va.
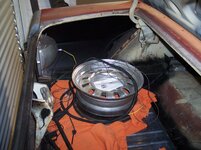
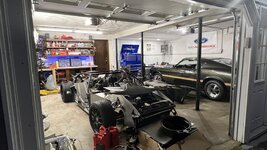
Today is a chilly drizzly day so it was a good day to spend in the garage working on the wiring in the trunk of the Mustang. I am in the process of wiring up the taillights & the side lights, then the backup lights & the license plate light. After that the electric fuel pump & the gas gauge.

100_2101.JPG
 

Mike65

Well-known member
Joined
Mar 7, 2007
Messages
3,102
Location
Horse Pasture, Va.
I’m putting in a new mail so I wanted to cut everything and fit it together before actually “Putting in” the new Mailbox. Still need to find the right cap for it, and pour the pad and such. Fist time cutting stone like this, I cut tile before and wasn’t too great at it. I really tried to take my time and adhere to the measure twice and cut one, I’m usually a cut twice after measuring once type of guy.
IMG_8589.jpeg
At Lowes or Home Depot they sell cut off wheels for an angle grinder that will cut stone, or you could rent a stone cutter saw. At our last house I put down a paver stone walkway to the front door & IIRC we rented a tile cutting machine with a stone cutting blade from Home Depot & it worked very well to cut the stone. If you look at the attached picture between the grass & the Explorer is the paver stone walkway I put in that we cut the stone to fit the edges.

100_1515.JPG
 
To avoid these ads, REGISTER NOW!

SRU1436

ALLIANCE MEMBER
Joined
Apr 1, 2017
Messages
571
Location
Bay Area, CA
At Lowes or Home Depot they sell cut off wheels for an angle grinder that will cut stone, or you could rent a stone cutter saw. At our last house I put down a paver stone walkway to the front door & IIRC we rented a tile cutting machine with a stone cutting blade from Home Depot & it worked very well to cut the stone. If you look at the attached picture between the grass & the Explorer is the paver stone walkway I put in that we cut the stone to fit the edges.

100_1515.JPG
I bought a generic stone saw for the project.
 

Craig Balzer

Well-known member
Joined
Sep 21, 2005
Messages
867
Location
Colorado Springs

Attachments

  • Morton Hotel.jpg
    Morton Hotel.jpg
    17.6 KB · Views: 34

nadogail

Well-known member
Joined
Jan 23, 2009
Messages
32,032
Location
Coronado, CA
Pancake Breakfast, peek at the Newspaper, trip to Costco which was followed by a short nap. Afternoon with the Bookkeeper and the Cable Guy who restored my WiFi by replacing the modem.
 

rayra

Well-known member
Joined
Dec 1, 2014
Messages
4,724
Location
Escaped from Los Angeles
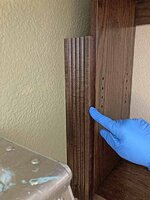
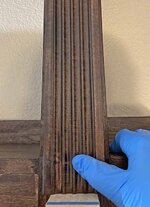
Got the bookcase carcasses I've been building lofted into place. Next couple days will be making the decorative fascia elements that will complete the 'built-in' look.
Flipping a coin about making the back inserts, was going to laminate beadboard and 1/4" luan to fill the empty back area. But I'm ready to declare victory and move on from this projects.
But 1st I have to use the rented 10' ladder early in the morning to install a roof turbine vent and measure my garage attic joist spacing so I can install some pull-down stairs, soon.
 

Attachments

  • sparta high bookcases 25 new reveals.jpg
    sparta high bookcases 25 new reveals.jpg
    53.9 KB · Views: 29
  • sparta high bookcases 24 new reveal.jpg
    sparta high bookcases 24 new reveal.jpg
    49 KB · Views: 25
  • sparta high bookcases 22 lofted.jpg
    sparta high bookcases 22 lofted.jpg
    64.5 KB · Views: 33

kaymccampbell

Well-known member
Joined
Feb 27, 2015
Messages
29,599
Location
Upstate New York
Got the bookcase carcasses I've been building lofted into place. Next couple days will be making the decorative fascia elements that will complete the 'built-in' look.
Flipping a coin about making the back inserts, was going to laminate beadboard and 1/4" luan to fill the empty back area. But I'm ready to declare victory and move on from this projects.
But 1st I have to use the rented 10' ladder early in the morning to install a roof turbine vent and measure my garage attic joist spacing so I can install some pull-down stairs, soon.
If you panel the back of that area with your beadboard, then install the carcasses against it, it'll have the same effect, without the precision problems of cutting n fitting individual little panels. I'd prefinish the strips, and use construction adhesive to glue them to the wall. And the finish nailer to tack them into place while the glue sets.
 

Uncle murph

Well-known member
Joined
Jan 28, 2021
Messages
1,477
Location
Harford county
One of my neighbors is a RN who also does Anesthesia, her husband is gravely ill. As I was walking to my workshop, she was trying to back out of her garage, but was blocked by a BroDozer diesel pickup with a plumbing company logo on the tailgate. She said "that pickup has to move so I can get out, I have an Emergency!

I walked, with my cane, and told the guy that that truck needs to move Now, my neighbor has an emergency! He looked at me with a blank look, I started to yell at him "The truck needs "Right Fing Now, don't keep B S ing on your phone, "Move that truck, Right Fing Now".

Why do some people think they can park in a the middle of a Fire Lane, with Red Stripes on both sides?
The world is filled with self absorbed,inconsiderate a-holes,depending on his age you may have been the first to inform him that he is not the only person who matters which could explain the blank stare.
 

Outlawmws

Well-known member
Joined
Aug 9, 2011
Messages
39,310
Location
The Badlands
Going a second pass after yesterdays dismal results

Solar heating test for my new to me (factory made) pressurized water tank for camping. Its been way too cloudy for good results, I did better in 2 hours late yesterday, than today's' "Mostly cloudy" day...

Maybe tomorrow will be sunnier; its supposed to be 7-8 degrees warmer...

I made a second pass at the solar heating of camp water today. The overcast did burn off adn clouds mostly went away. not a particularly hot day, but the key here is sunlight more than temp to get this to work.

First three hours was about like yesterday, not enough sun to make progress.
Then there was good sun and I was getting 8 or 9 degrees of gain per hour.
then it peaked, and then it fell off, and that seems tied to the ambient temp as well.

I think there is a direct relationship between what it can gain, and what it loses off the shady side. So radiant from the sun, good. but there is radiant off the back side as well and the threshold seems to be about 35-40 degrees from ambient. It's peak was 110 F with an ambient temp of 70, but that fell to 104F at 68. I did find that in the heat of the day, trading sun sides front to back seemed to do better.

I also want do a side by side test with one of my stainless steel wash stations, to compare temp rise. I know I have used a reflector off the back for the SS tanks with just aluminum foil, but I can also get mirrored plexi from Tap plastics and make a good reflector.

I'm also thinking this plastic tank can benefit from a "bed" of Styrofoam for the back? I'm also wondering about the ability of the thick black plastic to get heat into the water, vs, the SS (painted flat black)

This is the GoSpout(R) water sprayer I've been testing just to get a read on if its a good option. I like that my wash home built Stations stand securely, and are easier to get on and off with one person. Moreover add a riser and mine are showers, easily, the GoSpout need to set on something chest high and is a hassle to lock open flow. The sprayer on the GoSpout has some headiness, but now you are one handed?

One advantage the GoSpout and Hudson sprayer based units I have made have, is a built in air pump for pressure


GOSPOUT tank.jpg
 

rockcrawler

Well-known member
Joined
Jan 11, 2013
Messages
930
Location
Dallas, TX
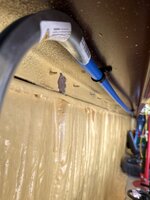
Ran some 3/4” Pex in my shop for an outside hose bib and a utility sink. I ran it under the purlins in the middle to keep any screws from hitting it when I put plywood walls up later. I‘m thinking of running the drain through the siding at the back of the shop and have it drain into a hole with gravel in it. It will mainly be used to wash hands. Obviously have more work to do.

DC1E2ED6-089B-41C2-B7F8-03A2EFCCE5A8.jpeg48AD848D-49AD-4720-954E-44514BB030FB.jpeg24BE0593-6BD4-4430-8BD0-AE2A91CDF925.jpeg82750724-0CA2-4777-8910-5F33FD61ACFA.jpeg000BF13F-58AF-41B1-99EA-5F858EA3CFBD.jpeg90C63903-D005-4531-A21E-BDF774417D37.jpegB345356F-22C1-40AC-B2E0-81B3B6CA4DB2.jpeg
 
To avoid these ads, REGISTER NOW!
Top Bottom