To avoid these ads, REGISTER NOW!

ZMotorsports Shop Projects 2.0

OP
Z

zmotorsports

ALLIANCE MEMBER
Joined
Oct 20, 2009
Messages
21,488
Location
Northern Utah
Continuing on.

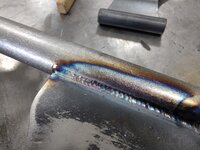
Before final welding of the steering crossmember I drilled a .062" hole near the end. This is critical when welding tubing as the pressures build up internally in the tubing from the heat generated during the welding process and if the pressure is not allowed to be relieved it will blow out right as the weld is being completed and make everything look like ****. When joining tubes I generally drill these holes under the area where the next tube will join so they are always vented back to atmosphere. However, in this instance where the holes around the rest of the chassis have been covered already I drilled a couple of small holes near the end of each tube. I then weld the joint close to where the hole is drilled and stopped. I let the heat and pressures dissipate while I do something else and then come back and weld the last quarter or half inch and close up the hole as I finish the weld. The tube is just large enough that the pressures won't build up fast enough for the last quarter inch or so of weld and I'm able to finish it out smoothly without blowing the molten puddle out.
rf273.jpg

One more mockup the steering to check for interferences. I measured the length between the tie rod holes in the straight position and then at the turned position for reference.
rf274.jpg

Next I thought I'd fabricate some mounting tabs for the lights. I found these from a motorcycle parts supplier to simulate the large King Bee headlights typically found on a 32' roadster. These will not be powered of course and are being installed purely for aesthetics. Tabs cut out of cardboard and transferred to some .095" plate.
rf275.jpg

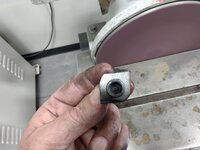
After mounting holes were drilled and reamed they were bolted together for metal finishing. The heavy grind marks from the 60-grit disc going perpendicular to the mounting tabs.
rf276.jpg

Shapes are symmetrical.
rf277.jpg

Then the mounting tabs were turned parallel with the 120-grit sanding belt for the smooth finish.
rf278.jpg

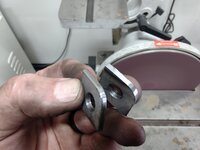
After separating the tabs and the one in the foreground has been chamfered compared to the one in the background with the hard edges remaining.
rf279.jpg

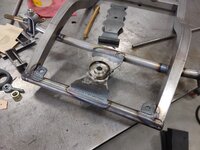
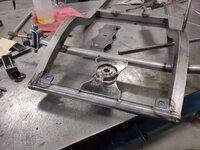
Tabs welded into position at the front of the chassis. This step was chosen to be done before the center crossmember to take advantage of the vent holes previously drilled to allow the pressures to escape.
rf280.jpg

rf281.jpg

Overview of the front end before final welding of the crossmember.
rf282.jpg

More to come...
 
To avoid these ads, REGISTER NOW!
OP
Z

zmotorsports

ALLIANCE MEMBER
Joined
Oct 20, 2009
Messages
21,488
Location
Northern Utah
The last of the pictures from Saturday's work on the Radio Flyer wagon project.

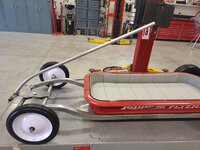
Now to mock the headlights into position....
rf283.jpg

..and check one final time for any interferences.
rf284.jpg

Everything looked good so the steering crossmember was fully welded into place. The last quarter of an inch or so was left and allowed to cool before completing and closing up the vent holes.
rf285.jpg

rf286.jpg

rf287.jpg

Steering mocked into place one more time.
rf288.jpg


Thanks for looking. The wagon project is getting very close to having the fabrication work completed then it can be broken down for paint & body.

I think I am going to try something different with this chassis however. It's been about 20 years since I built my last street rod chassis and with the street rods that I built in the past I mudded and smoothed the welds for aesthetics. They turned out awesome and netted me some nice trophies and magazine exposure but also much of that decision was due to the fact that my welds were, well let's just say less than desirable to look at. They were strong but not as pleasing to the eye as I would have wished. In fact, after my last street rod chassis in 1999 is when I made the decision to take a deeper dive into welding and fabrication and work on fine tuning my skillset. I also got into a bit of a battle with the NHRA during a couple of events when I decided to race mine as they like to see the actual welds. My local track was less concerned but coincidently, back in the 90's my car was just under the threshold requiring such inspections so I slipped through the cracks.

That being said, when I started building sand drag quads and then sand rails, I had studied much of the literature from the NHRA and followed the guidelines and requirements for welded tube joints and therefore when I built those chassis I refrained from mudding and smoothing the welds. My welds had been improving by that time and to be honest, once covered with a sealer, paint and clear the ripples were visible but didn't look all that bad.

I feel my welds are a bit better than even 10 years ago so for that reason I think I am going to leave the welds raw on this chassis and just let the sealer, paint and clear fill in where they do. To be honest, I actually like seeing nicely done welds when I look at street rods chassis vs. smoothed and mudded welds these days, so I hope they turn out as well as I am imagining.
 
OP
Z

zmotorsports

ALLIANCE MEMBER
Joined
Oct 20, 2009
Messages
21,488
Location
Northern Utah
I am also in the camp of leaving a great weld for all to see! Beautiful work Mike, and thanks for sharing with us.

I would leave my welds untouched but for the sake of decorum and public decency I seem to always end up grinding them. If they looked like yours I wouldn't have to.

Thanks guys. Yeah, I think I'm going to leave them untouched and just seal, paint and clear over them.

I appreciate the input and for following along.
 

MadeByMiller

Well-known member
Joined
Dec 29, 2018
Messages
1,230
Location
Rapid City, SD
Mike, your posts are just oozing with excellence as always! I hope your mental well being is improving in regards to some of your recent posts. One thing I struggle with almost daily is to understand that no one can or will appreciate your work and see the details the way that you do. We pour our heart and soul into our work because we are deeply passionate about it, very few can relate. I just remind myself that that's okay, because I do what I do because I love it, and there's no other way I would rather do it. Maybe that's a bit vague or nonsensical, but it's sort of at the top of my mind today and I think that you can relate.
 
OP
Z

zmotorsports

ALLIANCE MEMBER
Joined
Oct 20, 2009
Messages
21,488
Location
Northern Utah
Mike, your posts are just oozing with excellence as always! I hope your mental well being is improving in regards to some of your recent posts. One thing I struggle with almost daily is to understand that no one can or will appreciate your work and see the details the way that you do. We pour our heart and soul into our work because we are deeply passionate about it, very few can relate. I just remind myself that that's okay, because I do what I do because I love it, and there's no other way I would rather do it. Maybe that's a bit vague or nonsensical, but it's sort of at the top of my mind today and I think that you can relate.

Thanks Austin.

Yes, I can relate and I appreciate the comments.

I couldn't wait to get out into the yard and shop on Saturday and get something productive done. I was actually quite excited about being able to work on the wagon project so I think that helped me mentally shake off the last week or so and get my head straight. I was also able to spend some time "benchracing" in the shop with my son the other night which did me a lot of good. I haven't had that one on one time to bounce ideas around and talk shop with him for a while and I miss that.

I agree that no one will look at nor appreciate the details in our work like we do and although that's ok, I find myself looking at those little details in other's work more and more. Not to criticize however, but to learn from the small details and see what I can do to improve my own work.

But yes, we pour ourselves into everything because of our passion and it often gets overlooked. We just have to keep reminding ourselves that we do it for our own gratification and not for others.
 

casmurbax

Well-known member
Joined
Sep 25, 2012
Messages
2,761
Location
Wilton, NY
Well once again you show great work on everything you do. I very much appreciate the time you take to describe your thought process, technique and picture sharing.

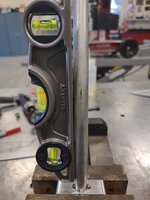
No working lights on the wagon, my goodness, that is where you draw the line?

ok I am not being serious....
 
OP
Z

zmotorsports

ALLIANCE MEMBER
Joined
Oct 20, 2009
Messages
21,488
Location
Northern Utah
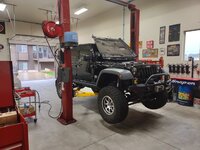
My son needs to use the lift to service his wife's car this week so I figured I had better hurry and rack the Jeep to give her a once over and rotate the tires.

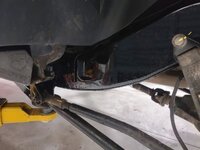
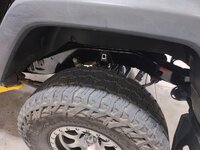
After pulling tires/wheels I noticed some rust scale starting to form just above the front of the rear suspension mounts along the lower sides of the frame. It appears this is where the tires throw the road spray and debris as the frame kicks just a bit here so it must catch the worst part of it.

I grabbed my needle scaler and knocked off the outer bit then a wire wheel and removed most of the surface rust but also got a nice "tooth" in the metal. I then went over the remainder of the rear frame sections with a Scotchbrite pad to scuff up the surface. I hit the rust areas with some Gloss Black POR-15 then once it began to set up I went over the majority of the rear frame rails with some Eastwood Extreme Chassis Black.

While the paint was drying I noticed the other day when the wife and I were going for a drive that I heard just a bit of what sounded like an exhaust tick upon initial start in the morning. While the paint was drying I figured I would throw a wrench on my exhaust manifold bolts and see if any were loose. Sure enough I had a couple on each side that were a bit loose. The front two on the passenger's side were more than a little loose and I could even see a very slight trace of carbon around the flange so I am pretty sure that was the area creating the sound. After about a half hour of going over each exhaust manifold bolt on both sides I closed the hood and before putting the tires/wheels back on I repainted my rear suspension fasteners using my yellow paint pen.

jeep1.jpg

jeep2.jpg

I've made it a habit of anytime our Jeeps are on the lift that I throw a prybar under the front tires to double check ball joints and/or unit bearings.
jeep3.jpg

I've put several hundred miles on the Jeep after repairing the rear upper control arms so I also wanted to take a good look at them and ensure they are holding, although I haven't really flexed it since the repair. I also give the remainder of the links a good look over in more detail and everything seems to be in order. Still not quite sure why this one failed at the HAZ after 9-years of use. I really wish I could point to the reason and make absolutely sure it doesn't happen again.
jeep4.jpg

You can see just a little bit of texture on the lower edge of the frame rail just above the suspension links. This was where I had a little bit of rust starting. I knocked it off with my pneumatic needle scaler then a wire wheel and finally brushed some Gloss Black POR-15 onto the frame rail and Eastwood's Extreme Chassis black on the remainder of the rear frame rails. Lastly, just before reinstalling the tires/wheels I hit the fasteners with a paint pen.
jeep5.jpg

jeep6.jpg

Tires/wheels reinstalled and torqued to spec.
jeep7.jpg

jeep8.jpg

Work complete and ready to park the Jeep in the house's attached garage before the wife got home.
jeep9.jpg

As I was putting tools away I noticed that I had forgotten to change the calendar when I opened up the shop for the evening.
oct1.jpg


Thanks for looking.
 
OP
Z

zmotorsports

ALLIANCE MEMBER
Joined
Oct 20, 2009
Messages
21,488
Location
Northern Utah
Also, you can see in some of the pictures that the shop's apron was wet. We have had nearly 1-1/2 inches of rain here along the northern Wasatch front over the past 24-hours. It was a very soggy day and my dry wells were actually overflowing again but the soil seemed to be handling it ok thus far. We got some more rain overnight and supposed to get some off and on today but not as heavy as yesterday from what we are being told.

Before closing up the shop last night after parking the Jeep I snapped a couple shots of the shop at dusk. The rain had stopped a couple hours prior but it was threatening again.
shop1.jpg

shop2.jpg

Thanks for looking.
 

OutlawDrifter

Well-known member
Joined
Jan 20, 2015
Messages
3,903
Location
KS
Mike, we could use some of that moisture out here, we'll take it even with harvest in full swing, we need some rain to kill the dust. Already had our first combine fire of the year last week.
 
OP
Z

zmotorsports

ALLIANCE MEMBER
Joined
Oct 20, 2009
Messages
21,488
Location
Northern Utah
Mike, we could use some of that moisture out here, we'll take it even with harvest in full swing, we need some rain to kill the dust. Already had our first combine fire of the year last week.

We really don't have much to complain about this year Marc. We have had a few nice rain producing storms throughout the summer months for a change to help keep things green and the help with the fire season which also hasn't been bad at all this year.

I love fall though and hope we still have some nice moderate temperatures yet as I'm not quite ready for that white stuff to fall. Although we usually get a dusting of snow in October sometime, then it warms a bit and we have a nice November and early December before it turns. That is in a "normal" year. ;)
 
OP
Z

zmotorsports

ALLIANCE MEMBER
Joined
Oct 20, 2009
Messages
21,488
Location
Northern Utah
Your rain was accumulating at higher altitudes; the Weather Channel was showing the snow in Park City and Brian Head this AM.

Yeah, I heard that on the news while getting ready this morning. We should be back to more normal temperatures by the latter part of the week and it will mostly melt by then. We've been about 15 degrees below normal for the past couple of days and 20+ degrees below last week so it's been a shock to the system. :ROFLMAO:

So much of a shock that the wife had me get the fireplace ready last night. For someone who couldn't figure out why I wanted a fireplace when we were house hunting, she sure enjoys it. :headscrat

I refuse to just turn the fireplace on without first going through and giving the inside a good cleaning and vacuuming. It wasn't terrible but definitely needed some TLC since last used in the spring of this year.
fireplace1.jpg

Glass had a little dust on the inside around the perimeter.
fireplace2.jpg

All cleaned and ready to reinstall.
fireplace3.jpg

Cleaned, reassembled and test fired. It's ready for the wife to turn on when she arrives home from work.
fireplace4.jpg
 

bigdave_185

Well-known member
Joined
Feb 14, 2021
Messages
443
Location
Utah
Boy I pulled the rain gauge out of the ground tonight and had 2.5” here in my end of town. I believe that’s Monday- Tuesday rain total. It’s sure a soggy mess at work but the views in the canyons have been fantastic

Are you going to give your front links the similar treatment as the rears? Just curios is all
 
To avoid these ads, REGISTER NOW!
OP
Z

zmotorsports

ALLIANCE MEMBER
Joined
Oct 20, 2009
Messages
21,488
Location
Northern Utah
Boy I pulled the rain gauge out of the ground tonight and had 2.5” here in my end of town. I believe that’s Monday- Tuesday rain total. It’s sure a soggy mess at work but the views in the canyons have been fantastic

Are you going to give your front links the similar treatment as the rears? Just curios is all

Yeah Dave, it's been a wet couple of days alright. I was surprised at the amount of rain overnight again. I thought it was supposed to pretty much be done raining by late yesterday. I guess I missed the memo. :oops: Doesn't look like I'll be mowing the lawn tonight either. :(

As for the Jeep links, no, I won't be modding them as they are a bit different scenario than the rears. Plus I don't think they get quite the stress, especially when I disconnect the front swaybar. Also, the front uppers are a different style of end at the top mount where it is in double shear around the bushing that is encapsulated into the front axle and the lowers consist of larger diameter link tubing as well as bushing housing so there is more surface area where the weld took place. I will however, be inspecting them more closely than I have in the past. In years past when I racked the Jeep just before a trip I would look at the bushings, put a prybar in between the bushing and the mount to ensure there's no play and look at the Johnny Joint, specifically at the spherical ball and surrounding material and lastly, make sure the jam nut is tight and hasn't backed off.

When I had the Jeep on the lift the other night for tire rotation and frame touch-up, I did a more in-depth inspection of the HAZ around each of the welds at the bushing housings. I really hope this failure was just a fluke because I cannot see any specific reasoning behind the failure, especially after 9-years. It has no interferences, flexes so easily and smoothly when I've wheeled it and I think if it would have been a binding issue it would have failed long before now. I know hope isn't a plan so they will get more scrutinizing before and after each off-road adventure.
 
OP
Z

zmotorsports

ALLIANCE MEMBER
Joined
Oct 20, 2009
Messages
21,488
Location
Northern Utah
Last night I dug into my rattle on the 21" Snapper walk-behind mower and really nothing jumped out at me. It sounded like the blower housing where the pull rope mechanism resides was where the tinny rattle was coming from and other than a few questionable rivets securing the pull rope pulley to the blower housing I found nothing out of the ordinary. I did take a punch and anvil and tighten up the three rivets while it was off the engine though.

Upon reassembly and a test run it was smooth and quiet as could be so either the rivets were the issue or I moved something just enough upon reassembly that it was no longer creating the rattle. The next mow will tell the story.

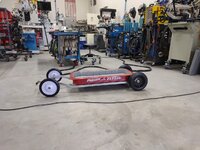
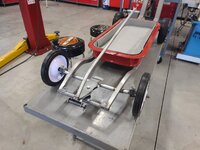
While I was working on the mower my son was servicing his wife's car so while I had him at my disposal I mocked up my grandson's wagon with tires/wheels and body so I could get an accurate measurement for handle length. I know the last one I built 30 years ago the handle was so short it was kind of uncomfortable to pull around and my son and DIL are both quite tall so I didn't want to make the same mistake on this wagon.

Overall I really like the stance and rake it takes on. It's low enough to look kool but not so low it will drag and be hard to pull through grass.
rf289.jpg

rf290.jpg

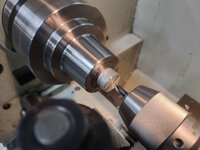
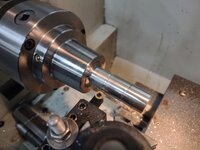
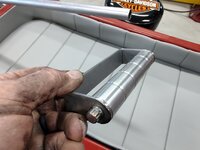
After determining handle length, I grabbed a piece of 1" 6061 aluminum and went to the lathe. I measured to determine a good width that would be comfortable and determined spacing of the grooves. Chucked up the piece and faced the end then.
rf291.jpg

Then drilled and tapped for 3/8"-16 threads.
rf292.jpg

I then took about .010" off to clean up the finish a bit.
rf293.jpg

Used my radius tool and cut some grooves into the handle to give it some texture.
rf294.jpg

Lastly run some white Scotchbrite around the part to polish it up a bit before flipping it around and doing the same to the other side.
rf295.jpg

I dug through my misc. fastener assortment and found a couple of 12-point stainless steel ARP bolts that should fit the theme of this project perfectly. Before final assembly I will run some aluminum polish around the grip.
rf296.jpg


Thanks for looking.
 
OP
Z

zmotorsports

ALLIANCE MEMBER
Joined
Oct 20, 2009
Messages
21,488
Location
Northern Utah
Little more progress last night before the kids come by for a visit.

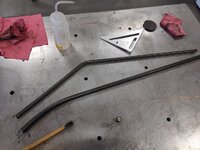
When I opened the shop door and walked to the fab table, I really wasn't "feeling" the hard bend in the handle from the night before. Glad I didn't just go ahead and weld it out after bending and moved onto machining the grip as something didn't feel right about it. Sure enough, when I walked in last night it jumped right out at me. So I grabbed another length of 4130 tubing, switched dies in the tube roller and decided to roll out a larger radius rather than the 40-degree bend on the tubing bender.
rf297.jpg

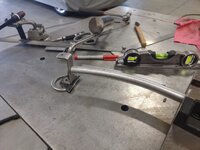
Being much happier with the larger radius handle I proceeded to prep it for welding to the lower bracket or hinge point. I used some scrap to get it to the exact position where it's centered on the bracket.
rf298.jpg

I tacked it and before final welding I test fit it to ensure I liked the angle.
rf299.jpg

After just a bit of tweaking I went to final welding. Clamped it to the welding vise and made sure it was perpendicular to the base.
rf300.jpg

I'm liking that much better.
rf301.jpg

rf302.jpg

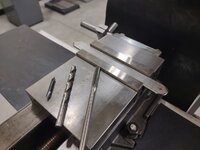
Next I moved on to the grip end and cut a piece of .125" to size, rounded the ends and clamped in the mill vise to center drill, drill and ream the bolt holes for the grip.
rf303.jpg

I am really enjoying having a nice quality pan brake in the shop. After marking the ends for the bends and completing the bends the grip fit perfectly into the grip bracket.
rf304.jpg

Assembled and ready to mock up.
rf305.jpg

I'm pleased with how that will look once painted and the grip polished.
rf306.jpg

Before welding I moved back over to the lathe to machine a bump stop for the handle at the steering pivot plate. I purchased a small rubber bump pad in which to screw into a machined base to keep the handle up slightly off the paint when completed. I figured I would machine the mounting base for the bumpstop as well as a small receptacle in which the bumpstop will fit into and then move onto the welding.

Thanks for looking.
 

fouckhest

Well-known member
Joined
Jul 24, 2013
Messages
1,872
Location
Greer, SC
Fantastic fab work as always!

Love the tig torch holder! I have a bent connecting rod from an engine that blew in one of my cars after a boost line failed, was a fun, albeit short ride, but very expensive torch holder at the end of the day :ROFLMAO:
 

Jgaz

Well-known member
Joined
Dec 16, 2016
Messages
1,714
Location
AZ
Nice work goes without saying, but………
Dang, but I love looking at the background in your shop pictures!

You may have said it already but I’ve not yet read your whole thread, what brand/model is your box brake?

Thanks.
 

gearhead1960

ALLIANCE MEMBER
Joined
Mar 21, 2019
Messages
1,864
Location
Manassas, VA, a small blot in history

Mike,

Love the progress on the "hot rod wagon". Question, did you test fit your "mitt" for the handle? Looks to be a snug fit between the handle and the bracket. Even though I know your svelt hand should be able to slide in, did you give thought to what would happen if you need hand protection when the weather turns a little cooler? Gloves might not fit. Of course, maybe I'm being presumptuous about the usage and that this is an "only fair weather" vehicle...... :ROFLMAO:
 
OP
Z

zmotorsports

ALLIANCE MEMBER
Joined
Oct 20, 2009
Messages
21,488
Location
Northern Utah
Fantastic fab work as always!

Love the tig torch holder! I have a bent connecting rod from an engine that blew in one of my cars after a boost line failed, was a fun, albeit short ride, but very expensive torch holder at the end of the day :ROFLMAO:

Thank you. I think I documented the TIG torch holder earlier in this thread as it was one of the first organizational projects I did in the new shop. Probably because I found the box of old pistons when I closed up the old shop and kept this one from one of our GS1100 sand drag quads.

Agreed, the radiused bend fits better with the upkick in the frame. Nice work!

Thanks Marc.

Street Rod of the Year Mike?

Very cool!!!

Thanks Pat. Not sure about Street Rod of the year but it should be a cool toy for the kids to drag around at car shows or evening walks around the neighborhood.

Nice work goes without saying, but………
Dang, but I love looking at the background in your shop pictures!

You may have said it already but I’ve not yet read your whole thread, what brand/model is your box brake?

Thanks.

Thank you. The pan brake is an old DiAcro 24" pan brake that I picked up a few years ago. It really adds to the capabilities of the shop, even in its small footprint.


Mike,

Love the progress on the "hot rod wagon". Question, did you test fit your "mitt" for the handle? Looks to be a snug fit between the handle and the bracket. Even though I know your svelt hand should be able to slide in, did you give thought to what would happen if you need hand protection when the weather turns a little cooler? Gloves might not fit. Of course, maybe I'm being presumptuous about the usage and that this is an "only fair weather" vehicle...... :ROFLMAO:

Thanks Mark. Yeah, when I measured for the handle I was somewhat conservative in my measurements and didn't compensate for the bolt hole being offset by .5". I am planning on remaking this part tonight but not by much, just going back to my original plan without the oversight of the bolt hole offset. My hand fits in the handle but touches the backside whereas my son's fits much better so I'm certain my DIL's will as well. Don't think I'm planning on compensating for gloves though as I don't want a big gap in the handle. This is a fair weather ride. :bounce:
 

MadeByMiller

Well-known member
Joined
Dec 29, 2018
Messages
1,230
Location
Rapid City, SD
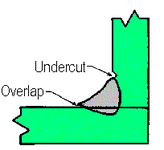
Mike, I went back and tried to analyze the failure on your suspension link a bit closer. I'm thinking that perhaps the failure could have been caused by some undercut at the end of the weld. I know, calling undercut on something is kind of a meme in the welding world, but I do have a supporting hypothesis based on experience!

1696527168297.png

I can't tell for sure, but it looks like the part was originally MIG welded and perhaps done in one shot on a positioner. While it's not as easy to get undercut on a MIG weld, this scenario lends greater possibility due to how quickly the part would become heat soaked. The failure looks like it began at the end of the weld, which would be the hottest point of the weld. Unlike TIG welding where you can easily reduce amperage by letting off the pedal, it's more difficult to overcome a heat soaked part while MIG welding. I think the weld puddle pulled some base material down ( gravity is king) leaving some undercut at the upper tie in of the weld. This left a stress riser and led to the failure.

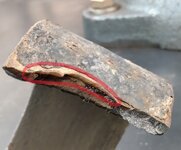
Looking at your photo below, I've circled where I believe the undercut to have been which I believe coincides with the end of the weld. That part of the failure appears to be the oldest as well, and the right side of the tube clearly failed last, which is where the start of the weld appears to have been. Factoring in that the rubber bushing has to be pressed in, it's very possible that this weld had already cracked from the pressing forces and began to fail before you even mounted it on your Jeep!
repair2.jpg

Just my armchair analysis!

Wagon is looking excellent, you're in the home stretch with it too!
 
Last edited:
To avoid these ads, REGISTER NOW!
Top Bottom