To avoid these ads, REGISTER NOW!

What's on your walls? Neat storage ideas!

danski0224

Well-known member
Joined
Jan 29, 2005
Messages
13,414
Location
Near Naperville, IL
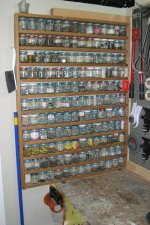
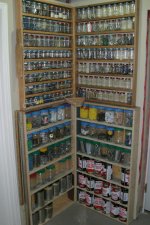
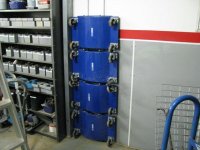
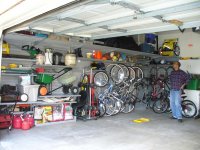
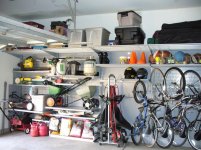
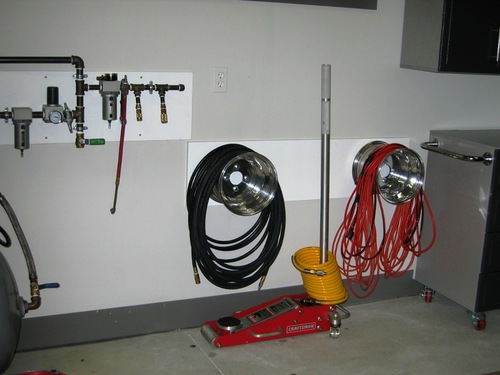
I put this in for someone. Amazing how dust catches the camera flash...
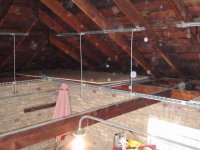
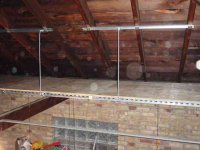
Left to right:

Empty space

Pile of hardware (slotted strut not shown)

Framework in place

Plywood fastened

Took a few hours to lay it out on paper and generate a materials list. It went up quickly... laser to project the lines on the rafters... a cold saw to make big pieces of strut smaller. Buying in 20' lengths means less waste.

There's about $400 in materials here to generate 148 square feet of shelving.
 

Attachments

  • image002.jpg
    image002.jpg
    14.8 KB · Views: 4,027
  • image005.jpg
    image005.jpg
    19.6 KB · Views: 4,101
  • image012.jpg
    image012.jpg
    20.3 KB · Views: 4,806
  • image018.jpg
    image018.jpg
    20.6 KB · Views: 4,503
Last edited:
To avoid these ads, REGISTER NOW!

keflaman

Well-known member
Joined
Jan 22, 2006
Messages
229
Location
Waynesboro, VA
Here's my idea for a quick and inexpensive storage solution for long stock. I screwed a piece of scrap composite to my wall studs and cut a 4" plastic downspout into equal lengths. I screwed the top of the downspout to the composite and screwed a scrap piece of board to the footer to hold the bottom of the downspouts in place.

View media item 4012
Obviously, it's not for heavy material.
 

hilld

Well-known member
Joined
Jan 19, 2010
Messages
867
Location
Vancouver, WA & San Juan Island, WA
Hey Andy Griffith. This is a wonderful idea for a steel rack and one I am goint to copy soon. Any chance of getting us a couple of measurments and angles. Well, angles mostly.

Thanks in advance.

Warren..............

+1

Right now I am struggling of where to store my 10' pieces of steel tubing, all thread, etc.

Ok, senior moment, found the link you posted, looks good, will be a late spring project for me.

Thanks,

Derek
 
Last edited:

DaleJR88Fan

Well-known member
Joined
Feb 3, 2010
Messages
73
Location
North East, Indiana
Sorry for the delay on this, life has been a bit busy lately. There is a rough sketch and additional pictures of the steel storage rack at this link.
http://jacksonii.smugmug.com/Other/Steel-Rack/1329455_uhnFN#62688463_aNti6

I came across this concept in an industrial supply magazine and took the overall LxWxH dimensions listed in the catalog and just kind of built the rack around them. The rack in the catalog did not have casters on it, it was designed to sit flat on the floor.

You will see in the pictures that my original design had a shorter base, which was taken off the industrial rack dimensions. I was concerned about how stable the rack would be, particularly in regards to tipping over backwards when fully loaded.

Typically I will tack something together and test it before finish weld, but in this case I was concerned about fully loading the rack with steel while it was only tacked together. So I went ahead and finished welded the rack. The original base seemed relatively stable but I'm a bit paranoid about heavy things tipping over and I could get the original design to tip up a bit if it was loaded with 10-12' long sticks and I really hung my weight off it. So I decided to extend the base length which is why you see the angle pieces added on and gusseted in the pictures.

In retrospect the rack is probably way over-built for the amount of steel it holds.

Hope this helps.

Thanks Andy, the images and drawing were very helpful.
 

jpoint

Active member
Joined
Mar 21, 2010
Messages
40
Location
Chicago suburbs
TSImpala's idea for the BMW wheel air hose storage also works - with a mild modification for storing wheels with tires mounted. I had 3 sets of wheels and tires to get off the ground. Note: I've only done this with a finished wall. I started with a several long 1x6 boards. Rip each board into two long pieces 1x3 and 1x2.5 (or 1x3.5 and 1x2). Glue and screw these two pieces into an "L" shape - screwing through the 3" piece down into the 2.5" piece. mount this long "L" to the wall so the 3" piece is perpendicular to the wall and parallel to the floor and on top of the 2.5 inch piece, screwing through the 2.5 inch piece into the studs on the wall. I did this to create a 20' long "L" on the wall. I then screwed lag hooks into the studs about 20" above the "L" and every other stud (or so depending on the tire diameter). You can now mount the wheels and tires on the wall by putting a long eye bolt or threaded hook through a lug hole, put a washer and nut on the threaded end that sticks out through the finished side of the wheel and place the hook or eye over the lag hook mounted in the wall. Tighten up the nut until it snugs the wheel up to the wall. The "L" is primarily there to give you something on which to rest the tire so you don't have to hold it up while you're hooking the bolt. I used this instead of a shelf because when I take the tires down to go racing, the "L" doesn't stick out in the way. This worked quite well until I got 36" deep cantilever shelves that hold 400 pounds each. Now I just stack the wheel up on top. That's also why I have this long explanation instead of a picture - My "L" creation is now gone. Picture of one section of the shelves that now wrap around most of my garage courtesy of the Circuit City -bankruptcy attached. Last note - the wood L and lag screws cost about $30 to build. The cantilever shelves (if not pulled off a wall) are about $50 each from Lozier.
 

Attachments

  • garage4.jpg
    garage4.jpg
    147.6 KB · Views: 4,123
  • garage5.jpg
    garage5.jpg
    148.5 KB · Views: 3,787
Last edited:

aveguy

Active member
Joined
Oct 29, 2008
Messages
25
These forums are loaded with great ideas. I really like the dummy quick disconnect air tool holders. Take a look at these "stud grabbers", I use them every where. They work great if your garage is unfinished. Use on wall studs or ceiling joist.
 
Last edited:

john37

Active member
Joined
Feb 8, 2008
Messages
36
Here are some of my 'creations'. I love the tape measure holder. It works perfectly! The screwdriver rack works okay but I need to make a lower guide hole "shelf".

bench1.jpg

extention1.jpg

hex1.jpg

sockets1.jpg

tape1.jpg

tape2.jpg
 

logical

Well-known member
Joined
Aug 31, 2005
Messages
2,451
Location
Northern fringe of the Motor City Suburbs
I've posted these pics in other threads. These are some $10 each craigslist ATV alluminum wheels that cleaned up pretty well.

I still need to solve the coiled hose storage with something similar to the under-bench idea above.
img_0001_500x375.jpg


img_0002_500x375.jpg


img_0003_375x500.jpg
 

HemiRambler

Well-known member
Joined
Apr 20, 2010
Messages
270
Location
Cleveland, Ohio
Here's my air tool storage. I'm too cheap to buy couplers to mount them... actually as cool as the couplers are - I'm too impatient to fiddle with them - this way you just drop it in and go - makes it easy if you have one hand occupied.
 

Attachments

  • DSC04027.JPG
    DSC04027.JPG
    145.4 KB · Views: 2,690
  • DSC04026.jpg
    DSC04026.jpg
    37 KB · Views: 3,455

lilredex

Well-known member
Joined
Apr 29, 2006
Messages
5,956
Location
Toronto
I have a cheap, easy and flexible way to mount plastic bins to a wall. I tried to attach a photo but got an "Upload Error" message. It's a 89 KB JPG File - max allowed is 146.5 KB. Is any one else having problems? I have posted several larger photos in the past without any difficulties. I tried to upload the same photo and some much larger ones on to the H.A.M.B. forum and had no difficulty.

Sorry about the lack of photos ... I'll keep trying.

Old reply - same problem,
If you have not solved that problem, look here:


http://garagejournal.com/forum/showthread.php?t=69413
 
To avoid these ads, REGISTER NOW!

Mattlt

Well-known member
Joined
Nov 30, 2005
Messages
1,382
Location
MN
I added a white board to one of my cabinets.

OK, it's not much of a cabinet, more of a frame made of 2x6's. The door is framed to contain a piece of window glass. A 1/4" plywood backing with a wooden frame around the edges, and some small stops to hold the glass in place.

The glass is painted white on the back side. You can write on the front (non-painted) side with a whiteboard marker and it wipes right off. I'm guessing a piece of Plexiglas would work just as well but I haven't tried it.

I kinda made this cabinet based on the size of an old piece of window glass that I had.

I have used mine to keep track of vehicle oil changes, although now it seems to get used more as my to-do / shopping list. When I'm running low on some supply it gets written on the board.

This would be really easy to do on many existing cabinets doors.
 

Attachments

  • white_board.jpg
    white_board.jpg
    22.9 KB · Views: 1,532

R6 Racer

Well-known member
Joined
Feb 21, 2010
Messages
1,632
Location
Northern Ontario Canada
I posted this in a hardware thread but it fits here too!
Everything is recycled! ....FREE!
I did actually buy about 20% of the hardware the rest was "acquired":)
Over the years I have accumulated many different storage containers. Some I have kept & still use, others have been replaced with better options!

This is my current set up consisting of...
2 different sizes of old used baby food jars
plastic peanut butter jars
plastic mayonnaise jars (only while I wait for more peanut butter ones, more sturdy)
2 different sizes of recycled ammo boxes
2 different sizes of juice cans
& lastly my pride & joy a hardware rack from my father in laws shop that he took out of his hardware store when he closed it.
 

Attachments

  • Bench Hardwares.jpg
    Bench Hardwares.jpg
    151.2 KB · Views: 4,238
  • Corner Hardware.jpg
    Corner Hardware.jpg
    150 KB · Views: 3,989
  • Shelves.jpg
    Shelves.jpg
    147.9 KB · Views: 3,218
  • Hardware Bins.jpg
    Hardware Bins.jpg
    145.2 KB · Views: 2,689

heavyfoot86

Member
Joined
Jul 13, 2010
Messages
7
Location
Wilmington, NC
Everyone keeps cans of extra house paint, but you really don't need it often. So, I jacked it up via these hangers. To prevent sag in one board, I added a rib under it. I really like these.
Nice. My Dad stores all of his on a shelf directly above the garage door. They're the perfect height. I'll have to take a picture of it and the brackets we made to hold the surf boards against the ceiling above the door.

I've posted these pics in other threads. These are some $10 each craigslist ATV alluminum wheels that cleaned up pretty well.
That's a pretty good use for old, spare wheels. Thanks!
 

rartuin270

Well-known member
Joined
May 19, 2009
Messages
178
Location
Fort Wayne, IN, USA
I added a white board to one of my cabinets.

OK, it's not much of a cabinet, more of a frame made of 2x6's. The door is framed to contain a piece of window glass. A 1/4" plywood backing with a wooden frame around the edges, and some small stops to hold the glass in place.

The glass is painted white on the back side. You can write on the front (non-painted) side with a whiteboard marker and it wipes right off. I'm guessing a piece of Plexiglas would work just as well but I haven't tried it.

I kinda made this cabinet based on the size of an old piece of window glass that I had.

I have used mine to keep track of vehicle oil changes, although now it seems to get used more as my to-do / shopping list. When I'm running low on some supply it gets written on the board.

This would be really easy to do on many existing cabinets doors.

the guy i bought my compressor from was a carpenter and built all the cabinets in his garage with dry erase panels in the front, it was one of the greatest ideas i have ever seen
 

beelsr

Well-known member
Joined
May 6, 2007
Messages
1,324
Location
NE PA, USA
Yep! Here's one cabinet from my last garage. no pics of the current.

todo list
shopping list
phone notes
project lists
sketches
etc....


the guy i bought my compressor from was a carpenter and built all the cabinets in his garage with dry erase panels in the front, it was one of the greatest ideas i have ever seen
 

LWW

Well-known member
Joined
Feb 8, 2008
Messages
322
Location
SF Bay
I've learned a lot of great ideas from this thread so far, so I'm adding my little idea to the group.

If you have a Gorilla Rack style shelving unit or bench that has the cut-outs all along the length of the uprights so you can put the shelves in at whatever height you want like this one:

gorilla-rack-sample.jpg


All those unused cut-outs on the uprights were just begging for some kind of use. I originally put straps on them to hold electrical cords and air hoses. It was ok, but didn't really give me the storage or shelf space back that I wanted. I have about a dozen different cordless tools and 4 pneumatic nailers that are taking up a ton of bench and shelf space. Then I had what "I" thought was a brilliant idea when I ran across these at Home Depot:

husky-bigg-lugg.jpg


These things were designed to hold cordless tools securely on your belt. I figured they would be perfect to hang on my Gorilla Racks to get my cordless drills, circular saws, skill saw and nailers off the valuable and limited shelf/bench space:

IMGA0176.JPG
IMGA0175.JPG
IMGA0177.JPG
IMGA0178.JPG
IMGA0179.JPG
 

LWW

Well-known member
Joined
Feb 8, 2008
Messages
322
Location
SF Bay
Is this poor thread withering away? Will anyone else come up with a great storage idea that can be shared with the rest of us or will we languish in our current state of disarray?
 

Call me the Breeze

Well-known member
Joined
Jul 28, 2009
Messages
1,385
Location
Sebring Fl
Old Oil and antifreeze jugs work well as storage bins. They don't get all moldy if it's damp in the garage. They are easy to pick up and take with you, More convienant than the boxes that screws and nails come in, and after your oil change, they are free. I have an old card file cabinet that these fit great in. It works well for me anyways.

View media item 5189
 

MScott

Well-known member
Joined
Jun 30, 2009
Messages
1,616
Location
Eastern Ontario
I added a white board to one of my cabinets.

OK, it's not much of a cabinet, more of a frame made of 2x6's. The door is framed to contain a piece of window glass. A 1/4" plywood backing with a wooden frame around the edges, and some small stops to hold the glass in place.

The glass is painted white on the back side. You can write on the front (non-painted) side with a whiteboard marker and it wipes right off. I'm guessing a piece of Plexiglas would work just as well but I haven't tried it.

I kinda made this cabinet based on the size of an old piece of window glass that I had.

I have used mine to keep track of vehicle oil changes, although now it seems to get used more as my to-do / shopping list. When I'm running low on some supply it gets written on the board.

This would be really easy to do on many existing cabinets doors.


Similar idea is to use "blackboard paint" on a metal cabinet to use as a note board. We used this on the front of a fridge in the family cottage and it is great for leaving messages, shopping lists, to do lists etc. Stuff just paints on with a roller and you write on it with chalk. Easy cleanup with an blackboard eraser or cloth.
 

evil_twin

Well-known member
Joined
Apr 3, 2009
Messages
136
Tired of stacking the wheels and tires on the ground, so I built some racks to get them up in the air. I can still park both cars under the rack, although the girlfriend's Jeep might have issues. It's cleaner now, I swear, this was right after building...

3850875983_88a2be570b_b.jpg

I've since added some supports to the top rack on the wall.

3851673564_f5c166a3a4_b.jpg


I have to admit, it still wasn't enough, I have two more sets on the ground under the big shelves...

3850875209_bd5b3f05d2_b.jpg


Lots of great ideas here, that I hope to use next time I upgrade (renting here, hopefully buying soon!)

Are those IE fender flares I see?
 

Fatbrosracing

Well-known member
Joined
Feb 19, 2009
Messages
72
Haven't posted for a while, but I made this the other day. Wheel dollys are great except when you are not using them. This solved the problem.
 

Attachments

  • rack1.jpg
    rack1.jpg
    44.6 KB · Views: 3,049
  • rack2.jpg
    rack2.jpg
    52.4 KB · Views: 3,369

rmousir

Well-known member
Joined
Jan 31, 2009
Messages
116
that one is pretty awesome. I think I might have to do that my self. Did you make that form wood or steal?
 

Fatbrosracing

Well-known member
Joined
Feb 19, 2009
Messages
72
Inch square box section steel with the pins made from 1/2 inch round bar through on an angle and welded from the back. It runs floor to ceiling and I've put pins all the way up, I will find something to hang on the upper ones I'm sure.
 
To avoid these ads, REGISTER NOW!
Top Bottom