To avoid these ads, REGISTER NOW!

What did you do "IN" your garage today?

To avoid these ads, REGISTER NOW!

Fixr

Well-known member
Joined
Dec 23, 2012
Messages
9,710
Location
SW VA
More van stuff....

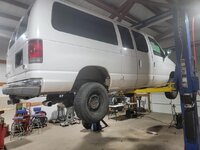
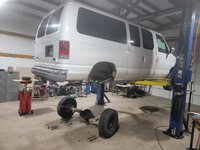
It's on the lift and I have a replacement axle for it... lets get to work!

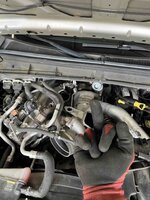
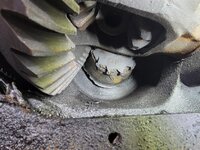
Look at that pinion!!!
18822-albums1670-picture48742.jpg
I love having a lift. Axle was out in about 45 minutes....
18822-albums1670-picture48741.jpg
What else do I love? A compact tractor with forks! I wish I could go back in time and tell 30yo me to get one of these.
18822-albums1670-picture48743.jpg
Annnnnd..... Axle is in. That was quick!
18822-albums1670-picture48744.jpg
Well, wait a minute. Something isn't quite right....
This van is a 98, and I sourced an '06 axle because thats what was available and affordable. As a side benefit, the 06 has nice big disc brakes, while the 98 had drums. It was a really easy swap, all the threads were the same and everything just bolted in.
Except... the 98 had 15" steel wheels, and the calipers on the 13" rotors don't quite fit. Shoot.
I'm going to check tomorrow if some wheel spacers will resolve the issue (I'm sure it will, I only need about 1/2"), otherwise I'll be browsing marketplace for some 16" rims and tires. I have about 30 rims and tires on the property, plus another 75 or so on vehicles and trailers, but not one of them is a 5x5.5 bigger than 15". Kinda weird because I used to be a jeep guy and had piles of those things.
Pinion? What pinion? I don't see no stinkin' pinion!
 

rayra

Well-known member
Joined
Dec 1, 2014
Messages
4,724
Location
Escaped from Los Angeles
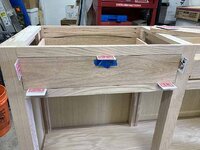
Got the top deck finished and edges beveled and sanded. It's basically ready for stain now.

Got the drawer boxes glued up, but made a mistake in my length batch cutting and completely failed to accommodate any sort of jointing in the width / length of the front and back drawer box pieces. So the joints are the weakest possible, butted, glued and brad nailed. I will probably drill and glue in some pegs during the weekend.
Some day I'll advance to dovetailed joinery for drawers, but not this year. I can't seem to even master 'walking', yet.

Had bigger plans for getting all the doors trimmed down to the desired fit, but all I managed to do with them today is stack them out of the way.
It's going to be Tue-Wed before I'm ready for staining everything.
Everything seems to be taking longer, or I'm getting slower. Or both. Like some sort of Zeno's Paradox, or sliding into a Black Hole.
And I'm getting a little burned out. Been making furniture almost every day since New Year's, trying to crush out 5-6 completed projects / pieces before mid-Spring. That's not going to happen. I'll be lucky to have this dining hutch completed by the Ides, the way things are going.
 

Attachments

  • dining hutch 80 countertop.jpg
    dining hutch 80 countertop.jpg
    63.3 KB · Views: 29
  • dining hutch 81 countertop.jpg
    dining hutch 81 countertop.jpg
    70.1 KB · Views: 27
  • dining hutch 82 THE DRAWERS.jpg
    dining hutch 82 THE DRAWERS.jpg
    83 KB · Views: 23
  • dining hutch 83 THE DRAWERS.jpg
    dining hutch 83 THE DRAWERS.jpg
    87.3 KB · Views: 23
  • dining hutch 84 THE DRAWERS.jpg
    dining hutch 84 THE DRAWERS.jpg
    107.5 KB · Views: 22

Motorman55

Well-known member
Joined
Apr 10, 2016
Messages
2,654
Location
South Jersey
Started cleaning up my table top Craftsman drill press. The flat machined surfaces were getting pretty rough looking with surface rust and dirt from years of use. I used Rust-oleum Rust Dissolver Gel. Stuff works great. Spread it around and let it sit for a half hour then used a small metal brush to scuff it around. Wiped off excess and final clean with water and a rag. The results speak for themself. The bottom plate look just lik the top plate when I started. 1708748948495.jpeg1708748897019.jpeg1708748852350.jpeg
 

Old Man Roger

Well-known member
Joined
Apr 6, 2017
Messages
17,942
Location
Palm Coast Florida
More van stuff....

It's on the lift and I have a replacement axle for it... lets get to work!

Look at that pinion!!!
18822-albums1670-picture48742.jpg
I love having a lift. Axle was out in about 45 minutes....
18822-albums1670-picture48741.jpg
What else do I love? A compact tractor with forks! I wish I could go back in time and tell 30yo me to get one of these.
18822-albums1670-picture48743.jpg
Annnnnd..... Axle is in. That was quick!
18822-albums1670-picture48744.jpg
Well, wait a minute. Something isn't quite right....
This van is a 98, and I sourced an '06 axle because thats what was available and affordable. As a side benefit, the 06 has nice big disc brakes, while the 98 had drums. It was a really easy swap, all the threads were the same and everything just bolted in.
Except... the 98 had 15" steel wheels, and the calipers on the 13" rotors don't quite fit. Shoot.
I'm going to check tomorrow if some wheel spacers will resolve the issue (I'm sure it will, I only need about 1/2"), otherwise I'll be browsing marketplace for some 16" rims and tires. I have about 30 rims and tires on the property, plus another 75 or so on vehicles and trailers, but not one of them is a 5x5.5 bigger than 15". Kinda weird because I used to be a jeep guy and had piles of those things.
If you don’t mind me asking, why so many vehicles?
Pinion? What pinion? I don't see no stinkin' pinion!
Ya, you don’t need no stinkin badges.
 

PhantomEB

Well-known member
Joined
Feb 6, 2006
Messages
6,858
Location
Medicine Hat, AB, Canuckistan
Tire kicker changed her mind from last night to this morning so it will be a quick look over of the quad as last night I was down to one last oil leak. Will knock off a hundy or five to get that thing out of my hair then I can pop down to the driveshaft shop and give them the go ahead on my driveshafts This week.

also need to whip up a SOLID quick disconnect for the rear storage box so It don’t just fk off on a bump.
 

66HertzClone

ALLIANCE MEMBER
Joined
Dec 6, 2006
Messages
4,055
Location
Long Valley, NJ
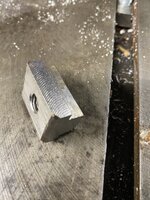
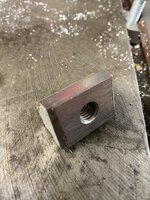
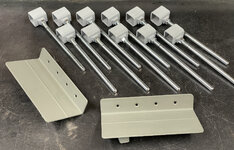
I have been frustrated trying to find an easy and safe way to secure the vise and other things to the table on my Craftsman drill press. The table doesn't have holes nor do the slots go through the entire table. I have tried various assortments of nut and other random pieces of hardware without much success.

IMG_3463.jpgIMG_3464.jpgIMG_3465.jpgIMG_3466.jpg I measured the opening of the slots and made a sketch of it and starting flipping though pages of things that I might be able to use for this, finally I stumbled upon these from Amazon. There are just about perfect for this purpose, I placed the order and having a total of 4 pieces was just great. When they arrived I tried to install them and found the overall length was a problem, because of the small gap between the rail around and the table these needed to be slid in place at an angle. Time to use the bench grinder to fix this.

Used a small 45 degree square to keep these at the correct angle I ground the sharp 90 degree edge away and made it a 45 edge, trial fit indicated I would need to do this to both sides. Once that was done they fit perfect, they are low enough to rest below the table surface so they can just stay in the slots, the threaded hole it 3/8 so a common thread size and large enough to have some strength. I will be getting some thread rod and plastic threaded handles to make it faster to use when needed. But all in all a very satisfying project for me.
 

kbeefy

Well-known member
Joined
Sep 14, 2013
Messages
3,479
Location
Harington, Eastern Washington
If you don’t mind me asking, why so many vehicles?
I've just always been a car guy.

When I was broke (from 16 to about 28) my friends would always joke that they knew where I was when they spotted the for sale sign in a car window. I went thru 30 cars in about 10 years, one at a time. I've never totaled or scrapped a car, all have been sold running and driving. I think I'm at about 80 owned thus far.

By the time I got my first diesel (which I still have) I decided I didn't want to daily drive a diesel in alaska winters, so I got a daily driver as well. And I had only got the diesel to tow my race car. It spiraled from there.


So now I have my diesel (tow pig), the salvage diesel I just finished to possibly replace my existing diesel, and 2 other diesels I bought as 'fixer uppers'.
I have my daily driver, a VW golf Tdi (also diesel). I have a turbo subaru outback as a winter beater, bought it for $500 with a blown up motor and it's currently for sale.
Sometimes I want a truck but not my diesel, so I have a tacoma as a 'runnabout truck', it also has a snowplow.
I just sold my vanagon, so I have another van I'm making a replacement campervan out of (it's also a diesel).
And I bought this van at an auction ($250) for the doors. It runs, so I thought I'd fix and sell it. Should make me a few bucks for my other van project.
I also have a Samurai just because I've always liked them. I'll probably clean it up and sell it also, because I just bought a first gen Raptor with a bent frame.
 

Blue Chips

Well-known member
Joined
Jan 25, 2012
Messages
199
Location
Maine
I just tried out my recently-purchased TIG cold wire feeder for the first time on this little project.

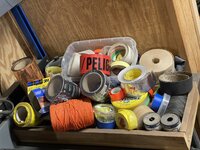
I was looking for a way to free up some needed worktop space that’s currently occupied by a pile of tape, twine, etc.

IMG_1099 (002).JPG

A gentleman on another forum had a good suggestion for a tape storage rack design that I could install under one of my existing ceiling-hung shelves. I figured that making the mounting brackets for the rack would be a good way to start experimenting with the wire feeder. This is the torch that I used.

26-series-tig-torch-with-wire-feeder.jpg

By the way, I'm in the process of setting up another TIG torch for use with my wire feeder; that torch will use gas-lens collets and cups, but I'll experiment with that one later. For now I just want to get the hang of using the wire feeder with the torch shown above, which has standard cups and collets.

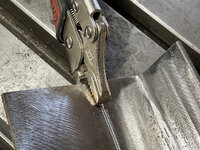
After messing about with a few practice scraps (and producing some messy-looking welds) I finally came up with some settings that worked fairly well as a starting point for mild steel 1/8" **** joints. I used pieces of 2” x 1/8” flat bar and 1-1/2” x 1-1/2” x 1/8” angle to make the mounting brackets for the tape rack. I cleaned off some of the mill scale, clamped the pieces together, tacked the joints in a couple of places on each side, and welded them.

bar-and-angle-clamped-reduced-image.jpg

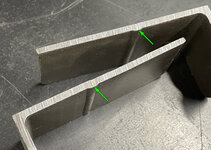
I'll admit that I cheated a little by clamping a length of angle on the workbench to serve as a guide that I could slide my torch hand along to help maintain a straight line. Even using the guide, I still had to toss out a few less-than-acceptable (read 'ugly') welds, until I found a comfortable position for holding the torch with both hands and drawing it steadily along the guide. Using both hands really helped steady the torch. After welding, I trimmed off a couple of pieces of excess metal at the ends to check the weld penetration, and I was pleased to see that they had full penetration (see green arrow below). I think that with some further fine-tuning of settings and technique, I should be able to reduce the HAZ width. The pieces below are my best efforts so far, which I think came out pretty well.

wire-feed-weld-tape-bracket-1.jpg

weld-penetration-check-1.jpg

I welded a short piece of ¾” x 1/8" wall square tube (rotated 10 degrees) onto each of the mounting brackets to insert in the ends of the long 1” x 1/8" wall square tube that the rod-holder sleeves will slide on. Then I cobbled together the rod-holder sleeves, which are pieces of 1-1/4” x 1/8" wall square tube with nuts welded onto them. The rods are 3/8” x 8" bolts with the heads trimmed off. If desired, the bolts can double as set screws to secure the positions of the rod-holder sleeves on the long tube.

sliders-and-brackets-for-tape-rack-reduced-image.jpg

Oops, after reconsidering the intended mounting position, I ended up slicing 1-1/2” off each of the mounting brackets. On the plus side, that gave me a chance to check more places for weld penetration along the **** joints (green arrows below), which was still excellent.

weld-penetration-check-2.jpg

Here's the finished rack, mounted under one of my ceiling-hung shelves. As you can see, I can slide the rod-mount sleeves back and forth along the bar to accommodate rolls of tape and other items with different diameters.

tape-rack-mounted-under-shelf-1-reduced-image.jpg

Now I have to wade through dozens of rolls of tape and other stuff and start loading up the rack.

Update (3/5/24): Here's the rack with tape and twine loaded onto it.

tape-rack-with-tape-2.jpg
 
Last edited:

Matt018888

Well-known member
Joined
Sep 29, 2021
Messages
293
Location
Shelby TWP Michigan
Looks big enough to do a car, bit only a man door? :dunno:

And is there ventilation?
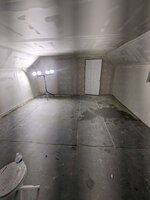
Lol, we did frame for a larger door, but for rate now I used a fire rated door I had left over from a job, I really only spray cabinets. The filter housing will be installed on finish. Same with the lights we will cut them in on finish the wire is there. 16x20
 

imagineer

Well-known member
Joined
Dec 13, 2015
Messages
1,019
Location
Ohio
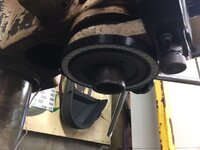
I added a light to my milling machine. The light is a 120mm ring purchased from SuperbrightLEDS. I 3-D printed a U-cup ring, the ID of which fit the 96mm OD of the quill snugly; then cast the LED ring in clear 2-part epoxy.halo light.JPGlight off.JPGlight on.JPG
 

PhantomEB

Well-known member
Joined
Feb 6, 2006
Messages
6,858
Location
Medicine Hat, AB, Canuckistan
Showed the quad again….hes interested but had no way to get it home with the family all in the truck for a shopping trip. Should be back next week as I gave him a deal since he contacted me thru kijiji not marketplace. Hope to see a deposit by end of the week.

cleaned up the garage big time then tackled the welder. I have a feeling it’s the trigger so time to order a new m15 whip. Least I can do is try it and return it after if I want. I am sure i rather keep it and use my current m10 for a back up.
 

rayra

Well-known member
Joined
Dec 1, 2014
Messages
4,724
Location
Escaped from Los Angeles
I added a light to my milling machine. The light is a 120mm ring purchased from SuperbrightLEDS. I 3-D printed a U-cup ring, the ID of which fit the 96mm OD of the quill snugly; then cast the LED ring in clear 2-part epoxy.halo light.JPGlight off.JPGlight on.JPG
Excellent. I bought a similar light rig to put inside the upper frame of my Dillon Reloading press, really made a nice improvement.
 

rayra

Well-known member
Joined
Dec 1, 2014
Messages
4,724
Location
Escaped from Los Angeles
3/4-assing my way thru the drawers install, they are ready for finish sanding. Got the drawer boxes installed, but that took some extra work, I'd messed up something in my spacing math and they were all a way-too-tight fit between the glide rails. So did the only thing I could, I shaved their sides down using the table saw, just to the height of the interference with the glides.
Then it was on to shaving down the false drawer fronts to get the gap spacing I wanted. It's about 5-6 playing cards thick on all sides, ~3/32.
Then while trimming those planks I discovered to my dismay that the plank I'd picked out of the bunch for the best looking graining was actually starting to cup. And in the wrong direction. So I flipped them so the cupping faced the drawer, used a trim router bevel on their new outer edges and used a screw at the center knob position and two thru screws from inside the drawers to draw the false fronts tight to the drawer boxes. Removing most of the cupping and hoping to forestall any more. If they continue to curl I'll have to replace them in the future. But for now I'm pressing forward.

Taking a break / having a snack and then it is back out there to trim the doors to fit, using the same playing card gap trick. I'm going to try and get all of them mounted today as well. Then tomorrow I can work on edge beveling and finish sanding.


and re the earlier joke about 'break on thru to the other side' I almost did today, while preparing to attach the drawer faces. I grabbed a box of snazzy pan-head GRK screws out of the organizer I built the other day, and at literally the last moment before pulling the trigger, I realized 1-1/2" into 1/2"+3/4" was A Bad Idea.
 

Attachments

  • dining hutch 85 THE DRAWERS.jpg
    dining hutch 85 THE DRAWERS.jpg
    111.3 KB · Views: 24
  • dining hutch 86 THE DRAWERS.jpg
    dining hutch 86 THE DRAWERS.jpg
    105 KB · Views: 21
  • dining hutch 87 THE DRAWERS.jpg
    dining hutch 87 THE DRAWERS.jpg
    73.2 KB · Views: 19
  • dining hutch 88 THE DRAWERS.jpg
    dining hutch 88 THE DRAWERS.jpg
    104.2 KB · Views: 37
To avoid these ads, REGISTER NOW!

smackey05

Well-known member
Joined
Oct 21, 2009
Messages
792
Location
Massachusetts
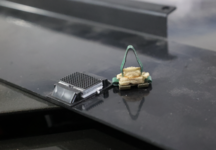
I made some parts to replace the "tree style" clips on the right. Much easier of an install on the 69 Mustang interior panels. No vibration, easy to adjust, and the hooks and loops allows easy removal and reinstallation. There are still self tapping screws in the panel, these just replace the "push" clips.

1708825207391.png
 
Last edited:

rayra

Well-known member
Joined
Dec 1, 2014
Messages
4,724
Location
Escaped from Los Angeles
Ran out of daylight and G.A.S. once I finished size-trimming / fitting the doors to their respective openings, and running the trim router around both their front and back outer edges. (and maybe trimming the back will help with clearance when opening the inset euro hinges).

Drilling and mounting hinges can wait until tomorrow.
 

Attachments

  • dining hutch 89 THE DOORS.jpg
    dining hutch 89 THE DOORS.jpg
    100.8 KB · Views: 29

02Xterra

Well-known member
Joined
Oct 1, 2015
Messages
525
Location
Lynchburg, Va
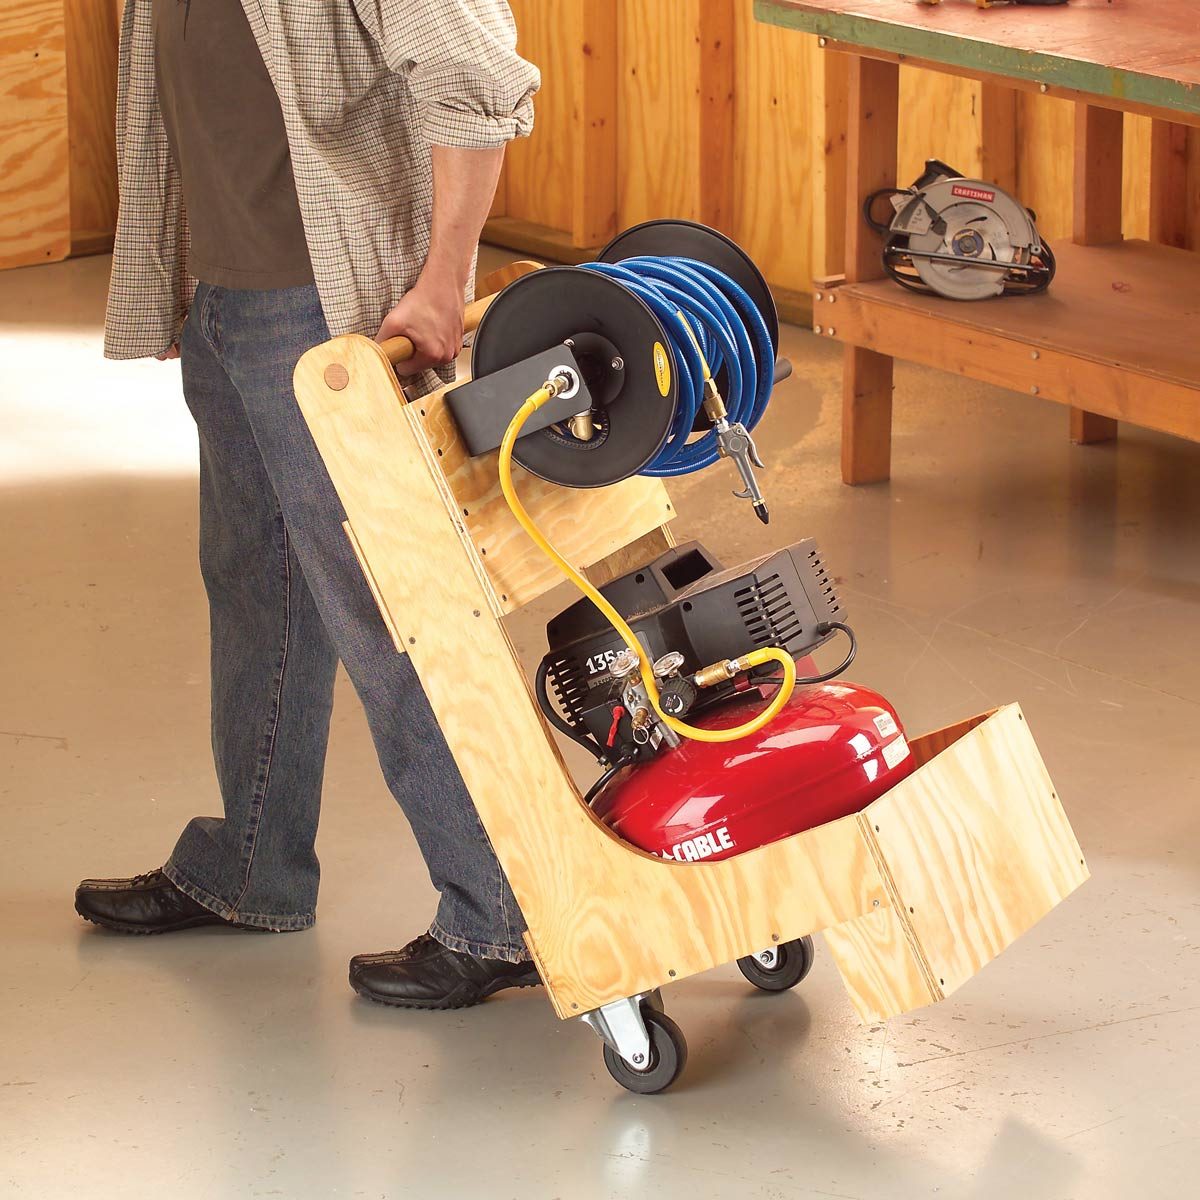
Is that a tool bin on the back side of the reel mount?
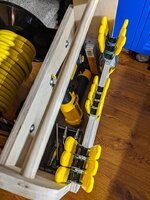
Yup! Here's a pic from my original one. Ample space for a nail gun and other attachments.

Cart_11.jpg

It's based off of these plans, with a few changes. I preferred to have 4 swiveling casters for maneuverability and added 3/4" corner guard around the bottle edges to keep them from getting beat up


Bob Heine

ALLIANCE MEMBER
Joined
Oct 24, 2009
Messages
10,709
Location
Boca Raton, Florida
Some day I'll advance to dovetailed joinery for drawers, but not this year.
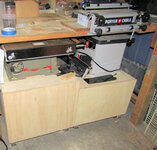
@rayra, I waited until I had a shop project that wouldn't be seen by SWMBO, relatives or friends. I made a couple of cabinets, one for my low- end Craftsman table saw and one for my Bosch router table. Used biscuit joints to put the plywood cabinets together and sized the cabinets so the two table surfaces match.
Table Saw and Router Cabinets.jpg
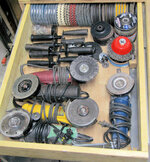
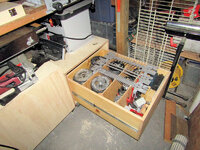
I used a Porter Cable dovetail jig (seen above) to make three sturdy drawers to go inside. Two drawers in the saw cabinet; 1) for all the circular, reciprocating and vibrating saws and 2) for all the electric angle grinders and wheels. All the drawer lumber is low grade pine. I wasn't expecting to be successful so I avoided a lot of heartache and walletache if it didn't work out. They turned out way better than expected.
Table Saw Drawers.jpg
Those drawers hold a lot of tools and you have to be careful opening them (full extension slides). The two heaviest drawers are right at the tipping point when they are fully extended. It's like that Monty Python scene with Mr. Creosote. If you are planning on dining in the next day or so, I would avoid watching it.
The electric angle grinder draw is no problem but a thin mint would push the electric saw drawer over the limit.
Table Saw Upper Drawer 12.jpg Table Saw Drawer 20.jpg
The single drawer in the router table cabinet has already passed the tipping point. I store four full size routers, two trim routers, a couple of plunge bases, 1/2" and 1/4" bits, accessories and the dovetail templates.
Router Cabinet Drawer 25.jpg
I'm sure pocket screws or dowels and glue would have worked but the dovetail construction does give me confidence the drawers won't fall apart right away.

And @rayra, if a cross-eyed one-armed ooold man can make dovetail jointed drawers, I'm absolutely certain you can. Just practice on some cheap wood for a non-critical project.
 

nadogail

Well-known member
Joined
Jan 23, 2009
Messages
32,062
Location
Coronado, CA
Added an independent switch and quick disconnect to the box fan that moves the air through my workshop air cleaner today.
Previously I had to plug in and unplug the fan. I chose to assemble a switched outlet on the box that supports the air cleaner witch is made from a box fan and 5 20X20X1” furnace filters. The filters are held together and to the box fan with foil backed duct tape.
The power cord is a 12 gauge Air Conditioner extension cord I bought at a Close Out Sale in 1978.

 

Outlawmws

Well-known member
Joined
Aug 9, 2011
Messages
39,347
Location
The Badlands
I got the T-bird battery charged (again - I need to drive it more often...)

I looked for parts out of my "collection" for the weather station tower mounting (to my shed) and for the adapter from the antenna post to the Weather station (partially successful). One key thing I need to find is a hand crank winch I know I have that seems to be MIA? (three pole "triangle tower" and a 1-1/2" Dia extendable pole...)

Went out looking for other MIA parts (partially successful - No on wants to stock 3/4" Sch 80 PVC over 24" unless its full length sticks, and galvanized steel pipe is ridiculous in cost! WOW, sticker shock! (costs about as much for a 48" section as for a full length? WHY?) It would also make the thing more top heavy...

Also stopped to look at a new Easy chair a second time, (I was close by) to be sure it fits as my "office" (two different laptop setups one for work and one for personal use) And that it fits ME!

Came home and installed the ground socket into the T-van so other than plastic de-burring that's completed, then put all the tools away for that project... (Been rained out for several weeks)

T-van-Jumper-plugs.jpg


I also discovered one of the two batteries for my good Battery drill has died in some way, the charger says its all good and changed, but it won't run the drill
 

driftpin

Well-known member
Joined
Dec 22, 2016
Messages
11,327
Location
Miami-Dade/Broward Co. Florida
Spectacular cemetery! One could spend hours there (or for some, an eternity...). Super easy to get to as noted. Although Jim Morrison's grave is modest, it's typically covered with tributes. Some of the monuments are huge, many have intricate stone work or sculpted bronze.
IMG_4212.jpegIMG_0907.jpegIMG_0943.jpeg
100% worth it to visit if you find yourself in Paris. It covers over 100 acres - you'll get your steps in, for sure.

BTW - I'm 100% jealous of your trip to see F1 @ Monaco. Perhaps one day...
That was my only trip to Pere Lachaise Cemetery, but I'd like to visit again. The cold fog, an early a.m. walk after leaving the Metro, I felt like I was in a Sydney Greenstreet movie. Here comes Peter Lorre!

I planned nearly a month in Europe so I could be in Nice at the time of the Monaco F1 race. I called-up the Principality of Monaco Embassy to find-out about a visa, and how much were tickets for admission. The lady who assisted me was helpful, she asked me, "from where are you coming?" I told her I was staying in Nice, and she said to just take the Mediterranean coastal train headed towards Italy, and to get-off at the Monaco/Eze stop. "From the train station, you just walk towards the water (the Mediterranean Sea) and you will see the admissions booths. Everyone -else around you will be doing the same thing, so just follow the crowd." She told me general admission was inexpensive, but if you wanted to spend the race at a restaurant or a hotel by the track, or get a reserved seating ticket, it could get expensive. She recommended walking around the track to different places, which is what I did. And that's how I met my new British friends whom I'd see nearly a week later at Pere Lachaise. I also saw many places across western Europe I'd only seen in books and in the movies.

Next weekend, the Mercedes-Benz factory/museum is bringing one of Juan Fangio's Formula 1 cars to Miami for a $$$$ car show, which is being sponsored by some of the people who used to run Amelia island. However Hemmings bought Amelia Island's car show, and the Miami people are some of those who lost their jobs. I'm considering the cost of a ticket to see at-least one day of the Miami show, because it's probably the only chance I'm likely going to see one of Juan Fangio's Formula 1 racers. Fangio still has the position of winning the largest % of his F1 races, more-than Lewis Hamilton. The F1 Mercedes-Benz of Juan Fangio represents a most-dangerous era in motorsports, with both competitors and the audience viewing the cars dying with alarming frequency. That was when the most-successful Formula 1 driver in the world was driving his famous #8 Silver Arrow W 196 R Mercedes-Benz, and he lived long-enough to retire from that most-dangerous competition.
 

rayra

Well-known member
Joined
Dec 1, 2014
Messages
4,724
Location
Escaped from Los Angeles
@rayra, I waited until I had a shop project that wouldn't be seen by SWMBO, relatives or friends. I made a couple of cabinets, one for my low- end Craftsman table saw and one for my Bosch router table. Used biscuit joints to put the plywood cabinets together and sized the cabinets so the two table surfaces match.
Table Saw and Router Cabinets.jpg
I used a Porter Cable dovetail jig (seen above) to make three sturdy drawers to go inside. Two drawers in the saw cabinet; 1) for all the circular, reciprocating and vibrating saws and 2) for all the electric angle grinders and wheels. All the drawer lumber is low grade pine. I wasn't expecting to be successful so I avoided a lot of heartache and walletache if it didn't work out. They turned out way better than expected.
Table Saw Drawers.jpg
Those drawers hold a lot of tools and you have to be careful opening them (full extension slides). The two heaviest drawers are right at the tipping point when they are fully extended. It's like that Monty Python scene with Mr. Creosote. If you are planning on dining in the next day or so, I would avoid watching it.
The electric angle grinder draw is no problem but a thin mint would push the electric saw drawer over the limit.
Table Saw Upper Drawer 12.jpg Table Saw Drawer 20.jpg
The single drawer in the router table cabinet has already passed the tipping point. I store four full size routers, two trim routers, a couple of plunge bases, 1/2" and 1/4" bits, accessories and the dovetail templates.
Router Cabinet Drawer 25.jpg
I'm sure pocket screws or dowels and glue would have worked but the dovetail construction does give me confidence the drawers won't fall apart right away.

And @rayra, if a cross-eyed one-armed ooold man can make dovetail jointed drawers, I'm absolutely certain you can. Just practice on some cheap wood for a non-critical project.
"eet ees waffer thin"

I really do need to step up into jointed drawers some day.

Those appear to be exactly the glides I used for the hutch.
 

driftpin

Well-known member
Joined
Dec 22, 2016
Messages
11,327
Location
Miami-Dade/Broward Co. Florida
Added an independent switch and quick disconnect to the box fan that moves the air through my workshop air cleaner today.
Previously I had to plug in and unplug the fan. I chose to assemble a switched outlet on the box that supports the air cleaner witch is made from a box fan and 5 20X20X1” furnace filters. The filters are held together and to the box fan with foil backed duct tape.
The power cord is a 12 gauge Air Conditioner extension cord I bought at a Close Out Sale in 1978.
That sounds like a 'make something worthwhile out of old stuff' project.

I was out hunting the ads in Bob Heine's neck of the woods, I'm probably one of the few people on-here who live south of Bob. I came across this item, a JET air purifier with a remote control, 3 speeds and a max. airflow of 1,000 cfm. Maybe I can set up a curtain system spray booth, and, BAM! take my paint efforts up a notch.

1708841476218.png


I haven't decided where/how to place it, but I'm thinking about it.

nadogail, how-often are you changing those filters? The filters are taped together in series, so you have one (taped-together) filter, of five elements, and the fan is on the back-side so that the incoming air passes-through the filters before reaching the box fan?
 
Last edited:

Old Man Roger

Well-known member
Joined
Apr 6, 2017
Messages
17,942
Location
Palm Coast Florida
I got the T-bird battery charged (again - I need to drive it more often...)

I looked for parts out of my "collection" for the weather station tower mounting (to my shed) and for the adapter from the antenna post to the Weather station (partially successful). One key thing I need to find is a hand crank winch I know I have that seems to be MIA? (three pole "triangle tower" and a 1-1/2" Dia extendable pole...)

Went out looking for other MIA parts (partially successful - No on wants to stock 3/4" Sch 80 PVC over 24" unless its full length sticks, and galvanized steel pipe is ridiculous in cost! WOW, sticker shock! (costs about as much for a 48" section as for a full length? WHY?) It would also make the thing more top heavy...

Also stopped to look at a new Easy chair a second time, (I was close by) to be sure it fits as my "office" (two different laptop setups one for work and one for personal use) And that it fits ME!

Came home and installed the ground socket into the T-van so other than plastic de-burring that's completed, then put all the tools away for that project... (Been rained out for several weeks)

T-van-Jumper-plugs.jpg


I also discovered one of the two batteries for my good Battery drill has died in some way, the charger says its all good and changed, but it won't run the drill
Have you tried just cleaning the contacts on the tool and the battery?
That sounds like a 'make something worthwhile out of old stuff' project.

I was out hunting the ads in Bob Heine's neck of the woods, I'm probably one of the few people on-here who live south of Bob. I came across this item, a JET air purifier with a remote control, 3 speeds and a max. airflow of 1,000 cfm. Maybe I can set up a curtain system spray booth, and, BAM! take my paint efforts up a notch.

1708841476218.png


I haven't decided where/how to place it, but I'm thinking about it.

nadogail, how-often are you changing those filters? The filters are taped together in series, so you have one (taped-together) filter, of five elements, and the fan is on the back-side so that the incoming air passes-through the filters before reaching the box fan?
I think I’ve seen those used for welding stations too.
 

kaymccampbell

Well-known member
Joined
Feb 27, 2015
Messages
29,630
Location
Upstate New York
I also discovered one of the two batteries for my good Battery drill has died in some way, the charger says its all good and changed, but it won't run the drill
Yup. Depending on the brand, there is a management board inside the battery, that somehow links up with another board inside the tool. This board provides a resistance or voltage or series of both in a special sequence that a allows the tool to run. You can try cracking open the battery and pulling the board for repairs or replacement. I've found the quality on these aftermarket boards is abysmal, and you wind up better off just buying another battery.
 

Outlawmws

Well-known member
Joined
Aug 9, 2011
Messages
39,347
Location
The Badlands
Have you tried just cleaning the contacts on the tool and the battery?

I haven't had time to look into it yet, but the drill works fine on the second battery. I'll hit the battery contacts with contact cleaner; not a lot of opportunity for getting a tool/abrasive inside the battery contacts, but I'l give that a shot too.


I've found the quality on these aftermarket boards is abysmal, and you wind up better off just buying another battery.

Yeah, I'm expecting to have to replace. It's a 20V Dewalt, I've had it quite a while now and its been a good drill and the drill is in good shape. . I'll pop it open and see if maybe it's something obvious if contact cleaning doesn't do the trick. At least it has screws holding it together, and I'm pretty sure I have the bit needed in my "everything" set. I'm so sick of companies heat sealing things like this together...
 
To avoid these ads, REGISTER NOW!
Top Bottom