To avoid these ads, REGISTER NOW!

What did you do "IN" your garage today?

PhantomEB

Well-known member
Joined
Feb 6, 2006
Messages
6,817
Location
Medicine Hat, AB, Canuckistan
dabbling in wiring more and more….ain’t hating it as much now but that will disappear soon enough.

lengthened up the power wires for the switch panel to be fed from the auxiliary fuse box up in the passenger footwell. should get the sniper and lightbar fed to the switch panel done today so i can stop pulling fuses to shut things down.

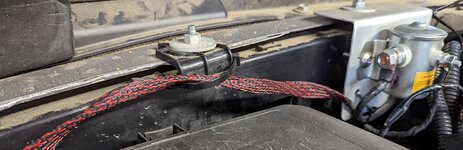
also added in a solid ground in the engine bay Just above the said fuse box. I plan to do thIs to a few more spots around this truck.

now waiting on a longer belt and a shorter leak free oil line to show up today.

basically just getting this truck ready to be put on a trailer out to my old OHV trails to do a few shakedown runs while camping in a few weeks. Then I will shorten and reroute wires, do sheet metal replacement, etc.
5C3F3DF9-568A-4CCC-A4C1-173FCAD44F45.jpegBC286A42-8E52-4360-9045-F6A4777988DC.jpeg
 
To avoid these ads, REGISTER NOW!

cannuck

Well-known member
Joined
Nov 30, 2021
Messages
4,656
Location
Rural SK
Took two hours to get the first coat of epoxy on. Now to wait 2 hours and do the first fill coat. I'm very happy you can't see the inside of the bow on a kayak.
What is the overall construction technique? Appears to be epoxy+glass on each side of the wooden hull, but how did you build that part? Sorry if you had previously posted, just didn't see it.
 

cosmokenney

Well-known member
Joined
Oct 18, 2017
Messages
275
Location
Loyalton, CA
dabbling in wiring more and more….ain’t hating it as much now but that will disappear soon enough.

lengthened up the power wires for the switch panel to be fed from the auxiliary fuse box up in the passenger footwell. should get the sniper and lightbar fed to the switch panel done today so i can stop pulling fuses to shut things down.

also added in a solid ground in the engine bay Just above the said fuse box. I plan to do thIs to a few more spots around this truck.

now waiting on a longer belt and a shorter leak free oil line to show up today.

basically just getting this truck ready to be put on a trailer out to my old OHV trails to do a few shakedown runs while camping in a few weeks. Then I will shorten and reroute wires, do sheet metal replacement, etc.
Nice. I recently decided to up my wiring game in my Jeep. Did a hard-mounted on-board air compressor.
When you come back to clean up your wiring get some of this tape, works great. Much better than electric tape which tends to unravel over time. https://www.amazon.com/gp/product/B0821HFZGQ/?tag=atomicindus08-20
Also I highly recommend this wire loom. It is not split like the corrugated **** that is impossible to put longer wires into without the special tool: https://www.amazon.com/gp/product/B074GMN7BK/?tag=atomicindus08-20
Both of those together really clean up the wiring job. And the loom does a great job at protecting the wires.
wire loom.jpg
 

kaymccampbell

Well-known member
Joined
Feb 27, 2015
Messages
29,603
Location
Upstate New York
I don't know if you are aware of the risk, but whatever you do when tracking an injection leak DO NOT put you fingers onto fitting to feel for oil with the engine running !!!!! High pressure diesel will not only penetrate your skin with ease, but the resulting infection usually costs you that finger. It is one of the more dangerous things that we have to keep in mind when working on diesels (and some high pressure gasoline direct injection engines).
Fun at work? Some goofer touch the rainbow?
 

cannuck

Well-known member
Joined
Nov 30, 2021
Messages
4,656
Location
Rural SK
Nice. I recently decided to up my wiring game in my Jeep.
I have built a fair number of fairly complex wire harnesses and looms. I almost always do it with spiral wrap to wires can come in and out at various places. If protecting wire from UV, road dirt, etc. is needed, after harness is done stretch it out and wrap with vinyl tape and if REALLY serious about covering it all (and spending a lot more) wrap it in self adhering rubber tapes (that I have used for years to seal up high volage terminations).
 

cosmokenney

Well-known member
Joined
Oct 18, 2017
Messages
275
Location
Loyalton, CA
I have built a fair number of fairly complex wire harnesses and looms. I almost always do it with spiral wrap to wires can come in and out at various places. If protecting wire from UV, road dirt, etc. is needed, after harness is done stretch it out and wrap with vinyl tape and if REALLY serious about covering it all (and spending a lot more) wrap it in self adhering rubber tapes (that I have used for years to seal up high volage terminations).
Pics?
 

cannuck

Well-known member
Joined
Nov 30, 2021
Messages
4,656
Location
Rural SK
Sorry, nothing handy. Most are running around under various trucks I have upfitted. I keep a large tote in my storage area with a full range of spiral wrap sizes on reals. I used to do aircraft harnesses by tying off with cord. Not sure plastic wrap would be allowed today, but it would have made the job 100x easier back in the day.
 

Wrench97

Well-known member
Joined
Jun 23, 2018
Messages
12,147
Location
Southeastern Pa
Nice. I recently decided to up my wiring game in my Jeep. Did a hard-mounted on-board air compressor.
When you come back to clean up your wiring get some of this tape, works great. Much better than electric tape which tends to unravel over time. https://www.amazon.com/gp/product/B0821HFZGQ/?tag=atomicindus08-20
Also I highly recommend this wire loom. It is not split like the corrugated **** that is impossible to put longer wires into without the special tool: https://www.amazon.com/gp/product/B074GMN7BK/?tag=atomicindus08-20
Both of those together really clean up the wiring job. And the loom does a great job at protecting the wires.
wire loom.jpg
This type of tie down cleans up the mounting issues.

1714840392820.png
 

ZRX61

Well-known member
Joined
Aug 15, 2006
Messages
28,716
Location
Solar Blight Valley, SoCal
Well, after completely destroying our folding plastic table, I decided it was time for a work table for the shop. Thankfully I had enough scraps around to build it for no cost. Even had a piece of masonite to use for the top over plywood....(pic of everything heavy I had in the shop to hold it during gluing)
Then this afternoon, I cleaned and lubed the tractor to get ready for this Spring/Summer. Continuing to clear land and trying to cut in a couple of fire breaks/roads
Why did you glue the masonite to the plywood? That's a sacrificial surface that will need changing at some point.
 

niget2002

Well-known member
Joined
Oct 2, 2012
Messages
11,216
Location
Josephine, TX
What is the overall construction technique? Appears to be epoxy+glass on each side of the wooden hull, but how did you build that part? Sorry if you had previously posted, just didn't see it.
No problem It's a cedar-stripped kayak.

I have a few places you can get more information on it.

Build thread here: https://www.garagejournal.com/forum/threads/cedar-stripped-kayak-build.528831/

And youtube playlist here: https://www.youtube.com/playlist?list=PLAAWpaJ35q1Z80fnh4DlqJKhWw2NcO0m1
 

BetterDays

Well-known member
Joined
Mar 26, 2005
Messages
2,948
Location
Ohio
I have decided to start redoing portions of the walls one section at a time.
Take down anything on the wall, fill holes and paint, and then reorganize it appropriately

When we moved in 8 years ago, we just used what the previous owner had or added to it. It has never looked clean or organized. And sadly, we have a lot of junk that needs to be organized or disposed of.

The two side walls won't be as bad as certain things may stay in place such as my raised pegboards.

The back wall will be a lot since I have four heavy duty shelves running across it. This means pulling everything out, nicely staging it, and then moving the units to access the wall.

This is going to be a fun, all summer project since it will be sectioned by section. I simply do not have dedicated time or energy to do this all at once.

The first section has started is that is all of my yard tools (shovels, rakes etc), with all of my duplicates and triplicates being put into the shed. And yes, with the shed will then be another project in itself :)
 

Attachments

  • 17148472913403097089653320329106.jpg
    17148472913403097089653320329106.jpg
    838.4 KB · Views: 51

SweetD

Well-known member
Joined
Feb 8, 2010
Messages
3,265
Location
Rhode Island
Wife's coworker opened her door into the passenger side mirror a couple of weeks ago. Being the good guy that I am, I hunted for a used unit on eBay and found a paint-matched one. Also found a perfect YouTube tutorial vid. Went about as smoothly as possible, happy with the result, and wife's coworker will only be in it for $107 rather than an insurance claim.

IMG_20240504_103159682.jpg
IMG_20240504_105149590.jpg
 

ZRX61

Well-known member
Joined
Aug 15, 2006
Messages
28,716
Location
Solar Blight Valley, SoCal
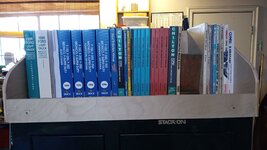
Half-assed the garage bookshelf together with the wrong screws (for now). It will be coming apart for sanding/varnish etc, and filling three mis-drilled holes
Checked how many manuals I could get on it... (there's are MANY more, some of which I added since I took the pic).
Decided the space in front of the manuals is going to be the permanent home to my measuring tapes.

IMG_20240504_130917343.jpg
 
Last edited:

niget2002

Well-known member
Joined
Oct 2, 2012
Messages
11,216
Location
Josephine, TX
Got new parts installed on the big 3d printer.

Upgraded Lightburn on the shop laptop. Got pissed at cncjs and hooked the laptop up directly to the laser engraver. Used Lightburn to burn a test piece of my wife's logo.

My wife has been sewing handbags and started a small Etsy shop. She wants to put leather tags on the bags with her logo. I'll be using the laser to engrave and cut them.
 
To avoid these ads, REGISTER NOW!

GarageHobbyist

Well-known member
Joined
Feb 18, 2024
Messages
366
Location
Illinois
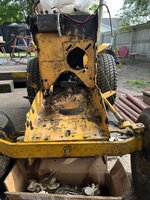
Pulled the engine out of the tractor to figure out what was done to the it that’s causing some issues. Turns out nobody has cleaned this thing since probably 1966 so I started cleaning it up before digging into the engine.

This coil isn’t supposed to be there, the wire from the factory magneto is gone.
IMG_5147.jpeg

Years worth of grass, oil, and grease. At least it kept it from rusting much 🤷🏼
IMG_5144.jpegIMG_5145.jpeg
 

Mike65

Well-known member
Joined
Mar 7, 2007
Messages
3,105
Location
Horse Pasture, Va.
Yesterday on the 69 Mustang 5.0 I removed the alternator & brackets, radiator, water pump, & crank dampener, to get at the timing cover. When the engine was built, they used the timing cover that does not have the opening in the cover for a mechanical fuel pump. Removed all the bolts plus the 4 that go from the oil pan to the cover & the cover feels like it still has a bolt in it unless it is just stuck on the dowel pins.
 

Wrench97

Well-known member
Joined
Jun 23, 2018
Messages
12,147
Location
Southeastern Pa
Yesterday on the 69 Mustang 5.0 I removed the alternator & brackets, radiator, water pump, & crank dampener, to get at the timing cover. When the engine was built, they used the timing cover that does not have the opening in the cover for a mechanical fuel pump. Removed all the bolts plus the 4 that go from the oil pan to the cover & the cover feels like it still has a bolt in it unless it is just stuck on the dowel pins.
Probably siliconed to the oil pan.

Was the motor built with the intention to run FI?
 

PhantomEB

Well-known member
Joined
Feb 6, 2006
Messages
6,817
Location
Medicine Hat, AB, Canuckistan
Wiring seems to get slower and slower.

gonna pull the switch panel up a little just to make sure the connections are actually connecting as it’s a pain with a mirror and 3x4 hole…as well unmount the fuse box to connect the upper half of positives….

first though I got to do some semi annual maintenance and look at the forecast for next weeks trip up to the union hall. Been talked to and hinted at with putting my name in for a spot on the executive board as well delegate to the Regional Council in Toronto.

might put the mudflaps on the truck too.
 

Arne73

Well-known member
Joined
Mar 20, 2010
Messages
1,477
Finished changing over to LED bulbs on the bug. Last step was an electronic flasher for the turn signals.
Ready to start and move it out of the garage & the battery was dead. It was on the maintainer all winter do WTF? Popped the rear seat to take a look and remembered that it was the original battery repurposed from my 03 Town and Country, 21 years old. Bought a new battery & installed, fired right up.
 

Bob Heine

ALLIANCE MEMBER
Joined
Oct 24, 2009
Messages
10,708
Location
Boca Raton, Florida
Do you have a link for those? I wouldn't even know how to phrase a search. But I like them! Thanks!
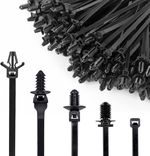
@cosmokenney, Google (or Amazon) search for "mount cable zip tie."
Or these, for when you don't have or want to make a big hole:
Or these, when you have just a small screw hole:
I also have a bunch of these in my zip tie shoebox:
 

Outlawmws

Well-known member
Joined
Aug 9, 2011
Messages
39,314
Location
The Badlands
Won't be much: half our power is out PG&E killed one leg of the two 120 V circuits. the "smart" meter doesn't know whats happening. (88888.8* readings...)

I spent 30 min going :wtf: before I figured it out. same with the neighbors... I think the issue is 2 doors down but he's parked at my underground boxes. I did unplug the 220V dryer I don't need it dying with someone trying it with 1/2 power... The good news is the refer and stove and heater work!

I'm not surprised, all the circuits that are out have been flickering for a month...
 

pancholasvegas

Well-known member
Joined
Nov 6, 2017
Messages
253
Got an opportunity to work out in the garage uninterrupted a bit today, and got straight to work on a project I’ve been gathering some parts for.

Little backstory, I picked up this old CB100 a while ago at a swap meet and have been planning on building it into something a bit more fun and a bit more serious than a normal pitbike.


Did some research and found out that an XR100 and this bike share similar front end specifications, but there’s much more aftermarket availability for XR100’s for what I’m interested in (read:BBR Springs, Triples, etc.). Ended up purchasing a complete XR100 front end, and disassembled so I could swap out the steering stem from the CB100 into the XR100, letting me run the CB100 wheels/brake combo, with the XR100 suspension.

Pictured below is the stem welded into the lower fork clamp of the CB100.
IMG_1993.jpeg
I removed material slowly until I could identify the parting line from it being pressed in.

IMG_2013.jpeg

I did the same to the XR100 Lower Clamp & Stem. Following that, I placed them both into the shop press, and applied light pressure to make sure all the necessary material was removed so I could fully remove the stem. Shown below is the XR100 stem beginning to separate after lightly applying pressure.

IMG_2010.jpeg


No pictures of the next stage, but I then pressed out each stem, and then pressed the CB100 stem into the XR Triples. After that, rolled over the Tig machine and welded it back up. I’m not a welder, so don’t look too close.
IMG_2046.jpeg

No photos of the test fit, but pleased to report it fit up just as planned.
 
To avoid these ads, REGISTER NOW!
Top Bottom