To avoid these ads, REGISTER NOW!

What did you do "IN" your garage today?

ZRX61

Well-known member
Joined
Aug 15, 2006
Messages
28,716
Location
Solar Blight Valley, SoCal
Rick, sounds like the guy who bought our house. Two weeks after the closing he called to tell me there were ants in the pool and when could I come over to get rid of them. I offered to do it in exchange for a down payment on a new car lease (not that I ever lease anything). That was 25 years ago and I haven't heard back.
I told the guy I bought a house from back in '97 not to leave his cat behind as I didn't like cats, but my wolves did.
He left the cat behind.
 
To avoid these ads, REGISTER NOW!

rcktpwrd

Well-known member
Joined
Mar 5, 2008
Messages
1,098
Location
Raleigh, NC
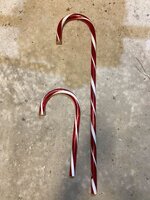
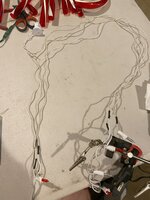
Working on Christmas lights for the display. Cut down a bunch of candy canes to make short ones. Had to cut and add wires to make extra length between bulbs to allow space between the candy canes that the light string will be threaded thru. Also flipped the wires in the middle of the string so the lights all work with the rectifier.

IMG_7019.jpg

IMG_7020.jpg

long extensions
IMG_7021.jpg
short extensions
IMG_7022.jpg


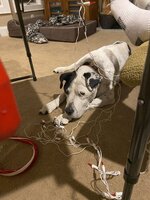
The dog was also keeping any eye on things
IMG_7023.jpg
 

Wrench97

Well-known member
Joined
Jun 23, 2018
Messages
12,147
Location
Southeastern Pa
True that! I have a couple of 2003 Malibus with the dreaded small evap leak, have not found the real problem even after much effort. Fortunately they will pass emissions without the evap monitor running, but the Check Engine light is annoying.

If anyone has ever found the real cause of this issue with 2000 vintage malibus, please share. I'm guessing it is some common issue, but after replacing the cap, filler tube, solenoids, hoses, etc. and smoke testing it, I have not been able to find it.
Chevy it's either the purge valve sticking or the vent valve sticking or the wire to the vent valve broken, if you replaced any of the above with Dorman just shoot yourself in the foot now.....
 

Wrench97

Well-known member
Joined
Jun 23, 2018
Messages
12,147
Location
Southeastern Pa
Have you checked the sending unit? Is it the plastic one? The plastic they used in that era sometimes turns porous or cracks over time. The smoke test won't show it. I've had to drop the tank, use Big Blu, or a similar HVAC leak tester fluid and super low pressure air.
Usually if the customer fills the car regularly you'll see stains running down the tank from it leaking gas when topped off.
 

Dh3256

Well-known member
Joined
Mar 19, 2018
Messages
1,145
Have you checked the sending unit? Is it the plastic one? The plastic they used in that era sometimes turns porous or cracks over time. The smoke test won't show it. I've had to drop the tank, use Big Blu, or a similar HVAC leak tester fluid and super low pressure air.
I have replaced all of the solenoids and valves at the tank, as well as the gaskets at the tank.

Do you mean the sending unit in the front? Replaced that too :-(
 

Dh3256

Well-known member
Joined
Mar 19, 2018
Messages
1,145
Chevy it's either the purge valve sticking or the vent valve sticking or the wire to the vent valve broken, if you replaced any of the above with Dorman just shoot yourself in the foot now.....
Hmm, wasn't Dorman but was after market. Maybe that is the problem.

Have to say, though, I bought cheap Amazon parts for the Colorado and it did fix the evap leak.
 
To avoid these ads, REGISTER NOW!

kaymccampbell

Well-known member
Joined
Feb 27, 2015
Messages
29,602
Location
Upstate New York
I have replaced all of the solenoids and valves at the tank, as well as the gaskets at the tank.

Do you mean the sending unit in the front? Replaced that too :-(
What I mean is the big plastic thing with the round disk on top that locks into the top of the tank and holds the gas gauge sender and fuel pump. Is it intact and leak free? They're apparently not totally fuel proof.
 

PWC Repair

Well-known member
Joined
Dec 27, 2012
Messages
3,188
Location
Arkansas
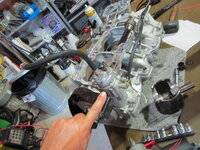
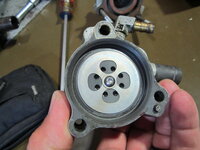
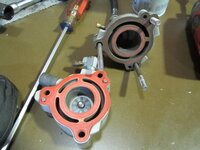
I worked on the 130hp Direct Injected Rotax a little more. I thought I'd point out something interesting to you mechanical types. On the back of this engine, driven by a pin in the rear of the balance shaft, is an air compressor! Yes, a liquid cooled compressor! It has it's own little replaceable cylinder sleeve, and is a round disc "reed" type. How this thing works is the fuel pumps up into the fuel rail at the regulator......which is directly on the backside of the air regulator. The fuel primes up to 24psi, then as you crank, the compressor pumps up to 83psi DIRECTLY raising the fuel pressure the same amount. Kind of like a rising rate fuel regulator on a turbo setup. Yes....this 2 stroke runs at 107psi fuel pressure!! It also controls ignition timing via a knock sensor. Just thought some of you might find this fascinating.
 

Attachments

  • IMG_2974.JPG
    IMG_2974.JPG
    688.1 KB · Views: 32
  • IMG_2976.JPG
    IMG_2976.JPG
    574.8 KB · Views: 25
  • IMG_2977.JPG
    IMG_2977.JPG
    624.6 KB · Views: 24
  • IMG_2978.JPG
    IMG_2978.JPG
    612 KB · Views: 25

Motorman55

Well-known member
Joined
Apr 10, 2016
Messages
2,647
Location
South Jersey
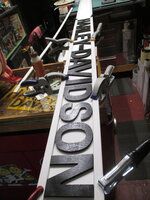
Today I got back to working on my garage 'theme'. Using one of my favorite 1960's-70's era Harley logo decals as referance, I started making a simple 3-D version sign of it.

Part 1.....Starting with a 6"W x 3/4" T x 8' L white painted board I laid out some basic wood letters which I painted black a couple weeks earlier. Next I clamped down a couple of 8' long plastic white strips for a top/bottom guide followed up by placing and spacing the black painted wood letters between them. Once that was done it was just a matter of gluing each letter down, removing the plastic top/bottom spacer and trimming the 8' board to size.

In Step 2, I'll replicate both the black and white outlines around the main sign with painted trim board.

In Step 3, I will use the leftover cut off piece from the 8' board to make the orange colored top and bottom rockers and attach them to the sign with addition white trim. Probably add a couple of eye lag screws to the top of long ends so I can hang it from the ceiling. 1720490973260.jpeg1720490947681.jpeg1720490893389.jpeg
 
Last edited:

rd65

Well-known member
Joined
Sep 29, 2017
Messages
2,819
Location
Granite Falls, WA
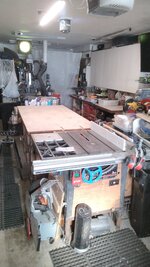
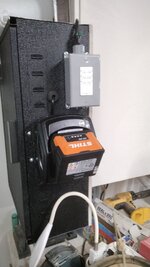
Performed the biannual poop pipe reaming. Cleaned and serviced the pressure snake. Cleaned the walks n deck. Interviewed a committee chair candidate. Cleaned, flung, put away. Repaired some small broken things. Mounted the Stihl charger on the charger cabinet. Set up all the angle grinders with appropriate guards and handles. Now they need a new home, cause in full dress they're too big for their old one.
IMG_20240706_180847.jpgIMG_20240706_180738.jpgIMG_20240706_171603.jpg
I assume you are using a nozzle on a pressure washer hose.
 

rd65

Well-known member
Joined
Sep 29, 2017
Messages
2,819
Location
Granite Falls, WA
I tore into a 130hp Direct Injected 2 stroke Seadoo. Yep, that's 10 pounds of "stuff" in a 5 pound box!! Well, something has been dancing on top of that piston... Oh... it's just the c-clip that came out of the piston, LOL!! Cleaned up that nasty bilge too.
The Bomb sure does seem to like the burly circlips, such a PITA
 

DAVE94LIGHTNING

Well-known member
Joined
May 24, 2024
Messages
198
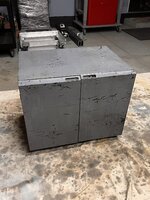
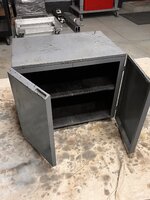
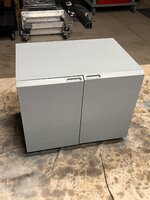
Picked up a steel cabinet for the shop and refurbished it. It’ll hold my extra bending dies . Not bad for $35 on Facebook marketplace
 

Attachments

  • IMG_7053.jpeg
    IMG_7053.jpeg
    875 KB · Views: 26
  • IMG_7054.jpeg
    IMG_7054.jpeg
    781.4 KB · Views: 22
  • IMG_7056.jpeg
    IMG_7056.jpeg
    681.8 KB · Views: 22
  • IMG_7055.jpeg
    IMG_7055.jpeg
    771.8 KB · Views: 28
To avoid these ads, REGISTER NOW!
Top Bottom