To avoid these ads, REGISTER NOW!

What did you do "IN" your garage today?

NUTTSGT

Super Moderator
Staff member
Joined
Sep 14, 2009
Messages
51,183
Location
Northern Central Ohio
After coming home yesterday from working 5 days straight, the garage was cold and it took all day yesterday to get some heat in it. However, it didn't warm up like it should have.

I proceeded to clean a bunch of ash out of the firebox along with some coals this morning. There was way too much in there and I realized why I wasn't getting a good burn and little heat yesterday. It's picked up 6+ degrees and pumping out some heat 45 minutes later. . . . still trying to recover from 120 plus hours of no heat.
 
To avoid these ads, REGISTER NOW!

Prospecter

Well-known member
Joined
May 16, 2015
Messages
2,456
Location
Maine
Ash will do that, as I am sure you know. Our stoves are getting full, but I'll probably manage since we have some warm (30s) days coming up.
 

PhantomEB

Well-known member
Joined
Feb 6, 2006
Messages
6,858
Location
Medicine Hat, AB, Canuckistan
Now my birthday is done……she did say something about I must be around from 3-4pm so dunno what’s up.

Gonna load up the beer fridge and get back on cleaning up the shop some more…..I‘d really would free up some room by moving her tires back outside. ***** I got plans to put new rubber on those rims for one last year with that car. Gotta play with the snowblower tube alignment now the extension is on.

Maybe I will create father’s corner up front behind the man door which will move Daddy Dave’s lanterns (that I eventually want to restore) and my dads old saws/shovel( might start taking one at a time to work to sandblast then polish up).
470D6125-B21A-4958-8AA1-F794C3850E4B.jpeg
 

JEFFREYWisconsin

Well-known member
Joined
Oct 9, 2021
Messages
380
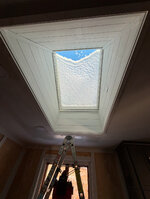
In and out of the garage and up and down the ladder 800 times and finally got the skylight tunnel ready for paint! Took advantage of a nature made snow blanket on the roof/glass which made it easier to see any areas that needed addressing.
 

Attachments

  • IMG_0112.jpeg
    IMG_0112.jpeg
    1.8 MB · Views: 66

larry4406

Well-known member
Joined
Jan 27, 2006
Messages
19,657
Location
Northern Virginia
In and out of the garage and up and down the ladder 800 times and finally got the skylight tunnel ready for paint! Took advantage of a nature made snow blanket on the roof/glass which made it easier to see any areas that needed addressing.
Nice detail on the skylight!

What do you do with the outlet up there?
 

JEFFREYWisconsin

Well-known member
Joined
Oct 9, 2021
Messages
380
Nice detail on the skylight!

What do you do with the outlet up there?
Thank you! When we bought the house, it had a switched exhaust fan in the tunnel as it had old glass and probably got hot as hell under it. I switched to a new skylight and it doesn't get very warm any more. I pulled the exhaust fan and my wife and I want a strand or two of vintage lights up there. I am in the process of kicking around ideas for how they will be supported and how they will suspend and swag. The tunnel is now directly over the eat
in portion of the kitchen (we flipped the kitchen 180 degrees so it used to be above the range area), so the hope is the lights in the tunnel will create a nice restaurant style ambiance. The outlet was just the easiest way to plug in the lights, the support for the lights will block the view of the outlet, hopefully, otherwise I will retrofit some type of junction box sort of like what a hard wired ceiling swag lamp would have?
 
Last edited:

niget2002

Well-known member
Joined
Oct 2, 2012
Messages
11,267
Location
Josephine, TX
Rails came in before we had to leave for the evening, so I ran out and installed the new server and made sure it booted with correct specs.

Don't worry. Windows isn't staying on it. I'll be installing proxmox on Monday.

The new server is the one in the middle. I'll be repurposing two of the 15k drives from the top server for a raid1 OS drive for the new server.

Once I get migrated to it, I'll be respinning the bottom server to proxmox too.

Only 30TB of sata storage on the new box.

1000003522.jpg

1000003523.jpg
 

DGersic

Well-known member
Joined
Mar 12, 2017
Messages
6,390
Location
DeKalb, IL
Amongst doctor appointments, family emergencies, and general life stuff, as of today the four bottom cabinets have their backs, sides, and (today) floors covered with FRP.

IMG_6446.jpegIMG_6480.jpeg

I’m hoping to get the doors on these four next week. Then the upper cabinet is next.

The buckets are full of water, acting as a clamp while the adhesive cures. The particle board is scraps I’ve had since 1997 or so, left over from a set of bookshelves I built for my daughter’s nursery.
 

SMOKEYBEAR

Well-known member
Joined
Jan 3, 2016
Messages
467
4th installment on the service for the F355. Should get the car back mid to late February.


Thanks for taking a look at Nick’s video!

IMG_1817.jpeg
I'm probably never going to work on a Ferrari, but here I go watching the entire video. He does an excellent job explaining what he is doing while simultaneously executing the task. The draw I have to his videos is that he is working on cars that one would believe only get service/ repair at the dealers and here he is in a "regular" garage, albeit very nice, organized and sanitary.
 
To avoid these ads, REGISTER NOW!

SMOKEYBEAR

Well-known member
Joined
Jan 3, 2016
Messages
467
Regular visitors will remember the Soma sets I make:
1000001610.jpg
1000001613.jpg

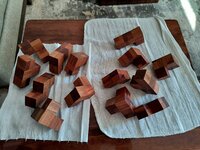
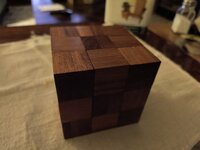
Recently, at futilitycloset.com, I ran across a sort of precursor to that puzzle, a late 19th century cube puzzle called the Diabolical Cube.

It's like Soma, but with differently shaped pieces. Anyway I decided to make a couple of them. Here's the first:

1000002302.jpg
1000002301.jpg

As usual, this is made from jatoba flooring scraps with teak oil finish. I'm sending this one to the guy who does Futility Closet (we email regularly), and I'll keep the other for myself.
Alright...what set up, measuring and cutting tools are you using to get such accuracy on such a small scale/size project? I feel like the pencil I use wouldn't allow me to measure and mark with that precision. Accuracy is something a friend and I talk about routinely, he makes knives and I mess with what ever comes my way.

My accuracy ability is best suited for log cabins built in the Pioneer era.
 
Last edited:

SMOKEYBEAR

Well-known member
Joined
Jan 3, 2016
Messages
467
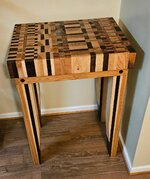
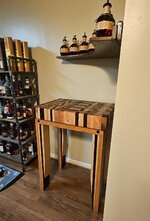
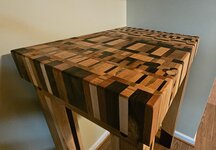
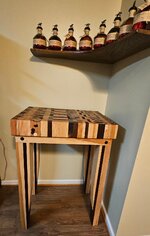
Minus a few follow up coats of oil and wax, its done. Spent today bouncing between projects - butcher block table, cleaning an old RAS, painting the wood components of the router sled and painting shelves I made for repurposing a food warmer cabinet/ oven I'm going to use for paint and finish storage. Bunch of pics, the short sides are different as are the long sides. So pictures from both sides. There is no mechanical fasteners, that was my goal. Glue, dowels and some over-site from my late grandfather who taught me everything.
 

Attachments

  • BT1.jpg
    BT1.jpg
    259.8 KB · Views: 30
  • BT2.jpg
    BT2.jpg
    187.7 KB · Views: 26
  • BT3.jpg
    BT3.jpg
    117.4 KB · Views: 26
  • BT4.jpg
    BT4.jpg
    315.1 KB · Views: 21
  • BT5.jpg
    BT5.jpg
    345.7 KB · Views: 20
  • BT6.jpg
    BT6.jpg
    233.9 KB · Views: 21
  • BT8.jpg
    BT8.jpg
    113.2 KB · Views: 20
  • BT9.jpg
    BT9.jpg
    333.1 KB · Views: 19

dwasifar

Well-known member
Joined
May 28, 2017
Messages
2,101
Alright...what set up, measuring and cutting tools are you using to get such accuracy on such a small scale/size project? I feel like the pencil I use wouldn't allow me to measure and mark with that precision.

You're probably not going to like this answer, but I barely measure or mark at all. The most important measuring tool is a try square.

I start with two pieces of scrap flooring glued face to face, with the glue channels facing out. I cut off the grooves and tongues on the table saw, just eyeballing it. Then I rip it in half, then make two more rip cuts to each piece to mostly remove the glue channels, then rotate 90 and one more rip cut on each piece without moving the fence, and I have two long square rods, which I check for square before proceeding.

From there it's a few passes on the planer to smooth them out and remove any saw marks or remaining traces of the glue channels. Check again for square.

Then I take them to the miter saw and use the width of the workpiece itself to set a stop block. I make a couple of test cuts on scrap, adjusting the stop block as necessary until it's in the right position to produce perfect cubes. Then I just chop each rod into cubes, sand them, glue up shapes with cyanoacrylate, and add finish.

Because each puzzle is a standalone work, I don't pay attention to specific measurements. It's not like I set out to make, say, 1-1/8" cubes (though I could if I needed to, I guess). I just make the cubes as big as the current material allows.

Does that help at all?
 

kbeefy

Well-known member
Joined
Sep 14, 2013
Messages
3,479
Location
Harington, Eastern Washington
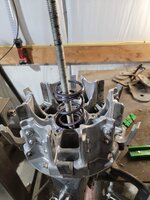
Finally figured out why I couldn't get my new helix installed in the sxs CVT clutch...
My homemade compressor (allthread and pieces of tubing) didn't allow the bits to move freely. It was my first time and all I was going by was youtube vids. Anyways, got it figured out.

20250125_180652.jpg

Put a clutch kit in also. Not in this picture but it happened right afterwards....

20250124_171835.jpg
 

kaymccampbell

Well-known member
Joined
Feb 27, 2015
Messages
29,630
Location
Upstate New York
You're probably not going to like this answer, but I barely measure or mark at all. The most important measuring tool is a try square.

I start with two pieces of scrap flooring glued face to face, with the glue channels facing out. I cut off the grooves and tongues on the table saw, just eyeballing it. Then I rip it in half, then make two more rip cuts to each piece to mostly remove the glue channels, then rotate 90 and one more rip cut on each piece without moving the fence, and I have two long square rods, which I check for square before proceeding.

From there it's a few passes on the planer to smooth them out and remove any saw marks or remaining traces of the glue channels. Check again for square.

Then I take them to the miter saw and use the width of the workpiece itself to set a stop block. I make a couple of test cuts on scrap, adjusting the stop block as necessary until it's in the right position to produce perfect cubes. Then I just chop each rod into cubes, sand them, glue up shapes with cyanoacrylate, and add finish.

Because each puzzle is a standalone work, I don't pay attention to specific measurements. It's not like I set out to make, say, 1-1/8" cubes (though I could if I needed to, I guess). I just make the cubes as big as the current material allows.

Does that help at all?
This is pretty much how everything was done in the day. Very little measuring. It's only in recent years with much automation and computerization that precise measurements have come into the woodworking world.
 

SMOKEYBEAR

Well-known member
Joined
Jan 3, 2016
Messages
467
You're probably not going to like this answer, but I barely measure or mark at all. The most important measuring tool is a try square.

I start with two pieces of scrap flooring glued face to face, with the glue channels facing out. I cut off the grooves and tongues on the table saw, just eyeballing it. Then I rip it in half, then make two more rip cuts to each piece to mostly remove the glue channels, then rotate 90 and one more rip cut on each piece without moving the fence, and I have two long square rods, which I check for square before proceeding.

From there it's a few passes on the planer to smooth them out and remove any saw marks or remaining traces of the glue channels. Check again for square.

Then I take them to the miter saw and use the width of the workpiece itself to set a stop block. I make a couple of test cuts on scrap, adjusting the stop block as necessary until it's in the right position to produce perfect cubes. Then I just chop each rod into cubes, sand them, glue up shapes with cyanoacrylate, and add finish.

Because each puzzle is a standalone work, I don't pay attention to specific measurements. It's not like I set out to make, say, 1-1/8" cubes (though I could if I needed to, I guess). I just make the cubes as big as the current material allows.

Does that help at all?
Yes, thank you for the explanation. I still think you are down playing your ability a smidge. I purchased a tool to find the center of odd ball stuff, works well, but I still have to set the saws and ect up and account for the width of the blades. Typically that's where I find my errors.
 

ed_

Well-known member
Joined
Nov 5, 2019
Messages
187
Location
Maine
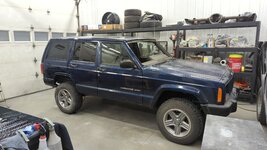
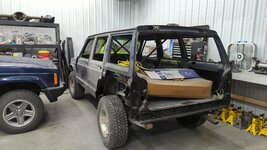
XJ is almost fully assembled. Got the interior back together, popped in the rear windows and mounted up the hatch / tail lights.
1.jpg
2.jpg

Once I get a windshield in it I'm gonna wash it and start buffing the original paint to better match the new stuff.

The hatch that's on it now was stolen from my other XJ.

3.jpg
 

dwasifar

Well-known member
Joined
May 28, 2017
Messages
2,101
Yes, thank you for the explanation. I still think you are down playing your ability a smidge. I purchased a tool to find the center of odd ball stuff, works well, but I still have to set the saws and ect up and account for the width of the blades. Typically that's where I find my errors.

That's very flattering. Thanks. :D
 

Prospecter

Well-known member
Joined
May 16, 2015
Messages
2,456
Location
Maine
Minus a few follow up coats of oil and wax, its done. Spent today bouncing between projects - butcher block table, cleaning an old RAS, painting the wood components of the router sled and painting shelves I made for repurposing a food warmer cabinet/ oven I'm going to use for paint and finish storage. Bunch of pics, the short sides are different as are the long sides. So pictures from both sides. There is no mechanical fasteners, that was my goal. Glue, dowels and some over-site from my late grandfather who taught me everything.
Precision work there. That table looks great!
 

dwasifar

Well-known member
Joined
May 28, 2017
Messages
2,101
Minus a few follow up coats of oil and wax, its done. Spent today bouncing between projects - butcher block table, cleaning an old RAS, painting the wood components of the router sled and painting shelves I made for repurposing a food warmer cabinet/ oven I'm going to use for paint and finish storage. Bunch of pics, the short sides are different as are the long sides. So pictures from both sides. There is no mechanical fasteners, that was my goal. Glue, dowels and some over-site from my late grandfather who taught me everything.
I don't see how you can make a beautiful piece like that and then beat yourself up over accuracy. That's really, really nice.
 
To avoid these ads, REGISTER NOW!
Top Bottom