To avoid these ads, REGISTER NOW!

Between 265 & 485 SQ/FT The Time Machine: Rebuilding a PNW 1.5 car garage from 1946

Workspaces sized between 265 and 485 squarefeet.
OP
T

Tim_with_a_T

Well-known member
Joined
Dec 30, 2013
Messages
231
Location
Vancouver, WA
Nice score! :bowdown:

I've actually got the same model, picked mine up a few years back and don't know what I'd do without it now.

Does yours have the miter fence? What hp motor are you powering it with? This one is missing the miter fence and came with 2 really crusty 1/2hp motors. I’m tempted to replace with a 3/4hp.
 
To avoid these ads, REGISTER NOW!

gatewaysysop

Well-known member
Joined
Nov 11, 2008
Messages
3,317
Location
Arizona
Does yours have the miter fence? What hp motor are you powering it with? This one is missing the miter fence and came with 2 really crusty 1/2hp motors. I’m tempted to replace with a 3/4hp.

Mine has the 1/2 HP original motor. You can find some pics and details here, including the fence you asked about. If either of your motors are the original, I'd clean them up and try them before upgrading. The original motors are insanely reliable and easy to work on. Can't speak for every use case, but for me I don't feel like I need a bigger motor than 1/2 HP with this machine.
 
Last edited:

drivesitfar

Well-known member
Joined
Oct 23, 2013
Messages
36,217
Location
Pacific Northwest
Nice find and nice to see another member go the extra mile(s) to find and bring home a quality machine.

I agree with gateway that the older motors are much better than new unless you can find a nice older 3/4 to swap.

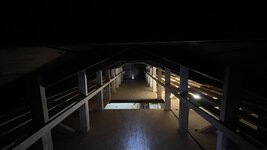
Nicely done on the attic!!
 
OP
T

Tim_with_a_T

Well-known member
Joined
Dec 30, 2013
Messages
231
Location
Vancouver, WA
Question time. I'm approaching a point where I believe I'll be able to use the attic soon, at which point I'll be able to free up storage in the house for what comes next - insulation. I've done a few quick death scrolls in binge research, and I believe I've decided on rockwool, for its fire resistance, slightly higher R-value than fiberglass, and sound deadening. It looks as though I need to special order through the big box stores, and for 24" width, I only have an unfaced option. So my questions become:

Is there another place to order this other than blue or orange?

If I order this stuff, what are my options for moisture barrier?

I'm assuming I could just insulate between studs and staple plastic sheet over top before walls go up?

Is there a standard thickness moisture barrier I need to use?

Also, for the attic, my plan is to insulate between garage ceiling and attic floor, again with rock wool. Is this a moisture barrier situation as well?

As a reminder, I live in the Pacific Northwest. I've never messed with insulation before. It's my first time. Be gentle.
 

drivesitfar

Well-known member
Joined
Oct 23, 2013
Messages
36,217
Location
Pacific Northwest
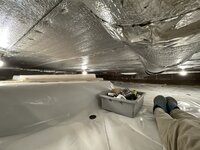
I just insulated my crawl space so I am pretty aware of what choices you can get at the big box stores. I ended up buying John’s manville r30 faced and it was a simple install with gloves and long sleeve sweatshirt. I’d make sure to wear my mask that was only a few feet away from my access next time I do this cause I did cough for a couple days ( more irritation than painful).

I’d probably would not put a vapor barrier in because in my opinion it traps moisture but I’d love to hear what others use and say about it. I was tempted to use rock wool but unfaced and in my tight crawl space it would have been a lot messier and harder to install in my opinion.

My advice would be to plug up as many holes as you can with spray foam or caulk so no critters or bugs can access your garage, maybe insulation added to your garage door if you don’t have one that is already insulated and insulate the walls and ceilings with faced insulation the thickest you can afford that will fit. Are your trusses 16 or 24 inches apart? Walls I’m guessing are 2x4’s 16 on center so r19 or something around that for your walls.

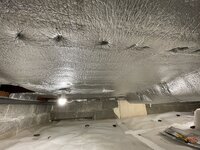
I picked up a bunch of rolls of this silver thin bubble wrap type insulation that I stapled up against my 12 inch thick r30 that might work well if you want to do unfaced rockwool to hold it in your walls or use scrap house wiring (black,white and copper to screw each end on a stud.

Ask questions if you have any and YouTube is also a good source that I use.

Good luckIMG_8274.jpegIMG_8273.jpegIMG_8257.jpegIMG_8276.jpeg
 
OP
T

Tim_with_a_T

Well-known member
Joined
Dec 30, 2013
Messages
231
Location
Vancouver, WA
I just insulated my crawl space so I am pretty aware of what choices you can get at the big box stores. I ended up buying John’s manville r30 faced and it was a simple install with gloves and long sleeve sweatshirt. I’d make sure to wear my mask that was only a few feet away from my access next time I do this cause I did cough for a couple days ( more irritation than painful).

I’d probably would not put a vapor barrier in because in my opinion it traps moisture but I’d love to hear what others use and say about it. I was tempted to use rock wool but unfaced and in my tight crawl space it would have been a lot messier and harder to install in my opinion.

My advice would be to plug up as many holes as you can with spray foam or caulk so no critters or bugs can access your garage, maybe insulation added to your garage door if you don’t have one that is already insulated and insulate the walls and ceilings with faced insulation the thickest you can afford that will fit. Are your trusses 16 or 24 inches apart? Walls I’m guessing are 2x4’s 16 on center so r19 or something around that for your walls.

I picked up a bunch of rolls of this silver thin bubble wrap type insulation that I stapled up against my 12 inch thick r30 that might work well if you want to do unfaced rockwool to hold it in your walls or use scrap house wiring (black,white and copper to screw each end on a stud.

Ask questions if you have any and YouTube is also a good source that I use.

Good luckIMG_8274.jpegIMG_8273.jpegIMG_8257.jpegIMG_8276.jpeg


Thanks. I’ve got 2x4 walls and rafters both on 24” centers. That seems to limit my options when I look for what’s out there in insulation land. The highest R-value I saw for a 2x4 wall was the R-15 rock wool. I guess I’m pretty set on that, I just don’t have a faced option in that particular type, so I’m wondering what to do in place of the facing.
 

drivesitfar

Well-known member
Joined
Oct 23, 2013
Messages
36,217
Location
Pacific Northwest
I’m not sure what the r value is if you double up 24 inch wide insulation but wondering if r30 faced insulation 24 inches wide would squeeze into your 2 by wall?

If you add the silver insulation to the rock wall insulation it might hold it place until you sheet rock (drywall) if that is your plan? Another option if you can find some inexpensive 1 by’s (wood) either old siding or fence boards to put on inside of your walls it might help.
I think I saw you upgraded your windows. Yes? Windows and garage doors and man doors are sometimes huge heat loss areas.

Since you’re not working underneath the rockwool insulation on the garage walls the only issue I see is holding it in place until you drywall or side the inside.
 
OP
T

Tim_with_a_T

Well-known member
Joined
Dec 30, 2013
Messages
231
Location
Vancouver, WA
I’m not sure what the r value is if you double up 24 inch wide insulation but wondering if r30 faced insulation 24 inches wide would squeeze into your 2 by wall?

If you add the silver insulation to the rock wall insulation it might hold it place until you sheet rock (drywall) if that is your plan? Another option if you can find some inexpensive 1 by’s (wood) either old siding or fence boards to put on inside of your walls it might help.
I think I saw you upgraded your windows. Yes? Windows and garage doors and man doors are sometimes huge heat loss areas.

Since you’re not working underneath the rockwool insulation on the garage walls the only issue I see is holding it in place until you drywall or side the inside.


I think squishing the insulation to fit a smaller space will reduce the R-value enough to negate any potential gains- not sure though.

I’ll scheme some more on it. I did replace the windows, and have two more to install on the South wall before I’m done with windows. For the garage door, I’ll need a small miracle, but I’m cooking something up for that as well.

For the walls, my plan is a bit obscure. To build up the thickness required for 5 1/4” jambs (to match the house), a combo of 1/2” plywood and 1/2” drywall will be used. This will be an improvement for a couple reasons - one: I can add an adhesive between sheets to create a small air gap between panel faces, which will reduce sound transmission as well as increase R-value; two: the plywood will act as a shear wall, increasing the strength of the building. I have enough 1/2” ply to get started- maybe one wall before I need to go get more.
 

drivesitfar

Well-known member
Joined
Oct 23, 2013
Messages
36,217
Location
Pacific Northwest
I agree that using r30 in a 2x4 wall might not get full value of the insulation but I don’t know for certain. Funny thing was after you wrote that last post and before I read it I was thinking you could add an interior 2x4 or 2x6 wall to give it a bigger hole to put the thicker insulation. With two hot rods and more than a few cool old tools you might not want to take away valuable space though.

Also you live in PNW and not the artic so temps aren’t super cold very often. Lining the walls with 3/4 plywood might add to the r value so to speak and then you could also have maybe a few more options for hanging your pictures and stuff. Or double up Sheetrock might be a bit cheaper?

Your attic space is turning out great so keep up the good work!!
 
Last edited:

M.Brane

ALLIANCE MEMBER
Joined
Feb 11, 2024
Messages
2,042
Location
1 hr N/W of LA LA Land
Sweet! Lots of storage for lightweight parts & supplies. I have a similar setup for plastic bike bodywork, and truck interior panels etc, but nowhere near as nice as yours. I just added some 2x4 joists, and 1/2" plywood above the raised roll up door area. Thinking I might add some netting on the open end so if we have a good quake it doesn't all come raining down on the stuff below.
 

drivesitfar

Well-known member
Joined
Oct 23, 2013
Messages
36,217
Location
Pacific Northwest
Tim: nicely done and I can see a lot of good storage up there now. a member I'd suggest looking at for a hoist (or lift) put a max jax in his 100+ year old garage that was similar size to yours. i'm not sure if you have enough ceiling height and maybe another option is using it in the driveway if your driveway is level (I can't recall if you have a slope). Denwood is the GJ member's handle and i've been following his garage thread for over a decade cause he is very detailed and answers questions if asked.

keep up the great work.

here's a couple pics of the silver insulation I put up under my master bedroom's floor in our crawl space. It might keep the rock wool in place in your attic area if that's what you think you'd like to use? I’ve got r30 fiberglass insulation in the floor joists. IMG_8291.jpegIMG_8289.jpegIMG_8296.jpeg
 
To avoid these ads, REGISTER NOW!
OP
T

Tim_with_a_T

Well-known member
Joined
Dec 30, 2013
Messages
231
Location
Vancouver, WA
Ladder is done. I made it this way with a few criteria in mind:
- needs to fold up and close off the access point
-needs to allow me to climb up without interfering with future electric hoist (I planned for ~ 22”x36” free space for hoist basket footprint)
-needs to be able to allow me to climb up and operate the hoist from above
-needs to be relatively inexpensive

After using it, it was apparent I needed to constrain the upper half from rotation, so I found some turnbuckles on clearance at the hardware store to mitigate that.

The latch is hot rod remnants, and I fabbed the aluminum mounting bracket.

The feet are adjustable so I can change the access angle a few degrees if desired, along with a turnbuckle adjustment.

Overall this was a pretty big project to figure out, but I’m really happy with it. At some point when I have time to death scroll on the internet, I’ll find some gas struts to help bring it down gently.


IMG_1755.jpeg

IMG_1756.jpeg

IMG_1757.jpeg

IMG_1758.jpeg

IMG_1759.jpeg

IMG_1760.jpeg

IMG_1761.jpeg
 

Vdubaddict

New member
Joined
Feb 6, 2018
Messages
1
on the rock wool questions, you could just use the 16" width and cut it to 24" long pieces and stack it into the wall cavity. rock wool is easy to cut with a large bread knife, you cut it just like a loaf of bread...you do not want to compress it much. you want a tight fit into the wall, with not air gap. if done right it will hold itself into the wall. a vapor retarder is recommended, but not required. it depends on your local codes. there is good information on their website under residential resources.
 
OP
T

Tim_with_a_T

Well-known member
Joined
Dec 30, 2013
Messages
231
Location
Vancouver, WA
Man handled the hoist up there on lunch break and tried it out after work, just by hooking up an extension cord. Works great!

I now need to scheme up a lifting basket, which shouldn’t be too bad, as well as scheme up my wiring strategy, which I’m not looking forward to. I need to draw out my remaining interior/exterior light circuits and what goes where, then read up on junction box wire capacity and understand that better. Essentially my plan was to run the attic and my lights off a single 20a circuit as I’ll be using LED lighting and the hoist pulls 9a. But when you factor in the interior, exterior lights and various switches, it gets complicated. I’ll get it sorted out though!

IMG_1778.jpeg
 

drivesitfar

Well-known member
Joined
Oct 23, 2013
Messages
36,217
Location
Pacific Northwest
When you mentioned hoist a week or so ago I immediately thought of a lift since you’ve got a couple hot rods hence my max Jax and flat driveway comment.

That metal work looks great!! I’m not sure how much those two trusses can safely support as you have the weight of the hoist and your baskets full of stuff but you’ve probably already figured that in? As far as your lights I know led’s are more efficient but I’m hearing from more than a few sources that they are not healthy for humans. I bought up all the old filament bulbs I could from Home Depot and garage sales years ago before they disappeared so I never had to change to led lights otherwise my bride would have me tossing them by now.

Good luck on figuring out the wiring and another option is to have a few sections up in the attic lights with 2-4 switches so you don’t have to light it all up every time.
 
OP
T

Tim_with_a_T

Well-known member
Joined
Dec 30, 2013
Messages
231
Location
Vancouver, WA
When you mentioned hoist a week or so ago I immediately thought of a lift since you’ve got a couple hot rods hence my max Jax and flat driveway comment.

That metal work looks great!! I’m not sure how much those two trusses can safely support as you have the weight of the hoist and your baskets full of stuff but you’ve probably already figured that in? As far as your lights I know led’s are more efficient but I’m hearing from more than a few sources that they are not healthy for humans. I bought up all the old filament bulbs I could from Home Depot and garage sales years ago before they disappeared so I never had to change to led lights otherwise my bride would have me tossing them by now.

Good luck on figuring out the wiring and another option is to have a few sections up in the attic lights with 2-4 switches so you don’t have to light it all up every time.


I feel comfortable with the trusses structural integrity to support the hoist, brackets, and a basket full of goodies. In my previous rental garage, I did an attic build, that was 1/10 the scope of this one. That attic had OSB sheeting, some blocking to tie the trusses together, and no shelving, with no structural improvement made to the trusses. I made an I-beam out of wood and mounted a boat winch to it.... I had SIGNIFICANT weight up there - SBC short block, a couple transmissions, a 9" iron 3rd member, a set of iron BBC cylinder heads, early Ford brake drums, early Ford wheels, early Ford beam axles, tires, about 50 Holley 4bbl and Rochester 2-jet carburetors, a couple motorized bicycles, and misc small stuff. I looked at the structure, and analyzed what I felt would be the weakest point, which was mid-span of the trusses, and took some measurements from concrete floor to bottom of truss, prior to building the attic, and periodically after loading it full of speed parts. That measurement never changed (no sag) in the 5 or so years I rented that space. I also used that boat winch mounted in the rafters routed over a couple trusses through a pulley to install/remove the engine and trans in the T bucket several times, as there was no room for a cherry picker in that garage. Never had an issue.

I do not plan on loading up this garage with ^^^THAT much weight, but I'm using it as an example of first hand experience that this will be more than adequate.

IMG_0117_zps246aa7dc.jpg

IMG_0114_zpscc552e72.jpg

IMG_0321_zps2667612e.jpg

And since I was digging through old pictures for this reply, an earlier version of the T:

IMG_2657_zpsb902b2de.jpg
 

Norwell Equipped

Well-known member
Joined
Jul 15, 2015
Messages
160
Location
Palookaville
I love this innovation and idea.... I use a cherry Picker in my shop.... and despise it..... it just so cumbersome and takes up to much space.
It's probably too late for myself to go with route. and I wish I had.
I need a hoist to lift engines and that kind of weight.
my initial thoughts were an I-Beam across and a trolley with a winch..... but it was out of my budget....

Very slick.
 
OP
T

Tim_with_a_T

Well-known member
Joined
Dec 30, 2013
Messages
231
Location
Vancouver, WA
I love this innovation and idea.... I use a cherry Picker in my shop.... and despise it..... it just so cumbersome and takes up to much space.
It's probably too late for myself to go with route. and I wish I had.
I need a hoist to lift engines and that kind of weight.
my initial thoughts were an I-Beam across and a trolley with a winch..... but it was out of my budget....

Very slick.


You’re in my brain. If I ever build a shop, the I beam, trolley, hoist, and maybe a boom or two would be incorporated into the design.

I also have a cherry picker that I despise, living outside- you can’t even use it on a hot rod without putting the car on blocks first as it won’t fit under the dropped axle or wishbones. I’ve seen where someone adapted a pallet jack forks to their cherry picker, and I will likely be doing that in the far, far future. But yeah, a trolley and hoist setup would be wayyyyyyyy sweeter.
 
OP
T

Tim_with_a_T

Well-known member
Joined
Dec 30, 2013
Messages
231
Location
Vancouver, WA
T: I just wanted to mention it and glad you’ve given it a lot more thought and attention. Speaking of heavy did you fab up that steel mounting bracket and bolt it in as one piece or weld it together in your attic? Either way well done sir!!


Yeah no worries I figured as much. Just for documentation's sake of any future viewers, I figured I'd post the previous setup.

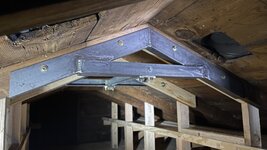
The hoist bracing is composed of several components:
  • sistered 2x4s glued/fastened to existing truss the length of original unbraced 2x4 rafter sections - my thinking there is to double up to the point where the truss bracing can distribute the load out to the walls.
  • 2" x 3" x 3/16" A36 steel angle, welded into an A frame to match the roof's 5:12 pitch. I first cut to length and miter, drilled holes for 3/8" bolts ~ 12" apart, tack welded the two roof pitch pieces together, checked the fit, then fully welded. After that, I clamped them up in the attic to the rafters and drilled through/transferred the mounting holes to the rafters, at which point I could bolt them in. Once I had them bolted in, I mocked up the horizontal braces and ensured they were level, marked them, brought everything back down, then fully welded the two assemblies. Once I had the two assemblies welded, I brought them back up into the attic with plans to join the two together with unistrut (where the hoist mounts). This proved to be pretty heavy and awkward of an assembly, and I wasn't able to easily get it to slide into place as one unit. Sooo..... the BFH came out and I broke the tack welds of the unistrut, and re-thought my plan.
  • Unistrut lateral horizontally bolted in at each end of the truss braces, as well as u-bolted vertically through the truss braces. This assembly has MASSIVE strength and is much easier to install in three sections, four if you count the hoist.
  • Hoist. This is a Harbor Freight special. 600# single line, 1300# double line capacity, 20% duty cycle. It's intended to be bolted to unistrut with provided u-clamps. I am really impressed with this unit. I've never owned an electric hoist before, but this thing is awesome. ( https://www.harborfreight.com/1300-lb-electric-hoist-with-remote-control-62853.html )
I realize this part of the garage doesn't really fit in with the time machine vibe.... And I plan to address that. But I need to get all the car parts clutter out of the house, so it's a circle back sorta deal. I set a goal to have the attic done by March. That leaves me a week to make this happen. I think you guys will be stoked with the end state of the attic hoist assembly - I just gotta proceed as-is for now.
 
OP
T

Tim_with_a_T

Well-known member
Joined
Dec 30, 2013
Messages
231
Location
Vancouver, WA
Well this weekend was a massive success. I’m really happy with this setup.

First, I made a hoist basket using remnants of a Harbor Freight welding table (I only needed the top and fixtures, so the base was up for grabs), a remnant of 3/4” plywood, and some D rings that I welded to the table frame.

For lifting, I went round and round with what to do- multiple trips to the hardware store staring at things, finally a trip to Harbor Freight. I decided on an engine load leveler. It basically did exactly what I needed it to do, but the assembly needed some tweaks to fit a tote in the basket and fully lift into the attic. More or less, I death wheeled the load leveler to pieces and re-welded it into the configuration needed. Now it works great!

For wiring, I intercepted the South wall run as I hadn’t terminated that wire yet, and the attic is on the way. I pulled that wire into a switch/outlet combo, then continued the run out to the South wall. No scrap wire this way.

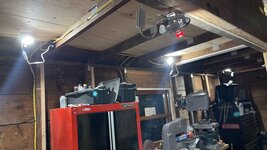
For lighting, I took some more of that plywood remnant and made a couple false ceiling panels to mount some recessed lighting. I am stoked. This setup has been above and beyond what I thought I could pull off. It is not perfect and there are things to nitpick, but overall this is a fantastic addition to the garage.

IMG_1793.jpeg


IMG_1792.jpeg
 
OP
T

Tim_with_a_T

Well-known member
Joined
Dec 30, 2013
Messages
231
Location
Vancouver, WA
Managed to get the recessed lighting above the workbench and peninsula wired in and on a switch. They are just zip tied in place for now, but even at that, they make a nice difference in the space.

Gonna march my way across to the main lighting circuit next, then similar workbench lighting mirrored on the opposite side.

IMG_1809.jpegIMG_1810.jpeg
 
OP
T

Tim_with_a_T

Well-known member
Joined
Dec 30, 2013
Messages
231
Location
Vancouver, WA
Making a lot of progress. Is that going to be enough light? To my old eyes, it looks like it's still a little dark.


In the picture you saw, yes- still pretty dark. These lights will be above workbench alone, not the main lights. I managed to get the Ring floodlight installed and working above the garage (no pics), as well as finish the remainder of interior lighting. Much brighter now.

IMG_1823.jpeg

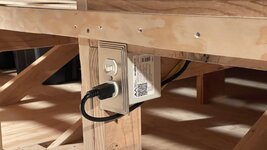
One thing I didn’t plan well enough for was adequate quantity of outlets where my computer workstation will be. I solved that by piggybacking another 2-gang box at the end of the run, swapped the outlets in the existing box for ones that have USB ports, then added a box below and moved the old outlets down there. The lower box will be below the workbench and upper above. Worked out great!

IMG_1824.jpeg

I’m going to do this same thing on the opposite side to put an outlet outside for my shop vac (it will mount on the outside wall next to the compressor).
 
OP
T

Tim_with_a_T

Well-known member
Joined
Dec 30, 2013
Messages
231
Location
Vancouver, WA
Had a pretty decent weekend. Managed to reach a stopping point on the wiring- I have all lighting “done” (at least the wires are ran), and all planned circuits “done” (there’s a couple circuits that will get more receptacles when the garage is a little more built out).

Pic of Ring floodlight install referenced in a previous post:

IMG_1829.jpeg


West side of garage got some outside lighting, controlled by a switch, as well as wired an outside receptacle to connect my shop vac. I’m planning a low cost dust collection, central vac sorta deal.

IMG_1831.jpeg
 
To avoid these ads, REGISTER NOW!
Top Bottom