To avoid these ads, REGISTER NOW!

What did you do "IN" your garage today?

JEFFREYWisconsin

Well-known member
Joined
Oct 9, 2021
Messages
380
Rainy day project that’s been on the back burner for a while.

We live across from a school, with enough outdoor lighting to be seen from space. I don’t know why they need the place lit up like that, but whatever. Makes it “too bright” in the bedroom for sleeping. Windows have cellular shades, but there’s enough light leakage around the edges that it’s still a problem.

A while back, walking through Menards, I found an end cap with “blackout curtains”, cheap, so I bought a couple. They’re way too big for the windows, and meant to hang from a rod, so completely wrong for these. But they make good cheap raw material.

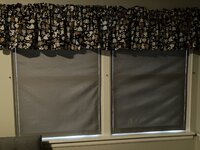
Today, I cut one up and made a fitted blackout curtain to go behind the cellular shade.

IMG_6800.jpeg

Theres still a little light leakage at the seams.

Because I want them to be removable, I mounted them to the window frame with strip magnet.

IMG_6801.jpeg

One side stuck with the included adhesive, the other side sewn in to the seam.

With the shade down, the side seams are hidden.
now the school will say, "we are by a bedroom that is so dark, it basically creates a black hole, I don't know why they need it so dark!" 😂
 
Last edited:
To avoid these ads, REGISTER NOW!

GirchyGirchy

Well-known member
Joined
Nov 14, 2011
Messages
9,949
Location
Central Indiana
I did get some more things done on Friday before the PCV valve mess. I've had the passenger side door panel off for months, waiting on new speakers, so I spent some time getting a plan together. I'm going with components and had previously spent time finding a spot for the tweeter, so I drilled all of the necessary holes for the two speakers. Rather than mount the crossover in the door, I ran some multi-conductor cable to shuttle the signal from the OE connector back to the crossover, then out to the two speakers. I'd picked the cable up for another project and was pretty happy I remembered it.

The crossover's mounted as well, now I just need to pick up some paint, caulk, and electrical terminals. Then onto the driver's side.
 

69charged

Well-known member
Joined
Sep 20, 2007
Messages
469
Location
carberry, manitoba
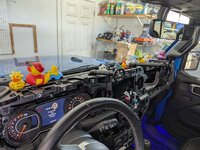
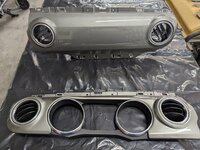
I removed the gray dash panels in the Jeep and color matched them to the exterior paint. I also painted the chrome trim bezels black to complete the look.

dash_01.jpg

dash_02.jpg

dash_03.jpg

dash_04.jpg
Looks good!
Although I have a rubicon, I got the tan interior and so my panels are grey. I don’t mind them but I like your idea of painting the bezels black. I’ll be curious to see how they hold up. Did you sand them first at all?
 

aka Larry

Well-known member
Joined
May 2, 2012
Messages
8,097
Location
Eastern, NC
Looks good!
Although I have a rubicon, I got the tan interior and so my panels are grey. I don’t mind them but I like your idea of painting the bezels black. I’ll be curious to see how they hold up. Did you sand them first at all?

Thank you.

You have a JLR and the panels are grey? I thought all the Rubicons either had leather or the matte red panels?

All the chrome bezels are removable (from the back) and I wet-sanded everything with 400 git before painting. Most interior painted stuff holds up well when it's not 'handled' in my experience. I painted the engine cover on my Charger almost 10 years ago and it still looks great even being exposed to engine temps.

Hemi Cover After.jpg
 

69charged

Well-known member
Joined
Sep 20, 2007
Messages
469
Location
carberry, manitoba
Thank you.

You have a JLR and the panels are grey? I thought all the Rubicons either had leather or the matte red panels?

All the chrome bezels are removable (from the back) and I wet-sanded everything with 400 git before painting. Most interior painted stuff holds up well when it's not 'handled' in my experience. I painted the engine cover on my Charger almost 10 years ago and it still looks great even being exposed to engine temps.

Hemi Cover After.jpg
My panels are the same colour yours were. Jeeps with the tan interior get the grey panels. I’m guessing they don’t want the red to clash against the tan seating? Not sure.
I have a full stereo to install and speaker pods to put in so maybe at that time I’ll paint those chrome bezels. Way too bright!
 

aka Larry

Well-known member
Joined
May 2, 2012
Messages
8,097
Location
Eastern, NC
My panels are the same colour yours were. Jeeps with the tan interior get the grey panels. I’m guessing they don’t want the red to clash against the tan seating? Not sure.
I have a full stereo to install and speaker pods to put in so maybe at that time I’ll paint those chrome bezels. Way too bright!

Cool, I did not know that, but I've also never seen a JLR with a tan interior. Kind of surprising, my co-worker has a '24 JL Sport and it has fabric covered dash panels.
 
To avoid these ads, REGISTER NOW!

welder4956

Well-known member
Joined
Apr 8, 2010
Messages
3,084
Location
Birmingham, AL USA
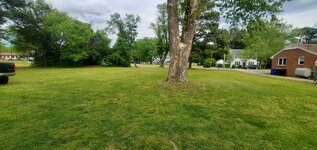
The only garage time I've had this week has been sitting in the doorway and getting cold drinks from the fridge during periodic breaks while working in the yard. We've been cleaning out flower beds and putting out mulch since we got back in town last Monday. I've hauled and spread 4 pickup loads of mulch, pulled weeds and mowed. We have some potted plants to move out of the greenhouse, then hook up and test sprinklers and it will be done. Looking forward to getting back to work on the Mustang.
 

cody1325

Well-known member
Joined
Apr 17, 2024
Messages
1,116
Location
Southwest Virginia
Pulled out the Stihl tiller my grandmother bought quite a few years ago and hardly ever used--since the Roto-Hoe is soon getting a Predator swap, and well, despite being adequate for tilling the garden from scratch, it's still way too big for extremely tight spaces.

Didn't start. Little did I know it wasn't just the spark plug--mud daubers had plugged up the exhaust--something I hadn't seen happen before, I punched the mess out with a screwdriver. As I was putting the plug boot back on (I hate this design with a passion--Stihl loves it in most of their weed-eater mower powered offerings) the boot decided to spring off to parts unknown (I think it's in the aisle between the UTV/my truck and the Escape/CJ-3. Closed up shop early due to impending rain. Tomorrow I will grab my magnet and go spring hunting--then get things back together. Should start right away afterwards. Somehow, it looked like the mud daubers ate the spark arrestor, so I may just replace the whole exhaust when I run up to my Stihl dealer.
 

E-RX7

Member
Joined
Mar 22, 2024
Messages
17
Got the new mower so now I can re-commence moving **** around again now that I see how it fits. Think I'm happy with my cabinet layout on the right side so I can focus on the left soon. I don't know if I wasted my time and back but I lifted one of them onto some old wood I cut into planks so it wouldn't sit right on top of the floor as from previous experience I've seen just about every old metal cabinet that sat directly any floor for years end up rusting through at the bottom. I'm not getting too excited though as an old tractor I've been looking for popped up on my marketplace alert so I might have to ensure I have room for another mower. I'm not one of those guys that has like a dozen fossilized tractors behind his shed or anything but this is an older one that looks like it would be a cool little restoration project and since my new one is a stand-on I'll need something to run around the place to haul junk so hopefully it has potential.
 

DGersic

Well-known member
Joined
Mar 12, 2017
Messages
6,383
Location
DeKalb, IL
Another mostly rainy / cloudy / cold-ish day. Can’t stain or paint, so cut and sewed up the other two blackouts and got them mounted.

IMG_6802.jpegIMG_6803.jpeg

This project is now complete and off my list of things to do one of these days.

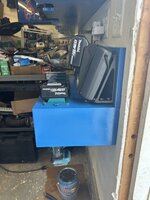
Amazon box showed up, started in on hacking up a new MagSafe charger to make a mount for it where I want it to go.
 

Ultradog MN

Well-known member
Joined
Jan 20, 2024
Messages
798
Location
Twin Cities
On the apron of the garage -
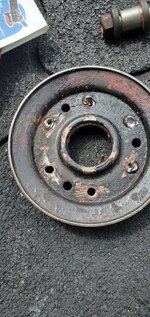
New rotors, pads and calipers on the front. The front right brake started to shudder/wobble Real bad on Sunday.
Dunno what caused it
2013 K2500 Chevy WT
80K on it now.
I enjoy wrenching on my tractors but hate working on automobiles.
Would Much rather tape and mud sheetrock. Seriously...
 

nadogail

Well-known member
Joined
Jan 23, 2009
Messages
32,051
Location
Coronado, CA
Deconstructed a Planter Box that I had assembled with a crooked end.
I first tried to saw it apart on a seam but became impatient with the progress, I then reached for my 3 pound dead blow hammer and got the results I wanted. I pulled the brads out with nippers and hit the former glue joints with a Flap Disc and decided to call it an afternoon.
Tomorrow I will spread fresh glue and after squaring everything up I will clamp everything together and shoot some brads in it to hold everything together until the glue sets.
 

Magnum440d100

Well-known member
Joined
Dec 2, 2018
Messages
3,581
Location
Indiana
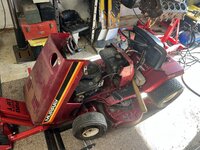
Just some small things. Got the Murray rider back to the main spot to put on the lift IMG_6119.jpeg

Found out the engine is junk. Oh well. I do have a 20 or 21 hp Briggs I can put on there.

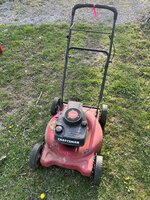
Got another mower out of the pole barn. Did some mowing with it to make sure it was good to go.IMG_6121.jpeg Aaaaannnnnnd of course, fuel leak. So back in the garage for a fuel line replacement. Then back out for some more mowing IMG_6122.jpeg


Tomorrow after work, when the engine is cooled down, I’ll clean it up proper, put a new plug in it, change the oil, etc. But it doesn’t smoke, starts first pull, and cuts through the thick stuff (with some coaxing). It should be a good mower for a smallish residential lot.


Also did some organizing and such. Tomorrow I’ll do more. I NEED my horizontal work space back! Hahahahaha
 

kaymccampbell

Well-known member
Joined
Feb 27, 2015
Messages
29,625
Location
Upstate New York
Rewrote the shop clock software to include the status of nothing panel. Spent too much time looking for my long USB A extension cord. Soldered and ran the harness from the clock through the key cabinet to the panel. And it lives. Cleaned, flung, put away.

IMG_20250422_165120.jpg
 

Outlawmws

Well-known member
Joined
Aug 9, 2011
Messages
39,331
Location
The Badlands
Had to catch up from this W/E as I fell off the thread again -

Yesterday I finally made the raised platform for the very back of my T-Van. This allows me to have the cooler chest and other boxed stuff on top of stuff I want handy, but not buried, and keeps the cooler and boxes available for access.

Part of it was glued, so today I un-clamped that and then started working on pulling and pushing the lower side dents from its days with the PO's and city battle damage. not perfect but better. a bit more and I'll do the bottom foot or so in undercoating. It will never be a show vehicle but I bought it to take camping and beat on anyway.
 
Last edited:

LeonardY

Well-known member
Joined
Apr 16, 2011
Messages
5,107
Location
Southern California
Did a bunch of miscellaneous stuff.
Fixed my push broom with some leftover methacrylate adhesive. It had cracked in half. Remembered I had a support bracket. And I even remember where I put after 15+ years. Good as new. Even if it is 28 or so years old.
1745369737240.png
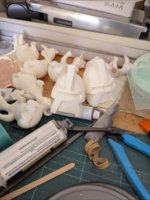
That lead to. I should use up my 6 year old model cast. Grabbed my ornament molds and started casting them
I'll finish these when I feel like it. Probably destroy the molds when I'm done.1745369837400.png
Then I really need to finish this Tricorder prop for my friend. I put another coat of texture paint on it.
1745370015801.png
Then I decided to setup the router with the miter lock bit. Test cut tomorrow.
1745370118011.png
 
Last edited:
To avoid these ads, REGISTER NOW!
Top Bottom