To avoid these ads, REGISTER NOW!

What did you do "IN" your garage today?

To avoid these ads, REGISTER NOW!

Jgaz

Well-known member
Joined
Dec 16, 2016
Messages
1,714
Location
AZ
First time going into the weekend without any customer orders; thought I'd cut some stuff for myself

20250829_113902.jpg

All 3/16"

20250829_123751.jpg

Now this is not my design at all

A repeat customer of mine throws ideas at me (or even a web page of something he likes) and I'll re-create it

Parts are super easy, so I told him not to buy the file and I'll draw it myself which I did - it's a small table top jack for holding up an axle or similar

20250829_115023.jpg

Cut two sets out as well as another table extension for myself

20250829_132122.jpg

The table jacks I drew and cut out more out of curiousity, I still need to draw and cut the remaining parts for the screw but it could serve as a useful tool
I love your additional table fixtures. Especially the table extensions.

I saved thisworkbench picture for ideas to use if I ever made another woodworking bench. I would probably make version 2 a bit narrower than I have now and incorporate something like the extension I marked with the arrow.
IMG_1639_Original.jpeg

Also, have you ever thought about starting your own thread?
“In KwikFab’s shop” would be a good place to keep all your great ideas (like your stool project) in one place.
Lots of talented people here have their own thread and yours would certainly, IMO, be a great addition.
 

KwikFab

Well-known member
Joined
Jul 27, 2024
Messages
1,236
Location
Central Valley, CA
I love your additional table fixtures. Especially the table extensions.

I saved thisworkbench picture for ideas to use if I ever made another woodworking bench. I would probably make version 2 a bit narrower than I have now and incorporate something like the extension I marked with the arrow.
IMG_1639_Original.jpeg

Also, have you ever thought about starting your own thread?
“In KwikFab’s shop” would be a good place to keep all your great ideas (like your stool project) in one place.
Lots of talented people here have their own thread and yours would certainly, IMO, be a great addition.

Damn, that looks like a badass wood working table

My cousin was by (when I welded his grill) and said he loved my fab table; he's a wood worker and said people use something similar but I've never even seen pictures of one before

I considered my own thread, but I ain't as talented as some of those guys

Should I just post my recent work to gain traction? I wouldn't know where to start

Also I just welded up the second extension lol
 

Mike65

Well-known member
Joined
Mar 7, 2007
Messages
3,119
Location
Horse Pasture, Va.
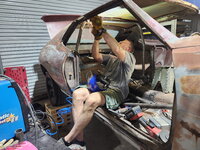
I spent a couple hours trying to figure out where the brake fluid is leaking from on the Mustang. It appears to be coming from the disc brake proportion valve & running down the l/s rear inner fender panel where the valve is mounted. I had to remove the master cylinder & the power brake booster to make room. It looks like I will have to remove the clutch master cylinder which is mounted right next to the proportion valve & I cannot get the wrench on a couple of the lines. Tomorrow is another day.
 

Outlawmws

Well-known member
Joined
Aug 9, 2011
Messages
39,344
Location
The Badlands
Spent a bit over an hour fixing a flat before it went flat. Not in my day's plan at all!

Picked this up in an AM drive:

Flat tire a.jpg

Marked it, pulled it, popped the tire loose and one side off. blocked it open, wire wheel prepped the spot, and applied 2 coats of the rubber cement, then the patch and rolled it in... All good and a couple hours later tire is holding pressure

Flat tire b aftr patch.jpg

this is what came out - dang good thing I marked the spot as inside it barely broke the inner seal. the tire never really lost pressure.


Flat tire c after patch.jpg
 

Old Man Roger

Well-known member
Joined
Apr 6, 2017
Messages
17,938
Location
Palm Coast Florida
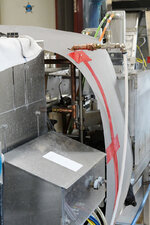
Keep in mind that this area of the conveyor--the only really dirty part--is after the lids get sealed. The worst part was directly under the rinser that removes any beer from the outside of the cans (to keep O2 out, the cans get lidded "over foam"). Next step is a blower to dry the can off, then on to the pressure-sensitive labeler.
Schlemiel Shschlimazel hasenpfeffer incorporated.

Ya ya I know you’ve heard it a million times.lol
 

LeonardY

Well-known member
Joined
Apr 16, 2011
Messages
5,110
Location
Southern California
I considered my own thread, but I ain't as talented as some of those guys

Should I just post my recent work to gain traction? I wouldn't know where to start
I have my own. It will keep your work cohesive. I still post here too. I just get into more detail in mine.

Just start with your shop layout or projects.

Dude, you have plenty of talent. Give yourself some credit. You do some cool work.
 

zanyad

ALLIANCE MEMBER
Joined
Apr 26, 2018
Messages
2,842
Location
NE Ohio
Also, have you ever thought about starting your own thread?
“In KwikFab’s shop” would be a good place to keep all your great ideas (like your stool project) in one place.
:+1:
Should I just post my recent work to gain traction? I wouldn't know where to start
Yes
:beer:

Thread created!
Followed!
Dude, you have plenty of talent. Give yourself some credit. You do some cool work.
Concur.
 

larry4406

Well-known member
Joined
Jan 27, 2006
Messages
19,654
Location
Northern Virginia
Finally finished the Racedeck project!

Vert would not cooperate. Steering has locked up even though the key is in the column and the lock release lever deployed. Fortunately, the wheels were mostly straight. Coaxed it out with floor jack.

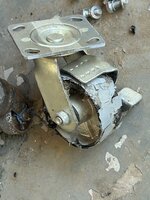
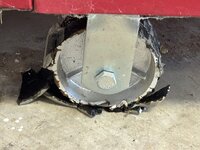
Then the last Harbor Freight tool box to roll out decided it was time to shred its tires! I recall this was a problem for the Series One tool boxes. So, off to HF for some new casters. The new ones did not have the wheel locks, so I took the new wheel apart and put it on the caster frame with lock.

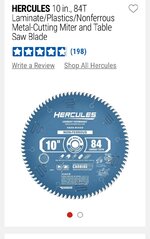
Lastly, the 10" 84 tooth laminate blade from HF in the table saw worked just fine making all of the cuts. It would leave a slight burr which was easily removed by dragging a razor knife across it. I mostly cut with the finished surface of the tile against the table of the table saw (upside down). Some of the tiles I cut free hand with the finish side "Up"; I saw no difference in the cut quality.

Glad this project is DONE!
IMG_1447 (Medium).JPG
IMG_1461.JPGIMG_1466.JPG
1756549289710.jpeg
1756549215986.jpeg
1756549318994.jpeg
 
Last edited:

SMOKEYBEAR

Well-known member
Joined
Jan 3, 2016
Messages
466
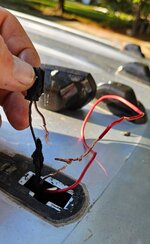
Replaced the cab lights on the dually. I bought it used 2 years ago...I've previously replaced one of the cab lights, odd an LED light goes out twice so quickly. Found out why..whoever swapped out the factory lights for smoked LED lights got two plugs mixed up. The outside cab light and the vanity light on the passenger side sun-visor. So the vanity light was on with the cab lights, and that one cab light on with the mirror open. The extra red wire (only twisted together and taped) added was used to rob power from the one light to the next. It's all fixed with heat shrink marine connectors and properly wrapped back up. Amber lens / amber LED lights replace the smoked ones. Last of the blacked out items from the previous owner.
 

Attachments

  • CL1.jpg
    CL1.jpg
    224.4 KB · Views: 4
  • CL2.jpg
    CL2.jpg
    229.7 KB · Views: 5
  • CL3.jpg
    CL3.jpg
    223.2 KB · Views: 5
To avoid these ads, REGISTER NOW!

Skyman

Well-known member
Joined
Nov 9, 2021
Messages
1,225
Location
Central Maryland
I used to work commercial refrigeration, mostly ice makers in bars and restaurants. It's the reason I don't like to eat out much, although fast food restaurants are mostly cleaner than sit down places.
Most bars are disgusting and I won't go in one now unless forced.

I worked for a contractor who had landed the contract to pull new circuits to the kitchen in a bunch of local McDonald's stores for a new appliance. I've never eaten in a McDonald's since then. That was 40+ years ago.
 

Old Man Roger

Well-known member
Joined
Apr 6, 2017
Messages
17,938
Location
Palm Coast Florida
Finally finished the Racedeck project!

Vert would not cooperate. Steering has locked up even though the key is in the column and the lock release lever deployed. Fortunately, the wheels were mostly straight. Coaxed it out with floor jack.

Then the last Harbor Freight tool box to roll out decided it was time to shred its tires! I recall this was a problem for the Series One tool boxes. So, off to HF for some new casters. The new ones did not have the wheel locks, so I took the new wheel apart and put it on the caster frame with lock.

Lastly, the 10" 84 tooth laminate blade from HF in the table saw worked just fine making all of the cuts. It would leave a slight burr which was easily removed by dragging a razor knife across it. I mostly cut with the finished surface of the tile against the table of the table saw (upside down). Some of the tiles I cut free hand with the finish side "Up"; I saw no difference in the cut quality.

Glad this project is DONE!
IMG_1447 (Medium).JPG
IMG_1461.JPGIMG_1466.JPG
1756549289710.jpeg
1756549215986.jpeg
1756549318994.jpeg
I had every wheel in my garage do that one night. Turns out some plastic bottle cracked and the chemical in it had fumes that were heavier than air. I don’t remember the chemical, but the garage I had at the time was not vented down low. May have been paint thinner or sulphuric acid?

None of the liquid leaked out, just the fumes.
 

PhantomEB

Well-known member
Joined
Feb 6, 2006
Messages
6,853
Location
Medicine Hat, AB, Canuckistan
Did you build over concrete steps?
Sure did, why spend over 2500$ to remove when still structurally sound. Less than 1000$ into it as it sits now. Stringers are 2x4 PT wood so shouldn’t collapse any time soon.
While in Yellowstone Sinclair gas station they had free 11x17 maps. Got a tube at the post office and made it back in luggage without bending it. Ordered frame and added acid free foam board and paper to back. Got it framed. Thought I’d hang in the shop.
I need to get me one when I head on down. Need to get my Moab and various local OHV maps framed and One of the Rubicon ordered up.
 

PhantomEB

Well-known member
Joined
Feb 6, 2006
Messages
6,853
Location
Medicine Hat, AB, Canuckistan
Pretty sure next payday I will have enough saved up for my Dodge Ram3500 ECM to be ordered up then take the wife down to Montana for our biannual Stateside day trip. So laying low on eating out or shopping.

This weekend I am working from the back bumper forward from the outside before I go inside the truck on wiring.

Should have brake lights, Nuetral Safety Switch wired into the switch panel then onto Stereo rough wiring while I wait on JBL waterproof speakers for the kick panels. And the Light bar wired up too.

Thinking this weekend will also include some trips down the alley to play more with the porportioning valve so I am not digging ruts in the back lane switching gears.
 

niget2002

Well-known member
Joined
Oct 2, 2012
Messages
11,266
Location
Josephine, TX
Oil change on the wife's car. Then I finished the kitchen cabinet drawers.

That was the last 'open' project I had going, so the rest of the day is for cleaning shop and watching football.

I have 2/3 of the shop done at this point. I have two more work benches to clean.

I think this is the first time I've deep cleaned since moving in 6 years ago. All rolling items have been pulled away from the walls and everything has been swept and vacuumed.

I have a pretty large pile of garbage next month on the 'city wide trash day'.

I've also realized this 'temporary' mitre saw stand has been set up since we moved in too. I should really get around to building something.

1000004163.jpg
 

River19

Well-known member
Joined
Mar 19, 2015
Messages
52
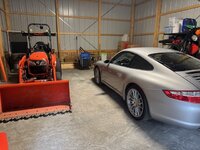
Spent some time deciding where to put the 4 post lift.......Thinking where the tractor is parked. 14' walls but the sliding door hardware limits that to about 12'6" which is fine since the 911 only stands ~50" high anyways and the Kubota with the ROPS up needs ~84" so we should be pretty solid.

Thinking I will need to get the casters for the 4 post to make on/off more of a straight shot with the center door so I can tuck it over to the lack left when loaded for the winter.

IMG_8029.jpeg
IMG_8063.jpeg
 

niget2002

Well-known member
Joined
Oct 2, 2012
Messages
11,266
Location
Josephine, TX
Oil change on the wife's car. Then I finished the kitchen cabinet drawers.

That was the last 'open' project I had going, so the rest of the day is for cleaning shop and watching football.

I have 2/3 of the shop done at this point. I have two more work benches to clean.

I think this is the first time I've deep cleaned since moving in 6 years ago. All rolling items have been pulled away from the walls and everything has been swept and vacuumed.

I have a pretty large pile of garbage next month on the 'city wide trash day'.

I've also realized this 'temporary' mitre saw stand has been set up since we moved in too. I should really get around to building something.

1000004163.jpg
Aaaannndddd I'm done.

No pictures. The shop still looks messy because of all the garbage I need to haul off.
 

rd65

Well-known member
Joined
Sep 29, 2017
Messages
2,849
Location
Granite Falls, WA
Only about an hour or so of so time today. Still managed to damn near screw up bad. I guess, maybe I didn't have all the short nails out of the gun. Thought I was out of the way but found out I wasn't totally in the clear. Happened on the 3rd corner block. Deep enough to bleed but at least I didn't need to pry myself free. It's beer- thirty.
 

Attachments

  • 20250830_140510.jpg
    20250830_140510.jpg
    602.1 KB · Views: 6

Jgaz

Well-known member
Joined
Dec 16, 2016
Messages
1,714
Location
AZ
Exactly what I was thinking of!

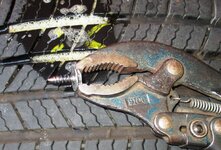
It was installed backwards. Head should be inside the tire.
For ice racing we used a sheet metal screw with a 5/16” hex head AND a screwdriver slot (another cutting edge). The were screwed into the knobs on a knobby tire.

If you really wanted to be trick you would cut a second screw driver slot perpendicular to the original.
 

Beerhippie

Well-known member
Joined
Oct 13, 2023
Messages
10,047
Location
Far NE Oregon
Since I can't get a solid schedule for next week, I spent a couple of hours getting the canning line ready to run. It will still need some fine tuning while running.

54754916301_daeea51989_o.jpg

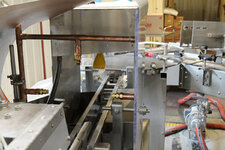
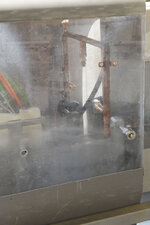
30' of belt cleaned and threaded back through, the last sections of guide rails back in, transfer plate on. The slot in the transfer plate (one of the things that'll need tweaking) is another rinser for the bottom of the cans. I installed that years ago when we had problems with the cans sticking to the flats. Also visible is the yellow blower for drying the cans.

54754063832_97d16e82d4_o.jpg

An overview of the canning line. The line runs at ~35-40 cans per minute and can be run by a single person--two make for lighter work.

The vignetting is because I'm an idjit and grabbed the wrong lens hood for my ultra-wide lens. The contrast with the afternoon sun shining through the window was a bit of a challenge to process.

The line is folded up to fit our limited space. Back when we were also bottling, there was even more equipment crammed in that room.

Out of sight to the left in an unheated warehouse is the depaletizer and the full-twist pre-rinser/sanitizer for the empty cans to remove anything that might have gotten into the stretch-wrapped pallets. Next is the big box, which houses the controls and seven filler heads. The slanted thing to the right of the box is the lid dropper that puts a lid on each can, then the seamer--the most expensive part of the line--that seams and seals the lids onto the cans. Right of that is the rinser I just installed and the blower enclosure. The canning line feeds off onto a rotary transfer table/accumulator. The accumulator allows some slop so we can change the label rolls without having to stop the line. The transfer table feeds the pressure-sensitive linear labeler. Last is the "gun" that applies the six-pack holders and the pack-off table where the six packs get manually loaded into flats and then onto a pallet--ready to ship to you.

Whew--just describing all that leaves me feeling like I need a beer break....
 

Beerhippie

Well-known member
Joined
Oct 13, 2023
Messages
10,047
Location
Far NE Oregon
For ice racing we used a sheet metal screw with a 5/16” hex head AND a screwdriver slot (another cutting edge). The were screwed into the knobs on a knobby tire.

If you really wanted to be trick you would cut a second screw driver slot perpendicular to the original.
Guys around here would use old, near treadless tires with 1" roofing screws driven through from the inside. A liner kept the heads from flattening the tube too quickly. Guys would ride them on Wallowa lake (6 miles long by ~1 mile wide) when it froze over--which it doesn't much do these days. Farmer/rancher tech is a thing to see.
 
To avoid these ads, REGISTER NOW!
Top Bottom