To avoid these ads, REGISTER NOW!

What did you do "IN" your garage today?

pancholasvegas

Well-known member
Joined
Nov 6, 2017
Messages
253
Parts for the pedal car have been slowly trickling in through the week.

IMG_3703.jpeg

The wheels and seat pan came back from powder coat at the start of the week. I also received a set of NOS tires/wheels that I found on eBay.


IMG_3706.jpeg

Broke those down and transferred them to the newly powdercoated wheels.

Then I received a partial delivery of the running gear and hangers. I had these done in a “Chrome” powdercoat to add some pop. They were originally black, that’s way too much contrast. This is a bit more fun.

IMG_3712.jpeg

IMG_3713.jpeg

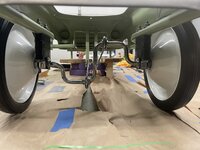
I assembled as much of the rear end as I could right now, aside from staking the drive wheel - I’ve got a few things I’d like to do differently than the factory did. The wheels and spacers are held to the axle by use of a “Push nut,” - I’m not crazy about it, the tolerances on this thing are loose enough as is. I’m planning to use a die and thread the axles to accept a low profile nut instead. I have to work this evening, so I’ll see what I can dig up at the store tomorrow, hopefully.

Here’s where we wrapped up for the day.
IMG_3715.jpeg

IMG_3719.jpeg
 
To avoid these ads, REGISTER NOW!

Beerhippie

Well-known member
Joined
Oct 13, 2023
Messages
10,018
Location
Far NE Oregon
Parts for the pedal car have been slowly trickling in through the week.

IMG_3703.jpeg

The wheels and seat pan came back from powder coat at the start of the week. I also received a set of NOS tires/wheels that I found on eBay.


IMG_3706.jpeg

Broke those down and transferred them to the newly powdercoated wheels.

Then I received a partial delivery of the running gear and hangers. I had these done in a “Chrome” powdercoat to add some pop. They were originally black, that’s way too much contrast. This is a bit more fun.

IMG_3712.jpeg

IMG_3713.jpeg

I assembled as much of the rear end as I could right now, aside from staking the drive wheel - I’ve got a few things I’d like to do differently than the factory did. The wheels and spacers are held to the axle by use of a “Push nut,” - I’m not crazy about it, the tolerances on this thing are loose enough as is. I’m planning to use a die and thread the axles to accept a low profile nut instead. I have to work this evening, so I’ll see what I can dig up at the store tomorrow, hopefully.

Here’s where we wrapped up for the day.
IMG_3715.jpeg

IMG_3719.jpeg
Coolisimo!

Now you have a set of rims for the winter tires, too!
 

SMOKEYBEAR

Well-known member
Joined
Jan 3, 2016
Messages
466
Wow! REAL butcher block! Somehow, it bothers me that any table/countertop assembled from pieces of wood, regardless of grain orientation, gets called "butcher block".
Yes, it all came to life when I started one last year trying to use all the scraps that I built up from past projects, then the bigger scraps became cutting boards (face and edge grain) for family and friends...then the last bit into a butcher table top (end grain) I only purchased lumber for the legs and what I would call the "skirt". The goal was no metal fasteners. It's all glued and or doweled together. This one is for my kid sister who tried to negotiate relocating the first one. I used the first one to calculate the board foot required and purchased lumber specific to this project. Fun for me, and a Christmas surprise for my kid sister.
 

oldman_pottering

Well-known member
Joined
Jun 3, 2024
Messages
421
Location
Tinonee, NSW Australia
walked in,grabbed a spanner, climbed the roof of the shed and adjusted the aerial to have a similar direction to the house aerial,climbed back down to find out I still don't have a video signal :poop:
Went inside to watch some of the telecast and an add appears for the Tv stations app, downloaded app and cast it to the TV in the shed :)
Happy days
 

Jgaz

Well-known member
Joined
Dec 16, 2016
Messages
1,711
Location
AZ
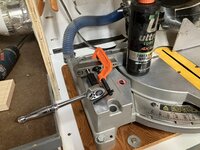
Starting another attempt to improve dust collection at the miter saw.
I've made progress but there is still room for improvement.

Below is one step of three or four necessary before I can even try a new idea.
I'm only showing the step for the tools used while tapping a hole.
These tools made what could have been a rather difficult job, simple.
IMG_5829.jpeg
Tap socket and Big Gator Tools tap guide for the win!
 

CoogarXR

Well-known member
Joined
Jan 11, 2016
Messages
6,871
Location
Ohio
Finished 99% of the wiring in my little attached garage. When I bought the place I ran a sub panel and just installed outdoor lights, a 120v outlet and a 240v outlet right below the panel for temporary use. I had extension cords strewn everywhere (to my bench, to the lights, etc) temporarily. Now I have proper bench receptacles run, lighting circuits, and an electric heater circuit. I need to buy one more breaker and a double-gang wall plate for the switches and it'll be done.
 

LeonardY

Well-known member
Joined
Apr 16, 2011
Messages
5,107
Location
Southern California
Starting another attempt to improve dust collection at the miter saw.
I've made progress but there is still room for improvement.

Below is one step of three or four necessary before I can even try a new idea.
I'm only showing the step for the tools used while tapping a hole.
These tools made what could have been a rather difficult job, simple.
IMG_5829.jpeg
Tap socket and Big Gator Tools tap guide for the win!
We seem to have the same taste in tools. I was going to mention that about your Bosch drivers.

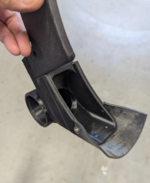
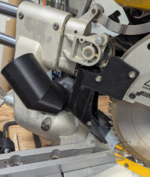
I've done multiple irritations for dust control on my miter saw. Last actual built version was this.
1760241983786.png
1760242013748.png
It's ok but I wasn't able to cut all the way through on a thick board.

If you interested in what I am doing.
You can check it out here.
It's not all in one place as i get distracted easily.
 
Last edited:

Jgaz

Well-known member
Joined
Dec 16, 2016
Messages
1,711
Location
AZ
We seem to have the same taste in tools. I was going to mention that about you Bosch drivers.

I've done multiple irritations for dust control on my miter saw. Last actual built version was this.
1760241983786.png
1760242013748.png
It's ok but I wasn't able to cut all the way through on a thick board.

If you interested in what I am doing.
You can check it out here.
It's not all in one place as i get distracted easily.
Thanks. Did you 3D print the dust catcher you showed in your post?
It looks waaaay better than my aluminum and rubber catcher I’m using now. I have ideas for that but right now I’m working on sealing the enclosure box have the saw mounted in

Edit: I just looked at your linked thread. You are light years ahead of me in the design phase.
Nice work
 

Gangly

Well-known member
Joined
Jun 9, 2025
Messages
283
Location
The Woodlands, Texas
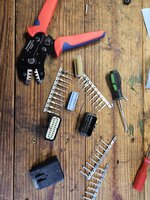
The backup camera in my truck quit working so I started looking at it last weekend. I saw where two pins had been pulled out of a connector so I purchased a new connector, pins, and a pin crimp tool to do the repair.
20251011_105509.jpg

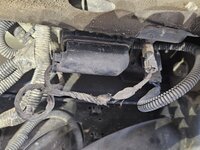
After doing the repair, the camera still wasn't working. I removed the spare tire and checked the rear harness under the truck bed, and sure enough the culprit (a busted coaxial cable) decided to join the party.
20251011_125607.jpg

You can't purchase just the coaxial cable, so I had to order the entire lift gate harness. A 30 minute drive to the dealer, and ~$120 later, a harness is on its way and should be here Tuesday of this week.

I'll have to be more careful off roading next time.
 

LeonardY

Well-known member
Joined
Apr 16, 2011
Messages
5,107
Location
Southern California
Thanks. Did you 3D print the dust catcher you showed in your post?
It looks waaaay better than my aluminum and rubber catcher I’m using now. I have ideas for that but right now I’m working on sealing the enclosure box have the saw mounted in

Edit: I just looked at your linked thread. You are light years ahead of me in the design phase.
Nice work
Thanks.

Here's where I started. https://www.garagejournal.com/forum/threads/uncle-lennys-house-of-toys-and-tools.103998/post-9774465

I haven't printed the version I showed in the post. I've started to redesigned the dust chute. I'll be posting the new one soon.
 

DGersic

Well-known member
Joined
Mar 12, 2017
Messages
6,382
Location
DeKalb, IL
My garage, pulled the hot rod out. Drove about 400 miles (DeKalb to Savanah to Prairie du Chien, then back again). Put the hot rod away. Packed up some tools and ideas.

IMG_8104.jpeg

Dad’s garage, shortened the legs on his bed by 3” to help him get in and out of it. First cut was 2”, then the second cut was another 1”.

IMG_8158.jpeg
 

oldman_pottering

Well-known member
Joined
Jun 3, 2024
Messages
421
Location
Tinonee, NSW Australia
The backup camera in my truck quit working so I started looking at it last weekend. I saw where two pins had been pulled out of a connector so I purchased a new connector, pins, and a pin crimp tool to do the repair.
20251011_105509.jpg

After doing the repair, the camera still wasn't working. I removed the spare tire and checked the rear harness under the truck bed, and sure enough the culprit (a busted coaxial cable) decided to join the party.
20251011_125607.jpg

You can't purchase just the coaxial cable, so I had to order the entire lift gate harness. A 30 minute drive to the dealer, and ~$120 later, a harness is on its way and should be here Tuesday of this week.

I'll have to be more careful off roading next time.
the crimps can be a work of art if you get them situated correctly, it normally takes me a few goes to get it sorted
 

SMOKEYBEAR

Well-known member
Joined
Jan 3, 2016
Messages
466
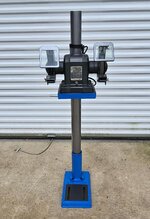
Repurposed a 90's Taiwan drill press stand/ lift table for a grinder. Just a quick refresh, de-rust, paint, wheels and grade 8 and SS fasteners. I have a larger one set up like this, works well for what I do.The grinder is something I've been sitting on waiting for a stand to pair it up with..pictures no order.
 

Attachments

  • VCG2.jpg
    VCG2.jpg
    297 KB · Views: 34
  • VCG3.jpg
    VCG3.jpg
    367.8 KB · Views: 23
  • VCG4.jpg
    VCG4.jpg
    316.8 KB · Views: 22
  • VCG5.jpg
    VCG5.jpg
    232.7 KB · Views: 32

bugnut

ALLIANCE MEMBER
Joined
Jul 14, 2012
Messages
3,998
Location
Central Ohio
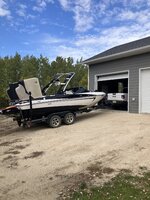
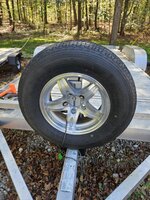
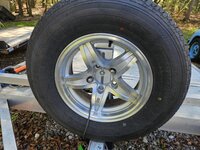
Not in the garage but just outside. Spare for the trailer has been riding in the truck bed while traveling. Local dealer not interested in helping with the spare mount. Found one online and received earlier this week. Went to install it and it rubs on the toprail and has a wide gap on the bolt holes. I 3d printed a standoff for each side, black piece in images, and then installed. Spare mounted and in a reluctant nod to my cronies slipped a bicycle lock on the rim, as they were overwhelmingly concerned it would be stolen. Ready to go!
 

Attachments

  • 20251011_130053.jpg
    20251011_130053.jpg
    903.1 KB · Views: 47
  • 20251011_130040.jpg
    20251011_130040.jpg
    950.4 KB · Views: 38
  • 20251011_130032.jpg
    20251011_130032.jpg
    952.5 KB · Views: 40
  • 20251011_130027.jpg
    20251011_130027.jpg
    805.3 KB · Views: 48
To avoid these ads, REGISTER NOW!

Skyman

Well-known member
Joined
Nov 9, 2021
Messages
1,225
Location
Central Maryland
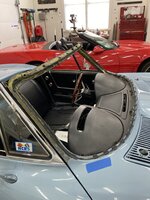
Not today, but this past week. Wrapped up what had turned into a costly multi-week project with this windshield removal, frame clean-up, reveal molding conversion, and reassembly. Glad it's finally done. Took it for a five-hour round trip on a gorgeous day yesterday.
Went from this ugly and leaking mess:

1760282738064.jpeg


To this:

1760282526517.jpeg
1760282542414.jpeg

1760282559819.jpeg

1760282572344.jpeg
 

pancholasvegas

Well-known member
Joined
Nov 6, 2017
Messages
253
Looked like Black Friday outside the farm supply this morning with the amount of people lined up at opening…

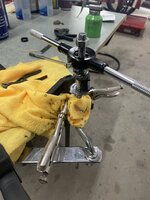
Picked up an appropriate 3/8-16 Die and pulled the running gear off the car. Cleaned up the axles and clamped it up to the table and got moving.

IMG_3721.jpeg


Flipped it over and did the opposite side as well. Now we’ve got it remounted and accepting of standard hardware instead of the weak little push fasteners.

IMG_3723.jpeg

Now we’ve got a bit more flexibility on the rear end. Plus - these nuts I used for testing fit underneath the hubcap as is, so no need to find something shorter.

IMG_3724.jpeg

Hopefully I’ll get the front end back from the powdercoat shop this week - I’d like it to be able to fit everything up before I do the final assembly. Hoping to stop at the fabric store this week and find something for a seat pad as well.
 

Gangly

Well-known member
Joined
Jun 9, 2025
Messages
283
Location
The Woodlands, Texas
the crimps can be a work of art if you get them situated correctly, it normally takes me a few goes to get it sorted
For sure! I practiced on an extra conductor before commiting to the vehicles harness, and butchered quite a few before getting it down.

Practice makes perfect, or in my case, practice makes "ok".
 

Old Man Roger

Well-known member
Joined
Apr 6, 2017
Messages
17,846
Location
Palm Coast Florida
Looked like Black Friday outside the farm supply this morning with the amount of people lined up at opening…

Picked up an appropriate 3/8-16 Die and pulled the running gear off the car. Cleaned up the axles and clamped it up to the table and got moving.

IMG_3721.jpeg


Flipped it over and did the opposite side as well. Now we’ve got it remounted and accepting of standard hardware instead of the weak little push fasteners.

IMG_3723.jpeg

Now we’ve got a bit more flexibility on the rear end. Plus - these nuts I used for testing fit underneath the hubcap as is, so no need to find something shorter.

IMG_3724.jpeg

Hopefully I’ll get the front end back from the powdercoat shop this week - I’d like it to be able to fit everything up before I do the final assembly. Hoping to stop at the fabric store this week and find something for a seat pad as well.
Will the nut on the left side wheels try to unthread in use ?
 

Beerhippie

Well-known member
Joined
Oct 13, 2023
Messages
10,018
Location
Far NE Oregon
This damned thing:

54850559554_0c63ac7129_o.jpg

keeps on comin' back to the shop. It's like trying to throw away a boomerang.

Try as I might, I can't get it to malfunction. I got the kitchen crew a bit POed this AM when I suggested user error--wrong move, Timm. They insist they understand the safety interlocks, but sometimes it just doesn't work.

I tore it down as far as I was comfortable going today--there are parts I can't get off with "reasonable force", so I was unable to remove the motor entirely to give me unimpeded access to the safety switches. I used a tube and shot some DeOxit into the area the the switches appear to be, then put it back together (only lost one cosmetic plug that went flying when it popped out--I think it went thataway). I've been trying since to get it to malfunction, but no luck.

Damn I hate intermittent problems--and no OBD plug on this thing.

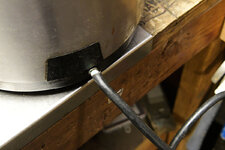
At least I was able to "fix" one small problem that had some of the kitchen staff afraid to use the processor:

54850559594_fe29fc041e_o.jpg

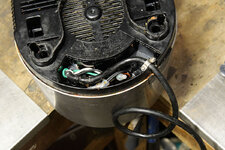
That's just a break in the sheath--the wire insulation is uncompromised. A couple of the prep kids were afraid to use it as they might get electrocuted.

Quick fix:

54849454187_e9b33b7874_o.jpg

54850575368_d45f5b1cb4_o.jpg

Don't tell 'em the 'lectric monster is just hiding under the bed. As you can see form the way the cord hangs--or rather, doesn't hang--it's one of those wonderful near-rigid cords.
 
Last edited:

Wrench97

Well-known member
Joined
Jun 23, 2018
Messages
12,161
Location
Southeastern Pa
This damned thing:

54850559554_0c63ac7129_o.jpg

keeps on comin' back to the shop like a bad penny.

Try as I might, I can't get it to malfunction. I got the kitchen crew a bit POed this AM when I suggested user error--wrong move, Timm. They insist they understand the safety interlocks, but sometimes it just doesn't work.

I tore it down as far as I was comfortable going today--there are parts I can't get off with "reasonable force", so I was unable to remove the motor entirely to give me unimpeded access to the safety switches. I used a tube and shot some DeOxit into the area the the switches appear to be, then put it back together (only lost one cosmetic plug that went flying when it popped out--I think it went thataway). I've been trying since to get it to malfunction, but no luck.

Damn I hate intermittent problems--and no OBD plug on this thing.

At least I was able to "fix" one small problem that had some of the kitchen staff afraid to use the processor:

54850559594_fe29fc041e_o.jpg

That's just a break in the sheath--the wire insulation is uncompromised. A couple of the prep kids were afraid to use it as they might get electrocuted.

Quick fix:

54849454187_e9b33b7874_o.jpg

54850575368_d45f5b1cb4_o.jpg

Don't tell 'em the 'lectric monster is just hiding under the bed. As you can see form the way the cord hangs--or rather, doesn't hang--it's one of those wonderful near-rigid cords.
Are there newer ones in the kitchen?
I have seen this thing I call new truck syndrome where a company gets a lot of new trucks at once and the guy that didn't get a new one but rather a hand me down newer one from a driver that got a new one feels slighted and has at least 5 issues a week with the new hand me down truck even though his old truck was a bigger POS..........
 

Beerhippie

Well-known member
Joined
Oct 13, 2023
Messages
10,018
Location
Far NE Oregon
Are there newer ones in the kitchen?
I have seen this thing I call new truck syndrome where a company gets a lot of new trucks at once and the guy that didn't get a new one but rather a hand me down newer one from a driver that got a new one feels slighted and has at least 5 issues a week with the new hand me down truck even though his old truck was a bigger POS..........
They bought a new one when this one started acting up. It's much lighter-duty than this Waring.

I've turned it off and on a dozen times, took the bowl off and put it back on and can't get it to malfunction.
 

Wrench-Polisher

Well-known member
Joined
Aug 29, 2025
Messages
317
Location
DEEP in the rusty rust of rust belt
This may sound silly but I live in the rust belt on the great lakes in the lake effect belt which means the worst possible rust situation and we get really high moisture level 3 out of 4 seasons. My jacks are sitting on concrete so I hit them up with some fluid film to slow down the rust.
 

Attachments

  • 565076994_10164116341385039_238472100812856604_n.jpg
    565076994_10164116341385039_238472100812856604_n.jpg
    930.9 KB · Views: 51

PWC Repair

Well-known member
Joined
Dec 27, 2012
Messages
3,189
Location
Arkansas
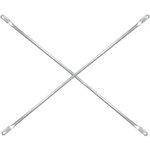
......Well........I needed a few more crossbraces for my scaffolding so I could Have 3 wide on the 2nd level. That would allow me to get a lot of siding installed on my sons house-->https://www.garagejournal.com/forum/threads/the-not-a-garage-cabin-build.539906/ without disassembling and moving uprights. So I ran to Home Depot and bought 8 sticks of 3/4 electrical conduit and made 4 mre like this pic! Took me a couple hours to flatten all the ends and drill all the holes but got 'er done!
 

Attachments

  • ItemImage-771060-q5wzns-8bgne8-f2et7u.jpg
    ItemImage-771060-q5wzns-8bgne8-f2et7u.jpg
    43 KB · Views: 47

GrayFlattop

Well-known member
Joined
Jan 18, 2018
Messages
1,051
Location
Chicago
As part of the never-ending clean-up effort, I disassembled and trashed a number of router and table saw jigs/fixtures that have been taking up space and collecting dust for the last 30 years or so. Not sure why I kept them this long, but now I have a bunch of toggle clamps. The scraps of plywood and particleboard filled the remaining space in the garbage can. The rest will have to wait a few more days.

Put tools and supplies away, then visited my neighbor across the alley who is in the process of moving into his newly built garage. Interesting young man with a built Subie STI to go along with his very mint ‘66 Dodge Coronet with a bored and stroked big block under the hood. Yes, I am a bit jealous.
 

JEFFREYWisconsin

Well-known member
Joined
Oct 9, 2021
Messages
380
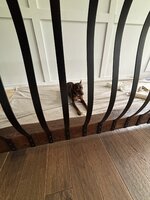
I had to build a platform in my garage and carry it in the house... it spans the stairway opening so that we can reach to finish the walls without a high and possibly unstable ladder... our dog spent a week wondering where the stairs went and now she just likes to lounge around on the platform and get in the way of progress. I love this little dog but she can make tasks a lot more difficult!

I was going to buy pier pieces but they were really expensive and not something I hope to ever need again. The platform is beefy made from mostly scrap and it has 8 legs down to the stairs so it is really nice to be able to paint and work on the wainscot without fear of falling. I will take it all apart when done and move it to my shop where I will build a new workbench from it. IMG_5716.jpeg
 

Attachments

  • IMG_5709.jpeg
    IMG_5709.jpeg
    822.7 KB · Views: 14
Last edited:
To avoid these ads, REGISTER NOW!
Top Bottom