To avoid these ads, REGISTER NOW!

What did you do "IN" your garage today?

bustedcrawler

Well-known member
Joined
Feb 12, 2015
Messages
88
Location
Denver
Confirming that the LS won't bolt up to the factory BH in my C1500? Or use its existing FW?

TIA.


Not sure. I know with the Gen 3 5.3 and the early NV4500 I have, the bellhousing didn't mate up. It was close and the NV4500 bellhousing would index off the alignment dowel pins but not all of the bolts lined up. If you have a later NV4500 (post 95, I think), it may work.

I didn't dig into making the factory parts line up as I want the slave cylinder on the drivers side to give more room for the front driveshaft
 
To avoid these ads, REGISTER NOW!

Beerhippie

Well-known member
Joined
Oct 13, 2023
Messages
10,004
Location
Far NE Oregon
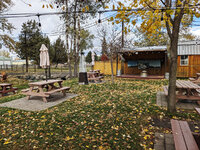
Timm what happens to the wood? Does the pub have a fireplace, or do you at home?
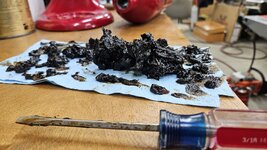
Aspen isn't the best fire wood to begin with and the one tree that snapped off 6' up is so rotten it looks like toilet paper inside.

But we do have a Solo Bonfire firepit, so I'll save any wood that looks decent. We still haven't burned what I saved from the last tree disaster.
 

stonesfan68

Well-known member
Joined
Apr 19, 2012
Messages
2,763
Location
Houston, TX
2nd of two today.
- Took a lunch break
-Snugged up my jock strap
- Started the front brakes on the F350 dually

I'm neither small nor physically weak..but this is quite the task. It's a solid workout. It all went pretty good, its just all heavy and the bolts are damn tight. The torque specs on the caliper bracket bolts are 295 Ft Lbs with thread locker, rotors weigh 40lbs...ect Two caliper pins were seized...explains how it was performing this past few weeks. Anyway, had to order new pins, you can see the corrosion results. I have everything clean and ready to go back together once the pins and boots get delivered. Start the back once the front is wrapped up. Pics no order..
I did the front suspension on my Yukon a couple years back and it wore me out. I think I'll be outsourcing that work from now on.
 

Old Man Roger

Well-known member
Joined
Apr 6, 2017
Messages
17,807
Location
Palm Coast Florida
I loved the look of the car with the sidepipes. And I loved driving it. For the first ten minutes. After that, it quickly devolved into auditory torture for my horribly messed-up hearing.

The car is now a pleasure to drive for hours. It sounds great, but not exhausting (intended).
I would have built a resonator/silencer and kept the pipes.lol
 

Brent T

Well-known member
Joined
Sep 29, 2018
Messages
459
Location
Arizona, USA
Moved my 4-post lift to the 3rd stall. I originally had it in the middle of the garage. I was ok with the two cars stacked, but I realized there was no way to ever have two open stalls next to each other. I think this is a better option, I just now need to raise the door tracks on that second garage door. I'm currently just using the lift for storage. If/when I get another vehicle I'll be able to stack cars again.

54883181517_a24beb79f9_b.jpg[/url]
 

BonzoHansen

Well-known member
Joined
Jun 24, 2005
Messages
1,742
Location
NJ
Moved my 4-post lift to the 3rd stall. I originally had it in the middle of the garage. I was ok with the two cars stacked, but I realized there was no way to ever have two open stalls next to each other. I think this is a better option, I just now need to raise the door tracks on that second garage door. I'm currently just using the lift for storage. If/when I get another vehicle I'll be able to stack cars again.

54883181517_a24beb79f9_b.jpg[/url]
Looks nice. How much headroom do you have floor to ceiling.
 

rd65

Well-known member
Joined
Sep 29, 2017
Messages
2,827
Location
Granite Falls, WA
Regreased the Mrs' Kitchen Aid mixer. That had been on the to-do list for awhile. Sharpened the blades on the 032 & Craftsman 2.0. Fitted a new fuel line on the 2.0, old one had snapped off at the fuel tank. I do need to source a couple of replacement bolts for it. Luckily the owners manual lists the bolt sizes with part numbers. It is so old that it is all SAE hardware. I have my metric stuff sorted but my sae stuff in just in bins.
 

Attachments

  • 20251026_140306.jpg
    20251026_140306.jpg
    1,015.9 KB · Views: 47
  • 20251026_140400.jpg
    20251026_140400.jpg
    780.1 KB · Views: 47

Brent T

Well-known member
Joined
Sep 29, 2018
Messages
459
Location
Arizona, USA
Looks nice. How much headroom do you have floor to ceiling.
I'm 10'2" floor to the light fixtures. Could gain another 4" if I rearranged the lights. When I had my M Coupe, I could put either car on top and raise the lift all the way. It's a Backyard Buddy, so it doesn't go very high, but works great for my purposes.
 

Wrench97

Well-known member
Joined
Jun 23, 2018
Messages
12,153
Location
Southeastern Pa
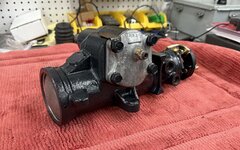
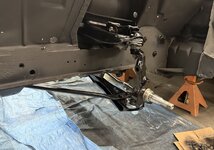
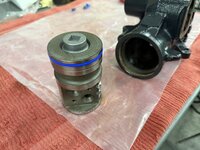
Wrapped up the Saginaw power steering box rebuild, then started installing the front suspension and steering components into the '73 Mustang.

560047918_10101359123159303_1311780457533936150_n.jpg

571211559_10101360639814913_5975618502290927788_n.jpg571177720_10101360642878773_4469206278676558032_n.jpg

One slick trick to shrink the Teflon seals back down after you've stretched them into their grooves: wrap tightly with plastic, then with electrical tape, then snug a hose clamp down on it and let it sit for awhile. That trick made reassembly a cinch.

557720966_10101359123563493_6369829306924591697_n.jpg

After shrinking the Teflon seal.
571344833_10101359124840933_4428278355715252496_n.jpg
I've used silicone hose clamps(the ones with a smooth inside tail) to compress them in past on hydro cylinders.
 

Skyman

Well-known member
Joined
Nov 9, 2021
Messages
1,222
Location
Central Maryland
I would have built a resonator/silencer and kept the pipes.lol
That's very problematic to implement. Clearances are very tight. I spent quite a bit of time studying the situation in the hope of coming up with a satisfactory solution, and ultimately punted and put it back the way it was when the car was built.
 
To avoid these ads, REGISTER NOW!

Beerhippie

Well-known member
Joined
Oct 13, 2023
Messages
10,004
Location
Far NE Oregon
I have a magnet glued to a length of wooden dowel, it saves me a lot of bending over and reaching all the way to the floor.

The floor seems to be getting further away every time I have to pick something up.
Magnetic rake w/release plate:


Fill it up, park it over a piece of cardboard, pull the release. Simple. You're welcome.

I have coworkers who don't seem to understand why leaving our gravel customer parking lot full of "sharps"--nails, screw, etc--is not a good thing. I get a lot of use out of the mag rake and maybe someday I'll pick up a nice meteorite for a bonus.
 

wolfhawk73

Well-known member
Joined
Aug 27, 2016
Messages
164
Location
Eastern North Carolina
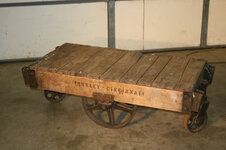
I've been working on restoring an old railroad cart that used to be in my father-in-law's textile mill. It's probably from the 50's or earlier. The old one in the pic is similar to the one I have. I didn't get a pic of it before I took it apart.

The cast iron and steel parts are spending quality time in Evapo-Rust. I like the way they look when they're bare. Some gloss lacquer will make them suitable for indoors. Probably going to use if for a coffee table like everyone else, but at least I came up with the idea a couple of decades ago before I heard about everyone else doing it.

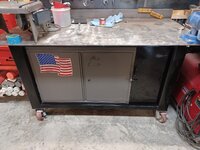
My father-in-law ripped off the original white oak boards 15 years ago, replacing them with 5/4 treated. It took a while in our area to find replacement wood, and I drove an hour and a half to get some 2" thick boards. I made a ton of sawdust to get them down to a true inch. I just need to figure out how to ding them up a bit to match the wear on the old frame boards.1000004068.jpg1000004070.jpg1000004128.jpg1000004091.jpg
 

Attachments

  • 1000004128.jpg
    1000004128.jpg
    1 MB · Views: 50

imagineer

Well-known member
Joined
Dec 13, 2015
Messages
1,018
Location
Ohio
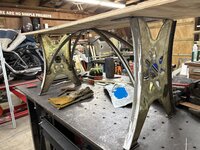
I made a base for a bench for outside the pack patio. I cut the uprights on my plasma table over a month ago, but wasn't until this weekend I had the time to start welding it together.

The uprights are 1/8" stainless with 1-1/4" x 1/8" stainless bar TIG welded (badly). The curved braces are 5/8" OD x .040" wall stainless tubing. I made the curve in the tube using a homemade slip roller. The 4 curved tubes are all welded to a 1/8" stainless spider plate at the top.

The bench seat will 36" x 15" x 2" thick and will be made using concrete countertop mix. I'll make the form and pour the concrete next weekend,

The plywood bolted to the base was there to keep all the parts straight and square for final welding together, then the same plywood will be used to hold and locate the fasteners embedded in the concrete.
 

Attachments

  • bench base.jpg
    bench base.jpg
    927.3 KB · Views: 40

M.Brane

ALLIANCE MEMBER
Joined
Feb 11, 2024
Messages
1,783
Location
1 hr N/W of LA LA Land
That's very problematic to implement. Clearances are very tight. I spent quite a bit of time studying the situation in the hope of coming up with a satisfactory solution, and ultimately punted and put it back the way it was when the car was built.
Earplugs would have been much cheaper, and easier. I'd wear 'em in a convertible regardless.
 

Outlawmws

Well-known member
Joined
Aug 9, 2011
Messages
39,321
Location
The Badlands
Smalls over the last few days:

Painting various cardboard boxes that have become "camp gear" keeps the cardboard from soaking up wet as easily. 4 down, one to go. Paint is not drying fast in this colder weather!

Added a top handle to a wood lantern box. -Made copper loop straps for the chosen handle.

Fixed the fuel fill station pump spigot handle for stripped wood screw threads (Drill , plug with dowel, drill, carefully re-thread without spiting it... (looked at making a "wood screw tap" but didn't have the right wood screw thread size...)

Making new "top spikes" for 4 tent poles for the "short wall" of the big canopy. Planing to nickle plate the nails used tomorrow.

Hardware store (Ace not BB) for various parts.

First major "raking" of the year in front. (used the blower for making a coupe piles). Oak trees are barely started!

Knocked a hardwood pallet apart for the wood.

Charged T-bird battery - Nope - "Its Dead Jim"...
 

ObnoxiousFumes

Well-known member
Joined
May 22, 2023
Messages
1,513
Location
Southwest Sask
This was from Saturday, but I finally got a minute to put the second axle seal in the Ram, had to modify a worn socket-fusion die to make an adapter so I could pull it in with some threaded rod. I don’t have enough proper tools of that sort yet but luckily I have others, like a tiny lathe. Lol. I think this is the only time I’ve actually used it this year.
IMG_4192.jpeg
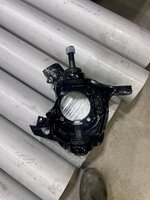
Then at the shop after work I pressed the new ball joints into the knuckles, and helped my coworker do a quick muffler delete on his Sierra. Sort of in payment for painting said knuckles.
IMG_4215.jpeg
 

Old Man Roger

Well-known member
Joined
Apr 6, 2017
Messages
17,807
Location
Palm Coast Florida
That's very problematic to implement. Clearances are very tight. I spent quite a bit of time studying the situation in the hope of coming up with a satisfactory solution, and ultimately punted and put it back the way it was when the car was built.
I would have cut the pipe open if I had to, but that’s just me. I’ve spent more time and money making something the way I wanted it then if I had just bought new stuff.lol
 

Skyman

Well-known member
Joined
Nov 9, 2021
Messages
1,222
Location
Central Maryland
Earplugs would have been much cheaper, and easier. I'd wear 'em in a convertible regardless.

Yeah. Cheaper and easier. Perfect.

Except for the fact that they didn't solve my problem (hyperacusis).

Neither did the expen$ive ones I bought that have active noise cancelling.

When I was a young buck, there was no such thing as a vehicle that was too loud for me. That's now ancient history.

An unexpected bonus was that after putting some mufflers under the car, I could suddenly hear the heavy pinging under load that was previously impossible to hear and had thus gone unresolved. Fixed now.
 
Last edited:

mrb1

Well-known member
Joined
Aug 20, 2021
Messages
5,552
Location
Miami County, Ohio
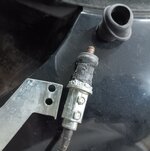
Getting the winter time daily driver ready. Noticed this summer that both the AM/FM reception went to hell. Found the mast had broken free of the mount. Quite the struggle getting the old one removed without breaking anything. Soaked overnight in PB. Wrapped it in some bare CCA speaker wire and taped her up. Better than factory :LOL:

ca.jpg

ca2.jpg
 

M.Brane

ALLIANCE MEMBER
Joined
Feb 11, 2024
Messages
1,783
Location
1 hr N/W of LA LA Land
Yeah. Cheaper and easier. Perfect.

Except for the fact that they didn't solve my problem (hyperacusis).

Neither did the expen$ive ones I bought that have active noise cancelling.

When I was a young buck, there was no such thing as a vehicle that was too loud for me. That's now ancient history.

An unexpected bonus was that after putting some mufflers under the car, I could suddenly near the heavy pinging under load that was previously impossible to hear and had thus gone unresolved. Fixed now.
Interesting. Thanks for the education.

After many years of exposure to high SPLs I have a surprisingly mild case of Tinnitus. I wear my plugs religiously now, and they work for me. By attenuating certain frequencies they also reveal things you wouldn't hear without them.
 

Skyman

Well-known member
Joined
Nov 9, 2021
Messages
1,222
Location
Central Maryland
Interesting. Thanks for the education.

After many years of exposure to high SPLs I have a surprisingly mild case of Tinnitus. I wear my plugs religiously now, and they work for me. By attenuating certain frequencies they also reveal things you wouldn't hear without them.

Yeah, I have that condition as well. I have become zealously cautious with hearing protection in recent years, in the hope of preserving what hearing I have remaining, for as long as possible. We don't miss it until it's gone. And I miss it now. I'm gonna miss it even more when more of it has taken its leave.
 

niget2002

Well-known member
Joined
Oct 2, 2012
Messages
11,225
Location
Josephine, TX
Small progress on converting the govee spotlight's to WLED. The new WLED controllers and waterproof connectors came in, so I cut one of the spotlight strips in half and wired 2 of the spotlights to one controller. These two will go on the left side of the house. The other 2 spotlights will be modified for lighting up decorations in the yard. Then the second 4-light spotlight will be used to light up the right side of the house.

At some point I need to mount the WLED controllers to the house and run the wires to get to the lights.
 
To avoid these ads, REGISTER NOW!
Top Bottom