

You are using an out of date browser. It may not display this or other websites correctly.
You should upgrade or use an alternative browser.
You should upgrade or use an alternative browser.
What did you do "IN" your garage today?
- Thread starter mayhemman
- Start date
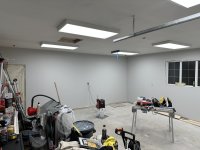
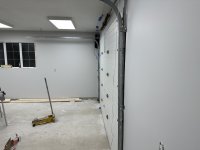
SRU1436
ALLIANCE MEMBER
Thanks. I plan on doing a meticulous rebuild. I bought a book, a master rebuild kit, and additional components to replace. Honestly, I’m looking forward to it.They're easy, only like a bajillion parts. Didn't forget to snap or draw pictures of where the little balls go in the valve body. And don't forget to get the 'lacquer' off that has built up on the valve spools. If you're thinking of cleaning the current converter, forget it. You'll fill the transmission with particles. Buy a reman or new unit. And make sure you clean the governor fastidiously. Actually make sure you clean the whole damned thing fastidiously, including the outside.
niget2002
Well-known member
We bought my daughter a new toilet seat.
I was working on other stuff so she (15yo) decided to do it herself.
I came in to the house to this conversation:
Daughter : this bolt isn't coming out
Wife : the bolt is really long, just keep turning it
Me: what are you holding the nut on the bottom with?
Wife and daughter in unison: what nut?
I went out to the shop and grabbed a few extra tools and lended the daughter a small hand. The nuts were on there pretty good, so I used the electric driver to pulse it off.
I was working on other stuff so she (15yo) decided to do it herself.
I came in to the house to this conversation:
Daughter : this bolt isn't coming out
Wife : the bolt is really long, just keep turning it
Me: what are you holding the nut on the bottom with?
Wife and daughter in unison: what nut?
I went out to the shop and grabbed a few extra tools and lended the daughter a small hand. The nuts were on there pretty good, so I used the electric driver to pulse it off.
Swanny1953
ALLIANCE MEMBER
Not garage, but lake house. Google decided, in their infinite wisdom, to discontinue support for their early version Nest thermostats, which means the app will no longer control them. They did offer a 40% (I think) discount on 2 replacement units. I have 4 units at the lake house, only 2 of which are no longer supported. So, replaced one of them before heading out to lunch yesterday. Yipee!! Now I get to use 2 apps to control my remote thermostats!!!
My "media center" at the lake is a rats nest of wires, with only minimal surge protection. I bought a pretty stout surge protector with 15 outlets (ended up being just enough). I traced all the power wires and labeled them all, the plugged them into the new surge protector and got some semblance of order restored in the "media center".
The R&R of the second Nest thermostat will have to wait until the next trip as we had to return to town early this morning.
My "media center" at the lake is a rats nest of wires, with only minimal surge protection. I bought a pretty stout surge protector with 15 outlets (ended up being just enough). I traced all the power wires and labeled them all, the plugged them into the new surge protector and got some semblance of order restored in the "media center".
The R&R of the second Nest thermostat will have to wait until the next trip as we had to return to town early this morning.
GrayFlattop
Well-known member
Yeah, I went out at 3:30 to make a pass before dark. We had just shy of 7”, but it was a wet, heavy base. Still coming down when I put the toro away - the rest can wait until tomorrow morning. The prognosticators feel there is another 4-5 inches coming, so that becomes tomorrow’s project after breakfast. At least tomorrow’s temps will be tolerable - much improved over the single digits they were threatening a few days ago.Took the snowblower out.
Put the snowblower away.

Earlier in the day I spent a few hours in the woodshop cleaning, organizing, plotting and scheming. I also discovered that I had the exact drawer slides on hand for the next project I’ll be making.
spsullivan82
Member
- Joined
- Nov 12, 2025
- Messages
- 20
Outlawmws
Well-known member
As I get older, and my bad leg gets worse, I don't do much up on ladders anymore, so we are just doing the porch surround.
BMW, My lights are all remounted to false "fascia boards", (long 1X4's) I painted the same as the trim, and those have ordinary cup hooks, (2) and hang on long deck screws into the back of the real fascia boards. So with 5 of these hung and plugged in, we are done except for the blow up snowman. Takes about an hour each way.
Best of all I can put most of these up with minimal ladder work, even the garage peak is from the ground (two people and don't unplug the two boards!) then we swing the low end up and a short very stable painting ladder is used.
To store, these hang in the garage rafters, from other cup hooks, and take maybe a foot of space. the rafter spacing decided the spacing on the light boards. These boards have had 3-4 sets of different lights over the nearly 40 years we have been here as the lights wore out. (LED don't last in weather) we are back to the "old school" C9 big lights in LED. I hated the "icicle" lights... (tangles)
Work smarter not harder!
some pics for reference:

Stored - these were spaced for icicle lights as they tangle to each other so easily...:

rd65
Well-known member
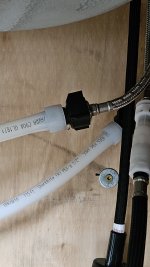
Thursday - turned on the sink water, hot water line had a drip. Cut off the fitting, replaced with same, still has a drip. Maybe bad pex?? I will replace the line.
Today - Looked at the huge mess I need to get cleaned up. Didnt happen today, most likely wont happen tomorrow, need to finish leaves and need to get the water line figured out so I can leave the water turned on and the water heater plugged in. I need the residual heat under that cabinet. I hear winter is coming.
Today - Looked at the huge mess I need to get cleaned up. Didnt happen today, most likely wont happen tomorrow, need to finish leaves and need to get the water line figured out so I can leave the water turned on and the water heater plugged in. I need the residual heat under that cabinet. I hear winter is coming.
Attachments


bmwrd0
Well-known member
@Outlawmws It only takes me an hour or so, and half of that is untangling the lights. I have he hooks up, although you can see were I still need to replace a couple, as my wife hangs little bells from them the rest of the year. The hooks have been there for who knows how long, at least a few paint jobs back, as they have more paint than space in them now. I just replace them as I see them, and move on.
JSGAuto
Well-known member
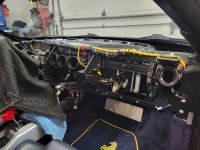
Pulled the dash to replace broken vents, and have soft touch parts recoated.
2001ZR2
Well-known member
I am behind on my reading of this post because I've been working in the garage.
A weekend or two ago I changed the oil and topped off all the fluids in my wife's truck. Her Mom is 3 hours away and not doing well. So I told her that we will have her truck ready to go as much as possible. Also replaced the intermittently failing low beam bulbs.
Now for the cluster XXXX I've been working on. Have a 2001 Blazer with a 5 speed in it. Since I purchased it it's needed upper control arm bushings. Ordered parts from Rock Auto months ago and needed to order the balance of the parts...any guesses what I forgot to do.
Dropped an order with the jungle website and should have had it all on Friday. Got the outer tie rod ends and the pitman arm but the idler arm was supposed to arrive yesterday. It was out for delivery in the town and post office that I live in...today it's 30 or so miles away and in another state. New delivery Thursday.
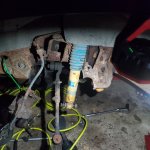
The parts being rerouted is annoying but the scope creep starts with a CV axle shaft falling on the ground. The inner boot only has one clamp...odd but the outer boot is bad so I was replacing it anyway. Them the one of the upper control arm bolts broke and it's also the alignment adjustment bolts. New ones inbound for Thursday. Driver side CV had the same boot system w/o clamp on the inner boot. Replace one...scope creep.
The bushings are out of the lower control arms and I found it's easy with a ball joint press coupled with an air hammer. Using the air hammer to crush the shell and once the bushing moves it knocks out the bushing quickly. First time I ever did this it was two days of learning what didn't work.
Now warming up as the weather broke and it's about 20 degrees outside and my garage is not heated.
One thing my ongoing clean up has helped with is I can work on my work bench instead of the garage floor like we used to do in high school and beyond.
Normally I catch up reading on the thread before posting.
A weekend or two ago I changed the oil and topped off all the fluids in my wife's truck. Her Mom is 3 hours away and not doing well. So I told her that we will have her truck ready to go as much as possible. Also replaced the intermittently failing low beam bulbs.
Now for the cluster XXXX I've been working on. Have a 2001 Blazer with a 5 speed in it. Since I purchased it it's needed upper control arm bushings. Ordered parts from Rock Auto months ago and needed to order the balance of the parts...any guesses what I forgot to do.
Dropped an order with the jungle website and should have had it all on Friday. Got the outer tie rod ends and the pitman arm but the idler arm was supposed to arrive yesterday. It was out for delivery in the town and post office that I live in...today it's 30 or so miles away and in another state. New delivery Thursday.
The parts being rerouted is annoying but the scope creep starts with a CV axle shaft falling on the ground. The inner boot only has one clamp...odd but the outer boot is bad so I was replacing it anyway. Them the one of the upper control arm bolts broke and it's also the alignment adjustment bolts. New ones inbound for Thursday. Driver side CV had the same boot system w/o clamp on the inner boot. Replace one...scope creep.
The bushings are out of the lower control arms and I found it's easy with a ball joint press coupled with an air hammer. Using the air hammer to crush the shell and once the bushing moves it knocks out the bushing quickly. First time I ever did this it was two days of learning what didn't work.
Now warming up as the weather broke and it's about 20 degrees outside and my garage is not heated.
One thing my ongoing clean up has helped with is I can work on my work bench instead of the garage floor like we used to do in high school and beyond.
Normally I catch up reading on the thread before posting.
LeonardY
Well-known member
Hit the print button on the resin printer. It really did all the work.

PhantomEB
Well-known member
After a run around for a camper that fell thru, on my accord.
back on dialing in the truck for road trips.
gonna be on extending and putting ends on each single ground coming up from my brake lights to hopefully get that all fixed.
then putting 110v NOCO outlets on both sides of the topper.
Then it will be start looking at stereo decks so we get SOME tunes for our Christmas drive back over the pass to the Inlaws.
Also looking at Auxbeam lights to run in the wheelwells for when I am out on the highway after dark.
back on dialing in the truck for road trips.
gonna be on extending and putting ends on each single ground coming up from my brake lights to hopefully get that all fixed.
then putting 110v NOCO outlets on both sides of the topper.
Then it will be start looking at stereo decks so we get SOME tunes for our Christmas drive back over the pass to the Inlaws.
Also looking at Auxbeam lights to run in the wheelwells for when I am out on the highway after dark.
2001ZR2
Well-known member
Here a couple pics of work in progress...I am behind on my reading of this post because I've been working in the garage.
A weekend or two ago I changed the oil and topped off all the fluids in my wife's truck. Her Mom is 3 hours away and not doing well. So I told her that we will have her truck ready to go as much as possible. Also replaced the intermittently failing low beam bulbs.
Now for the cluster XXXX I've been working on. Have a 2001 Blazer with a 5 speed in it. Since I purchased it it's needed upper control arm bushings. Ordered parts from Rock Auto months ago and needed to order the balance of the parts...any guesses what I forgot to do.
Dropped an order with the jungle website and should have had it all on Friday. Got the outer tie rod ends and the pitman arm but the idler arm was supposed to arrive yesterday. It was out for delivery in the town and post office that I live in...today it's 30 or so miles away and in another state. New delivery Thursday.
The parts being rerouted is annoying but the scope creep starts with a CV axle shaft falling on the ground. The inner boot only has one clamp...odd but the outer boot is bad so I was replacing it anyway. Them the one of the upper control arm bolts broke and it's also the alignment adjustment bolts. New ones inbound for Thursday. Driver side CV had the same boot system w/o clamp on the inner boot. Replace one...scope creep.
The bushings are out of the lower control arms and I found it's easy with a ball joint press coupled with an air hammer. Using the air hammer to crush the shell and once the bushing moves it knocks out the bushing quickly. First time I ever did this it was two days of learning what didn't work.
Now warming up as the weather broke and it's about 20 degrees outside and my garage is not heated.
One thing my ongoing clean up has helped with is I can work on my work bench instead of the garage floor like we used to do in high school and beyond.
Normally I catch up reading on the thread before posting.


nadogail
Well-known member
Using two Air Compressor accessory kits from Harbor Freight , some stuff from my “Shop Stock” and a few pipe fittings I added two drops from my compressor at assembly tables. The tables are where the Raised Bed Planting boxes are assembled.
My newest helper did not show up to work, he failed to make a call. This is the second time; We will be having a serious conversation about his future employment.
My newest helper did not show up to work, he failed to make a call. This is the second time; We will be having a serious conversation about his future employment.
Skyman
Well-known member
Installed the light that came with the new Liftmaster opener back in July (yeah, took a while to get around to it), and paired it with the controller. Decided it was too bright/harsh/glaring, even in my peripheral vision. Taped a sheet of white printer paper over it to introduce some illumination attenuation. Might add layer(s) in the days to come, if it still annoys me.
No call, no show, no job.Using two Air Compressor accessory kits from Harbor Freight , some stuff from my “Shop Stock” and a few pipe fittings I added two drops from my compressor at assembly tables. The tables are where the Raised Bed Planting boxes are assembled.
My newest helper did not show up to work, he failed to make a call. This is the second time; We will be having a serious conversation about his future employment.
niget2002
Well-known member
Still working on the small stand.
Re-epoxied a part of the phone holder from my truck.
Rewired a new inflatable pink flamingo for the front yard.
Re-epoxied a part of the phone holder from my truck.
Rewired a new inflatable pink flamingo for the front yard.
GreenIron
Well-known member
Hey, man! That looks great.Stole the Christmas tree idea from @GreenIron . I made 3 and put our little snowman family in front of them.
I built another 5' tree this afternoon for our DIL.

I'll leave the decorating to her.
kaymccampbell
Well-known member
Cleaned, flung, put away. Tanked up spray bottles. Made a bucket of soapy water. Headed out to the greenhouse. Back inside. Cleaned up and put things away. Boxed up the turkey blow-up. Fixed a broken nail.
spsullivan82
Member
- Joined
- Nov 12, 2025
- Messages
- 20

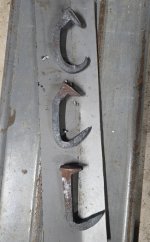
Last night on the left, tonight on the right. I still need to cut my welded handle off, but I'm not sure that it's done. I tried to mimic the best of last night, but I wanted to stretch it out and clean up the square of the spike first. I also wanted a more pronounced top section without adding too much angle. I think maybe just a little more curve on the bottom a just barely a little more angle on the top.
I could smash this thing into shape and call it a day, but i really want to keep the railroad spike DNA. I also don't want out just look like a bent nail. Trying to balance too much vs not enough.
rktinc
Well-known member
A long and brutal holiday work resulted in finishing 90% of my floor patch experiment. It's working out very well. It is a very labor intensive process. I mixed the polyurethane rock glue a gallon at a time, but that seems to be the best method. It sets up very hard in 24 hours. I moved my vette up to work on the floor this morning and got reminded that some photos just take themsevles Had to post it.
Ran out of rock, so off to grab a bit more this week, wash it, dry it, then get back to work finishing this back-breaking repair project for good.
RKTINC


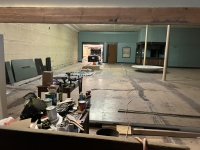
Had to post it. Ran out of rock, so off to grab a bit more this week, wash it, dry it, then get back to work finishing this back-breaking repair project for good.
RKTINC
Last edited:
SMOKEYBEAR
Well-known member
- Joined
- Jan 3, 2016
- Messages
- 502
Messed with this and that..
Wrapped up some cutting boards/ family gifts, used my heat gun to measure the heat on my new brand trying to find some consistency. I was burning some scraps in the fire pit, tried it to heat the brand..fail, not hot enough, back to the torch. I brand my stuff bottom right corner, my mom is left handed, so all the stuff I make her gets it upper left corner.
Starbond without the accelerator takes way to long to cure..
When I sent the W ones through the planer, I just looked away. Previous attempts broke the glue joint. They are captured better with the two additional rows added.
Pics, no order
Wrapped up some cutting boards/ family gifts, used my heat gun to measure the heat on my new brand trying to find some consistency. I was burning some scraps in the fire pit, tried it to heat the brand..fail, not hot enough, back to the torch. I brand my stuff bottom right corner, my mom is left handed, so all the stuff I make her gets it upper left corner.
Starbond without the accelerator takes way to long to cure..
When I sent the W ones through the planer, I just looked away. Previous attempts broke the glue joint. They are captured better with the two additional rows added.
Pics, no order
Attachments


Rearranged an old fridge and new fridge, which created more work.
Outlawmws
Well-known member
I could smash this thing into shape and call it a day, but i really want to keep the railroad spike DNA. I also don't want out just look like a bent nail
What are we making here?
Outlawmws
Well-known member
I mixed the polyurethane rock glue a gallon at a time, but that seems to be the best method. It sets up very hard in 24 hours
That looks good!
jblnut
ALLIANCE MEMBER
Little man and I got started on consolidating all the bolts and bolt stuffs from the 7 places they’ve been living for the last decade.
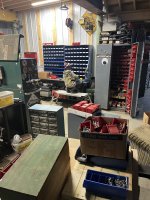
Mostly done. WTF do I have 7/16” hardware? I don’t think I’ve ever needed anything with a 7/16” shank before lol. Just got to go through the blue bin that seems to be fill of the most random stuff I’ve ever seen.

A drive in one of my backup boxes backup box died and warranted a replacement. To be fair it’s been yelling at me for a few weeks so I can’t even be mad or surprised. These two Synology boxes have been chugging along happily for quite a few years now. Just might be time to get some new backup boxes. I dropped some coin on drives in the main TrueNAS box a few months ago and frankly am sort of done mentally with this **** for a little while. Between this setup, the setup in the shop and the offsite backup setup at my parents place I’m maintaining 72 drives, two TrueNAS boxes, four Synology NAS units and two ancient Windows Home Server boxes. Plus a host of USB single drives. Every time I think I’m consolidating and simplifying things I seem to create another layer of complexity.

Mostly done. WTF do I have 7/16” hardware? I don’t think I’ve ever needed anything with a 7/16” shank before lol. Just got to go through the blue bin that seems to be fill of the most random stuff I’ve ever seen.
A drive in one of my backup boxes backup box died and warranted a replacement. To be fair it’s been yelling at me for a few weeks so I can’t even be mad or surprised. These two Synology boxes have been chugging along happily for quite a few years now. Just might be time to get some new backup boxes. I dropped some coin on drives in the main TrueNAS box a few months ago and frankly am sort of done mentally with this **** for a little while. Between this setup, the setup in the shop and the offsite backup setup at my parents place I’m maintaining 72 drives, two TrueNAS boxes, four Synology NAS units and two ancient Windows Home Server boxes. Plus a host of USB single drives. Every time I think I’m consolidating and simplifying things I seem to create another layer of complexity.
jblnut
ALLIANCE MEMBER
Looks like something I’d use to pull up my socks. Or a back scratcher. Or a hell of a flyswatter.What are we making here?
niget2002
Well-known member
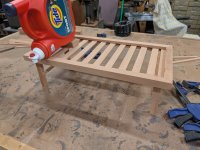
Worked on leveling the feet on the stand I'm working on.
jimkinney
Well-known member
Drug Christmas stuff out of closets for the wife. Hung some lights.
Chucked some PVC fittings in the lathe to make adapters for the HF cyclone dust separator. Has nonstandard fitting diameters, what a surprise.
Chucked some PVC fittings in the lathe to make adapters for the HF cyclone dust separator. Has nonstandard fitting diameters, what a surprise.
nadogail
Well-known member
Not a thing, just slept late and then watched pointless YouTube videos.
It was my first truly Lazy Day in recent memory.
It was my first truly Lazy Day in recent memory.
Skyman
Well-known member
A long and brutal holiday work resulted in finishing 90% of my floor patch experiment. It's working out very well. It is a very labor intensive process. I mixed the polyurethane rock glue a gallon at a time, but that seems to be the best method. It sets up very hard in 24 hours. I moved my vette up to work on the floor this morning and got reminded that some photos just take themsevles
Ran out of rock, so off to grab a bit more this week, wash it, dry it, then get back to work finishing this back-breaking repair project for good.
RKTINC
Looks like a nice C4. Got more pix of it?
LeonardY
Well-known member
Pushed the go button on the printers.

The Saturn finished first and then I found I didn't tighten the build plate knob. Quick cleanup and I pressed the go button again.
Cleaned the excess resin and post process the prints.
For some reason a few neighbors are wary of me.

I have no idea why...
Fixed a bunch of LED light strings.

The Lady of the Garden is happy because we can decorate another tree.
Cleaned everything up.
The Saturn finished first and then I found I didn't tighten the build plate knob. Quick cleanup and I pressed the go button again.
Cleaned the excess resin and post process the prints.
For some reason a few neighbors are wary of me.
I have no idea why...
Fixed a bunch of LED light strings.
The Lady of the Garden is happy because we can decorate another tree.
Cleaned everything up.
Beerhippie
Well-known member
After yesterday's celebration of the traditional Thanksgiving weekend shooting spree, I have some stuff to fix.
As we were shooting some WWII arms, I wanted to use my LED-converted rechargeable WWII USN Battle Lantern to illuminate the targets on a short winter afternoon. Murphy had other ideas.
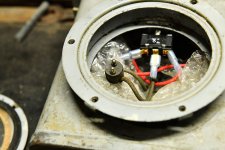
That black thing with the pins is supposed to be part of the socket. While trying to make a field-expedient repair (hammer it back in place), the tube of the socket shot out the back of the reflector. Fortunately, some 21rst Century LED headlamps allowed us to find the errant part:

How is it that a small part like that, dropped on my clean, well-lit, tidy(ish) shop floor will vanish, never to be seen again, while it took minutes to locate it in the dark on the forest floor?
Now that I have it in the shop with good lighting and tools, it should be a fifteen-minute job to get it back together.
Several hours later:
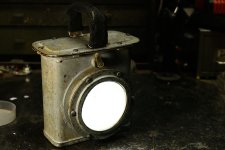
Done.
Now to figure out why one of my heavily-modified Ruger 10/22s decided not to run worth ****. FTFs due to light or no strikes, FTEs, etc. The gun was left clean, but hasn't seen use in a couple of years. Probably just needs another good cleaning and some light lube.
But we had a literal blast. High points were the M1 carbine (also needed some field-expedient repair (some oil got it running fine)) and the German MP40.
As we were shooting some WWII arms, I wanted to use my LED-converted rechargeable WWII USN Battle Lantern to illuminate the targets on a short winter afternoon. Murphy had other ideas.
That black thing with the pins is supposed to be part of the socket. While trying to make a field-expedient repair (hammer it back in place), the tube of the socket shot out the back of the reflector. Fortunately, some 21rst Century LED headlamps allowed us to find the errant part:
How is it that a small part like that, dropped on my clean, well-lit, tidy(ish) shop floor will vanish, never to be seen again, while it took minutes to locate it in the dark on the forest floor?
Now that I have it in the shop with good lighting and tools, it should be a fifteen-minute job to get it back together.
Several hours later:
Done.
Now to figure out why one of my heavily-modified Ruger 10/22s decided not to run worth ****. FTFs due to light or no strikes, FTEs, etc. The gun was left clean, but hasn't seen use in a couple of years. Probably just needs another good cleaning and some light lube.
But we had a literal blast. High points were the M1 carbine (also needed some field-expedient repair (some oil got it running fine)) and the German MP40.
Last edited:
spsullivan82
Member
- Joined
- Nov 12, 2025
- Messages
- 20
Coat hook of sorts to hold ppe in my metal working section of my shop. I want the bottom hook for jacket/ apron, and the top for welding mask/ face shield. Really any of these I've done would work, but i never expected to enjoy anvil work so much. Now I'm making excuses to smash on glowing metal. Lol. Not really kidding about that now that I think of it. I could have had a double cost hook out of anything with numerous other methods. Instead I'm fixated on forging them from some of railroad spikes I have. Learning a new craft while trying to solve issues in the shop is never a bad thing.What are we making here?
spsullivan82
Member
- Joined
- Nov 12, 2025
- Messages
- 20
Am I the only one that didn't see the leg on right and was wondering how this was possible?Worked on leveling the feet on the stand I'm working on.
Jay__Dub
Well-known member
Pulled the wheel off my Wife's car. Verified the caliper is bad.
rd65
Well-known member
Woke to 27 degrees this morning, was concerned about the new water heater under the shop sink. It was full of water and not plugged in as the pex line had a leak. Was warmer in the shop than it was outdoors, good thing. Removed the pex line, made up a new one and installed it. It leaked at the heater, not at the faucet hook up like the last one. Thought that maybe I didnt wait long enough to turn on the water. I am using Pex A lines and I saw on YT that they can take a bit to shrink back down in cool temps. I let it set while I started on some yard work. Turned the water on about an hour later and it was holding fine. Placed some paper towels down in a couple areas under the sink and went back to the yard, checking on it every now and then. After the yard work, all was still dry so I plugged in the heater and did a little shop clean up while having a beer. Washed up with warm water and called it a day. Nice to finally have that project mostly done. Need to cut down an old upper cabinet from Mom's kitchen, install a light over the sink, and a towel rack and it will be complete.
The same guy you had such high hopes for? That would be a shame....Using two Air Compressor accessory kits from Harbor Freight , some stuff from my “Shop Stock” and a few pipe fittings I added two drops from my compressor at assembly tables. The tables are where the Raised Bed Planting boxes are assembled.
My newest helper did not show up to work, he failed to make a call. This is the second time; We will be having a serious conversation about his future employment.
kaymccampbell
Well-known member
When doing PEX A in inclement weather, I've got a little butane torch to speed the collars up. Some folks use a heat gun.Woke to 27 degrees this morning, was concerned about the new water heater under the shop sink. It was full of water and not plugged in as the pex line had a leak. Was warmer in the shop than it was outdoors, good thing. Removed the pex line, made up a new one and installed it. It leaked at the heater, not at the faucet hook up like the last one. Thought that maybe I didnt wait long enough to turn on the water. I am using Pex A lines and I saw on YT that they can take a bit to shrink back down in cool temps. I let it set while I started on some yard work. Turned the water on about an hour later and it was holding fine. Placed some paper towels down in a couple areas under the sink and went back to the yard, checking on it every now and then. After the yard work, all was still dry so I plugged in the heater and did a little shop clean up while having a beer. Washed up with warm water and called it a day. Nice to finally have that project mostly done. Need to cut down an old upper cabinet from Mom's kitchen, install a light over the sink, and a towel rack and it will be complete.