To avoid these ads, REGISTER NOW!

ZMotorsports Shop Projects 2.0

gamescastspencer

Well-known member
Joined
Apr 4, 2016
Messages
165
Location
Saint Peters, MO
Long time listener, first time caller on your thread here Mike.

Have you looked into running snowblower tires up front if snow removal is going to be the main use of the Wheel Horse?

A friend of mine did that on the front of his Gilson that is used solely for plow duty about five years ago and it made a huge improvement handling in the snow. Img_2025_12_17_07_11_46.jpeg
I have never used it to plow with, but I put a set on my Cub Cadet when I put new tires on it a few years ago.
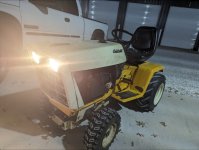
Img_2025_12_17_07_12_49.jpeg

On the subject of the harbor freight multicolored zip ties, I inherited the remains of a set of them from my grandfather, and was gifted a fresh set a couple years ago. I too use them for ID purposes and for temporary purposes, the bright colors are a nice reminder it needs to be snipped off before the job is complete.
 
To avoid these ads, REGISTER NOW!

Xti04

Well-known member
Joined
Nov 11, 2016
Messages
2,364
@Mr.zippy


Now you have no excuse!

In all seriousness though, I bought a big zip tie assortment like 15 years ago from Advance that had some small multi colored ties in it and I am still using them to this day. I tag wire harness repairs with a yellow tie as we used yellow electrical tape in my Audi dealer days to notate a harness repair. Not many people will recognize it under the hood, but it goves me a visual in case I forgot I had done wire repair.
 

fouckhest

Well-known member
Joined
Jul 24, 2013
Messages
1,871
Location
Greer, SC
@Mr.zippy


Now you have no excuse!

In all seriousness though, I bought a big zip tie assortment like 15 years ago from Advance that had some small multi colored ties in it and I am still using them to this day. I tag wire harness repairs with a yellow tie as we used yellow electrical tape in my Audi dealer days to notate a harness repair. Not many people will recognize it under the hood, but it goves me a visual in case I forgot I had done wire repair.

Thanks for that link, just picked up an assortment, these will come in handy for harness work that I know I need to tackle at some point and pushed the delivery out and get a $2 digital reward for a future movie purchase, $7 for 1200pc zip ties, win/win! :cool:
 
OP
Z

zmotorsports

ALLIANCE MEMBER
Joined
Oct 20, 2009
Messages
21,477
Location
Northern Utah
Long time listener, first time caller on your thread here Mike.

Have you looked into running snowblower tires up front if snow removal is going to be the main use of the Wheel Horse?

A friend of mine did that on the front of his Gilson that is used solely for plow duty about five years ago and it made a huge improvement handling in the snow. Img_2025_12_17_07_11_46.jpeg
I have never used it to plow with, but I put a set on my Cub Cadet when I put new tires on it a few years ago.
Img_2025_12_17_07_12_49.jpeg

On the subject of the harbor freight multicolored zip ties, I inherited the remains of a set of them from my grandfather, and was gifted a fresh set a couple years ago. I too use them for ID purposes and for temporary purposes, the bright colors are a nice reminder it needs to be snipped off before the job is complete.

Thank you very much for participating in the discussion and thank you for following along. I had not given any thought to snowblower tires in fact. I had remembered what my dad told me many, many years ago on the farm and when I researched on the Wheel Horse forums the 3-rib were the most favored for steer tires on a tractor being used for snow plowing, followed quite closely by the V61 or 5-rib tire. I may have to consider those in the future if I am not pleased with the 5-rib tires I currently have ready to be installed.

Thank you.
 
OP
Z

zmotorsports

ALLIANCE MEMBER
Joined
Oct 20, 2009
Messages
21,477
Location
Northern Utah
WOW! I had no idea colored zip-ties would be such a popular conversation piece. You guys continue to amaze me at what you pick up in the background of photos. Things I never would have imagined get brought into question and to the surface that are not even on my radar of things to discuss. I love this forum and how observant and inquisitive the members are.

That being said, I had posted about a year ago pertaining to zip-ties after I had performed some impromptu testing of a couple different brands of zip-ties and then purchased bulk so I should be set for a few years, maybe.

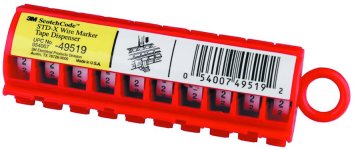
I never thought to include the POS HF colored zip-ties just because I don't think they hold well and solely use them for identification purposes, nothing more. They seem to stay put quite well until the task or job is completed and then I simply cut them off and no one's the wiser. In the past I used one of these 3M wire marking dispensers and although they work well on nice clean and fairly new wiring looms, any grease or residue on the wire or loom and they don't stick for ****, resulting in labels falling off and then wondering which wire went where. I would take note of the # and write it down to know where various wires or connections went, but now for the past several years I have been doing the same thing with the colored zip-ties, just writing down on a scratchpad or job notes which color and which size. The HF bag of colored zip-ties was like $9.99 and lasts a long time, whereas the last time I ordered one of these 3M dispensers they were over $50. I will usually write something like LO for "Large Orange" or SP for "Small Pink", etc. for the corresponding notes to connection points which keep things short and sweet without writing out long descriptions as there are a large and small of each color zip-tie in the HF package.

Here is the 3M label dispenser that I have used in the past.
4309225.jpg
 

Jgaz

Well-known member
Joined
Dec 16, 2016
Messages
1,713
Location
AZ
They just work well for identification purposes, I don't know that I would trust them for anything more than that.
And up until this multi colored HF ties idea the only thing I trusted HF ties for were Xmas lights on my pergola.
i even store the bag with the lights so they don’t get used by mistake.
Note: I use about two dozen ties hanging the lights and always break a couple trying to tighten them
 

rd65

Well-known member
Joined
Sep 29, 2017
Messages
2,843
Location
Granite Falls, WA
WOW! I had no idea colored zip-ties would be such a popular conversation piece. You guys continue to amaze me at what you pick up in the background of photos. Things I never would have imagined get brought into question and to the surface that are not even on my radar of things to discuss. I love this forum and how observant and inquisitive the members are.

That being said, I had posted about a year ago pertaining to zip-ties after I had performed some impromptu testing of a couple different brands of zip-ties and then purchased bulk so I should be set for a few years, maybe.

I never thought to include the POS HF colored zip-ties just because I don't think they hold well and solely use them for identification purposes, nothing more. They seem to stay put quite well until the task or job is completed and then I simply cut them off and no one's the wiser. In the past I used one of these 3M wire marking dispensers and although they work well on nice clean and fairly new wiring looms, any grease or residue on the wire or loom and they don't stick for ****, resulting in labels falling off and then wondering which wire went where. I would take note of the # and write it down to know where various wires or connections went, but now for the past several years I have been doing the same thing with the colored zip-ties, just writing down on a scratchpad or job notes which color and which size. The HF bag of colored zip-ties was like $9.99 and lasts a long time, whereas the last time I ordered one of these 3M dispensers they were over $50. I will usually write something like LO for "Large Orange" or SP for "Small Pink", etc. for the corresponding notes to connection points which keep things short and sweet without writing out long descriptions as there are a large and small of each color zip-tie in the HF package.

Here is the 3M label dispenser that I have used in the past.
4309225.jpg
Reminds me of an old '68 IH Scout I used to own, the harness was all green wire with painted numbers to identify them. Paint did not hold up well after 20+ years.
 
OP
Z

zmotorsports

ALLIANCE MEMBER
Joined
Oct 20, 2009
Messages
21,477
Location
Northern Utah
I have one of these I got from a previous job:
1765987474222.png
It does not like cheap Zip ties even on the lowest setting. it works great for control panel work.

Jason

I have a very similar one made by Thomas & Betts. Works great and the tension can be dialed in specifically for the task at hand. I especially like it when putting a loom together because I can set the tension and go from zip-tie to zip-tie and not have to worry about different tensions being applied and creating bulges or irregularities in the bundle of wire.


Reminds me of an old '68 IH Scout I used to own, the harness was all green wire with painted numbers to identify them. Paint did not hold up well after 20+ years.

In the past I have used Ron Francis as well as Painless Wiring kits and one from American Autowire and they will do a great job of labeling the wires directly on the insulation every few inches. Works great for troubleshooting and tracing wires.

Monaco coach uses a numbering system and then the numbers correspond to their wiring schematics, however most people don't buy the schematics for their specific coach so they don't know what the numbers relate to and the original Monaco Coach is no longer in business so that ship has sailed. Prevost and Newell both do and excellent job of labeling wires, but they are not the norm as far as RV's go.
 

Jgaz

Well-known member
Joined
Dec 16, 2016
Messages
1,713
Location
AZ
Reminds me of an old '68 IH Scout I used to own, the harness was all green wire with painted numbers to identify them. Paint did not hold up well after 20+ years.
The medium duty IH. bread trucks I used to work on in the 70’s were that same light green wires with some gray wires thrown in. Royal PITA!
 
OP
Z

zmotorsports

ALLIANCE MEMBER
Joined
Oct 20, 2009
Messages
21,477
Location
Northern Utah
The medium duty IH. bread trucks I used to work on in the 70’s were that same light green wires with some gray wires thrown in. Royal PITA!

Personally, Hyster forklifts have been my least favorite to troubleshoot wiring issues, they're all black, every single wire... 🙄 Crown Lift Trucks at least used colored wires and they had a couple of common traits, any white was a ground and a white w/green trace were switched ground. Same with battery positives which were red and a red w/white trace was a switched positive. Those few commonalities made first glances quite easy to know what should be happening at various components.
RV's in my experience have been all over the place, from common-colored wires to multi-colored with "some" commonalities to multi-colored with zero commonalities. There really have been no common wiring codes amongst RV manufacturers so a wiring schematic is paramount when troubleshooting and they are hard as hell to get one's hands on.
 

BigMike782

Well-known member
Joined
Dec 19, 2008
Messages
1,885
Location
49120
@zmotorsports I've been following along the thread about clients and finances for awhile and agree on 99% of the sentiment. Our problem, that many folks don't consider until it hits them in the face, is once you reach retirement, how do you create that income stream from the wealth you have created, for your retirement. There are many things to navigate through such as taxes, healthcare, budgeting for hobbies, and/or travel to name just a few. My college degree was in Finance (although never worked in that field) and knew how to save and invest for retirement. When I approached my retirement date, I was perplexed about how to plan and prepare post career for said income stream and dealing with the tax and healthcare issues among other things. When I was in college (at that time), the courses I took never considered retirement as part of the background needed for my degree. As a result, I had no solid ideas about how to plan for this. My older brother has a financial advisor and I consulted with his advisor to help with this planning. As the wife and I have a very strong background in finance, we had some very pointed questions about how he would plan our future. In our three interviews with the advisor, he never would give us a straight answer. The advisor eventually stated that "we don't seem to be a good match", i.e. he fired us! My conclusion is that we knew too much and weren't about to be a Lemming (as my brother freely admits). The point of my story is, you can never ask too many questions to protect yourself (financially) and secondly, sometimes being fired as the client is for the best (for both parties). More importantly, as you plan for your retirement, make sure you have a Financial Advisor (if you feel you need one) that is willing to answer your questions satisfactorily and be a willing partner to meet your goals. As you well know, he/she works for you, not the other way around. We eventually did find a financial advisor. It does cost us money, but to be honest, I've way ahead of the game than if I tried to do it on my own. Even with the expense of the advisor. He has made a difference in increasing our wealth due to his expertise on getting our investments in the right place for our age and risk aversion. Mike, I'm sure you have given a lot of this consideration, so I might already be singing to the choir. As many others read this thread, I don't think it's a bad idea to voice these thoughts and experiences, for everyone else's benefit. Thanks for letting me use your soapbox....:)
Just catching up on this thread but holy moley this hits home.
I have guidance in place to MAKE money and I'm doing pretty well but being single(significant but doubtful to get married again) and debt free I am really looking forward to finding an advisor to guide me in SPENDING. I have talked to someone and we are planning to meet after the first of the year to start looking things over.
 

CGarage

Well-known member
Joined
Nov 23, 2018
Messages
3,057
Location
United States/Switzerland
Just catching up on this thread but holy moley this hits home.
I have guidance in place to MAKE money and I'm doing pretty well but being single(significant but doubtful to get married again) and debt free I am really looking forward to finding an advisor to guide me in SPENDING. I have talked to someone and we are planning to meet after the first of the year to start looking things over.


In my opinion, my best advice to you is you need to start to learn what things cost, realize that if you are in the U.S. or Europe, it is a free market, and adopt the mindset that you can vote with your dollars and will spend them where you receive the best value in return.

The goal for you should be to develop a substantial enough sum of money (ideally 6 figures) that you can begin to invest and see returns on over a long period of time.

A lot of money is foolishly spent due to convenience in the U.S. I see Americans buying milk and groceries at CVS and Walgreens for 2 to 3 times the cost of Walmart, or Aldi.
And in Europe, refueling just off the main highways / autoroutes can cost 20% more, in some countries. These are two basic examples of financial stupidity.

Over a lifetime, these costs - a result of bad habits - add up to a large sum which could have been earning you income via intelligent investing.
 

bustedcrawler

Well-known member
Joined
Feb 12, 2015
Messages
88
Location
Denver
WOW! I had no idea colored zip-ties would be such a popular conversation piece. You guys continue to amaze me at what you pick up in the background of photos. Things I never would have imagined get brought into question and to the surface that are not even on my radar of things to discuss. I love this forum and how observant and inquisitive the members are.

That being said, I had posted about a year ago pertaining to zip-ties after I had performed some impromptu testing of a couple different brands of zip-ties and then purchased bulk so I should be set for a few years, maybe.

I never thought to include the POS HF colored zip-ties just because I don't think they hold well and solely use them for identification purposes, nothing more. They seem to stay put quite well until the task or job is completed and then I simply cut them off and no one's the wiser. In the past I used one of these 3M wire marking dispensers and although they work well on nice clean and fairly new wiring looms, any grease or residue on the wire or loom and they don't stick for ****, resulting in labels falling off and then wondering which wire went where. I would take note of the # and write it down to know where various wires or connections went, but now for the past several years I have been doing the same thing with the colored zip-ties, just writing down on a scratchpad or job notes which color and which size. The HF bag of colored zip-ties was like $9.99 and lasts a long time, whereas the last time I ordered one of these 3M dispensers they were over $50. I will usually write something like LO for "Large Orange" or SP for "Small Pink", etc. for the corresponding notes to connection points which keep things short and sweet without writing out long descriptions as there are a large and small of each color zip-tie in the HF package.

Here is the 3M label dispenser that I have used in the past.
4309225.jpg

Have you looked into or use any of the heat shrink label makers? I use a Brother label maker and Brother heat shrink tubing that it can print on. Made the last trailer I rewired for a friend much easier to ID down the road. We will see how long those tubes are readable but was fast and easy to print out labels and shrink them on to wires.

Reminds me of an old '68 IH Scout I used to own, the harness was all green wire with painted numbers to identify them. Paint did not hold up well after 20+ years.

I have a very similar one made by Thomas & Betts. Works great and the tension can be dialed in specifically for the task at hand. I especially like it when putting a loom together because I can set the tension and go from zip-tie to zip-tie and not have to worry about different tensions being applied and creating bulges or irregularities in the bundle of wire.


In the past I have used Ron Francis as well as Painless Wiring kits and one from American Autowire and they will do a great job of labeling the wires directly on the insulation every few inches. Works great for troubleshooting and tracing wires.

Monaco coach uses a numbering system and then the numbers correspond to their wiring schematics, however most people don't buy the schematics for their specific coach so they don't know what the numbers relate to and the original Monaco Coach is no longer in business so that ship has sailed. Prevost and Newell both do and excellent job of labeling wires, but they are not the norm as far as RV's go.


IH did the same thing as Monaco, the wire numbers correlate back to the circuit number on the schematic. Schematic shows circuit number - wire gauge which is nice. Too bad they didn't put nearly enough numbers on the wires and rarely do any of the numbers hold up over time. My current '66 800 has some of the numbers up by switches and bulkhead connectors but that's it. Not many people understand that, even though it's right there in the FSM. Knowing what gauge to use has made some of the temporary wiring I have needed to do for the inspection coming up super easy.


I like the American Autowire harnesses I have used in the past.
 
OP
Z

zmotorsports

ALLIANCE MEMBER
Joined
Oct 20, 2009
Messages
21,477
Location
Northern Utah
Have you looked into or use any of the heat shrink label makers? I use a Brother label maker and Brother heat shrink tubing that it can print on. Made the last trailer I rewired for a friend much easier to ID down the road. We will see how long those tubes are readable but was fast and easy to print out labels and shrink them on to wires.


IH did the same thing as Monaco, the wire numbers correlate back to the circuit number on the schematic. Schematic shows circuit number - wire gauge which is nice. Too bad they didn't put nearly enough numbers on the wires and rarely do any of the numbers hold up over time. My current '66 800 has some of the numbers up by switches and bulkhead connectors but that's it. Not many people understand that, even though it's right there in the FSM. Knowing what gauge to use has made some of the temporary wiring I have needed to do for the inspection coming up super easy.


I like the American Autowire harnesses I have used in the past.

I have looked at the heat shrink label makers, but only for a full build, not really a consideration for normal service work where I'm just trying to mark something temporarily and then want it removed and back to OEM appearance once the repair is complete.

I liked the American Autowire as well, but have much more experience with Ron Francis and Painless full kits in the street rods and race cars I've built.
 
OP
Z

zmotorsports

ALLIANCE MEMBER
Joined
Oct 20, 2009
Messages
21,477
Location
Northern Utah
I stopped by my local NAPA on the way home yesterday and picked up a few items to get the Wheel Horse running once I get time to get back on it.
wh65.jpg


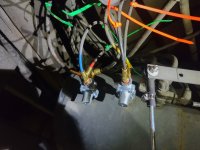
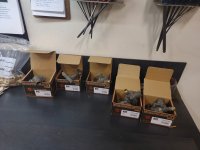
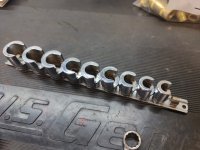
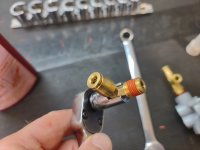
I then suited up to crawl back under the coach and finish up the front PPV valve installations and air line connections. I had a few people inquire about these Weatherhead sockets a while back and in my toolbox tour so I thought I would show them in action.
weatherhead1.jpg


weatherhead2.jpg


weatherhead3.jpg

With the PPV valves assembled on the bench, I crawled underneath and installed them, then reconnected all of the air lines in their respective locations.
ppv10.jpg

Once the air lines were installed, I fired the coach up to build pressure and check for leaks. While the coach was building air pressure I snapped a picture of the components replaced during this phase of preventive maintenance.
ppv11.jpg


Thanks for looking.
 
OP
Z

zmotorsports

ALLIANCE MEMBER
Joined
Oct 20, 2009
Messages
21,477
Location
Northern Utah
Once the coach's purge valve popped and the air governor hit it's limit, I shut it down, watched my gauges and noticed my green arrow on the pressure gauge was dropping a bit but the red one was holding steady. I went to the rear air tank area with soapy water bottle and sprayed the fittings down that I had replaced and not seeing anything, but I could hear a very faint air leak. I hit the main supply line with soapy water and sure enough, bubbles. Hmmmm, that's a line I didn't remove. :headscrat I must have disturbed it just enough while I was cleaning it though as it will be the one I cut into and replace the fitting when I tie in my supplemental braking components. So it's a good thing I bought a fitting in preparation as well as a couple feet of 5/8" DOT air line.

Other than that fitting/air line connection, everything looked good so I grabbed my tape measure and laid under the coach for a few minutes contemplating the location and devising a plan to mount the supplemental braking reservoir as well as the brake relay. I think I found a good location that is out of the way of the floating H-frame suspension in the rear and not in direct line with tires/wheels to avoid direct road spray yet still somewhat easy to access in the scenario I need to. There are structural supports at the rear of the storage bay bulkhead that I can span across and mount the components to a piece of steel plate. I really don't want to weld the plate, so I will bolt the components to a plate and then the plate to the bulkhead which will still clear the H-frame of the suspension by several inches.

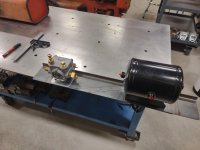
Some scrap steel I had on the shelf and cut to a rough length to begin layout.
supbrake1.jpg

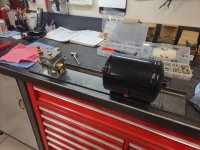
Air reservoir and brake relay laid out to miss the structural components that it will fasten to.
supbrake2.jpg

Pilot holes drilled for mounting to the diagonals and then 3/8" holes drilled to mount the brake relay and air reservoir.
supbrake3.jpg

Components mocked up.
supbrake4.jpg

Bracket clamped in the vise to simulate positioning in the coach. Seems pretty rigid and should hole the components well.
supbrake5.jpg

supbrake6.jpg

Fittings mocked into place to determine best routing for the air lines as there are a couple different options between the reservoir and the brake relay. This configuration will allow nice swooping radii on the air lines without too long of lengths between the components. The air reservoir will get its air from the rear tank (fitting that is leaking) which is only about 4' away and the brake relay will get its signal from the drive axle brake relay about 2' away, so everything is relatively close to avoid excessive air line lengths and then the small 1/4" line will go from the delivery port on the new brake relay back to the hitch area where I will install an air coupler.
supbrake7.jpg


Next order of business will be to remove the components to reduce weight while I hold the mounting bracket in place to mark mounting hole locations. Then drill and install Thread-Serts and lastly, I can sand and paint the new bracket for corrosion protection and then everything can be installed and hoses ran.


Thanks for looking.
 
OP
Z

zmotorsports

ALLIANCE MEMBER
Joined
Oct 20, 2009
Messages
21,477
Location
Northern Utah
One of these days I got to get a set. Whose are those Mike?

This set is made by Snap-on. I've had it for close to 3 decades and I don't think they can be purchased as a set any longer, I think they are sold as individual sockets, but I could be wrong. A coworker was looking at them a while back and I remember him telling me that. I'm sure there are other manufacturers that make them, but I used them a lot in the Industrial Maintenance world so I splurged all those years ago.
 

LXCam

ALLIANCE MEMBER
Joined
Apr 23, 2013
Messages
19,206
Location
AZ
This set is made by Snap-on. I've had it for close to 3 decades and I don't think they can be purchased as a set any longer, I think they are sold as individual sockets, but I could be wrong. A coworker was looking at them a while back and I remember him telling me that. I'm sure there are other manufacturers that make them, but I used them a lot in the Industrial Maintenance world so I splurged all those years ago.
Before I posted I did a real quick search and I saw where Sunex offered singles but no sets popped up. Not that that means much 😉
 
To avoid these ads, REGISTER NOW!
OP
Z

zmotorsports

ALLIANCE MEMBER
Joined
Oct 20, 2009
Messages
21,477
Location
Northern Utah
Before I posted I did a real quick search and I saw where Sunex offered singles but no sets popped up. Not that that means much 😉

I was surprised when my coworker told me that they were no longer available in set form and though he may be mistaken, but I guess maybe he wasn't. :headscrat I can honestly say however, that I have used every socket in the set, but that is over several decades and you probably don't need them all. But if you're like me Cam, you just have to have the size "just in case" you need it.


Those air fitting sockets are great, those would have been super handy years ago when I was doing air ride suspension installs what seemed like monthly.

Mike, in the Industrial Maintenance field, we used the snot out of brass fittings on a wide variety of pneumatic and hydraulic systems so they were used a ton and one of the best tool purchases I made in terms of making the job easier. I can't begin to tell you how many damaged fittings I ran across in my early years as an Industrial Maintenance mechanic when I would go out to do a repair. Funky angles and such trying to use a wrench just tore up fittings left and right. The sockets were a game changer in my opinion. I don't use them as often these days, but my feelings are the same that they save the fittings from damage and make the job so much more pleasant.
 

signcrafter

Well-known member
Joined
May 9, 2012
Messages
12,525
Before I posted I did a real quick search and I saw where Sunex offered singles but no sets popped up. Not that that means much 😉

sunex has a nice set of those sockets - 13 pc
Sunex still lists the 9913 set on their site but I can't find it online anywhere, all show out of stock. I had added that set to my Amazon wish list a long time ago but it wasn't a very high priority so never pulled the trigger. Hopefully they get them back in stock and didn't discontinue them.
 

LXCam

ALLIANCE MEMBER
Joined
Apr 23, 2013
Messages
19,206
Location
AZ
What???? You are really disappointing me Cam. And to admit that so openly on Garage Journal, are you feeling OK?
If you think for one second I’m beyond Adjusting to a proper hack, ya ain’t been paying attention Mike 😜


Sunex still lists the 9913 set on their site but I can't find it online anywhere, all show out of stock. I had added that set to my Amazon wish list a long time ago but it wasn't a very high priority so never pulled the trigger. Hopefully they get them back in stock and didn't discontinue them.

Scott do me a favor please. Being I’ll do most anything not to spend my dollars on the jungle. If they ever pop up, let me know would ya. Much appreciated bud.
 

signcrafter

Well-known member
Joined
May 9, 2012
Messages
12,525
If you think for one second I’m beyond Adjusting to a proper hack, ya ain’t been paying attention Mike 😜


Scott do me a favor please. Being I’ll do most anything not to spend my dollars on the jungle. If they ever pop up, let me know would ya. Much appreciated bud.
Cam I'm not a huge fan of the jungle either but since they carry just about everything it makes a good place to keep a wish list of tools I see on here or wherever. I do end up ordering a bunch from them just because I usually wait till the last minute and need it now or run into something while doing a repair and they can get it to me fast for a decent price. If I see them pop up somewhere I'll let you know.
 
OP
Z

zmotorsports

ALLIANCE MEMBER
Joined
Oct 20, 2009
Messages
21,477
Location
Northern Utah
Well hell, after seeing what Matt aka @lilscorpion has been doing, I don't know if I even want to post what I did last night....... :unsure:


In preparation for mounting the bracket which will hold my air reservoir and brake relay for my supplemental braking I dug out my assortment of Thread Serts as well as my installation tool. I really like this Marson installation tool, but it seems to work the best for the smaller sizes such as those less than 1/4". When you get above that, they are hard to squeeze and compress the inserts, especially the steel inserts which I prefer. The aluminum ones will compress relatively easily up to around 3/8". However, my grip hasn't been the best lately and with my jacked up shoulder it is difficult to maneuver much once I get under the coach.
supbrake8.jpg

So I laid under the coach looking to see if I could get my larger Marson 325-RN under there. While I think there is room just above the suspension's H-frame to fit the long handles, I don't think I can hold the tool that far above my head for long and even then, I don't think I can apply enough force with my shoulder being as sore as it's been lately. Damn this getting old is for the birds. I laid there contemplating what to do and then I realized I don't think I can even hold the bracket in place to drill the holes, let alone install the threaded inserts with both arms that far above my head while lying on my back. Hmmmm. :headscrat
supbrake9.jpg


So I had to devise a Plan B. I thought I could drill a couple of smaller holes in which to put a couple of tek screws in just to hold the bracket in place once I level it. That would free up both hands for drilling the remaining 5 holes using the pilot holes in the bracket without having to hold the metal bracket with one hand. Once the pilot holes were drilled, I could remove the tek screws and drill the holes to the final size for the Thread Serts. At that point I could sand and paint the bracket and prepare it for final installation once the paint dries and mount the reservoir and brake relay.

But how to install the Thread Serts? I added to the plan and thought I'd make a quick tool in which will allow me to hold the insert steady with one hand using a "handle" and then the insert can be compressed using a wrench or ratchet thus keeping the install a bit easier on my shoulder.

I've used similar designs like this when they have come with various components, but they always make the die where the threaded insert forces against too large and it forms an irregular shape on the end of the insert resulting in holding the part proud of the parent material in which it is being fastened to. In several applications I have had to mill a small pocket around the bolt hole to accommodate the shoulder of the insert so the part or component will not seat solely on the insert itself. I hope that makes sense without a visual demonstration.

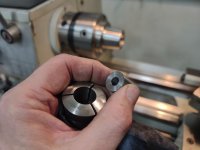
I machined a small die keeping the ID at the exact size of the fastener to alleviate this situation and keep the head of the insert flat and not deformed. I also made the die slightly larger than the inserts head, whereas I think that is also part of the problem with the cheap installation tools that come with various accessories, they are simply smaller than the insert resulting in odd shaped heads or sometimes even slightly offset.
supbrake10.jpg

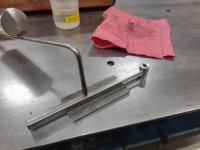
I dug through my drop drawer and found a small piece of 1/2" square tube that will work perfect as a handle.
supbrake11.jpg

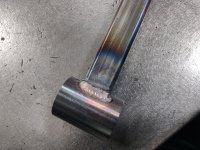
Quick couple of welds and I have an installation tool for the Thread Serts.
supbrake12.jpg

supbrake13.jpg

supbrake14.jpg

Ready to be put to use.
supbrake15.jpg

I saw the colors on our mountains as the sun was setting so I just had to step outside and snap a picture of the beautiful sunset last night after yesterday's storm passed through.
sunset.jpg


Thanks for looking.
 

WoodsTruck

Well-known member
Joined
Jan 12, 2013
Messages
1,028
I've thought about installing those in the same fashion.
My question, would it be better to use a threaded stud so that the threads extend out in front of the install tool and use a nut to pull the stud through to collapse the nut-sert instead of relying on the threads of the nut-sert?
Maybe I'm overthinking it.
 

LXCam

ALLIANCE MEMBER
Joined
Apr 23, 2013
Messages
19,206
Location
AZ
Mike you’re not the only one who’s fought the larger inserts. I dreaded my marson setup for 1/4” unless it was aluminum too. Then a couple years back I bought both of versions of Astro pneumatics units that eased the pain.
IMG_6455.jpeg

A couple months back I had to do a bunch of 3/8 inserts only to discover neither of those kits had a 3/8 mandrel. I did look for just that part but wasn’t able to confirm it’d work with either of these kits so I gave in and order this one.
IMG_5697.jpeg
Bud, that right there is the ****! Well worth the C note it cost.
IMG_5745.jpeg
 

Graham08

Well-known member
Joined
Dec 10, 2007
Messages
713
Location
Iron Station, NC
Nice work on the nut-sert tool! My dad has a Snap-On set that works on the same principle.

I bought one of the Huck manual/hydraulic tools for a project that involved a bunch of stainless inserts. It reduces the effort involved by quite a bit and works in tight spaces. Bonus is it also can be used for rivets.

I understand exactly what you’re saying about the insert being proud of what it’s attached to. Hammer Fab makes a set of dimple dies for that purpose when dealing with sheet metal.
 
OP
Z

zmotorsports

ALLIANCE MEMBER
Joined
Oct 20, 2009
Messages
21,477
Location
Northern Utah
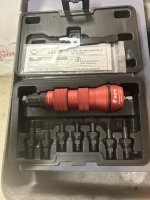
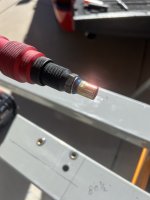
Mike, I am surprised that you do not have a pneumatic Riv-Nut gun considering your love for air tools. We use them all over at work and a few Riv-Stud guns as well.

Alex, I am embarrassed to admit this, but I did not know a pneumatic version existed. I guess I've never researched it to learn of their existence. Now you have me thinking... :unsure:


I've thought about installing those in the same fashion.
My question, would it be better to use a threaded stud so that the threads extend out in front of the install tool and use a nut to pull the stud through to collapse the nut-sert instead of relying on the threads of the nut-sert?
Maybe I'm overthinking it.

Probably six of one and half-dozen of the other. Yes there is some friction involved when tightening the bolt vs. a stud and nut, but the stud will still need to be removed afterwards. If I notice an increased effort using a bolt, I can easily switch over to a short stud and nut using the same shop-made tool though.


Graham and Cam, I just didn't realize so many various tools for these threaded inserts even existed. Cam, that Astro unit looks amazing. May have to look deeper into that as I use Thread Serts quite a bit for various projects and am always impressed with how well they hold.

Graham, for sheet metal many times I will simply use a Dzus dimple tool which seems to work well to keep the components from standing proud off the parent material, but I may have to look into the Hammer Fab set.
 

BigMike782

Well-known member
Joined
Dec 19, 2008
Messages
1,885
Location
49120
Having not read thoroughly through the entire tractor section I have some questions.
It is clearly a Kohler twin. It looks like a K??2. If so be aware that those are like some Onan twins and are great engines but can be a biotch to find parts for. If by chance it's a KT17 series one know that it is only partially pressurized oiling and prone to bad things if run on a side slop. KT17 series two are full pressure oiled.

Trans. Is it a hydro? Sunstrand hydro? If yes they are almost indestructible. I have had Cubs that had not had hydro fluid and filters changed since the 70s that operate like new.

PTO. For any not aware, PTO is different from farm tractors to garden tractors. Farm tractor PTO is a splined shaft. GT PTO is largely a V bely pulley although some super garden tractors have splined shafts but are very rare and there are very few attachments.

Tires.
I like traditional farm style ag tires. I have Firestone 26-12-12s on my Cub Cadet 2072 SGT and they work very well.
Fronts on it are Vredesteins,

One thing I forgot, compression testing on small engines can be tough because of the compression release holding the exhaust valve open until an RPM higher than cranking speed.
 
Last edited:
To avoid these ads, REGISTER NOW!
Top Bottom