I wasn't afraid of EMI, really, but a strong magnet near a ferrite-cored coil will affect its function. I've never opened the case, so I didn't know what effect I might see. Turns out nothing.EMI comes from moving magnetic fields, or wires moving through a magnetic field.


You are using an out of date browser. It may not display this or other websites correctly.
You should upgrade or use an alternative browser.
You should upgrade or use an alternative browser.
What did you do "IN" your garage today?
- Thread starter mayhemman
- Start date
Beerhippie
Well-known member
I actually completed a project today! This rarely happens. As soon as I start working on something, something else generally goes up in flames that's a higher priority, to the point that sometimes projects stay half-finished (or half-started) for so long I forget about them.
Putting together the new camera set-up was pretty easy. Fortunately, I've installed quite a few security camera set ups, and this was no different--same plugs, same wires. As this was replacing another camera, I was able to use some of the wiring that was already in place.

As this is a stand-alone camera, it has its own A/D converter box, right of the pic. I "mocked it up" with an old computer monitor and HDMI cable to be sure everything worked. It did. The old camera that was part of the security cam system is behind the new dome cam.
As I said, same connectors--except for that third one:

No idea what that is--but I don't need it.

I knocked together a magnetic mount for it from some scrap aluminum and an old HDD magnet.

In place. Good thing I'm an old climber.

Hard to tell from a crappy cell phone pic, but the image is so good I wish there was something more interesting to watch than a can depalletizer. The monitor allows one person to run the canning line and keep an eye on the depal for jams and when it's time to refill it.
I even got the old camera back where it originally lived, monitoring the brewhouse.
Putting together the new camera set-up was pretty easy. Fortunately, I've installed quite a few security camera set ups, and this was no different--same plugs, same wires. As this was replacing another camera, I was able to use some of the wiring that was already in place.
As this is a stand-alone camera, it has its own A/D converter box, right of the pic. I "mocked it up" with an old computer monitor and HDMI cable to be sure everything worked. It did. The old camera that was part of the security cam system is behind the new dome cam.
As I said, same connectors--except for that third one:
No idea what that is--but I don't need it.
I knocked together a magnetic mount for it from some scrap aluminum and an old HDD magnet.
In place. Good thing I'm an old climber.
Hard to tell from a crappy cell phone pic, but the image is so good I wish there was something more interesting to watch than a can depalletizer. The monitor allows one person to run the canning line and keep an eye on the depal for jams and when it's time to refill it.
I even got the old camera back where it originally lived, monitoring the brewhouse.
Motorman55
Well-known member
No worries, I just bought her a new big vac and carpet cleaner. She's all set. Ha, haIt wouldn't surprise the wife, but it would certainly not please the wife, either.
bmwrd0
Well-known member
Started getting things moved around, and showing progress, in the shop.

first, got a power strip installed so I can power the machines in the new locations without extension cords.

then built a frame for the old parts cabinet that I have been trotting around with for 20 years, and my father for at least 20 before that!
It was too shaky on its own to put the Gerstner on top of, but this made an ideal surface, as I was able to reuse one of the original stair treads I replaced when I bought this house. It has a crack along the back edge, and was starting to warp, which is why I pulled that one. It might get moved to the sit along the wall to the left, as I have another, small machinists stack to in put in that corner.
I should be able to get everything else moved in the next couple days, and then get my friend to come over on Monday to help move the lathe in place.
first, got a power strip installed so I can power the machines in the new locations without extension cords.
then built a frame for the old parts cabinet that I have been trotting around with for 20 years, and my father for at least 20 before that!
It was too shaky on its own to put the Gerstner on top of, but this made an ideal surface, as I was able to reuse one of the original stair treads I replaced when I bought this house. It has a crack along the back edge, and was starting to warp, which is why I pulled that one. It might get moved to the sit along the wall to the left, as I have another, small machinists stack to in put in that corner.
I should be able to get everything else moved in the next couple days, and then get my friend to come over on Monday to help move the lathe in place.
LeonardY
Well-known member
Mounted a air hose reel.

2001ZR2
Well-known member
Attacked the drawers in the upper portion of the stack and got the other 7 drawers cleaned up...glue and carpet remnants filled a small plastic bag from Walmart.
Did install one of the 12 drawer slide clips on my other red and gray stack so the drawers work on it.
I am hoping to get the 12 drawer bottom clean up tomorrow. Some of those drawers had actual draw liners in them. Rain is in the forecast all day tomorrow.
Did install one of the 12 drawer slide clips on my other red and gray stack so the drawers work on it.
I am hoping to get the 12 drawer bottom clean up tomorrow. Some of those drawers had actual draw liners in them. Rain is in the forecast all day tomorrow.
oldman_pottering
Well-known member
I wish you could do mineAs strange as it sounds. I dusted and vacuumed the garage today.
oldman_pottering
Well-known member
Did you forget to stab your finger this time ?Cleaned, flung, put away. Got my bench back, for a while. Fiddled in CAD with the tablesaw fence cover. Printed a few to get a good one. Fixed a Xmas decoration.
56vette461
Well-known member
I have one I pulled from a corvette 327/T-10 racing setup. Love the old shifter lookIdentified a Hurst Competition Plus shifter that's been sitting on a shelf in the garage for 15 or so years. I was relieved to find out that it's exactly what I thought it was - correct for a T-10 in an AMC application. Perfect for my '72 Javelin road race build.

Where's the compressor?Mounted a air hose reel.
nadogail
Well-known member
Made 24 legs for 6 Planter Boxes. I plan on delivering them in a week or two after the rain stops.
Motorman55
Well-known member
Last night I picked up some more 1x to finish the common bench in the hobby/craft room. Once again the local HDs' saw was still down so I just grabbed the 1x. Too late in the evening to do much of anything except stack the 1x for today.
So today I got busy and finished the lower section of the bench. While I was at it, I flipped the bench over and added feet to the legs then applied brown felt for furniture to protect the new floor.
I'm still deciding on the amount of overhang for the top. I took a couple boards and laid them on the edge for comparison. Looks like I might go with 1/2" or 3/4" over the 4 legs all round which would give me about 1-1/4" ro 1-1/2" of overhang over the long stringers. That would be enough to clamp a small vice or clamps on the edge when needed.
Tomorrow I'll drive over to a different HD and hopefully their saw will be up and running. I really like to finish this table by Sunday so I can move on with the next step(s) of setting this room up.
Oh yeah, in between all the chaos, I did manage to frame one of my whaling prints and hang it over the HF wood bench. More to follow.
Here's a few pics....
Last edited:
LeonardY
Well-known member

nadogail
Well-known member
Sometimes I wonder why I am not being told to sleep in my workshop.
TheRealZeus
Well-known member
Did you forget tomorrow is Valentine’s Day?
TheRealZeus
Well-known member
It’s a tactile switch/button, for pushing. Probably manually record start/stop. Manual come with it? If not, do you have a brand name and/or model number?I actually completed a project today! This rarely happens. As soon as I start working on something, something else generally goes up in flames that's a higher priority, to the point that sometimes projects stay half-finished (or half-started) for so long I forget about them.
Putting together the new camera set-up was pretty easy. Fortunately, I've installed quite a few security camera set ups, and this was no different--same plugs, same wires. As this was replacing another camera, I was able to use some of the wiring that was already in place.
As this is a stand-alone camera, it has its own A/D converter box, right of the pic. I "mocked it up" with an old computer monitor and HDMI cable to be sure everything worked. It did. The old camera that was part of the security cam system is behind the new dome cam.
As I said, same connectors--except for that third one:
No idea what that is--but I don't need it.
I knocked together a magnetic mount for it from some scrap aluminum and an old HDD magnet.
In place. Good thing I'm an old climber.
Hard to tell from a crappy cell phone pic, but the image is so good I wish there was something more interesting to watch than a can depalletizer. The monitor allows one person to run the canning line and keep an eye on the depal for jams and when it's time to refill it.
I even got the old camera back where it originally lived, monitoring the brewhouse.
bmwrdO-Started getting things moved around, and showing progress, in the shop.
first, got a power strip installed so I can power the machines in the new locations without extension cords.
then built a frame for the old parts cabinet that I have been trotting around with for 20 years, and my father for at least 20 before that!
It was too shaky on its own to put the Gerstner on top of, but this made an ideal surface, as I was able to reuse one of the original stair treads I replaced when I bought this house. It has a crack along the back edge, and was starting to warp, which is why I pulled that one. It might get moved to the sit along the wall to the left, as I have another, small machinists stack to in put in that corner.
I should be able to get everything else moved in the next couple days, and then get my friend to come over on Monday to help move the lathe in place.
Did you mean to frame your reflection in the Gerstner mirror? Adding an artistic flair to your efforts!
twistedstang
Well-known member


TheRealZeus
Well-known member
It’s a tactile switch/button, for pushing. Probably manually record start/stop. Manual come with it? If not, do you have a brand name and/or model number?


PhantomEB
Well-known member

Finally got the steel rack all tacked up, running low on funds due to a 3 day paycheck. just missing the porforated aluminum that went on as I put it all back in the corner.

damn I need a lathe to play with all this round stock!

love it when an idea in my head comes to fruition. Now cleaning up the other side.
Beerhippie
Well-known member
I have no idea what a push button would be for, at least in this set-up, as there is no recording device. It's purely a monitor--and that switch is now thirty feet in the air.It’s a tactile switch/button, for pushing. Probably manually record start/stop. Manual come with it? If not, do you have a brand name and/or model number?
See my comments on the manual above^. Summary? "You're on your own".
TheRealZeus
Well-known member
I have no idea what a push button would be for, at least in this set-up, as there is no recording device. It's purely a monitor--and that switch is now thirty feet in the air.
See my comments on the manual above^. Summary? "You're on your own".

 Yeah, I read that, then forgot. Sorry.
Although “you’re on your own,” is quite off-putting, you’ve got all of us!!
 right after I said that into dictate, I instantly realized don’t think that helps. Again.. sorry Boss.
Beerhippie
Well-known member
It took me all of five minutes to figure out what went where and rig up a bench test. No biggie--it's just a security camera. One coaxial plug for power, one RCA for output--and that mystery thing, which I at first thought was a Toslink, which I haven't seen in years and made absolutely no sense. I'm sure you're right and it's an MC switch for something I don't need.
Although “you’re on your own,” is quite off-putting, you’ve got all of us!!
If you haven't set one up before, finding a good manual would be helpful. This Linovision manual isn't it.
If its a multi function switch it could be for calling up and navigating an on screen set up menu...It took me all of five minutes to figure out what went where and rig up a bench test. No biggie--it's just a security camera. One coaxial plug for power, one RCA for output--and that mystery thing, which I at first thought was a Toslink, which I haven't seen in years and made absolutely no sense. I'm sure you're right and it's an MC switch for something I don't need.
If you haven't set one up before, finding a good manual would be helpful. This Linovision manual isn't it.
garfieldzzz
Well-known member
I assume its the reset button.I have no idea what a push button would be for, at least in this set-up, as there is no recording device. It's purely a monitor--and that switch is now thirty feet in the air.
See my comments on the manual above^. Summary? "You're on your own".
niget2002
Well-known member
Cleaning up and model progress.
Proper tools must be used when attaching the interior to the body

I also scrounged around for parts I had bought for my laser a few years ago. I figure if I'm upgrading the printer, might as well do the laser too.
Aparently this project started about the same time I tried to get organized with my projects as everything was in the same box. Not on the shelf I thought it was on, but at least all together.

Proper tools must be used when attaching the interior to the body
I also scrounged around for parts I had bought for my laser a few years ago. I figure if I'm upgrading the printer, might as well do the laser too.
Aparently this project started about the same time I tried to get organized with my projects as everything was in the same box. Not on the shelf I thought it was on, but at least all together.
BonzoHansen
Well-known member
clothes washer is leaking. Luckily it appears to be a feed line. Burst proof, but not fitting leak proof it seems. Off to the orange store
Edit 1: the old valve would not close all the way. so now I have a mess lol. blew through all my old towels, got 85%, got a fan on it now. back at it tomorrow after everything is dry.
Edit 1: the old valve would not close all the way. so now I have a mess lol. blew through all my old towels, got 85%, got a fan on it now. back at it tomorrow after everything is dry.
Last edited:
Itinerant
Well-known member
Measured, sketched, pondered.
I’m adding a bench that will necessitate the removal of a standing shelving unit that will be replaced by an overhead unit I’ve had for years but never installed. Contemplating moving a couple of floor cabinets as well, we’ll see.
I’m adding a bench that will necessitate the removal of a standing shelving unit that will be replaced by an overhead unit I’ve had for years but never installed. Contemplating moving a couple of floor cabinets as well, we’ll see.
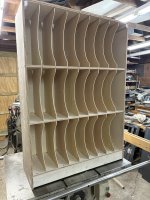
Made a storage bookcase for my growing stained glass supply. The case and shelves are 1/2" Birch plywood and the dividers are 5mm Luan plywood. It will get painted, probably white. I'm also going to add LED strips to help highlight the glass colors.
Attachments
Last edited:
pima67
Well-known member
Beerhippie:
You posts bring back memories from the good old days in western MT when we had these brands available: Oly Pop, Raneeeer Beeeer, Brand X, Highlander and Great Fall Shellac brewed by their original owners.
You posts bring back memories from the good old days in western MT when we had these brands available: Oly Pop, Raneeeer Beeeer, Brand X, Highlander and Great Fall Shellac brewed by their original owners.
SweetD
Well-known member
New drive shaft bearing housing sealed and installed on the outboard gearcase. Drained and pressure-tested the gearcase, seems OK but I don't fully trust my crappy pressure testing pump. I think I'm going to roll with it. It passed the "soapy water" test to my liking. Water pump next.

Beerhippie
Well-known member
Tinkered and fiddled with the Brick most all day.

Adjusted the shifter linkage--works much better. Adjusted the throttle pedal--works much better. Removed undesired stickers--less bothersome. Moved the roof racks forward to where I want them.
Details in my thread below.
Adjusted the shifter linkage--works much better. Adjusted the throttle pedal--works much better. Removed undesired stickers--less bothersome. Moved the roof racks forward to where I want them.
Details in my thread below.
swsman
Well-known member
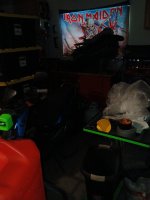
Organized some, I received 12 storage totes ordered via slick deals sale.
Fun car is on the jack stands, I certainly bent a rear lower control arm from the brief look.
Might disassemble tomorrow or in the next week or so.
Flyin Miata has a 15" wheel I like. Sort of a throwback on Alfa Romeo dial wheels.
Debating on redoing all of the suspension bushings, diff and transmission lube, oil/filter and some other bits while in there.
My Tetris skills came in handy, have room to work on passenger side, and all of my other toys fit on the driver side. Still some room to get around the garage
Attachments


INSP380
Well-known member
Gotta break from the Tundra and swept, blew and mopped out the garage / shop. Detailed my 04 Z/71 Silverado, the wives car and my DD. Finally feeling good walking thru the shop again.. I’m done with winter…
Steve
I’m done with winter…Steve
kaymccampbell
Well-known member
Looks a touch crowded in there. Time for a shed.Organized some, I received 12 storage totes ordered via slick deals sale.
Fun car is on the jack stands, I certainly bent a rear lower control arm from the brief look.
Might disassemble tomorrow or in the next week or so.
Flyin Miata has a 15" wheel I like. Sort of a throwback on Alfa Romeo dial wheels.
Debating on redoing all of the suspension bushings, diff and transmission lube, oil/filter and some other bits while in there.
My Tetris skills came in handy, have room to work on passenger side, and all of my other toys fit on the driver side. Still some room to get around the garage
swsman
Well-known member
Very crowded.Looks a touch crowded in there. Time for a shed.
Behind the totes is a small work area where I keep a work bench with a bench grinder and vise mounted on it. Plus some other bits.
Plan is to trim the fun toys some this summer. At least pondering on it.
Two car garage, 8' ceiling.
All of my tools/materials/parts.
Plus an NB Miata, atv, 2 motorcycles, and Zuma 125 scooter. Lets not forget Honda snowblower hahaha
Last edited:
SRU1436
ALLIANCE MEMBER
Disassembling the valve body on the transmission rebuild. It’s taking longer than I hoped but I dont have the engine back from the builder so I guess it’s ok.

Last edited:
niget2002
Well-known member
Worked on the laser upgrade. Flashed fluidnc onto an older Bart Dring board and made a stepper motor move.
LeonardY
Well-known member
Waxed the car.
swsman
Well-known member
Used to love washing/waxing/full interior detail.Waxed the car.
These days I keep interiors clean, F250 is lucky to get a wash once/twice a year.
Bikes get about similar, they are maintained where it counts.
I think I did a full detail on my Miata first summer I bought it, not since and coming up on 11 years of owning it. Mechanically car is solid - would not be afraid to roadtrip US at a moments notice.
Not letting things get filthy, but far from babying them anymore hahaha.
Cars and Coffee I attend is full of folks with shiny rides that make it from their garage to the event, and then put away.
I much prefer to use what I own, see no point otherwise.
Sadly work and life keep me plenty busy, and multitude of choices means nothing sees significant mileage anymore, save for the daily.