
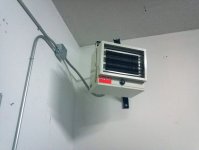
I figured I would try and make my first post on this forum one that might help anyone down the road who is looking for some further detail on hooking up a Dayton G73 heater. Specifically with an optional cutoff switch and a remote line voltage thermostat.
First I would like to say I gathered a ton of knowledge from Stargeezers original post HERE. Next is a standard disclosure: I am NOT an electrician and if you have any doubts on wiring contact a licensed electrician to validate your work.
This is the list of items I purchased to do the job:
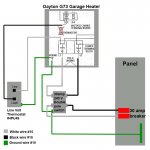
#10 2/1 Romex wire (Black, White & Ground)
30 amp double pole 240v breaker
30 amp double pole 240v switch (Looks like a standard light switch bit its not)
Dayton Single pole line voltage thermostat #4PU49
Conduit, Boxes, Connectors, etc…
To try and simplify things I’m going to break the wiring down into two different runs of 2/1 Romex wire, “Run #1” and “Run#2 thermostat”
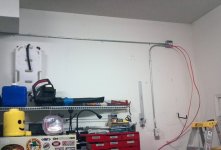
(Run #1) Run #10 2/1 Romex wire from the Panel to the placement of your 30amp 240v double pole switch on your wall. This switch will be your power cut off for your set up. You will see in the picture that I had the sheetrock already pulled in this small section to do a repair on some heating and cooling so it made it nice to hide some wires on this small section of the wall. Note: I had not yet secured the wires to the vertical stud before picture was taken. Connect the wires into the switch like you would a normal light switch, keeping black on one side and white on the other and hooking the bare copper wire to the ground on the switch.
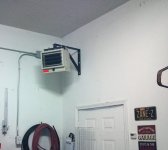
From the switch I continued the run of #10 2/1 Romex wire to a junction box near the final placement of the Dayton G73. Leave enough wire to do the final hook up within the heater.
First I would like to say I gathered a ton of knowledge from Stargeezers original post HERE. Next is a standard disclosure: I am NOT an electrician and if you have any doubts on wiring contact a licensed electrician to validate your work.
This is the list of items I purchased to do the job:
#10 2/1 Romex wire (Black, White & Ground)
30 amp double pole 240v breaker
30 amp double pole 240v switch (Looks like a standard light switch bit its not)
Dayton Single pole line voltage thermostat #4PU49
Conduit, Boxes, Connectors, etc…
To try and simplify things I’m going to break the wiring down into two different runs of 2/1 Romex wire, “Run #1” and “Run#2 thermostat”
(Run #1) Run #10 2/1 Romex wire from the Panel to the placement of your 30amp 240v double pole switch on your wall. This switch will be your power cut off for your set up. You will see in the picture that I had the sheetrock already pulled in this small section to do a repair on some heating and cooling so it made it nice to hide some wires on this small section of the wall. Note: I had not yet secured the wires to the vertical stud before picture was taken. Connect the wires into the switch like you would a normal light switch, keeping black on one side and white on the other and hooking the bare copper wire to the ground on the switch.
From the switch I continued the run of #10 2/1 Romex wire to a junction box near the final placement of the Dayton G73. Leave enough wire to do the final hook up within the heater.
Attachments

Last edited:


![pic%203[1].jpg](/forum/data/attachments/161/161237-925f5d7153a2608bb34da623a4dec5b7.jpg)
![pic%205[1].jpg](/forum/data/attachments/161/161246-c2834328d52fc107ecf5b1d2529099be.jpg)
![pict%202[1].jpg](/forum/data/attachments/161/161251-58266345ff57b3bfe10df5e8a35cff92.jpg)
![4783_big[1].jpg](/forum/data/attachments/115/115960-977284cbd84487965e69d1cc870fda88.jpg)
")
