To avoid these ads, REGISTER NOW!

Between 265 & 485 SQ/FT The 12-Gauge Garage

Workspaces sized between 265 and 485 squarefeet.

michel

Well-known member
Joined
Jul 9, 2009
Messages
230
Location
St-Joseph du lac Québec
On the dust issue, here's a lash-up I made that isn't too elegant but works well.
I think my sander is like yours, Jack. It's got an English brand name but made in Taiwan. Year is 1988. It is 6"x48" (but has 4" belt on at the moment).
Being in Europe it has a 240v motor.

P1070139.jpg


The dust catcher is the top of a plastic oil can, sink waste-pipe plumbed to an old vacuum cleaner. There's a hole under the disc guard which could also be connected to the pipe when I get time. My sander came with it's own stand.

P1070140.jpg

P1070131.jpg

I have the exact same belt sander, it has a "King machinery" logo on it made in 92.

It was broken, took it apart and had the part welded.
I will paint it this week and reassemble it.

The best part... it was a freebie.
 
To avoid these ads, REGISTER NOW!

Squankum

Well-known member
Joined
Mar 28, 2011
Messages
7,719
Location
Southeast
Dan in Pasadena:

See Bob's post #1911 in this thread, it shows a picture of the bushing adapter to make the 1" hole in the abrasive wheel fit on smaller shafts. I bought one of these, too, it was like $3.59 or some laughable price for such a handy bit.
 

Dan in Pasadena

Well-known member
Joined
Feb 18, 2009
Messages
13,139
Location
Pasadena, CA
Thanks Squankum. I definitely plan to buy one of these wheels and an adapter. Should be VERY helpful. Not only in my garage but also for parts on my '55 Chevy truck. Can't wait!

Now, back to the 12 Gauge Garage. (Sorry Jack!)
 
Last edited:
OP
J

Jack Olsen

Super Moderator
Staff member
Joined
Mar 22, 2009
Messages
6,678
Location
Los Angeles
BeltSander.jpg


Bob, that looks pretty good. It makes you think belt sander manufacturers should include a clamping surface for vise mounting.

P1070139.jpg


That's smart, Alfazer!
 
OP
J

Jack Olsen

Super Moderator
Staff member
Joined
Mar 22, 2009
Messages
6,678
Location
Los Angeles
Over the past couple of days, I put together a new wing idea for my race car. I got the cores for some wings I plan to vacuum bag with carbon fiber. But my thinking was that I'd also try this potentially-lighter-weight idea.

This one is made of a stronger foam than the EPS (beer cooler foam) I used last time. It's a material used for surf boards called Spyder Foam.

I started out by tracing the airfoil shape on a piece of paper, and then drawing in the shape of my brackets.

drawingj.jpg


Then I cut the shapes out and used some spray adhesive to stick them to a piece of plywood. In retrospect, I should have used at least 1/2" plywood. But I'll know that next time.

I sprayed primer over the adhered cut-outs and the wood.

primerondrawing.jpg


So when I peeled off the paper, I had a line on the wood that I could follow with a jigsaw.

lines.jpg


Here are the pieces cut out:

buckst.jpg


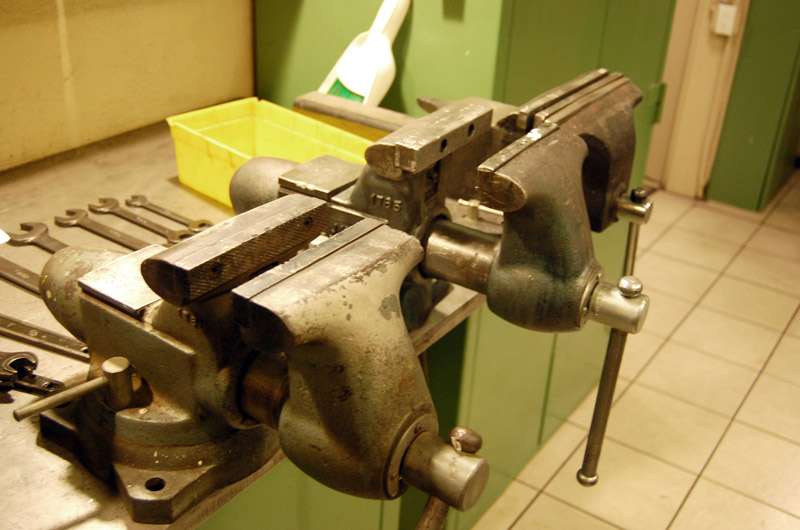
Then I cut out the same shapes in aluminum, but did a quick cut that left a lot of extra material around the outlines. The idea is to stick the wood buck to the aluminum with double sided tape and use a router to trim the aluminum to the exact shape of the buck.

routerready.jpg


routertrimming.jpg


I could have taken more care with the shapes, but using the buck allows me to make pretty-close-to-identical parts.

identical.jpg


Here are the end pieces and the mounting brackets.

piecescp.jpg


This is a lot nicer than the results I got on the previous wing, where I didn't have the right blade for the jigsaw.

Adhesive1316116495.jpg


Then I made L-shaped pieces to support the brackets, and a flat sheet to allow a large adhesive surface between the bracket and the wing. I used 3M Scotch-Weld adhesive.

gluing.jpg


I adhered captive threaded fittings in the end pieces, and attached the end pieces to both the wing and the aluminum tubing I'm running inside the foam.

epoxied.jpg


I'd made a new (and lighter) set of supports for this wing. I used a jack to get the car perfectly level so I could make sure they're mounted symmetrically.

supports.jpg


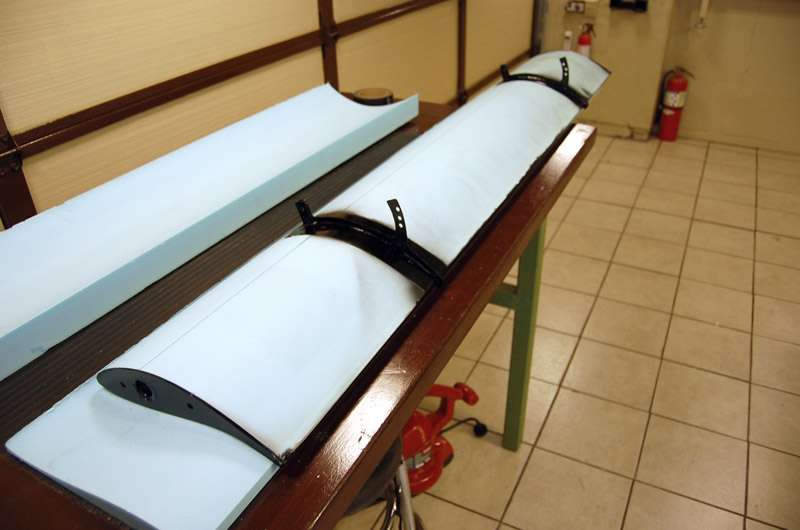
Here's the wing being test fitted. It's mounted slightly lower than the previous versions.

testfit.jpg


The plan was to skin the foam with Ultracote, a German heat-triggered plastic covering used by RC aircraft guys. But I knew I wanted to paint the bare aluminum. First, I checked to see if this foam would be vulnerable to the acetone in spray paint (like the EPS foam was). I dripped some on the scrap piece of Spyder foam.

acetonee.jpg


Answer: it does dissolve. That picture is of the scrap piece that was under the scrap piece I dripped acetone on.

So I masked it off before I spray painted the metal.

cappaint.jpg


I hadn't ever worked with Ultracote, so I did a test piece on the scrap foam.

ultracotetest.jpg


The only downside is that it has a glossy finish, which shows every irregularity in the surface:

halfcote.jpg


It looks better from this angle:

halfcoteb.jpg


The nice thing about the Ultracote is that it's light. My all-aluminum wing was 4 lb 14 oz. This is pretty light, considering it supports about 400# of force.

0161157157709.jpg


The second wing was EPS foam skinned with aluminum. It was slightly lighter: 4 lb 12 oz.

TopSkinned1316220955.jpg


This new one made a big leap forward, in terms of 'wing anorexia.'

threethreefive.jpg


That's 3 lb 3-1/2 oz.

Here's the wing installed on the car, viewed from below.

underside.jpg


For the top, I added a piece of black contact paper, which has a matte finish and looks a little better.

twopointone.jpg


The iron I was using to shrink/adhere the Ultracote had a problem where the dial kept creeping up, which led to some inadvertent melting of the foam. You can see it if you get up close. It shouldn't affect the functionality, though.

mattewing.jpg


And for the sake of perspective, here's a 3-1/2-year-old in front of the wing.

maxwing.jpg


In hindsight, I would do a few things differently. I think my quest for lightness might have made me make the bracket too light. It might need some reinforcement in back to avoid bending. I also was learning as I went with the Ultracote, which left some cosmetic problems.

But I'm going to test the new wing this Wednesday. I think it's going to work pretty well.
 

Omphaloskeptic

Well-known member
Joined
Oct 11, 2008
Messages
2,346
Location
Ultima Ratio, Wa.
OK Jack, 'Mod III' looks pretty awesome! I hope the support struts are stiff enough to resist the down force generated at speed. I wonder if some wire cross-bracing would help the struts twist resistance? :dunno:

Are you planning on pivoting your vidcam around and adding airfoil tufting to see what's going on back there as speed varies? Can you sync two cameras so you can record what tufts may do and track the speedo reading as the tufts change with the speed change? What I'm suggesting is kind of what experimental pilots use to check 'angle of attack' response, airfoil laminar flow, and other characteristics of a wing as it is mated to the fuselage. Good luck with the testing at the track!
 

Tony N.

Well-known member
Joined
Jun 19, 2011
Messages
120
That's a comfortable garage you got there. Definitely one of my favorites I've seen around here.

I'm also loving the 964, have you ever considered a RWB make over? =) I think this green monster would match your garage nicely: http://www.rwb.jp/SG964.htm
 
Last edited:

Zeke

Well-known member
Joined
Aug 13, 2009
Messages
17,176
Location
Long Beach CA, the sewer by the sea.
Pretty cool.

As we discussed at one point, working on the outside of a part is tough. Working against a from or mold will produce a finish as good as the surface being worked against. I think I have a pretty good idea of what you are going to do next which is to use the cut out part of the blanks as a reverse mold to make a sandwich over the wing. Mylar that is stiff enough to hold shape but flexible enough to conform to the shape provides that surface.

The surface medium used to strengthen the part such as a resin/cloth or epoxy/carbon fiber system (or a cross combination of those 4) can be applied to the core, placed in the sandwich and compressed with vacuum.

Guys, this requires a little more vacuum than what an auto A/C vac does, so if anyone has knowledge of an industrial vacuum pump that Jack can use, you might pass that info to him.

An example:

vacuum_pump.jpg


A hobby model:

aerospace_vacuum_pump.jpg
 

Zeke

Well-known member
Joined
Aug 13, 2009
Messages
17,176
Location
Long Beach CA, the sewer by the sea.
Jack, are you using proven airfoil patterns, or are you just building something close??

(I assume the former.)

Well, I'm not Jack, but he did say he bought the pre-cut forms. and I can say this is not his first rodeo. I think if you go back up this thread a few pages, there are pics of the various wings he has tried.

AFA that one car is concerned, he has become more or less an expert. A couple of years ago he found some stalls using string and yarn taped to one design and used a camera to watch as he hit speeds.

You should see his desk...

sleek-work-space-innovative-airfoil-design-enhances-classic-rolltop.jpeg


...just kidding
 
OP
J

Jack Olsen

Super Moderator
Staff member
Joined
Mar 22, 2009
Messages
6,678
Location
Los Angeles
OK Jack, 'Mod III' looks pretty awesome! I hope the support struts are stiff enough to resist the down force generated at speed. I wonder if some wire cross-bracing would help the struts twist resistance? :dunno:

Are you planning on pivoting your vidcam around and adding airfoil tufting to see what's going on back there as speed varies? Can you sync two cameras so you can record what tufts may do and track the speedo reading as the tufts change with the speed change? What I'm suggesting is kind of what experimental pilots use to check 'angle of attack' response, airfoil laminar flow, and other characteristics of a wing as it is mated to the fuselage. Good luck with the testing at the track!

I probably won't do any camera work on this wing, since it's an airfoil I've used for five or six years -- I've just changed the chord length slightly. On the earlier (all-aluminum) iteration of the wing, I did a fair amount of testing (well, a fair amount for a fiction writer). Here's the story in pictures. You'll see I went about as overboard on testing aero as I go in, well, a lot of things. :willy_nil

The stuff I've tested -- skirts:

Skirt+Shot1111613203.jpg


Diffuser:

Final+Rear1112209167.jpg


Canards:

QC021160516418.jpg


Oh hell, I'll test anything once. :dunno:

FullEffect1160272140.jpg


Wool tuft testing:

Leading+Edge+Yarn1159141659.jpg


Wing+U+20+91159142269.jpg


Height1149729936.jpg


Tufts1149651248.jpg


Med+Angle+Rear1149718170.jpg


What stall looks like:

Shorty+Max1149726624.jpg


Using compressed air and tubing to shoot glitter over and under the wing, at speed.

Med+Blow+021149901118.jpg


'No wing' tests:

None+021150059187.jpg


Inexpensive ($4 each) ride height sensors from a 95 Lincoln Continental:

RideHeight1159215051.jpg


And the data. This is on a lonely stretch of desert roadway where I could go 100 mph for a set period of time in both directions (to counteract prevailing winds):

Data1159630646.jpg


WingAnglesPlusSplitOnly1159630700.jpg


And track data to back it up:

RideHeightCluster1160621867.jpg


RideHeightComparo1160621765.jpg


Here's what the ride height sensors ended up showing: at 100 mph, with both the rear wing and the front splitter installed (and with the wing set at a 20 degree angle of attack),the front end runs .08" lower, and the rear runs .26" lower than when the car is sitting still.

That's a comfortable garage you got there. Definitely one of my favorites I've seen around here.

I'm also loving the 964, have you ever considered a RWB make over? =) I think this green monster would match your garage nicely: http://www.rwb.jp/SG964.htm

I like the Raugh Welt stuff a lot. It's a little 'loud' for driving around town. My big wing and splitter have the advantage of sitting in the garage on a shelf most of the time. They only come out for track days.

Pretty cool.

As we discussed at one point, working on the outside of a part is tough. Working against a from or mold will produce a finish as good as the surface being worked against. I think I have a pretty good idea of what you are going to do next which is to use the cut out part of the blanks as a reverse mold to make a sandwich over the wing. Mylar that is stiff enough to hold shape but flexible enough to conform to the shape provides that surface.

The surface medium used to strengthen the part such as a resin/cloth or epoxy/carbon fiber system (or a cross combination of those 4) can be applied to the core, placed in the sandwich and compressed with vacuum.

Guys, this requires a little more vacuum than what an auto A/C vac does, so if anyone has knowledge of an industrial vacuum pump that Jack can use, you might pass that info to him.

An example:

vacuum_pump.jpg


A hobby model:

aerospace_vacuum_pump.jpg

I'm going to see what Tyson has access to as a next step. And also see how this easy-to-skin wing works. I'm leery about jumping into Carbon Fiber work. But I know I'll like it once I've learned it.

Ummmm:wtf: Calling an early car (ESPECIALLY a '72 of all years) a 964??!!'
I'm telling!
I think he was referring to the Rauh Welt 964 in the link. (Although my car does have some 964 parts on it.)

Jack, are you using proven airfoil patterns, or are you just building something close??

(I assume the former.)
I had the help of some guys who knew more about it than I do. We tested a bunch of airfoil shapes. A very generous aerodynamicist did a model of my specific car so we could get some useful data from running very realistic simulations.

I'm running a camber-modified NACA 6520 profile.

NACA63520m+labeled1153988124.jpg


Here it is up against some others we considered:

LiftData031153915383.gif


DragData031153915419.gif


Well, I'm not Jack, but he did say he bought the pre-cut forms. and I can say this is not his first rodeo. I think if you go back up this thread a few pages, there are pics of the various wings he has tried.

AFA that one car is concerned, he has become more or less an expert. A couple of years ago he found some stalls using string and yarn taped to one design and used a camera to watch as he hit speeds.

You should see his desk...

sleek-work-space-innovative-airfoil-design-enhances-classic-rolltop.jpeg


...just kidding
That is a pretty cool desk. :)
 
Last edited:

nocones

Well-known member
Joined
Jun 12, 2007
Messages
48
Jack what software did you use to data log the rideheight sensors? And where did you get them?
 

Omphaloskeptic

Well-known member
Joined
Oct 11, 2008
Messages
2,346
Location
Ultima Ratio, Wa.
Jack, from the above pictorial history of your testing, I think I can state that you are definitely not one of those 'hold my beer and watch this' kind of guys. lol You've really done your homework on the car's aerodynamic profile.:bowdown:
 
To avoid these ads, REGISTER NOW!
OP
J

Jack Olsen

Super Moderator
Staff member
Joined
Mar 22, 2009
Messages
6,678
Location
Los Angeles
Well the wing worked great.

But the new uprights failed completely. :)

I tried one step thinner on the gauge of aluminum. It tested fine up to 90 mph. But the first time I went out (and into turn 8 at Willow) the uprights simply folded under the pressure.

Bent1331928902.jpg


You can see I still had the tufts and camera in place, although it wasn't running for the initial test.

The good news was that I had brought the old uprights with me. The bad news is the old uprights only work with the old wing. The good news is I had the old wing with me, too. The bad news is it took the duration of the 30 minute session to take apart the common parts and put the old wing and uprights back together.

The good news is during the next session, I set a new personal best lap time. :cool:

Here's video:

No shots of the wing in this video, but there is a cool reverse angle at 5:02 in the clip. (See that little camera on the license plate in the first picture?)
 

Dan in Pasadena

Well-known member
Joined
Feb 18, 2009
Messages
13,139
Location
Pasadena, CA
Impressive Jack. Congrats on the new personal best.

If I were to attempt something like that I think I'd pee my pants, lol!

Curious, what kind of times were your first laps; before the improved aerodynamics and perhaps before you knew the track as well as you do now?

Also, I saw a momentary 131-132 mph. At that speed do you feel the car has much left? And of course since I personally really loved BB1, did you track her and how was she?
 
OP
J

Jack Olsen

Super Moderator
Staff member
Joined
Mar 22, 2009
Messages
6,678
Location
Los Angeles
The aero gets me about a second per lap at Willow. Maybe one and a half. It hurts my top end speed, and actually is slowing me down on the straights and through turn 8 (since I'm flat on the gas either with or without it, and it adds drag). But it makes me faster through the 80mph-100mph turns (like 1, 2 and 9). I could probably run mid-1:29's now without the wing and front dam/splitter. But I like that I built and engineered them myself (well, with a lot of internet help).

On my first visit to the track, also with a 3.6 in an early car, my best lap time was a 1:54. This was in the rain, admittedly. But I've been driving the same basic setup there since BB1, with just incremental improvements in the car and slow and steady learning for the driver.

My car has very low gearing, which means there's as small a torque drop as I can manage with every shift. I will hit the rev limiter (6850 -- the software is under-reading my RPMs slightly) in fifth gear at 134 mph. So there's not a lot of top end left. If I went to actual race tires, I'd be bumping off the rev limiter at the end of the front straight and at the exit of turn 8. But stickier tires would let me go through turns 1, 2, 3, 4, 5, 6 and 9 faster, so I'd still see a net lap time improvement.

But I've always been too cheap to spring for Hoosiers or other good race tires. I get a full year out of each set of the Nittos -- which sounds crazy to non-racers, but is a great bargain once you're in that world.

There are still pieces of BB1 in this car. I guess my car has been like 'grandpa's hammer' for a dozen years now. I've replaced the body once and the engine twice. But it's still the same basic car.

Just faster. :)
 

Dan in Pasadena

Well-known member
Joined
Feb 18, 2009
Messages
13,139
Location
Pasadena, CA
Interesting. Encouraging (to a 'fraidy cat old dude, lol) is that you've improved your times 25 seconds or so since you began. Not that I ever plan to track a car, but its nice to know there's so much room (theoretically) for a driver to improve his skills.

For all the improvements you've made to your car I can't imagine you've not been VERY tempted to buy a set of Hoosiers; at least once, to see what you could do wearing those shoes? I wonder how many seconds or parts thereof they'd be worth? With and without aero stuff.
 

WNGER 83

Member
Joined
Dec 12, 2008
Messages
18
Location
Oakville, Ontario
Great video, Jack.

For that matter, great garage, great car. It shows that there is always room for improvement. You are an inspiration to us all, don't stop trying to improve.

Thanks for sharing with us.
 

Boosted1

Well-known member
Joined
Nov 25, 2007
Messages
1,679
Location
Georgetown, KY
I also think it would be hard to resist trying race tires just once. Maybe you could get a set comeone is taking off and just go for a couple of laps to compare.
 

Stuart in MN

Well-known member
Joined
Sep 8, 2005
Messages
23,120
Location
Minneapolis
Since I've never been there I had to look up lap times at Willow Springs to see what constitutes a fast lap: http://www.willowspringsraceway.com/page.php?id=11 You're right at the record time for SCCA GT-2, which is moving right along. :thumbup:

Interestingly, I see the actor Craig T. Nelson is way up at the top of that list...I knew he was a decent racer but didn't realize he was that good.

Maybe the next step is active aerodynamics, a la Jim Hall and his Chaparrals - flatten them out on the straights and flip them up in the corners.
 
OP
J

Jack Olsen

Super Moderator
Staff member
Joined
Mar 22, 2009
Messages
6,678
Location
Los Angeles
Thanks, guys.

Stuart, I once was working on a script with a director who was simultaneously directing a show that Craig T. Nelson was in. For whatever reason, they put me in Nelson's office for a couple of days while we were making changes to the script (and Nelson was out of town). The funny thing about his office was that all the pictures on the walls were about racing -- not much of anything from acting. You got the feeling that he acted in order to feed the racing habit.

Which I approve of. :)

Instead of overthinking my uprights mistake (it boils down to .132" sheet being replaced by .08", which was just too big a reduction), I think I'm going to see if I can adapt the old, tried-and-true uprights to the new (now-tested, although very briefly) wing. Cost will be close to zero.

If I can get some time after lunch today, I'll be working on that -- and also my new too-many-vises problem.

visesquad.jpg
 

takeiteasy

Active member
Joined
Dec 15, 2011
Messages
40
Location
WA
Jack, that looks like an awkward setup :) I think they will get in the way of your work. I bet you could make some money selling an "olsenized vise" - yet another way to feed your racing habit.

I like you how you used the yarn for the air flow study - I may have to use that idea for building a heat extraction hood for my car sometime.
 

ckadams00

Well-known member
Joined
Sep 12, 2011
Messages
1,273
Location
Seattle, WA
If I can get some time after lunch today, I'll be working on that -- and also my new too-many-vises problem.

visesquad.jpg

"vices". If you have three Wiltons on your bench you shoud spell it with a 'c'.

EDIT: whoops,my bad, the far one doesn't look like a Wilton. You're good then, no problem at all.
 
OP
J

Jack Olsen

Super Moderator
Staff member
Joined
Mar 22, 2009
Messages
6,678
Location
Los Angeles
Yeah. One is going (the cheap one on the end). One is staying. And one is going to get cleaned up and sold.

I bought it by accident. :rolleyes2
 

ckadams00

Well-known member
Joined
Sep 12, 2011
Messages
1,273
Location
Seattle, WA
Yeah. One is going (the cheap one on the end). One is staying. And one is going to get cleaned up and sold.

I bought it by accident. :rolleyes2

Well Shi**t, if I still lived in the valley I would drive over and get it. Shipping to IL is probably prohibitive . . .:sad:


"Where does he get those wondeful vises?" (voice of the Joker from Batman).
 
OP
J

Jack Olsen

Super Moderator
Staff member
Joined
Mar 22, 2009
Messages
6,678
Location
Los Angeles
I cleaned, buffed, stripped, primed and painted the vises today. The one I'm keeping got painted the same Anodized Bronze color as my other vises.

1765clean01.jpg


I went to the local hardware store to get some Verde Green for the other one, which they were out of. So I looked over the greens they had and saw Spruce Green in Rustoleum's satin finish. Both the color and the finish seemed kind of retro to me, so I changed the plan. My only concern was that this green probably wouldn't look good in pictures next to the green in my garage. Not a big deal, since I'm selling it. But this is what's funny, to me: I really believed I'd picked out a very different green.

1760clean01.jpg


I'm going to have to weld up three of the holes in the inch-thick bench and re-drill for the new vise. But I found some steel bar stock from some old shelves that will fill it pretty well. Then I'll just weld it in, and grind it flat.

I sourced some new pipe jaws, so now both vises have them.

As you can see, I have some kind of in-born inclination for that shade of green. It's a pretty close match to the rest of the green in the garage. :)

1760clean03.jpg
 
Last edited:

bad_idea

Well-known member
Joined
Jun 11, 2011
Messages
4,333
Location
Pasquotank, NC
No need to put round stock in the hole. Just weld in a circle around the outside edge of the hole in an inward spiral. Should only take a minute to fill each hole in. And it's fun to do too.
 
To avoid these ads, REGISTER NOW!
Top Bottom