To avoid these ads, REGISTER NOW!

Modifications to the HF 4 and 5 drawer service carts - what changes have you made?

Rogue1987

Well-known member
Joined
Jul 13, 2011
Messages
891
Location
Missouri
Figure its time I post up a few pictures of my cart. I've...ehh modified it a bit? The best thing about it being cheap as hell is I'm not near as worried about screwing it up as I would be if it were a tool truck cart.

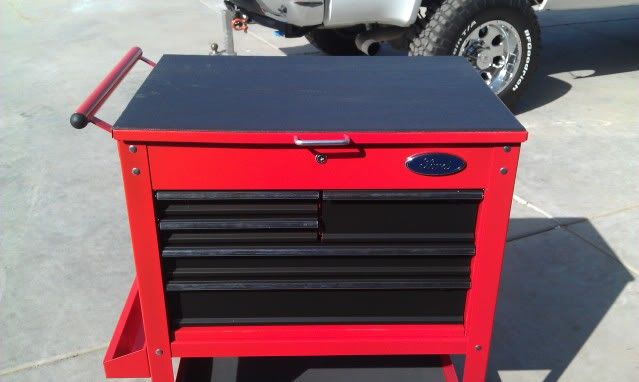
Harbor Freight 5 Drawer Cart
On the back you can see my 'high quality' rack for hanging **** (coats, airhose, whatever) made out of all thread I welded up one day when I was bored. Its held up surprisingly well, for the amount of effort I put into it. I've also replaced the handle with a wrench, an idea I stole from someone here, thanks to whoever thought that up.

cart1

The shelf on the side is just a piece of steel I beat into having a lip on it one day and drilled a few holes in for nut drivers and such. That was the first addition to the cart, besides the wrench handle. Another idea I stole from here. I hope to get the snap on cart hinges next time I see my snap on guy (he skipped us last week!)
cart2


Wooo random **** in the top of it.
cart3

The side cabinet is a mac 'economizer' I picked up for a song off of my snap on guy, with the fancy little side shelf thing. I welded the stock handle on there so I an still push it around on occasion. To be honest, as I'm sure ya all guessed, its a little cumbersome to move around, but at most it goes 10 - 15 feet a week.
cart4


So there is my cart. I'm going to steal the idea of using tubing to make a second shelf out of the one side. That is a great idea.

As you can tell the day I took these pictures we were working veeerrrryyy hard, tho for the last week the cart has been so covered in parts and tools that it was hard to tell the cart was there.
 
To avoid these ads, REGISTER NOW!

Butters

Well-known member
Joined
Jan 29, 2011
Messages
254
I think you win.

But that extra shelf using the steel tubing is a sweet idea too!

Nice work guys.
 

SRM

New member
Joined
Jan 21, 2011
Messages
3
Location
Bristol, Wi.
In response to Recoil Rob and ndnchf, the tubing is 1/4"OD. and is 304 Stainless Steel.
It is NOT brake line, although it would probably work.
I'm a pipefitter by trade and we use this tubing in clean rooms at pharmaceutical manufacturers for pneumatic actuators on
various types of valves for process equipment.
We get it in 20' lengths from pipe wholesale suppliers for most of our installations and I bring home the shorter scrap pieces to use in the garage.
Mostly I just bend an "S" to use for hanging stuff, nothing fancy.
Like my spare welding screen hanging from the garage trusses.(see pic)
 

Attachments

  • 100_2024.jpg
    100_2024.jpg
    139.8 KB · Views: 2,480

HAP

Well-known member
Joined
Aug 24, 2011
Messages
856
Location
NE North Carolina
Although not a HF, I did MOD my Kobalt tool cart. Ended up with an extra work top so I decided to use it for when I need the extra work surface. This box is only used during larger jobs for parts storage and organization of same. I have to be careful, with noting in the tool box the extra leverage can tip the box over.

Regards,
HAP
IMAG0133.jpg

IMAG0135.jpg

IMAG0141.jpg

IMAG0140.jpg

IMAG0139.jpg

IMAG0138.jpg
 

jeffmoss26

Well-known member
Joined
May 25, 2011
Messages
12,851
Location
Cleveland, Ohio
As promised, a picture of the coffee cup holder. He told me it's from a bearing race.
 

Attachments

  • IMG_0479.jpg
    IMG_0479.jpg
    145.5 KB · Views: 5,511

lwlobo

Well-known member
Joined
Mar 23, 2010
Messages
1,076
Location
Colorado Springs, CO
I finally got around to removing the US GENERAL logo and replacing it with that of my favorite motorcycle. Nothing personal against HF, I just wanted to personalize it to suit my garage.

QUOTE]

Nice touch with the Indian logo, I like it. Replacing the US GENERAL emblem with Snap On is silly, but a motorcycle logo? Now we're talking!
 
OP
N

ndnchf

Well-known member
Joined
Jan 9, 2012
Messages
1,556
Location
Fredericksburg, Virginia
Lwlobo - thanks, I think it adds a touch of class!

98tj - Nice job on the inside outlet, very clean installation.

For those interested, Snap On appears to have the lid hinge assembly mentioned earlier, back in stock. I ordered a set for my 5 drawer cart today.
 

ElectroLight

Well-known member
Joined
Jan 5, 2011
Messages
494
Location
Rockville, MD
Wow, some nice looking boxes so far! As promised, here's mine, sorry about the crappy cell phone pic. As I indicated before, I added a small side cabinet to store my battery tools (load tester, charger, tools etc), a 2200VA APC UPS, articulating lamp, outlet strip and modded the aerosol tray to accommodate the jump box. I think I want to build a fold-out work table on the back of the cart, with that UPS in the bottom, there isn't a chance in hell that this thing would tip over!
 

Attachments

  • IMG00373.jpg
    IMG00373.jpg
    141.7 KB · Views: 4,610
Last edited:

bimmerZ5

Well-known member
Joined
Aug 16, 2008
Messages
1,790
aren't you guys all tempted to paint the drawer faces black and slap a "Craftsman" badge on this?
 

crtt1976

Member
Joined
Jul 6, 2009
Messages
22
I saw you guys talking about something to protect the top. I have the 4 drawer and orded some of the black self adhesive stone protector that they use on trailor fenders. I ordered it from ebay and didnt cost much at all. Has worked well for me, just a suggestion for you other guys.
 

bimmerZ5

Well-known member
Joined
Aug 16, 2008
Messages
1,790
I saw you guys talking about something to protect the top. I have the 4 drawer and orded some of the black self adhesive stone protector that they use on trailor fenders. I ordered it from ebay and didnt cost much at all. Has worked well for me, just a suggestion for you other guys.

another option might be to buy a can of "flex seal", mask off the top and spray a coat of the flex seal stuff. instant rubber coating.
 

Twiggss

Well-known member
Joined
Jul 3, 2011
Messages
425
Location
middle
I have the 4 Drawer and the 5 drawer cart the 4 drawer one I took some extra wood paneling I had and boxed the bottom in to keep dust and dirt to a minimum. Used the Liquid Gold on the paneling to keep it lookin good. Works out fairly well thinkin about boxing in the 5 drawer also with aluminum and painting it red to match. would really like to add on 2 more drawers but dont know if they make a kit for this or if I would have to wing it.

on my 4 drawer, I just bought a cheap intermediate box from sears and stuck it on the bottom. and with the tiny bit of space left over between them I have enough room for
this and this for misc nuts, bolts...etc
 

jjjrmx5

Well-known member
Joined
Dec 30, 2010
Messages
3,431
Location
Cincinnati, OH
For those interested, Snap On appears to have the lid hinge assembly mentioned earlier, back in stock. I ordered a set for my 5 drawer cart today.

ndnchf,
Do I need to do a quick sketch with where to drill the new holes in each side of the bottom vertical hinge support ribs in the box since you cannot use the existing two holes that are there and the pins for the hinges are smaller in dia. than the HF holes as well.?

LMK and I'll save and post as a .jpg attachment if ya need it.
:thumbup:
 
OP
N

ndnchf

Well-known member
Joined
Jan 9, 2012
Messages
1,556
Location
Fredericksburg, Virginia
jjjrmx5 - I've printed out your previous instructions and think I understand what to do. But if you want to post specific measurements, that would be helpful.

BTW - my hinges arrived Saturday!
 
Last edited:

jjjrmx5

Well-known member
Joined
Dec 30, 2010
Messages
3,431
Location
Cincinnati, OH
jjjrmx5 - I've printed out your previous instructions and think I understand what to do. But if you want to post specific measurements, that would be helpful.

BTW - my hinges arrived Saturday!

Let's see if this works.

Dimensions are correct. Dwg not to scale.
Dia. of hole for pin depends upon what Snappy sends you.

I can do pics and specs for rest of hdwre if needed as you'll need the new pins for top, two M6 or eq. washers and 2 nylon spacers to make the hinges operate parallel.
:)

The bottom mount points are a no-brainer. The top gives you a fork in the road.

Due to the shock mount pins, the holes are larger than the pins Snap-On gives you. You can either find a rubber grommet with brass insert to insert to neck that hole down and then add the longer pin and shims for the cotter pin lock, or drill the Snap-On hinge holes bigger on the top arm, add a pin that fits the large OEM HF top tab hole and then shim to fit in the same fashion using the larger dia. pin.

Po-tay-toe, po-tah-toe really.
 

Attachments

  • HF-cart-dwg.jpg
    HF-cart-dwg.jpg
    13.4 KB · Views: 2,030
Last edited:

tjmonsen5

Well-known member
Joined
Oct 14, 2009
Messages
1,341
Location
Crystal Lake IL
I really like these carts, and I especially like how a few of you guys have added electrical boxes to them. That is a cool feature! That is the current problem with my craftsman box at home, the cords that stick out at night! I may need to drill a hole in my box so I can fish the wires through, kind of hesistant to do that though.
 
OP
N

ndnchf

Well-known member
Joined
Jan 9, 2012
Messages
1,556
Location
Fredericksburg, Virginia
Got my Snap-On hinges installed tonight. Man are they nice! The lid locks solidly in the vertical position and closes fine. A bonus is that the lid now stands straight up, not leaning in at an angle like it did before. jjjrmx5's directions and measurements were right-on, thanks for the detailed explanation. I made the spacers out of 1/2" aluminum rod. I drilled out the hole in the top of the hinges to 5/16" to match the hole in the lid's flange. Then attached them with stainless bolts, flat washers and nylock nuts. This is an excellent improvement for under $10.

All together I've made 5 modifications to my 5 drawer cart now:

1. Old Ford script wrench handle.
2. Rubber mat top added to the lid.
3. A 115v outlet box and 25' cord.
4. Indian motorcycle badge replaced the US General badge.
5. Snap-On hinges.

I think mine is about as tricked out as its going to be. A great addition to my garage :rocker:
 

Attachments

  • P1002162.jpg
    P1002162.jpg
    96 KB · Views: 3,978
Last edited:
To avoid these ads, REGISTER NOW!

jjjrmx5

Well-known member
Joined
Dec 30, 2010
Messages
3,431
Location
Cincinnati, OH
Winnah Winnah Chicken dinner!!!!!!!!

LOL.

The lid at 90 degrees/verticle is a big plus I agree.

Yep, it's not so high-tech as the shocks, but it ain't gonna wear out , and if it does, a few fasteners and rivets or shorty bolts with nylon lock nuts gets you a lifetime of service.

$10 ea. from HF for replacement shocks . Hmmmmm. I don't think so.

Glad to help. :thumbup:
 
Last edited:

bimmerZ5

Well-known member
Joined
Aug 16, 2008
Messages
1,790
Winnah Winnah Chicken dinner!!!!!!!!

LOL.

The lid at 90 degrees/verticle is a big plus I agree.

Yep, it's not so high-tech as the shocks, but it ain't gonna wear out , and if it does, a few fasteners and rivets or shorty bolts with nylon lock nuts gets you a lifetime of service.

$10 ea. from HF for replacement shocks . Hmmmmm. I don't think so.

Glad to help. :thumubup:

couldn't one just use the hood/trunk shocks from a BMW 3-series which are about $8 each and last about 100,000 miles... i doubt the cart will see that kind of mileage... LOL
 

jjjrmx5

Well-known member
Joined
Dec 30, 2010
Messages
3,431
Location
Cincinnati, OH
couldn't one just use the hood/trunk shocks from a BMW 3-series which are about $8 each and last about 100,000 miles... i doubt the cart will see that kind of mileage... LOL

Nope.

Way different compression rating.

I;m up to my *** in BMW and VW trunk/boot and hatch shocks, but they are meant to hold a far higher weight rating and thusly use a far higher gas charge. That means you need to struggle to close teh box lid or need a limber and agile fat dude to sit on it to close. Your choice. :lol:

The shocks for the tools boxes compare to those in the RV industry for windows, storage doors and are far less charged and meant to handle a certain and far less heavy weight load.

They all look the same, but shock travel and and compression ration vary greatly.

If you have shorties for a light trunk like the 318ti hatch, give it a try, but every one I have tried is a full weight lean on it deal vs the std box shocks.

Cavitation, combined with lack of use (age) along with ****** matl's usually lead to a lid shocks decline.
If used every day, it usually lasts longer, but if always down in the closed position or open all the time, they tend to fail more quickly. Just like hood and hatch shocks.

Lots of use keeps the seals lubed and the gas chamber happy.

:)
 
Last edited:

mdbeck1

Well-known member
Joined
Mar 7, 2010
Messages
2,297
Location
Norman, OK
N...

They all look the same, but shock travel and and compression ration vary greatly.

...
Cavitation, combined with lack of use (age) along with ****** matl's usually lead to a lid shocks decline.
If used every day, it usually lasts longer, but if always down in the closed position or open all the time, they tend to fail more quickly. Just like hood and hatch shocks.

Lots of use keeps the seals lubed and the gas chamber happy.

:)

I learned something. So I guess today was not a total loss after all.
 

FriendOfYours

Well-known member
Joined
Feb 26, 2012
Messages
303
Cut the back off my "souped up" 160 amp mig, used it as a mount for the tank and shoved the welder underneath

Welded a bracket on the back with an eyelet so the handle on tank can be zipped tied to the cart

IMG_20120314_181112.jpg
 
Last edited:
OP
N

ndnchf

Well-known member
Joined
Jan 9, 2012
Messages
1,556
Location
Fredericksburg, Virginia
Several folks have asked about putting a MIG in the cart, but this is the first time someone has posted about doing it. Nice job, just shows the versatility of these carts.
 

karl1672

Well-known member
Joined
Jan 19, 2012
Messages
118
Location
Lakes Region, NH
Picked mine up a few days ago and put it together today. Used the $150 coupon. It's definitely a lot of cart for the money and a lot of storage.

Assembly was pretty easy, a line up punch helped a lot. I was able to put it together myself by lying the assembled frame on the floor and sliding in the box section. Once it was in, I stood up the box an finished the assembly. The hardest thing was removing the drawer lock sticker :lol:

So far, took of the drawer trim pieces and the US General logo (put on SeaRay) and added a fold down shelf I had on another roller. Also, put grommets in all the screwdriver holes on the sides. Makes them fit much better. Now, just have to figure out what to put in it.

P3150002.jpg
 
Last edited:

bimmerZ5

Well-known member
Joined
Aug 16, 2008
Messages
1,790
anyone ever try to fit the shocks from the Snap-On KRSC33 boxes to these?
 

kartracer55

Well-known member
Joined
Jun 21, 2005
Messages
5,317
Has anybody enclosed the bottom of theirs? I have the black 4 drawer and I am thinking about turning the bottom into a sort of "honesty locker" since mine is in an environment where 10-15 people work out of.

Obviously these things are not super secure as it is, but the large storage area for my auto-dark and angle grinder would definitely be nice. Nobody would steal them, but there is definitely a tendency for people to borrow things. If I do go this route, I will certainly put up some pictures as I go. I would probably bolt in some painted 065" plates and lock nut the insides. I'd likely do two doors that meet in the middle with some sort of top/bottom locking mechanism. I'd love to see what you guys have come up with though!
 
Last edited:

mdbeck1

Well-known member
Joined
Mar 7, 2010
Messages
2,297
Location
Norman, OK
Has anybody enclosed the bottom of theirs? I have the black 4 drawer and I am thinking about turning the bottom into a sort of "honesty locker" since mine is in an environment where 10-15 people work out of.

Obviously these things are not super secure as it is, but the large storage area for my auto-dark and angle grinder would definitely be nice. Nobody would steal them, but there is definitely a tendency for people to borrow things. If I do go this route, I will certainly put up some pictures as I go. I would probably bolt in some painted 065" plates and lock nut the insides. I'd likely do two doors that meet in the middle with some sort of top/bottom locking mechanism. I'd love to see what you guys have come up with though!

I've got the red one and there's no reason to lock it (I'm just a DIY and it sits in the garage). HOWEVER. If I was you... I'd enclose three sides (like you said with locknuts on the inside) and then make two swinging doors (if they overlap you only have to lock one) with a single keyed cam lock. If you wanted more security you could use two cam locks (they're cheap and sometimes you can get ones with the same key) or get fancy and rig some kind of rods that move top and bottom. Take a look at another toolbox with swing open doors. I think that a lot of them use this technique... Of course if you want to get REALLY fancy you could use the locking mechanism that is already in the box and figure out how to make it lock the new doors as well.... hmmm...
 

Vividlyvintage

Well-known member
Joined
Dec 25, 2011
Messages
128
Has anybody enclosed the bottom of theirs? I have the black 4 drawer and I am thinking about turning the bottom into a sort of "honesty locker" since mine is in an environment where 10-15 people work out of.

Obviously these things are not super secure as it is, but the large storage area for my auto-dark and angle grinder would definitely be nice. Nobody would steal them, but there is definitely a tendency for people to borrow things. If I do go this route, I will certainly put up some pictures as I go. I would probably bolt in some painted 065" plates and lock nut the insides. I'd likely do two doors that meet in the middle with some sort of top/bottom locking mechanism. I'd love to see what you guys have come up with though!

Oh a place to hide your twinky stash eh? Lol good idea

thanks,
Douglas Johnson
"Skrach"
www.VividlyVintage.com
 

jtfc

Well-known member
Joined
Jul 3, 2011
Messages
148
Location
way out west somewhere
Does anyone know what the weight limit is for the bottom drawer on the 5 draw cart? I have all my 1/2 stuff in there I also keep 2 long prybars and my 1/2 gun in there. Space wise its not full at all but I don't want it to catastrophically fail on me. Any suggestions on how to macgyver a second slide in there or maybe replace them with snap on slides? Thanks in advance.
 

Recoil Rob

Well-known member
Joined
Jul 18, 2011
Messages
467
Location
NY
The specs say the two samll drawers are 44#, the other 3 are 88#. top and bottom compartments 176#'s

from the manual .pdf...

(4) Rubber Casters
5" Dia. X 2" W Industrial Quality (2) Swivel, (2) Fixed.
Construction
Cold Rolled Steel Body
Finish
Red Enamel
Weight Capacities
(2) Small (Top) Drawers
44 LB. (each)
(1) High Middle Drawer
88 LB.
(1) Low Middle Drawer
88 LB.
(1) Large Lower Drawer
88 LB.
Top (Locking) Tray
176 LB.
Bottom Shelf
176 LB.
Total Combined
700 LB.
 

genesis

Active member
Joined
Nov 27, 2011
Messages
37
Location
Arizona
Had a 2' piece of bedliner left over.
Contact cement to both sides and laid down on top.
Should be double tough.

IMAG0134.jpg
 
To avoid these ads, REGISTER NOW!
Top Bottom