To avoid these ads, REGISTER NOW!

1966 F100 EcoBoost Engine Swap (EcoBoosted)

Status
Not open for further replies.
OP
T

TimeWarpF100

Well-known member
Joined
Aug 21, 2010
Messages
6,784
Location
not here
Just counted 41 new pics....

Next up is swapping the engine and trans from the old frame to the new.
Think I finally have all the proper hardware to do that.

Once I get it on a rolling chassis I can then get proper position for the cab, fab up the cab mounts, figure out the floor, firewall, height of cab channeled over the chassis how low the cab can go without major rework of the box.

Since the wheelbase on new chassis is 2.9" shorter than the '66 chassis I will then need to see if I modify the '66 box to fit or change location of the rear axle in the new 2012 frame. I painted the new '12 frame knowing full well I may have to cut out the spring mounting brackets and move them.

I can gain approx 1" in wheelbase by moving the front axle centerline rearward so it will be under 2" I will have to re-locate the rear axle.

Still not 100% sure the new Rear axle is going to fit in wheelwells of the '66 box. Eyeballing and a quick measurement said it would but I do not have tires for the 18" wheels and have not mocked them up yet. Fingers crossed on that one.

Once the cab is mounted on frame I can then begin the tedious task of how I am going to get all the electronics to work in that tiny '66 Dash.

Do have some ideas but not sure how they will play out yet.

Lets just hope its not another 9 DAYS before another update!
 
Last edited by a moderator:
To avoid these ads, REGISTER NOW!

csp

Well-known member
Joined
Mar 23, 2010
Messages
5,720
Location
Franktown, CO
Just out of curiosity, was there any gear setup done, eg. measuring preload, backlash, taking a pattern?

I don't see any gear marking compound and since there was a carrier change I thought there would be.
 

jjpp

Well-known member
Joined
Mar 20, 2011
Messages
190
Location
michigan
I would add an extra bottle of modifier, they have enough problems with chattering on their own from the factory. When you replace the clutch plates you are suppose to soak them in modifier for at least 30 minutes prior to assembly but with the pre built carrier they come dry. For the price of an extra bottle it is cheap insurance.

How fun was it crushing the crush sleeve on jack stands? :)
 
OP
T

TimeWarpF100

Well-known member
Joined
Aug 21, 2010
Messages
6,784
Location
not here
Just out of curiosity, was there any gear setup done, eg. measuring preload, backlash, taking a pattern?

I don't see any gear marking compound and since there was a carrier change I thought there would be.

Yes, After spending this much time and $$ I was not about to cut a corner and to make sure it was done correctly. For the 1st time in my life I went to the Dealer (other than warranty work) and had their tech set the pinion depth & backlash as I did not have the proper Adaptor setup 205-160, 205-383, 205-226 along with proper Drive Pinion Gauge Tube @ nearly 1k for all the 9 3/4" axle tools I decided to have them do it. Nominal pinion depth was set at .032 & backlash @ .010. I did check pattern and backlash just to satisfy myself. I torque every single nut bolt and screw also that is why I spent well over 400.00 purchasing all the correct manuals etc. So glad you asked but I usually do not miss much doing this stuff. Glad someone is standing over watching . . . Thats part of reason why it took me 9 days or so to complete to gather everything needed and to make sure it was right. I did not like Fords paint on housing so I got it down to bare metal, scrubbed it with PPG Dx579 then with DX 520 and re-finished it. So yes I am slow but very very seldom ever have to re-do anything on an entire veh.

I would add an extra bottle of modifier, they have enough problems with chattering on their own from the factory. When you replace the clutch plates you are suppose to soak them in modifier for at least 30 minutes prior to assembly but with the pre built carrier they come dry. For the price of an extra bottle it is cheap insurance.

How fun was it crushing the crush sleeve on jack stands? :)

See above, and yes I did purchase actually 3 bottles of friction modifier 2 for this project and 1 for another project. I poured 1 bottle over each clutch pak.
I did not check the the traction lok itself as it was fresh out of the box.
With a few "connections" I used the best tech @ FoMoCo for the job.
In his notes it says: "Note, Must use Ford Friction Modifier and 1st 5 minutes of break in suggest rear wheel off ground, run in reverse to insure proper lube breakin on new bearings" He also reminded me to use 2 bottles of the friction modifier.

I was that concerned about getting it right, I for first time in my life farmed something like this out. Do I think I could have done the same? Absolutely but just did not want to spend the BIG BUCKS for proper rear end setup service tools.

Madness. I think this truck will be BETTER than factory by the time you're done. Plus its got cool sheetmetal.

Thanks!

I'd like an Ecoboost in my F150 when you are done.

No problem . . .

I think as this build moves on one will find I am not one to cut corners. I usually do my research before just jumping in and tackling a job I have not done before. Not that I am still not learning and the occasional screw-up still possible . . . It looks like we have some pretty sharp people here in case I wander off the proper build path. If there is something I skip or miss its nice to know someone can point out what I may have missed. I am just posting what I think could be of interest. If I posted all the pics I take the server would have crashed:dunno::lol_hitti:3gears:

Refer back to this build:

http://www.jalopyjournal.com/forum/showthread.php?t=595366

The last vehicle I restored was this one:

IMG_1723-1.jpg
 
Last edited by a moderator:

byoungblood

Well-known member
Joined
Apr 6, 2011
Messages
2,590
Location
Berryville, VA
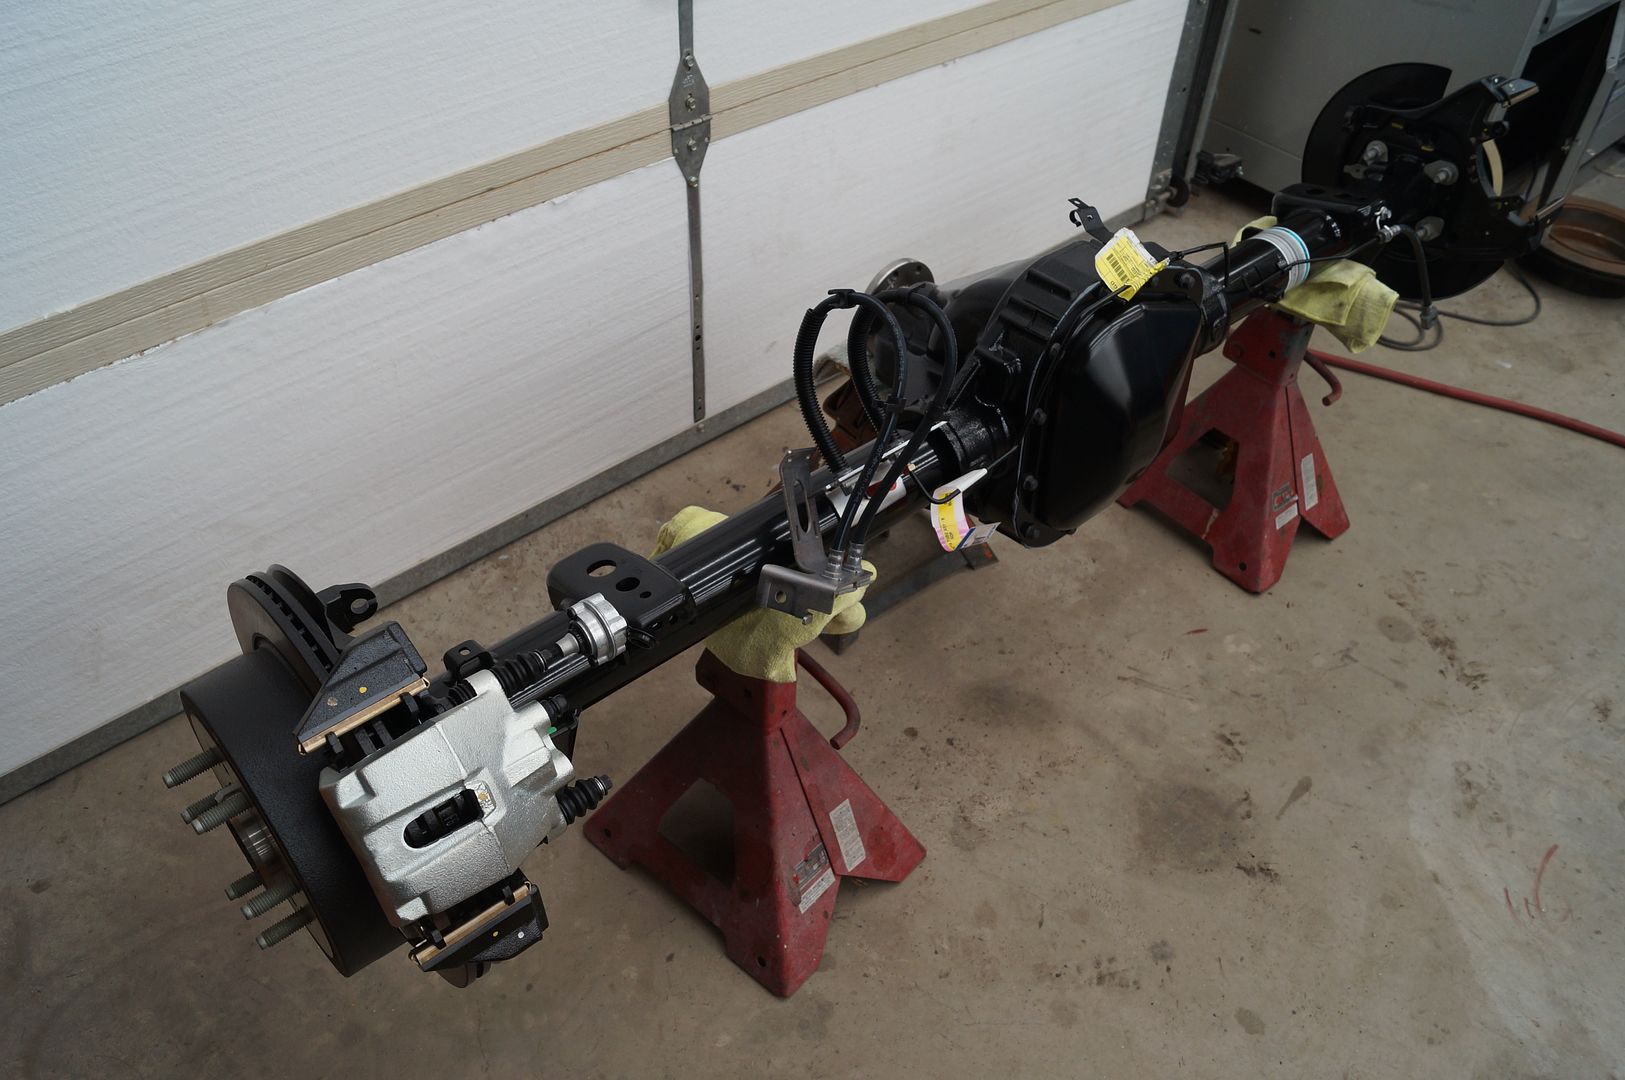
That part coming off of the caliper is a vibration damper. Ford must have changed something because my 2012 EcoBoost doesn't have one,
 
OP
T

TimeWarpF100

Well-known member
Joined
Aug 21, 2010
Messages
6,784
Location
not here
That part coming off of the caliper is a vibration damper. Ford must have changed something because my 2012 EcoBoost doesn't have one,

BINGO! We have a WINNER!

Is your truck a 4x4 or 4x2? I think its only on the 4x2 Trucks. Seems silly to me to have that chunk of weight hanging off the bolt. Looks like a complex little part. Might be with just a certain gear ratio etc.

I was hoping for some Funny responses to what it is. "Caption"
 
Last edited by a moderator:

byoungblood

Well-known member
Joined
Apr 6, 2011
Messages
2,590
Location
Berryville, VA
It's a 4x2.

I can only guess it is supposed to dampen some vibration from when the brakes are applied, but if that's the case, why not one on each caliper? Guess we'll never know unless a Ford engineer comments.
 

sselander

Well-known member
Joined
Nov 20, 2008
Messages
2,041
Location
CT
funny, I was just reading just last week about the low frequency dampers on the Raybestos website.

http://tinyurl.com/6uwc4zx

"Raybestos low frequency dampers incorporate an energy absorbing compound that eliminates low frequency vibration in the 0-2000Hz range… helping reduce low frequency noise for many problem applications."
 
OP
T

TimeWarpF100

Well-known member
Joined
Aug 21, 2010
Messages
6,784
Location
not here
Thanks to all for the kind words!

It's a 4x2.

I can only guess it is supposed to dampen some vibration from when the brakes are applied, but if that's the case, why not one on each caliper? Guess we'll never know unless a Ford engineer comments.

Great thread....best in freeparking...keep it up!

Shaun

I think so.

:beer:

funny, I was just reading just last week about the low frequency dampers on the Raybestos website.

http://tinyurl.com/6uwc4zx

"Raybestos low frequency dampers incorporate an energy absorbing compound that eliminates low frequency vibration in the 0-2000Hz range… helping reduce low frequency noise for many problem applications."

Interesting read, thanks for the link.


Plug one into a fox body, talk about scoot!

That would be a neat swap! When I started this project I told the wife I wanted to turn it into a business if this project turns out like I hope it will.

Business name maybe "EcoBoosted" Then have everything needed for swaps on hand for all the Ford EcoBoost engines. From the 1.0L to the 1.5L to the 2.0L & the 3.5L Along with the up and coming Direct injection V-8's.
Ford has some great up and coming engines in the pipeline.

That's the reason I sold off some of my prized possession"s. Its also driving me nuts to have the 427 Project truck just sitting here and so close from getting it fired up for the first time.

Feel free to drop one into my 85 GT. My son wants to put the 4V out of his 03 Mach into it.

Sorry bout that keep up the great work. What a support group you have developed on hear.

Best group on the net!

Had big plans for today to get going on this project as during the week the time seems to be so limited. Having a graduation party at our house this evening for 4 different families (college grads) so today is a day of getting some of the MESS cleaned up, making some parking room, been so busy trying to get things done it looks like I have a WEED factory going here. Somehow have to try to get in at least a couple hours on the ECO project.

Yesterday managed to pick up some neat electronic toys/testing equipment for great prices. Will post more info in a bit.

I am probably a bit "over excited" about this project right now as it reminds me of the time many moons ago when I dropped a Tunnel Rammed SCJ 429 into my 1970 Boss 302 Mustang. Solid Cam, ported heads, big tube OPEN headers & that first test drive (around midnight) I was so excited the late night run I was oblivious as to what my neighbors might think until of course my dad came to my garage and gave me a schooling on respect for the neighbors! And the time a couple years later when I took the first drive in my 1967 Mercury Capri with a Factory Installed 425HP 427. Its fun to be excited with projects as an "official" Old Fart. Keeps the brain going. LOL
 
Last edited by a moderator:

Mavawreck

Well-known member
Joined
Jan 30, 2011
Messages
1,835
Location
Durham NC
Plug one into a fox body, talk about scoot!

I embarked on a similar project with a unreal 52k mile reef blue 1993 notch a few years back but had to sell it when I left the country for work. The plan was a full coil over suspension, flaming river rack, 8.8 rear, 4 wheels discs, and a mild turbo 2.3 backed by a T5. Factory interior with bolstered seats, factory lx exterior, and pony rims. I plan on trying again with ecoboost in either another fox coupe or even a first gen.

as purchased...
IMG_0580.jpg


Still would not come close to the skill and execution going on with the OP's project. Looks amazing!
 

Chris Stapley

Well-known member
Joined
Jan 22, 2010
Messages
398
Location
Campbellford, Ontario
Thanks for the response, the truck I have Howling down the road is the notorious 2004 FX4 with a 9 3/4 with a 3.55:1 ratio. I expect that this axle would be an identical setup and you almost have me convinced to let Ford set mine up too with the lack of specialty tools as well. As a mechanic, I have done many setups of rear diffs, most of 'em were on farm or construction tractors though and they tend not to howl as bad at 25 moles per hour either..
Keep clicking those photos off, this has become by far the best read on any of my regular forums yet.


Thanks Chris!

What yr, make, model Rear axle are you rebuilding?

Getting ready to upload a few pics so will post them in a bit.
Just about done with axle assy. Still need to add brake lines, rt rotor and caliper, vent hose. Sure glad I added the Traction Lok as will most likely need it especially when I add some boost to the turbo's.

These new ones are pretty involved and not so simple like the ford 9".
 
To avoid these ads, REGISTER NOW!
OP
T

TimeWarpF100

Well-known member
Joined
Aug 21, 2010
Messages
6,784
Location
not here
Thanks for the response, the truck I have Howling down the road is the notorious 2004 FX4 with a 9 3/4 with a 3.55:1 ratio. I expect that this axle would be an identical setup and you almost have me convinced to let Ford set mine up too with the lack of specialty tools as well. As a mechanic, I have done many setups of rear diffs, most of 'em were on farm or construction tractors though and they tend not to howl as bad at 25 moles per hour either..
Keep clicking those photos off, this has become by far the best read on any of my regular forums yet.

If you are just repairing a noisy bearing etc that would not be so difficult. It was because I had a brand new housing with a new Traction Lok that it became a bit more involved. What all were you planning on doing to your rear axle? Just bearings would be not so difficult.

I have the entire shop manual in PDF file I made if you want me to send you a copy of the rear axle portion. Axle bearings/seals is a quick and easy job. Its getting the pinion depth correct if major components are replaced is the biggie.
 
Last edited by a moderator:

Worsedog

Well-known member
Joined
Mar 2, 2008
Messages
1,521
Location
Central FL
I just realized I do not have ANY recent pictures of the interior!

A couple from day I bought it 2~3yrs ago.

I was totally shocked when I pulled out the buckets and carpet at how nice it was inside. Wish the outside paint was that nice for sure!

The carpet was so dried out it was nearly powder on the floor. Not so bad on the carpet behind the seats.

This just gave me an idea I have never shot any video of this truck so now that I have a good 35mm Camera with video I will shoot some.

Interesting part with this LUCKY FIND Ranger is it was listed on craigslist for big bucks then the price dropped over a 2.5YR period. A single poor picture from a cell phone & a great distance away. I called the lady who turned out to be the original owner and asked her about rust & body and she was pretty insulted. I then asked if she could email me pics as the truck was approx 50 miles away from me. She said her grand daughter would email me some pics. When I saw a pic of a BUCKET SEAT I about dropped what ever I was doing and though naw, no such thing as a Bucket seat F250!

I called again and 1/2hr later was on my way to look at it. Ended up buying it for 900.00! She said it was parked because of a misfire and shop could not figure it out. Because she had a large camper on truck and towed a 27' trailer behind it she had added a more powerful GT engine. When I arrived I could tell it had been sitting for quite some time the california plate still on it. There was a piece of plywood in box and thought probably just to hide the dents. I asked if I could remove plywood.. Sure she said and much to my amazement it was there to protect the box. I went back home to get my car hauler with winch and the rest is history.

When I got home I started to check it out and found indeed the engine was a
1968 GT390! A friend needed a GT engine so sold it to him for 800.00 as a cam lobe had gone south the reason for the misfire. So I had this wonderful California RANGER for 100.00 and the trip to pick it up. It sat inside trailer for about a year then when I was moving my oldest daughter helped me get it running. She claims it as hers and just loves the truck. I was hoping to paint it the original color this summer if time allows. One of the best driving older vehicles I have ever owned. Video soon . . .

abd8334f.jpg

1d713166.jpg

Those seats and belts look just like the ones in my 65 Mustang, with out the risers of course.
 
OP
T

TimeWarpF100

Well-known member
Joined
Aug 21, 2010
Messages
6,784
Location
not here
Why was the last poster's post removed?

Just a bit ago there was a newbie who posted and now it has been removed completely. Can I ask a MOD why?

Nice plates on that trailer...

Good eye! Friends trailer from Wasilla, AK


Those seats and belts look just like the ones in my 65 Mustang, with out the risers of course.

Yes, Ford used the seats from Mustang and added the riser's to fit the truck.
If a console was ordered the one from a Falcon was used.

so ...is it done yet ?

:)

Sure is! I took it for the first ride saturday night and on the first real acceleration run it started to misfire and shake then a loud buzzing noise and the ride was over. (Stinkin' Alarm Clock)
 
Last edited by a moderator:

Chris Stapley

Well-known member
Joined
Jan 22, 2010
Messages
398
Location
Campbellford, Ontario
This is exactly what I'm up to . I have the notorious howling pinion bearing to deal with. If you would send the PDF to me I would be forever greatful. If you send to my e-mail address that would be awesome [email protected]
Thanks again for responding, can't wait for the next installment on this job...
Chris.


If you are just repairing a noisy bearing etc that would not be so difficult. It was because I had a brand new housing with a new Traction Lok that it became a bit more involved. What all were you planning on doing to your rear axle? Just bearings would be not so difficult.

I have the entire shop manual in PDF file I made if you want me to send you a copy of the rear axle portion. Axle bearings/seals is a quick and easy job. Its getting the pinion depth correct if major components are replaced is the biggie.
 
OP
T

TimeWarpF100

Well-known member
Joined
Aug 21, 2010
Messages
6,784
Location
not here
This is exactly what I'm up to . I have the notorious howling pinion bearing to deal with. If you would send the PDF to me I would be forever greatful. If you send to my e-mail address that would be awesome [email protected]
Thanks again for responding, can't wait for the next installment on this job...
Chris.

If it is just a noisy pinion bearing you should be good to go.

Just use same shim under inner bearing with new bearing then check from there and will most likely be spot on as its not usually the bearing that makes improper pinion depth. At least you will be in the ballpark starting out.
Check your "email"

I will send you the complete parts list also with an exploded view.

Never got to touch the project this weekend. Too many of those "help" calls from friends with car issues. When the temps hit 100deg many a/c systems are not up to the task.

Now that it will most likely be 100+ every day from now until after 1st wk in October things may slow a bit unless I can get some room in shop to work. I have been working mostly outside.
 
Last edited by a moderator:

Riverrojo

Well-known member
Joined
Oct 9, 2009
Messages
120
Location
Livonia, Michigan
That part coming off of the caliper is a vibration damper. Ford must have changed something because my 2012 EcoBoost doesn't have one,

I'm a tech at a Ford dealership and your information is incorrect.
It is not a vibration dampner, it's the sensor for rear trailer sway feature.
 
OP
T

TimeWarpF100

Well-known member
Joined
Aug 21, 2010
Messages
6,784
Location
not here
Stop dreaming. :lol: Awaiting progress reports :thumbup:

Only way I can get it done quickly is DREAM!

I love it, subscribed, keep up the good work, and MORE PICTURES!

Thanks! Chompin' at the bit to get back on it but so much other stuff to do and the temps are now in the 100's during the day. This week should get more done.

I don't know how I missed this thread but i'm sure glad I found it now. Awesome, keep it up.

Thanks! More soon . . .

I'm a tech at a Ford dealership and your information is incorrect.
It is not a vibration dampner, it's the sensor for rear trailer sway feature.

So FoMoCo, Raybestos are both wrong? I just bought another today it it costs under 15.00 and there are no wires going to it. it has a part number of
AL3Z-4A263-A. Can you explain that? See Raybestos web site here:

http://www.raybestos.com/wps/wcm/co...df78&CACHEID=e2c3a7804a6e86a5b09cfe3d02efdf78
 
Last edited by a moderator:
OP
T

TimeWarpF100

Well-known member
Joined
Aug 21, 2010
Messages
6,784
Location
not here
In real life Ford uses the Roll Stablity control along with wheel sensors, yaw rate, lateral acceleration sensors and also a gyroscopic roll rate sensor which then applies selective brake pressure on vehicles opposite side, its also possible to reduce engine power as part of trailer sway control. I have driven a new ecoboost towing a HUGE trailer and put it into trailer sway just to see how it would react. It was absolutely wonderful by the way.

In a fraction of a second the truck was straight, the sway light on dash came on for a brief moment and all was well. I repeated the test 3 times just to see how cool it was.
 
Last edited by a moderator:
OP
T

TimeWarpF100

Well-known member
Joined
Aug 21, 2010
Messages
6,784
Location
not here
Your thread on FTE is gone. Is there a different thread???

I was not aware it was gone. I have not been back there for quite some time as little interest. They did not like the mods I was doing. This is the only "BUILD" I will update on the net here on GJ. I will on occasion post something on youtube but the actual build will be here as long as there is interest.

108deg in shade here today and trying to work out in sun is just too much so on hold for a bit until I can get it in shop but only have 1 bay avail.
Problem when you go to 1/3 the shop space you had prior and less than 1/2 the house space. Just no place to put anything until I get a real garage built.

Makes me sick to see the eco chassis etc just sitting outside in sun.
I have far too much $$ in the 427 Project to push it out.

Today my cooling in garage could not keep up.... got up to 88 deg in shop with cooling on. (A/C) The metal siding on shop gets so hot you will get burns if you touch it. Need a lot of work on shop Exterior. Some how some way need to figure out a way to keep things out of the sun.
 
Last edited by a moderator:
OP
T

TimeWarpF100

Well-known member
Joined
Aug 21, 2010
Messages
6,784
Location
not here

Thanks! I had not seen that post . . .

Well, Today I was able to get a 2nd A/C unit installed in shop!
I had one sitting in my storage trailer that I used as a temp a/c unit at my rental house. Only took an hour or so to install. Cut a hole in wall, made up a cord and it was blowing 37deg air! 1st unit was blowing 52deg air which is still nice.
No problem keeping up with outside temps of 107deg today.

Now I just have to get room in shop so I can start back up on this project again. No idea where the days are going . . .

Got side tracked a bit with some electronic test equipment needed to finish the job on ecoboosted. Now I have a Ford (Rotunda) VCM & VMM up and working on a handy little laptop. Spent a couple hours testing it on my '02 7.3L PowerStroke. I like the fuel economy test the best, amazing after a few mods what it will get for mileage if its driven nice on level ground.

I now have the software and tools to do updates trouble shooting on any Ford~Lincoln~Mercury from 1996 thru 2013!

The new list even shows updates avail for the 2013 662HP Shelby. NEATO!
Live updates for the next year too. Now I really gotta get motivated for the EcoBoosted project again so I can try it out! At least when my own Fords have an issue I can fix them. Could not find the OBDII port on my '65 F250 so will keep looking...:lol::lol::willy_nil
 
Last edited by a moderator:

fergus

Well-known member
Joined
Oct 4, 2009
Messages
1,620
Location
Yolo County CA
So what's this fuel economy test you speak of? I have 2000 Powerstroke...the best I get is about 18.4 at 70 mph. I'm looking for more.
 
Status
Not open for further replies.
To avoid these ads, REGISTER NOW!
Top Bottom