To avoid these ads, REGISTER NOW!

The VISES of Garage Journal

To avoid these ads, REGISTER NOW!

bigcaddy

Well-known member
Joined
Jan 17, 2012
Messages
2,418
Location
Orange County/ San Fernando Valley
I like that, I have one of those pivoting bases, now can I find a nice BB or similar cool smaller vise and do that... :headscrat


I almost picked up a spare one of those at a sale not too long ago. It was sitting on a workbench, unnoticed, but i was occupied with going through a few tool chests while others around me shopped. Once i started on the bench, i looked over and saw it sitting in another guys box.

I asked him if he would be willing to part with it but he said "no, i'm building my own tools up right now. Once i get home and figure out what this is, ill find a use for it"

If i come across another one of the Wilton Power Arm bases, ill give you a call. All of my Baby Bullets are already mounted to bases:evil:
 

Catalyze

Well-known member
Joined
Feb 7, 2011
Messages
1,369
Location
New Mexico
Grats Zoomie on the BB and Power Arm. Maybe one day Wilton will give us a commerative baby to buy.

75R1 - very nice Parkers....the 900 series seems to be the most prolific of the Parkers and you have a great pair

craig
 

Outlawmws

Well-known member
Joined
Aug 9, 2011
Messages
39,188
Location
The Badlands
So almost two months ago I picked up what I thought was a cool, if small light duty little Columbian at an estate sale for $4. Well, I should have looked closer, as it turned out to be more of a parts vise than anything else. (Dark shed, hands full of stuff already, I simply hooked the handle with a finger and continued “shopping” and never really inspected the damn thing… not until I got home)


Then I realized its dynamic jaw had been broken out. Not once, but twice! Some of the broken out bits were missing… (On top of everything else this thing was well rusted together, and the center swivel bolt had to be “persuaded” with a hammer impact, and the swivel locking bolt was even worse to get off, taking repeated does of PB blaster, persuasion, and finally heat to get it to budge. The flat shoulders of the swivel lock bolt died and it had to be replaced with a slightly ground on carriage bolt.

Here is the vise as brought home. The arrows show where it had been braised together previously on one side the other side had also been braized. I think there were 3 parts besides the main jaw and slide... I decided to dissect it a bit and looked it over and finally decided to show you can repair a dead vise, or at least create a zombie vise that lives again even if technically dead! :D


attachment.php


So this post will dissect the damage and analyze what worked and what didn’t in the previous repair. The following post will cover the new repair I made to create the Zombie Vise”!

The dynamic jaw stripped and showing its wounds. I broke the lower red arrow braise off by hand, as well as the section that was still braised on. Then I used my regular vise and a crescent to “peel” the braize off the chip.

attachment.php
attachment.php
attachment.php


You can see where the braise actually stuck quite well to the smaller chip, and where the braize didn’t actually stick to the larger jaw. Why? :confused: 
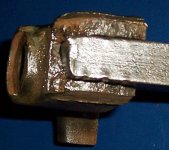
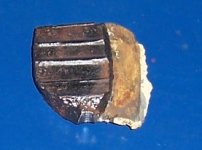
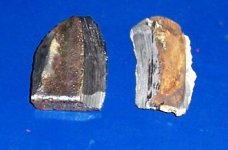
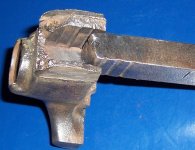
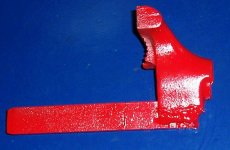
Because of the jaw’s extra mass; it was not properly heated up and the braise laid on top and didn’t actually adhere into the metal! It‘s hard to see in the pics, but the silver shiny section of the braize chip is actually metal off the smaller chip, and the other side that looks sort of brassy, is actually covered in a thin layer of rust that penetrated under the braize and ultimately failed it.


You can see where the dynamic jaw slide was in this case actually made in advance with grooves, and then cast in place when the dynamic jaw was made:

attachment.php


attachment.php


So someone broke this thing, who knows when, and someone (else?) made a stab at repair with braising, but failed to get the main jaw hot enough to actually get a good bond. The key here would have been to pre heat the main jaw at least, before braising. (Smaller parts tend to heat quickly; larger parts take more energy to get up to heat and if not properly heated, cool the repair with a heat sink effect.)

On to the repairs in the next post!
 

Attachments

  • columbian vise arrows.jpg
    columbian vise arrows.jpg
    25.9 KB · Views: 791
  • Fitted.jpg
    Fitted.jpg
    83.5 KB · Views: 788
  • parts 1.jpg
    parts 1.jpg
    26.6 KB · Views: 787
  • parts 1a.jpg
    parts 1a.jpg
    26.6 KB · Views: 782
  • parts 2.jpg
    parts 2.jpg
    34.5 KB · Views: 783
  • inside.jpg
    inside.jpg
    113.2 KB · Views: 1,494
Last edited:

Outlawmws

Well-known member
Joined
Aug 9, 2011
Messages
39,188
Location
The Badlands
Post two

So my attempt to repair this vise went as follows:

I put the parts into an oven (recent acquisition for the shop) and let it cook for an hour at 500 degrees (high as it will go…) I took the jaw part out, quickly clamped it in my welding vise, and then got the slide and Vise grip clamped it in place. Then I made three strong tack welds (I used my SP125 MiG with flux core wire... Why? I’ve had good luck welding cast steels together in the past with regular MiG wire, and while not using a gas in this case, the flux core is the same basic metal filler) I then unclamped it and welded the back side and two sides with about 5 passes each.

Sorry, I forgot to take pics before painting :dunno:

attachment.php


attachment.php


I did not weld the inside corner of the jaw to slide interface. First, I didn’t want to introduce a stress riser with a weld there, but also that is where the vise screw keeper rides and there was really no room for a weld fillet unless I ground a groove (another stress riser) and ground it flat after welding. Simpler to just leave it.

attachment.php


After I was done welding I put it back in the oven, still at 500 degrees, for another hour, and then backed the oven down and let it cool slow. Eventually I took it out and put it in the sun on a hot steel tank sitting conveniently nearby, and let it set the rest of the afternoon.

Ordinarily I’d have used the tried and true hot sand method for slow cool down, but didn’t have any sand handy, and simply didn’t want to mess with it, so I tried this method.

Once cool enough to handle, I assembled the major vise parts, and closed the screw and clamped a small bit of hardwood. I then hammered hard on the screw handle with my palm to “test” the weld’s strength. I got it as tight as I could, and no visible issues (and no failure) and it passed the basic “bridge test”

(Anyone remember Calvin and Hobbes?)

attachment.php


In any case, this Zombie Vise survived the “bridge test” so I painted up the dynamic jaw to match the rest of the previously painted vise, and reassembled shimming the main screw so it had less than 1/8 turn backlash, and its ready for light service again, (not that is was ready for heavy service even when new…) here it is before and after:

attachment.php


attachment.php


attachment.php
 

Attachments

  • Complete 2.jpg
    Complete 2.jpg
    87.3 KB · Views: 1,453
  • Complete 1.jpg
    Complete 1.jpg
    84.7 KB · Views: 747
  • Columbian vise.jpg
    Columbian vise.jpg
    46.2 KB · Views: 1,459
  • not welded.jpg
    not welded.jpg
    57.3 KB · Views: 751
  • Welded 2.jpg
    Welded 2.jpg
    70.6 KB · Views: 749
  • Welded 1.jpg
    Welded 1.jpg
    63.7 KB · Views: 752
  • Calvin & Hobbes bridge weight limit.gif
    Calvin & Hobbes bridge weight limit.gif
    21.7 KB · Views: 637
Last edited:

gregthor

Well-known member
Joined
Feb 24, 2010
Messages
267
Location
MICHIGAN
Outlawmws - Great technical write up on the weld repair. That is the stuff that makes GJ a great place to spend time.
Thanks for taking the time to do that!!
Greg
 

toomanytoyzz

Well-known member
Joined
May 11, 2012
Messages
1,571
Location
Malvern, PA
For $30 why are you not interested? :wtf:

He was asking $75 for it a few weeks ago. I'm going to look at a Chas. Parker for $65 more local to me this weekend. I always wanted one with a swivel jaw.

It would probably work out about the same if you factor in gas $$. I would really like both, but the wife would probably want to put an important part of my anatomy in one the vises:willy_nil.

Found this on my local craigslist while looking for a wilton, maybe someone else is interested?
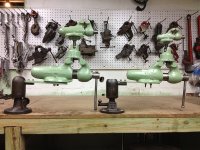
Hey markf4e
Do you ever get to the farmer's market on 13? You can usually score a vise or two up there. I should have snatched an old Craftsman machinists vise a guy was selling a couple of weeks ago. It was really cool looking. It had a HUGE swivel base.
 

Attachments

  • 5Na5I25Fb3G93Ff3L9c6jcf3b58ef5a001243.jpg
    5Na5I25Fb3G93Ff3L9c6jcf3b58ef5a001243.jpg
    33.3 KB · Views: 41
Last edited:

Tjc

Well-known member
Joined
Oct 15, 2010
Messages
552
Location
where am i nj
Well right now it's mostly apart.. except for that infernal design Prentiss uses to hold the screw in place. I'm thinking I'll paint it to match my other Prentiss which is the same color as the Littlestown I just finished...

4-28-11016.jpg


4-28-11018.jpg


Yes, the balls on the end of the handle are aluminum :) & yes, I know the cotter pin is missing. I'll fit that tomorrow.

At some point the Prentiss was black & has been dipped to strip it all off, except behind the jaws etc.

4-28-11017.jpg

That's weird as hell..... I just redit those exact 2 vises......
 

markf4e

Well-known member
Joined
Oct 25, 2010
Messages
87
Location
Delaware
Hey markf4e
Do you ever get to the farmer's market on 13? You can usually score a vise or two up there. I should have snatched an old Craftsman machinists vise a guy was selling a couple of weeks ago. It was really cool looking. It had a HUGE swivel base.

That vise is too big for what I want, otherwise i would snag it. I haven't been to that farmers market in years... I will have to make a trip up there when I have time! Thanks for the tip
 

toomanytoyzz

Well-known member
Joined
May 11, 2012
Messages
1,571
Location
Malvern, PA
That vise is too big for what I want, otherwise i would snag it. I haven't been to that farmers market in years... I will have to make a trip up there when I have time! Thanks for the tip

How big of one do you need? I have some small ones I'd let go for next to nothing. I'll be up there tomorrow and I'll see if they have any as well.
 

Catalyze

Well-known member
Joined
Feb 7, 2011
Messages
1,369
Location
New Mexico
While this post isn't about a Vise, it is about vise accessories! Once upon a Time there was a young lad (hey...it's my story and in it I am a young lad) and he was scanning Ebay late one night. It might have been a dark and stormy night...I don't remember. He came upon an auction with the title "Prentiss" in it. That caught the lad's attention like a free **** site. However, he could not identify what in the Wide Wide World of Sports, the auction items were. They had Prentiss stamped on them but no description of what they were or did. The Lad dashed off a carrier pigeon to Sir Autopts and said "Dear Sir....WTF is this auction?" His answer was "Buy it and if you win, I will tell you." I did...and he did. So here is a set of Prentiss Pipe Jaw Attachments for a 4" vise.
Craig
View media item 21025View media item 21024View media item 21023View media item 21022
 

zoomieport

Well-known member
Joined
Nov 21, 2011
Messages
1,803
Location
The Mall City
While this post isn't about a Vise, it is about vise accessories! Once upon a Time there was a young lad (hey...it's my story and in it I am a young lad) and he was scanning Ebay late one night. It might have been a dark and stormy night...I don't remember. He came upon an auction with the title "Prentiss" in it. That caught the lad's attention like a free **** site. However, he could not identify what in the Wide Wide World of Sports, the auction items were. They had Prentiss stamped on them but no description of what they were or did. The Lad dashed off a carrier pigeon to Sir Autopts and said "Dear Sir....WTF is this auction?" His answer was "Buy it and if you win, I will tell you." I did...and he did. So here is a set of Prentiss Pipe Jaw Attachments for a 4" vise.
Craig

WOW... JUST WOW... :bowdown:
 

mvptrukin

Well-known member
Joined
Aug 27, 2010
Messages
517
Location
Denver, CO
Mr Catalyze,
Did you repaint the pipe jaws or did they come like that? You always do a fine job on your vise projects and the paint does seem to match, also what price did you pay? No b4 and after pics?
 
Last edited:
To avoid these ads, REGISTER NOW!

nine4gmc

Well-known member
Joined
Mar 24, 2012
Messages
14,357
Location
Dallas
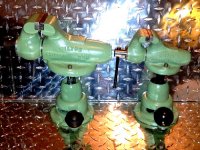
WOW!! How much does the Yost weigh??? Does it have pipe jaws which retract with the screws on the side? That's a REALLY nice looking vise. What's your plans with it?


the Yost 32 weighs about 74 lbs
pic354.jpg


that is pipe jaw slots, but no jaws:mad:
pic355.jpg


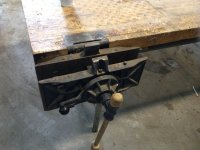
annnd, its cracked in back.:(
pic356.jpg


the Columbian 604 weighs about 45 lbs
pic357.jpg


the Reed 104 weighs about 42 lbs
pic358.jpg


and the lil Simplex weighs about 17 lbs
pic359.jpg


group shot
pic360.jpg
 

Catalyze

Well-known member
Joined
Feb 7, 2011
Messages
1,369
Location
New Mexico
They were in wonderful raw metal shape....not a bit of rust on them. They swivel at the touch of a finger and had those old square head pinch bolts. I beat out one other bidder and I think I paid $21.00 for them. The only reason that I painted them was so that I could paint the lettering so folks could see the logo better. So if you can imagine them as just bare clean metal (the actual gripping teeth are how they came)....that is the "before" version.
Craig
 

Catalyze

Well-known member
Joined
Feb 7, 2011
Messages
1,369
Location
New Mexico
Nine - your last photo shot looks like a defensive line at the end of a football game....dirty and still meaning business!
Craig
 

metalmagpie

Well-known member
Joined
Nov 1, 2011
Messages
798
Location
Seattle
I have a set of 3 stepped vee type pipe jaws if anyone needs them. Hit me up at gwe AT tinyisland DOT com if you want to talk about it.

metalmagpie
 

gatewaysysop

Well-known member
Joined
Nov 11, 2008
Messages
3,290
Location
Arizona
While this post isn't about a Vise, it is about vise accessories! Once upon a Time there was a young lad (hey...it's my story and in it I am a young lad) and he was scanning Ebay late one night. It might have been a dark and stormy night...I don't remember. He came upon an auction with the title "Prentiss" in it. That caught the lad's attention like a free **** site. However, he could not identify what in the Wide Wide World of Sports, the auction items were. They had Prentiss stamped on them but no description of what they were or did. The Lad dashed off a carrier pigeon to Sir Autopts and said "Dear Sir....WTF is this auction?" His answer was "Buy it and if you win, I will tell you." I did...and he did. So here is a set of Prentiss Pipe Jaw Attachments for a 4" vise.
Craig

Awesome! I remember seeing those ages ago and wondering what they were, now it all makes sense. Nice work, thanks for sharing these! :bowdown:
 

nine4gmc

Well-known member
Joined
Mar 24, 2012
Messages
14,357
Location
Dallas

Snyiper

New member
Joined
Jun 22, 2012
Messages
1
Any one know if this can be repaired or replaced? This is a WILTON 9400. I would like to restore if parts are out there.
 

Attachments

  • vice broke.jpg
    vice broke.jpg
    141.4 KB · Views: 58
  • vice broke 2.jpg
    vice broke 2.jpg
    144 KB · Views: 72

toomanytoyzz

Well-known member
Joined
May 11, 2012
Messages
1,571
Location
Malvern, PA
any threads on either of those methods? I am used to sewing and wrenching, thats french to me.


talking to me? will they fit this Yost?

If it were my vise I would not braze it. You'll get much better penetration if you stick weld it using nickle rod. That crack looks pretty deep. Go to weldingweb.com and lurk around. They have some REALLY knowledgeable guys there who can give you the proper way to do it. I think (do not quote me since I've never used that type rod before nor welded cast) you don't have to preheat the metal as much before starting your weld. That's always been the problem with welding cast. The weld will crack easily during cooldown. I've seen guys weld manifolds while they are packed in sand and left in a BBQ to heat up.
 
Last edited:

Outlawmws

Well-known member
Joined
Aug 9, 2011
Messages
39,188
Location
The Badlands
I'd stop drill that one and braize to fill...

any threads on either of those methods? I am used to sewing and wrenching, thats french to me.

The reason I'd braize that and not use nickle rod, is to get the filler completely through the crack, top to bottom.

Basic steps:

Clean the dynamic jaw completely. Then find the very end of the crack preferably from both sides. Where it stops drill a hole from one side to the other which removes the stress riser the crack end is, and provide a space to fill. You mav need to drill at an angle to accomplish this.

Personally I'd start de-rusting with Electrolysis; then use full strength Jasco metal etch (phosphoric acid) in the crack in particular to remove anything else.

Preheat the jaw at 500 degrees in an oven, and for something that big, do it for about 2 hours. while that is going on, get a BIG bucket of dry sand and heat that up as well; as hot as you can manage. Steel bucket and a good camp stove, or a deep fryer propane burner will do a good job.

Once pre heated, get to brazeing, flowing the rod into the crack from the top while you heat from the bottom. Fill it completely, Then bury the jaw in the hot sand to cool slowly. something that big, I'd let it set all day or overnight depending on when you did the deed.

Once cooled you can take a flat file to the top to smooth out any braize material left on the top surface.

Why not ni-rod and an arc welder? Unless you grind a deep vee into both sides you aren't going to get all that deep into a part that thick, and you are more likely to end up with the welded end with some warpage; and have a lot more cleanup to do afterward. There is no real stress on that section so all you need to do is stableize the crack, and a proper drill and braize job will do that and clean up easy, and all that should show is a thin line of brass and the filled stop hole.

Why the pre heat? Cast is funny stuff and without a good preheat and slow cool down, it moves a lot and will actually heatsink the heat out of the welded area and can fracture as it cools. I've see cold welded cracks simply break away from one side or the other on an arc welded cast piece when welded cold.
 

zoomieport

Well-known member
Joined
Nov 21, 2011
Messages
1,803
Location
The Mall City
OK, THIS IS IT with the Bullets mounted on PowRArms... I promise.:)
2"
2-1/2"
3'
4"
 

Attachments

  • B'sOA 1.jpg
    B'sOA 1.jpg
    139.2 KB · Views: 246
  • B'sOA 2.jpg
    B'sOA 2.jpg
    134.8 KB · Views: 168
  • B'sOA 4.jpg
    B'sOA 4.jpg
    140.2 KB · Views: 164
To avoid these ads, REGISTER NOW!
Top Bottom