
You are using an out of date browser. It may not display this or other websites correctly.
You should upgrade or use an alternative browser.
You should upgrade or use an alternative browser.
Mokena IL - 22Wx24D Gambrel Build
- Thread starter gpalmer77
- Start date
gussteve
Well-known member
So we've been getting some good building weather, how's it coming?
I picked up the steel on Friday of last week, cheapest price and best service came from a guy about 100 miles from home, so I rented a 20' flatbed trailer for $75 and spent about the same in gas. Still came in about $400 cheaper than some of the local outfits wanted.
Wood came on Saturday morning, stupid truck driver managed to drop half of it on the edge of my slab. Less than impressed. I think my front foundation wall saved the day, slab did not crack, at least on top!
Hopefully I'll have help to put the steel posts and the beam up this weekend, and do some framing over the Christmas break, weather permitting.
Wood came on Saturday morning, stupid truck driver managed to drop half of it on the edge of my slab. Less than impressed. I think my front foundation wall saved the day, slab did not crack, at least on top!
Hopefully I'll have help to put the steel posts and the beam up this weekend, and do some framing over the Christmas break, weather permitting.
So we've been getting some good building weather, how's it coming?
See my post above, haven't started framing yet. I need to finish the last of the siding on the house first. Just the upper part of the back gable end left to do.
This weekend saw the steel beam installed. Saturday, the weather was pretty bad, my Father in Law and I muscled the beam over to where it needed to sit, and lifted it one end at a time onto a two-high stack of cement blocks. Got it lined up with where it needed to sit above the slab, called it a day.
I started early Sunday, and 4 inches at time lifted each end with a 6-ton bottle jack. Inserted small house bricks or cement blocks as appropriate after each lift. It took two columns 12 blocks high to get where we needed to be to get the posts under and everything bolted up. The front baseplate sits over the anchor bolts in the gas curb between the doors, the rear baseplate sits on the slab 4 feet from the back of the garage, held with wedge anchors.
Here is a picture of the "mechanical lifting device" - we're south of I-80, so this is ok.

Here is a picture of the final install.

Not as easy as using a crane/lift, but it was cheap - and worked out better than I had planned. Whole lifting and install process took about 5 hours total, and I did the bulk of the jacking from two blocks high to twelve blocks high by myself. (I get help on other people's schedule, not mine, so I've learned to do things by myself a lot!)
The key to making it safer was to strap the single stack of blocks for jacking to the double stack the beam was resting on with ratcheting straps every three blocks. This seemed to stabilize the structure significantly.
Now for grouting the baseplates, little cold right now though.
I started early Sunday, and 4 inches at time lifted each end with a 6-ton bottle jack. Inserted small house bricks or cement blocks as appropriate after each lift. It took two columns 12 blocks high to get where we needed to be to get the posts under and everything bolted up. The front baseplate sits over the anchor bolts in the gas curb between the doors, the rear baseplate sits on the slab 4 feet from the back of the garage, held with wedge anchors.
Here is a picture of the "mechanical lifting device" - we're south of I-80, so this is ok.
Here is a picture of the final install.
Not as easy as using a crane/lift, but it was cheap - and worked out better than I had planned. Whole lifting and install process took about 5 hours total, and I did the bulk of the jacking from two blocks high to twelve blocks high by myself. (I get help on other people's schedule, not mine, so I've learned to do things by myself a lot!)
The key to making it safer was to strap the single stack of blocks for jacking to the double stack the beam was resting on with ratcheting straps every three blocks. This seemed to stabilize the structure significantly.
Now for grouting the baseplates, little cold right now though.
gussteve
Well-known member
South of 80 for sure, ha.get whatever is cheaper works for me as well.even though I'm just north of 80.looking good so far.I just got a steal of a deal, picked up a lift for my garage for 500 bucks.eddies trans.shop in tinley is closing there doors.he still has a four post lift for sale for you local boys it was too big for mine, but nice none the less.starting to snow hopefully you can get your walls up soon good luck. 
Framing has started! With most of the family sick with colds, including myself, I got 8 days to work on the first half of the structure, the low bay side with the attic workshop. My goal was to get the attic subfloor down and a tarp pulled over it before we get any weather. I got lucky really, a string of calm days in the 20s with little wind. Photos to follow on Monday when I'm back at work.
Dec 27th. Marked out three 12ft sill plates for anchor bolts, service penetrations and stud locations.Framed out the left wall in two 12 ft sections, and the left half of the back wall. Left wall has two doors to deal with, and a window.
Dec 28th. Added as much sheathing as possible to square the walls up, grabbed the in-laws and stood the back wall and rear section of the side wall up, nailed my first corner together. Added bracing to keep it square, piles of lumber are still big enough to use as immovable objects to brace too.
Dec 29th. Had to do a little reset, my corner was a little off due to a long stud, so out came the sawzall for a quick fix to get the top plates level. Stood up the front left side wall and got that braced plumb, then added my double top plates all around.
Dec 30th. Built up a header out of 3 2x12s for the left door. The front 2x12 is short to allow the header to be connected across the front of the garage to the header for the right door for more strength later. Framed out the posts either side, leveling my concrete on the left to the top of the steel baseplate on the the center pier with a water tube level. It was 20 degrees, so I used washer fluid. Squared the wall up and called it a day.
Dec 31st. Easy day. Lifted the garage door section into place, nailed the corner, braced it plumb and headed to the home depot for joists hangers and deck screws.
Jan 1st. Installed a 20 ft double 2x12 nailer in the web of the steel beam, bolted into place with 5" bolts. Installed my joists hangers, then cut my 24ft doug fir 2x8 joists in half, and lifted them into place. Hard work for one guy, I was beat by dark.
Jan 2nd. Glued the double 2x8 joists, nailed them, and set them in position. Got all the full length ones in by the end of the day. Coldest day so far, and I was out of toe warmers. Remedied this in the evening. Got 3 pieces of plywood installed as darkness fell and forced me to pack up.
Jan 3rd. Installed the header from the last joist on the steel to the back wall. This is about 2.5 feet in from the steel beam and will serve as the header supporting the stairs. Then installed the last two "short" joists, glued and nailed. Finished up by installing the last 6 pieces of plywood floor, glued and screwed every 8" with 2" deck screws. Cold windy day, and I was flagging from pushing myself the previous day. Hit my head about 8 times on the floor joists.
Some small jobs to do as time permits, need to add the headers for the doorways and window in the left wall, add the sheathing and Tyvek etc. Pulling a tarp over the deck tomorrow as freezing drizzle is in the forecast. So far I've built a pretty nice picnic shelter, but not a bad week's work for a one man crew. Hoping to use a few weekends in January and February to frame the right hand side and 12 ft storage floor out, then get some help in March with the roof framing.
Overall, good progress so far, I'm very happy.
Back to my day job on Monday. Today, I built garages out of jenga blocks with my kids.
Dec 27th. Marked out three 12ft sill plates for anchor bolts, service penetrations and stud locations.Framed out the left wall in two 12 ft sections, and the left half of the back wall. Left wall has two doors to deal with, and a window.
Dec 28th. Added as much sheathing as possible to square the walls up, grabbed the in-laws and stood the back wall and rear section of the side wall up, nailed my first corner together. Added bracing to keep it square, piles of lumber are still big enough to use as immovable objects to brace too.
Dec 29th. Had to do a little reset, my corner was a little off due to a long stud, so out came the sawzall for a quick fix to get the top plates level. Stood up the front left side wall and got that braced plumb, then added my double top plates all around.
Dec 30th. Built up a header out of 3 2x12s for the left door. The front 2x12 is short to allow the header to be connected across the front of the garage to the header for the right door for more strength later. Framed out the posts either side, leveling my concrete on the left to the top of the steel baseplate on the the center pier with a water tube level. It was 20 degrees, so I used washer fluid. Squared the wall up and called it a day.
Dec 31st. Easy day. Lifted the garage door section into place, nailed the corner, braced it plumb and headed to the home depot for joists hangers and deck screws.
Jan 1st. Installed a 20 ft double 2x12 nailer in the web of the steel beam, bolted into place with 5" bolts. Installed my joists hangers, then cut my 24ft doug fir 2x8 joists in half, and lifted them into place. Hard work for one guy, I was beat by dark.
Jan 2nd. Glued the double 2x8 joists, nailed them, and set them in position. Got all the full length ones in by the end of the day. Coldest day so far, and I was out of toe warmers. Remedied this in the evening. Got 3 pieces of plywood installed as darkness fell and forced me to pack up.
Jan 3rd. Installed the header from the last joist on the steel to the back wall. This is about 2.5 feet in from the steel beam and will serve as the header supporting the stairs. Then installed the last two "short" joists, glued and nailed. Finished up by installing the last 6 pieces of plywood floor, glued and screwed every 8" with 2" deck screws. Cold windy day, and I was flagging from pushing myself the previous day. Hit my head about 8 times on the floor joists.
Some small jobs to do as time permits, need to add the headers for the doorways and window in the left wall, add the sheathing and Tyvek etc. Pulling a tarp over the deck tomorrow as freezing drizzle is in the forecast. So far I've built a pretty nice picnic shelter, but not a bad week's work for a one man crew. Hoping to use a few weekends in January and February to frame the right hand side and 12 ft storage floor out, then get some help in March with the roof framing.
Overall, good progress so far, I'm very happy.
Back to my day job on Monday. Today, I built garages out of jenga blocks with my kids.
Burtonrider10022
Well-known member

Testing to see if this works from my phone. Should be a picture of my new picnic shelter.
The pic doesn't work for me... But I managed to extract this one from the page source coding of the host site you tried to use:

And here is the larger image:
http://m.flickr.com/photos/gpalmer_ambitech/8347477137/lightbox/
Nice cool weather this week.
Jan 8th. Strung some worklights when I got home from work, got about 4 hours of work in, made the (3) 2x10 headers for the entry door and window. Got them installed, along with the cripples and framed in the RO for the window.
Tonight I am hoping to get the sheathing installed around the window before we go to my brother in law's birthday party. Nice warm weather this weekend, hoping to begin framing the 12 ft bay if I can dodge the rain.
Jan 8th. Strung some worklights when I got home from work, got about 4 hours of work in, made the (3) 2x10 headers for the entry door and window. Got them installed, along with the cripples and framed in the RO for the window.
Tonight I am hoping to get the sheathing installed around the window before we go to my brother in law's birthday party. Nice warm weather this weekend, hoping to begin framing the 12 ft bay if I can dodge the rain.
milner351
Well-known member
With this weather - making hay while the sun shines is great - if you don't have a regular job, and they're talking about a lot of rain coming in with this January thaw.
Great work!
Great work!
Right now, I'm working..... but made the most of two weeks off over Christmas. Trying to skate out of work a little early today and tomorrow to take advantage of the nice weather, and keep working through the weekend to frame out the 12' bay on the right. I I can get that framed out and the storage floor down, I'd be well ahead of my proposed schedule.
Some showers forecast today, but looks like we might escape the worst of it where I am. We'll see.
Some showers forecast today, but looks like we might escape the worst of it where I am. We'll see.
MadMechMaster
Well-known member
I'll be around the corner at my dentist for a cleaning this afternoon. If you think that you'll need a hand lifting something into place around 5:45-6:00, PM me by 4:00.
I'll be around the corner at my dentist for a cleaning this afternoon. If you think that you'll need a hand lifting something into place around 5:45-6:00, PM me by 4:00.
Thanks, but I only just saw this. With the rain last night, I was mostly confined to cutting studs to length for the 12 ft walls, more cuts this evening and hoping to frame, sheath, Tyvek and lift the walls this weekend.
Feel free to stop by anytime you're in the area though.

Door framed out and ready to be lifted into place. The front board is short, the right door will be a mirror image of this, and a 10 ft 2x12 will span teh two, in front of the steel post in the middle (which is offset to the back of the 6" wall to allow space at the front).

This was after we had the garage door section raised into place. We bungeed the right side to the steel at first, then came back and plumbed it later with some bracing.

End of the day, with the last of the joists hanging on the beam set into place.

A view of the joists from underneath. The window area in the middle of the wall has since been framed and sheathed.
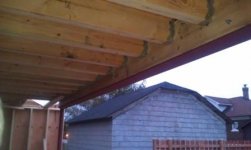
A shot of the (2)2x12 "nailer" in the web of the beam, and the joist hangers.

After having set 3 pieces of plywood, looking back at the house.

A shot of the workshop floor after all the plywood was set in place. You can see the cut out for the stairs in the back right corner.
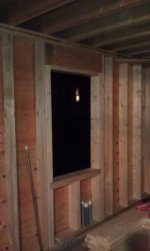
After the window area in the left wall was framed in and sheathed this week. (I also installed the header over the entry door, but haven't installed the one for the left rear "shed" door yet.) I decided to put the (3)x2x10 header right up against the underside of the double top plate, and add a spacer underneath to form the top of the rough opening for the window. Same for the door, with a RO of 82 1/2" The shed door will not have the spacer, as I'm leaning toward a half width garage door at 84".
Last edited:


Jan 11th. Spent the evening cutting some more studs to length, and then notching the 12 ft studs for the ribbon joist that will support the attic storage floor above the high bay. Gang cut the 1.5" depth then set up a little jig to make the 7.5" cut one board at a time. Went very well. Also cut eight studs with a steep 11° slope where they line up with rafter locations, in order for the lower rafters to clear.
Jan 12th. Framed out the two wall sections for the right hand wall on cement blocks on the driveway. Framed, sheathed, Tyveked both sections in about 8 hours.
Jan 13th. Lifted the wall sections into place and braced. Without a conventional top plate, they were a little flimsy, and a 12ft x 12 ft x 6" wall with some double studs is really freakin' heavy. Took four of us, and we struggled.
Next up is the last section of the rear wall, and the right hand door opening. Both are 12 ft high sections.
Jan 12th. Framed out the two wall sections for the right hand wall on cement blocks on the driveway. Framed, sheathed, Tyveked both sections in about 8 hours.
Jan 13th. Lifted the wall sections into place and braced. Without a conventional top plate, they were a little flimsy, and a 12ft x 12 ft x 6" wall with some double studs is really freakin' heavy. Took four of us, and we struggled.
Next up is the last section of the rear wall, and the right hand door opening. Both are 12 ft high sections.
Some pictures from the weekend......

The framed sections of wall sitting on cement blocks on my driveway. Note the weak construction at the top, no conventional top plate, just scrap 2x6s holding everything at 16s. Ribbon joist goes in after the wall goes up, sitting in the notches at the top of the stud.

After the wall sections were lifted into place and braced, a view of the outside from my neighbors yard. I warned him not to be too shocked when he saw a 12 ft wall go up, the lower pitch of the gambrel roof will eventually hide the top 5 feet of this wall.
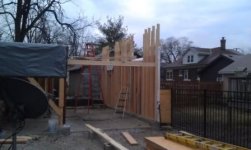
Same wall, viewed from my driveway.
The framed sections of wall sitting on cement blocks on my driveway. Note the weak construction at the top, no conventional top plate, just scrap 2x6s holding everything at 16s. Ribbon joist goes in after the wall goes up, sitting in the notches at the top of the stud.
After the wall sections were lifted into place and braced, a view of the outside from my neighbors yard. I warned him not to be too shocked when he saw a 12 ft wall go up, the lower pitch of the gambrel roof will eventually hide the top 5 feet of this wall.
Same wall, viewed from my driveway.
Jan 14th. My little girl (2 1/2 year old) helped me go through the last of the 12' 2x6s and pick out the straight ones. Then she tired of the cold and went inside. I cut the studs to length and framed up the wall ready to sheath and Tyvek tonight. Hoping to have enough time to lift it into place if the help is available late.
Jan 15th. Phew. I'm beat. Last night we lifted the last non-door section of wall into place along the back. 9'-6" wide by 12' high, almost completely sheathed and Tyveked. I built it with the sill plate toward the wall, then we lifted that end over a lumber pile, then tilted it up onto blocks placed outside the garage. The wall was then lifted back into place over the anchor bolts.
It was a tight fit between the other half of the back wall, and the right hand wall at the corner, so we couldn't walk it in like other sections. Had to keep it level while it came in. Eventually it was in and nailed in place. Just needs to have the sheathing installed that overlaps the end of the right hand wall to the corner, then pull the excess Tyvek that is currently rolled back, around the corner onto the right hand wall.
The only remaining wall section is the front right garage door. Hoping to do that Thursday and Friday evenings, and lift it early Saturday. Tonight, I'm taking the night off...... family trip to Culvers and a well deserved rest on the couch!
It was a tight fit between the other half of the back wall, and the right hand wall at the corner, so we couldn't walk it in like other sections. Had to keep it level while it came in. Eventually it was in and nailed in place. Just needs to have the sheathing installed that overlaps the end of the right hand wall to the corner, then pull the excess Tyvek that is currently rolled back, around the corner onto the right hand wall.
The only remaining wall section is the front right garage door. Hoping to do that Thursday and Friday evenings, and lift it early Saturday. Tonight, I'm taking the night off...... family trip to Culvers and a well deserved rest on the couch!

Not a good picture in the dark last night, but this is how it looks after the wall went up. I'm standing in the very center of the garage, under the beam, looking at the back wall. Low bay to the left (out of shot), looking up into the high bay. Open bay at RH end of back wall still needs sheathing across the end of the RH wall to the corner, then the Tyvek can be pulled around.
Jan 17th. Framed out the right hand garage door, much quicker than the left one as all the measurements were already done. Couple of things to do after work tonight (sill plate pieces, foam sill sealer, drill holes for ABs) and we'll be ready to lift. Looking to start on the ceiling joists for the 12 ft bay Saturday and Sunday, then the cold descends on the Chicago area next week.
Sunbimmer
Well-known member
This guy too.
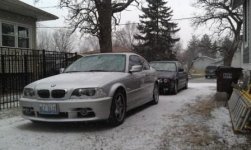
What a beast, nice color and wheels

I think that is going to be my next car.
Carguy99
Well-known member
Looks like a nice space. Oh and your close to me. Well youve had some "nice "weather.
What a beast, nice color and wheels
I think that is going to be my next car.
Thanks, Imola Red was my first choice, and I was lucky enough to find that exact color, with the red/black interior. The wheels were originally silver on the 99-00 models, that is a second set of rims rattle-canned a dark grey color with my sticky tires on.
Really fun to drive, "a lot like nothing else".
Jan 18th. 3 hours in the evening to fit the small sections of sill plates to the garage door section, make the small notch cuts for it to clear the steel beam, then my father in law helped me lift it into place. Nailed the corner and called it a night.
Jan 19th. Long day. Warm, but annoying, as I was working the mud. Installed the missing sheathing in the back RH corner, then wrapped the Tyvek around the corner. Took a break to eat lunch and clean the clay off my boots. Found a stud in the RH wall that was out of plumb, just a crappy measurement by me. A few nail cuts with one of those fancy oscillating tools that are all the rage, and I had it plumbed and spaced correctly. Finished off the day my installing the three sections of 2x8 ribbon joist along the top of the RH wall, and framing out part of the front wall above the RH garage door.
Jan 20th. Framed up a 12 foot section of wall for the top of the central beam and bolted it to the top of the metal beam. This is a short section of wall, (36" studs) that basically finishes the walls of the 12 ft bay so that I can start hanging the ceiling members on that side.
Here is a pic from the end of the day..... looking down into the front of the high bay from the attic workshop floor.

Two cold days coming up, highs in the low teens, so I'm not gonna be back out there until later in the week. Hoping that another few evenings and a full weekend and I'll have the 12 ft bay ceiling and plywood in.
Jan 19th. Long day. Warm, but annoying, as I was working the mud. Installed the missing sheathing in the back RH corner, then wrapped the Tyvek around the corner. Took a break to eat lunch and clean the clay off my boots. Found a stud in the RH wall that was out of plumb, just a crappy measurement by me. A few nail cuts with one of those fancy oscillating tools that are all the rage, and I had it plumbed and spaced correctly. Finished off the day my installing the three sections of 2x8 ribbon joist along the top of the RH wall, and framing out part of the front wall above the RH garage door.
Jan 20th. Framed up a 12 foot section of wall for the top of the central beam and bolted it to the top of the metal beam. This is a short section of wall, (36" studs) that basically finishes the walls of the 12 ft bay so that I can start hanging the ceiling members on that side.
Here is a pic from the end of the day..... looking down into the front of the high bay from the attic workshop floor.
Two cold days coming up, highs in the low teens, so I'm not gonna be back out there until later in the week. Hoping that another few evenings and a full weekend and I'll have the 12 ft bay ceiling and plywood in.
Sunbimmer
Well-known member
Really fun to drive, "a lot like nothing else".
I know it IS "a lot like nothing else", my daily driver is a Boston Green Z3 cabriolet 2.8 liter 6 cylinder and I love it.

You can put it's backside wherever you want with the subtle touch of the accelerator

Jan 23rd. Just a couple of hours to frame up the remaining ~8ft section of wall along the top of the beam. Double up the top plates all the way around tonight and I'll be ready for hanging floor joists on that side this weekend, maybe Friday if the weather is good.
Jan 24th. Don't stop me now! Wife's friend came over, with some playmates for the kids, so I kept at it. Started at about 4.30 and was out there until about 9.30. Got the remaining top sill plates installed, then set about cutting and lifting the 2x8 floor joists up into place above the 12ft bay. Got all the full length joists in place, nailed to a band joist on the central wall, just set in approximate positions on the outside wall right now. There are 5 of these joists that get doubled, and I'll install the doubles tonight, glued and nailed, then a quick double check of the outside wall for plumb and start attaching those ends into place.
Jan 25th. After the good progress of the night before, tonight was a little slower. Five of the joists from the day before needed to be doubled up, lots of ladder work to set them in place, glue, clamp, nail, move clamp, nail some more. Got all five done, but felt like I should have gotten more done in one evening. Oh well, there will be days like these.
Jan 26th. Split the day in two, because my buddy visited with his wife and little girl in the afternoon. In the morning, I did my final plumb on the outside wall of the high bay and then attached the outside end of the floor joists, and added hurricane clips. When I came back to it at 4pm, I started framing out the cut-outs in the floor for the windows to be vaulted into. Got two of them done, one more and the stairwell to go.
Jan 26th. Split the day in two, because my buddy visited with his wife and little girl in the afternoon. In the morning, I did my final plumb on the outside wall of the high bay and then attached the outside end of the floor joists, and added hurricane clips. When I came back to it at 4pm, I started framing out the cut-outs in the floor for the windows to be vaulted into. Got two of them done, one more and the stairwell to go.
gussteve
Well-known member
Wow lookin good I haven't check d in for awhile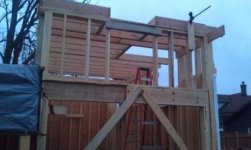

Feb 2nd. On and off snow this weekend meant very little progress. I did spend a few slow hours out there on Saturday getting the last of the ceiling joists installed on the high bay, but with more snow in the forecast, and maybe some rain on Wednesday, I didn't want to be putting plywood down yet. Hoping next weekend is better for that. I'd rather get it all down in one shot and be able to cover it up and protect it from the weather.