To avoid these ads, REGISTER NOW!

The VISES of Garage Journal

BFBOB

Well-known member
Joined
Sep 20, 2011
Messages
5,073
Thanks for the kind comments, guys. Yes, Provincial, the rabbets were a feature of my old vise that I used ALL the time. I made these taller and deeper. I also made sure the jaws went down within a whisker of the ways. V grooves are pretty common. It's the combination of all 3 features that makes these jaws so unusual.
The vise should outlive me unless I drop it!

Hey, this is my post no. 999! What do I win for making the big KiloPost?
 
To avoid these ads, REGISTER NOW!

rlanicek

Well-known member
Joined
Sep 13, 2006
Messages
68
Location
Van Alstyne, TX
This my my grandfather's vise. When I decided to refinish it was how I found Garage Journal. I wanted to research how to take it apart before I tried. I originally soaked and wire brushed it to remove years and years of gunk. I doubt my grandfather ever even wiped it down.

My 70-year old uncle claims he remembers playing with it when he was a kid.

I wish I had taken pictures of how filthy it was before, but I'm sure you get the idea. Here are a couple pics just before paint.

Can anyone here tell me the approximate age based on the pics? Thanks!

125pbwp.jpg


jg33tk.jpg
 

drivesitfar

Well-known member
Joined
Oct 23, 2013
Messages
36,028
Location
Pacific Northwest
just rub some wax on it and call it good. you already did the hard work and can't see a flaw anywhere in your pics. not sure of the age, but it is a keeper that is for sure. also nice to have granddad's vise in your shop too. first vise restore and more to come or one and done?? thanks for sharing and a pic when you put it together either naked or painted would be good.
 

bluebolt

Well-known member
Joined
Dec 28, 2008
Messages
5,441
Location
Benton LA
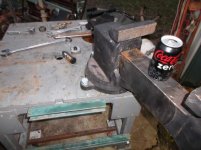
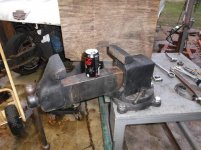
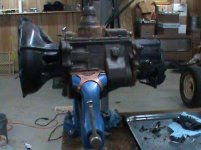
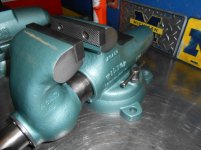
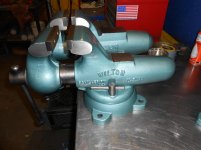
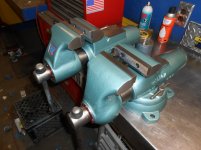
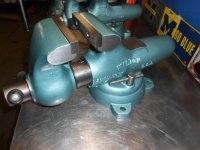
I picked up a 6" Reed 206 a while back for $100 but it's been sitting on the floor because I didn't have a place to mount the beast. This one is in great shape but the Reed and 206 markings are missing and the vise is smooth there.

A few months back I picked up a machine stand base with a 1" plate steel top at a yard sale for $10. I figured it was time to get the two together.

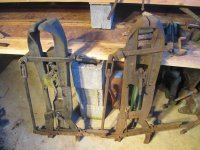
The weight of both was a factor in working on this, I removed the dynamic jaw from the vise to make it easier to manhandle.

I wanted to make this mobile for ease of use. A neighbor helped me flip the stand upside down and I removed the 7/8-14 leveling adjusters. I was going to mount casters to this but didn't have the right size on hand, either too big or too small. After some measuring I figured out a cart I had with 5" casters would fit perfectly underneath and I could use the leveling feet to raise and lower it so I could still use the cart for other things.

I used my engine hoist to pick the stand up and flip it and lower it on the cart. Glad I had the air powered jack! I then started mounting the vise. I used 3/4 grade 5 bolts. Drilling the holes in the 1" top was FUN LOL. The 1" plate is bolted on with 1/2 bolts in each corner. I used one of these holes, and drilled and tapped it for 3/4" along with drilling and tapping the plate for the other front bolt because it would hit the cross tube if I tied to use a nut under it. The two back ones use 3/4" bolts and nuts. I should have used 5/8" bolts, it was hard to get the holes perfectly aligned since the vise base holes were pretty much 3/4 as well.

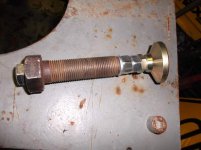
Now on to the leveling feet. For whatever reasons the 7/8 bolts used for leveling feet had 1/2" holes drilled through them. This was to my advantage as I could use 1/2" heavy duty leveling feet from JC Winco. I also needed to raise up the stand so the cart could slide under it. I put the bolts in with the big head up because it allowed assembly without having to hoist the table back up. So it was a 5" long, grade 5, 1/2" bolt going throught the 7/8 bolts, a lock washer and nut, another nut and the foot going on last.

Got it assembled and the feet would not go down far enough to get it clear of the cart. After a quick look realized some of the 7/8 bolts were not fully threaded. Great doubt I have a die that big. Checked the Craftsman big tap and die set I have and only went to 3/4" in the dies. BUT I looked in the tap drawer and spied a really big die. Woop woop it was a 7/8-14 die! I didn't have any deep socket or wrench that big so I had to turn it with a 18" Crescent wrench.

Got the feet all done and then went to put the dynamic jaw back in. Trying to get the screw to line up was just about impossible for me. I finally figured out how to use a small ratchet strap to tighten it up while I held up the screw and finally got it in!

So it's done for now, will probably mount one of my railroad track anvils to this stand later. The pictures **** but it was nippy outside today, about 32 degrees LOL.
 

Attachments

  • DSCF0461.jpg
    DSCF0461.jpg
    45.9 KB · Views: 103
  • DSCF0462.jpg
    DSCF0462.jpg
    49.2 KB · Views: 115
  • DSCF0460.jpg
    DSCF0460.jpg
    37.1 KB · Views: 91
  • DSCF0463.jpg
    DSCF0463.jpg
    53.1 KB · Views: 82
  • DSCF0464.jpg
    DSCF0464.jpg
    46.7 KB · Views: 83

drivesitfar

Well-known member
Joined
Oct 23, 2013
Messages
36,028
Location
Pacific Northwest
awesome effort and should work great for years. if you are going to put something heavy in that beast the RR anvil or an engine on the other side of your stand would be a great idea. or I second the watch your toes!!!

how long to drill those mounting holes?? how many bits did you burn through or break going through an inch of steel?
 

bluebolt

Well-known member
Joined
Dec 28, 2008
Messages
5,441
Location
Benton LA
awesome effort and should work great for years. if you are going to put something heavy in that beast the RR anvil or an engine on the other side of your stand would be a great idea. or I second the watch your toes!!!

how long to drill those mounting holes?? how many bits did you burn through or break going through an inch of steel?

As heavy as the stand is I am not too worried about tipping it over unless I put an engine in the vise LOL. The 2" square tubing appears to be 1/4" wall which works out to about 100 pounds for just the frame. The 29" by 29" 1" plate is about 200 pounds. I am thinking about putting my 130 pound Dake 3 ton arbor press on the opposite corner however.

I spent a few hours drilling and tapping those holes using my 1960's Craftsman 1/2 big drill. Broke 1 really small bit but I don't think I burned up any of the large ones.
 

thecj3man

Well-known member
Joined
Sep 21, 2009
Messages
190
Location
East TN
I hope you get many good years out of that Yost.

I have been putting it to work. Here are some pictures of it being used. There are alot of pictures of vises just sitting around in this thread so I wanted to contribute a working picture.

This is the T-98A transmission that I am getting ready to swap into my 1950 CJ3A. Its nice to know that I have a vise that can hold a 150 pound transmission, and thats without the T-case.
 

Attachments

  • DSC00041.jpg
    DSC00041.jpg
    41.2 KB · Views: 92
  • DSC00038.jpg
    DSC00038.jpg
    43.2 KB · Views: 102
  • DSC00035.jpg
    DSC00035.jpg
    41.7 KB · Views: 108
  • DSC00032.JPG
    DSC00032.JPG
    139.6 KB · Views: 87

drivesitfar

Well-known member
Joined
Oct 23, 2013
Messages
36,028
Location
Pacific Northwest
you have my thumbs up and impressive piece of steel it's sitting on too.

NICE WORK!!!

first and last vice restoration or did you need one for the other corner of that nice bench?

by the way are my eyes playing tricks on me or is one picture of a blue vise and the other a different Columbian that is grey??????? it looks like the same bench.
 
Last edited:

rlanicek

Well-known member
Joined
Sep 13, 2006
Messages
68
Location
Van Alstyne, TX
you have my thumbs up and impressive piece of steel it's sitting on too.

NICE WORK!!!

first and last vice restoration or did you need one for the other corner of that nice bench?

Wow thanks. Unless I come across another old vise by chance I don't plan on doing more. This one is likely all I'll ever need - for now. That table is a welding table still in work. Casters should be here tomorrow. I'll post some pics of it when I'm done.
 
Last edited:

C.BRAXMAIER

Well-known member
Joined
Apr 17, 2012
Messages
160
Here are a couple I just finished, 9450 and a 9500..
 

Attachments

  • 1-7.jpg
    1-7.jpg
    138.2 KB · Views: 34
  • 1-6.jpg
    1-6.jpg
    137.7 KB · Views: 34
  • 1-5.jpg
    1-5.jpg
    132.7 KB · Views: 30
  • 1-4.jpg
    1-4.jpg
    140.3 KB · Views: 31
  • 1-3.jpg
    1-3.jpg
    141.1 KB · Views: 34
  • 1-00.jpg
    1-00.jpg
    139.8 KB · Views: 37

C.BRAXMAIER

Well-known member
Joined
Apr 17, 2012
Messages
160
Here is some more I owe a lot to Nick for doing a lot of leg work for me and thank you zoom for the 9300 you guys are great,, got one more to get 9-600 that will complete the collection and that will be here the first of the year...
 

Attachments

  • DSCN0366.jpg
    DSCN0366.jpg
    139.5 KB · Views: 26
  • 2-9.jpg
    2-9.jpg
    136.1 KB · Views: 19
  • 2-7.jpg
    2-7.jpg
    138.3 KB · Views: 20
  • 2-6.jpg
    2-6.jpg
    137.8 KB · Views: 20
  • 2-5.jpg
    2-5.jpg
    136.6 KB · Views: 19
  • 2-4.jpg
    2-4.jpg
    131.1 KB · Views: 21
  • 2-1.jpg
    2-1.jpg
    129.9 KB · Views: 20
Last edited:

oldldh

Well-known member
Joined
May 22, 2012
Messages
3,700
Location
Fairhope, AL
If it's your Gramps then it's the best vise you could possibly have.
Nice job.!

Absolutely...

I've always thought of Grandchildren as the arrows Grandfathers fire into the future, where they cannot go...

Every time you use that vise, you'll think of your Grandfather, and if someone you love is thinking about you, you aren't really gone, are you???
 

Lump

Well-known member
Joined
Mar 16, 2009
Messages
3,405
Location
Jamestown, Ohio
Absolutely...

I've always thought of Grandchildren as the arrows Grandfathers fire into the future, where they cannot go...

Every time you use that vise, you'll think of your Grandfather, and if someone you love is thinking about you, you aren't really gone, are you???

Well said, Oldldh! Kudos! :thumbup::beer:
 
To avoid these ads, REGISTER NOW!

WhiteLightning

Well-known member
Joined
May 23, 2012
Messages
117
Location
Philadelphia, PA
Figured I'd ask here......

I restored my 4" Columbian vise a year or so ago. While doing so, the brittle retaining ring for the screw broke. I have since put a shaft collar on it, but it binds some and doesn't feel "right".

Does anyone have a spare laying around they could send me? I'd throw you some cash.

8228930730_b97b935fbc_c.jpg


.....
I've since had a friend make a new handle since the original one was bent

8256560880_aaf9df6196_c.jpg

8255488639_238b7bbcea_c.jpg

Anyone?!?!?
 

drivesitfar

Well-known member
Joined
Oct 23, 2013
Messages
36,028
Location
Pacific Northwest
sorry I don't have a Columbian vise part, but it looks a lot like a lock nut or washer. maybe you can buy a couple thick ones and maybe cut a slot in them to go over your handle to fill the gap that is bothering you? i'm not a machinist and don't have a metal lathe, but you might try that direction if the part can't be found or easily made. good luck on the search or having one made.

just wanted to say the close up and picture of your new vise handle looks awesome. your friend has some talent.
 

rlanicek

Well-known member
Joined
Sep 13, 2006
Messages
68
Location
Van Alstyne, TX
you have my thumbs up and impressive piece of steel it's sitting on too.

NICE WORK!!!

first and last vice restoration or did you need one for the other corner of that nice bench?

by the way are my eyes playing tricks on me or is one picture of a blue vise and the other a different Columbian that is grey??????? it looks like the same bench.

Same vice, different lighting angles. Rustoleum Machine Gray.
 

Provincial

Well-known member
Joined
Sep 21, 2011
Messages
6,869
Location
Near Salem, OR
Anyone?!?!?

At any good hardware store they should have an assortment of "set collars", which are kind of like your collar, except thicker and with a set screw to hold it in place. If you have enough room for the thicker collar, just slide it in place and tighten the screw to hold it there.

Larger Columbians used set collars with the screws.

Nice vise!!!! :beer:
 

WhiteLightning

Well-known member
Joined
May 23, 2012
Messages
117
Location
Philadelphia, PA
sorry I don't have a Columbian vise part, but it looks a lot like a lock nut or washer. maybe you can buy a couple thick ones and maybe cut a slot in them to go over your handle to fill the gap that is bothering you? i'm not a machinist and don't have a metal lathe, but you might try that direction if the part can't be found or easily made. good luck on the search or having one made.

just wanted to say the close up and picture of your new vise handle looks awesome. your friend has some talent.

I tried to modify a lock washer and it was impossible to re-crimp once in the dynamic jaw.

Yes, the handle came out awesome. He did an awesome job!

At any good hardware store they should have an assortment of "set collars", which are kind of like your collar, except thicker and with a set screw to hold it in place. If you have enough room for the thicker collar, just slide it in place and tighten the screw to hold it there.

Larger Columbians used set collars with the screws.

Nice vise!!!! :beer:

Thanks. The shaft collar I have does have a set screw. I re-adjusted it tonight and it seems to 'bind' less. I'm not sure if the vise screw is bent (from abuse- see old handle), or what's going on. Right now it seems good to go. I'd still like to obtain a proper retaining ring if possible.

looks tome that it needs tobe a crimped ring fitting that groove... correct?

nice vise/nice job.

Thanks. Yes, its an old lead? ring that someone would 'open' slightly to slide the screw out, and then re-crimp once in place. Mine was just very brittle and did not 'open' too well. The tolerances are as follows:

1.093" Ring OD
0.713" Ring ID
0.185" Ring thickness

0.635" Shaft OD (where the ring would sit)
0.255" Shaft width (where the ring would sit)
 

Outlawmws

Well-known member
Joined
Aug 9, 2011
Messages
39,251
Location
The Badlands
Lock washers are spring steel, so no, not an option for a retainer clip. The clips are a soft iron and bend easily.

You might try forming one out of soft brass rod.
 

jakemac

Well-known member
Joined
May 21, 2013
Messages
9,035
Location
New England
You might try forming one out of soft brass rod.

^^^^:+1:^^^^

I'll add that if you anneal the brass before you form it, it will go easier. Then, anneal it again before you open it up to insert it. The hammering process will re-harden it and could cause it to snap if you try to bend it. Once installed, use a torch to heat it up. Let it cool slowly, that will re-harden the brass to keep it in place.

The annealing process of brass is the opposite of annealing steel. In this case, heat and quench to soften the brass. Heat and let cool slowly to harden it.
 
Last edited:

wrenchguy

Well-known member
Joined
Sep 22, 2011
Messages
4,698
Location
NW Indiana
Yea. I went to Ace Hardware and bought a 3/4" set screw shaft collar. It looks like this......

i'd try to make the shaft collar work as long as it fits and stays true to mating surfaces. this may require some mods to the shaft and collar. this process will make it alot easier to remove the parts later on. good luck.
 

WhiteLightning

Well-known member
Joined
May 23, 2012
Messages
117
Location
Philadelphia, PA
Yea. I went to Ace Hardware and bought a 3/4" set screw shaft collar. It looks like this......

i'd try to make the shaft collar work as long as it fits and stays true to mating surfaces. this may require some mods to the shaft and collar. this process will make it alot easier to remove the parts later on. good luck.

Oh, it's been on and working since the restoration ~ 1 year ago. I think the issue was as I tightened the set screw, the collar would 'angle' some and cause the screw to bind at a certain point of the rotation. I took it apart last night and put a fender washer between the collar and dynamic jaw surface and tightened the set screw. This allowed for enough clearance so there isn't any binding- or so it appears. I'll hold tight for now and see how it reacts. If it still causes issues, I will make a new retaining ring.

:beer2:
 

andywander

Well-known member
Joined
Mar 24, 2012
Messages
359

BFBOB

Well-known member
Joined
Sep 20, 2011
Messages
5,073
Oh, it's been on and working since the restoration ~ 1 year ago. I think the issue was as I tightened the set screw, the collar would 'angle' some and cause the screw to bind at a certain point of the rotation. I took it apart last night and put a fender washer between the collar and dynamic jaw surface and tightened the set screw. This allowed for enough clearance so there isn't any binding- or so it appears. I'll hold tight for now and see how it reacts. If it still causes issues, I will make a new retaining ring.

:beer2:

Drill and tap for another setscrew 120 degrees away. with a 3-point contact it'll sit straight - or straighter.
 
To avoid these ads, REGISTER NOW!
Top Bottom