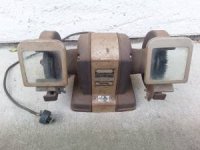
Great Thread Guys!!! who would have thought I could learn so much about bench grinders!! I haven't posted in awhile so decided to post this Block refresh. Another words no new bearings or switches just a little paint. It is Christmas time soon and I need a gift for my 23 year old son. So I went to the "to be restored some day pile" and picked this out. I got it at an auction a year or two ago.
View media item 45226
It seemed to have very light use over the years so a perfect candidate for a Christmas gift.
View media item 45225
It came with the original Craftsman wheels and a Craftsman wire wheel.
View media item 45223
Under the quench tray it was a little banged up. This will need fixing.
View media item 45221
The wire wheel took its toll on the soft aluminum housing, there is no fix for this but if the wire wheel is reinstalled, it well need a spacer to get it away from the housing.
View media item 45220
Inside was really clean.
View media item 45218
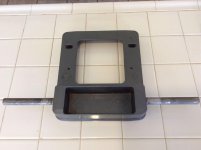
The sheet metal will need work.
View media item 45217
First step was to press on it a little with the arbor press.
View media item 45216
The arbor straightened out the bend but now it was not 90 degrees so I put it in my smooth jaw Chas Parker and tapped it with a rubber mallet.
View media item 45215
Finally I finished it with a small hammer. It is not perfect but very close and it will not be seen under the quench tray.
View media item 45211
Here is the after picture, Certainly my skills fall short of chopping a top on a 32 ford but for the bench grinder I am happy.
View media item 45210
I don't think it was ever perfect. Generally, it is not good stamping practice to have a punched hole so close to a radius.
View media item 45209
By the looks of this picture this was a wood grinder.
View media item 45208
All taped up and ready for paint. The dark gray colors will not be painted since they were really nice and it seems the original paint is more durable then rattle cans so only the sheet metal center is getting fresh paint.
View media item 45207
The inside of the light was really nice so it will not get paint, the outside will get fresh paint.
View media item 45206
I went with a argent silver intsead of the original dove gray.
View media item 45204
What better way to reassemble a vintage block grinder then with a 1960's Sears wrench I have had since new....
View media item 45203
I coated the screws with neverseize because they were originally self tapping and I don't want any stripped holes in the soft aluminum.
View media item 45202
I ring tested the wheels. Both grinding wheels "rang" nice at each 90 degree orientation.
View media item 45201
Unfortunately, the wire wheel did not ring at all and must be scrapped. It probably has a broken wire and I don't have time to look at all those wires to find the broken one...
View media item 45200
Ok OK I am just kidding... I did not ring test the wire wheel. I just wanted to see if you were paying attention...
I should have dressed the wheels before I refreshed the grinder. I don't want all that dust all over my new paint job. Sooo I dug out the "worlds ugliest grinder" to do the job. This old grinder works like a champ with tons of torque but it sure ain't no beauty queen.
View media item 45198
Of course what better dresser than a vintage Sears dresser. The wheels will get a final dress with a stone after they are back on the block.
View media item 45199
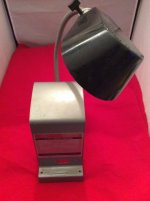
The finished grinder ready for a box and Christmas wrapping paper. I put new rubber feet on it but they were not on when I took this picture.
View media item 45197
A side shot
View media item 45196
A front shot
View media item 45195
View media item 45226
It seemed to have very light use over the years so a perfect candidate for a Christmas gift.
View media item 45225
It came with the original Craftsman wheels and a Craftsman wire wheel.
View media item 45223
Under the quench tray it was a little banged up. This will need fixing.
View media item 45221
The wire wheel took its toll on the soft aluminum housing, there is no fix for this but if the wire wheel is reinstalled, it well need a spacer to get it away from the housing.
View media item 45220
Inside was really clean.
View media item 45218
The sheet metal will need work.
View media item 45217
First step was to press on it a little with the arbor press.
View media item 45216
The arbor straightened out the bend but now it was not 90 degrees so I put it in my smooth jaw Chas Parker and tapped it with a rubber mallet.
View media item 45215
Finally I finished it with a small hammer. It is not perfect but very close and it will not be seen under the quench tray.
View media item 45211
Here is the after picture, Certainly my skills fall short of chopping a top on a 32 ford but for the bench grinder I am happy.
View media item 45210
I don't think it was ever perfect. Generally, it is not good stamping practice to have a punched hole so close to a radius.
View media item 45209
By the looks of this picture this was a wood grinder.
View media item 45208
All taped up and ready for paint. The dark gray colors will not be painted since they were really nice and it seems the original paint is more durable then rattle cans so only the sheet metal center is getting fresh paint.
View media item 45207
The inside of the light was really nice so it will not get paint, the outside will get fresh paint.
View media item 45206
I went with a argent silver intsead of the original dove gray.
View media item 45204
What better way to reassemble a vintage block grinder then with a 1960's Sears wrench I have had since new....
View media item 45203
I coated the screws with neverseize because they were originally self tapping and I don't want any stripped holes in the soft aluminum.
View media item 45202
I ring tested the wheels. Both grinding wheels "rang" nice at each 90 degree orientation.
View media item 45201
Unfortunately, the wire wheel did not ring at all and must be scrapped. It probably has a broken wire and I don't have time to look at all those wires to find the broken one...
View media item 45200
Ok OK I am just kidding... I did not ring test the wire wheel. I just wanted to see if you were paying attention...
I should have dressed the wheels before I refreshed the grinder. I don't want all that dust all over my new paint job. Sooo I dug out the "worlds ugliest grinder" to do the job. This old grinder works like a champ with tons of torque but it sure ain't no beauty queen.
View media item 45198
Of course what better dresser than a vintage Sears dresser. The wheels will get a final dress with a stone after they are back on the block.
View media item 45199
The finished grinder ready for a box and Christmas wrapping paper. I put new rubber feet on it but they were not on when I took this picture.
View media item 45197
A side shot
View media item 45196
A front shot
View media item 45195