Outlawmws
Well-known member
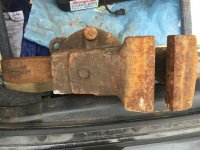
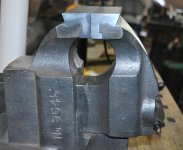
Wandering around FleaBay in the early AM, I know I'm a masochist, I spy this oddity. Anyone have any ideas as to the intended use?
http://www.ebay.com/itm/RARE-UNUSUA...932?pt=LH_DefaultDomain_0&hash=item259c7a49cc
Nuts
I'd guess its only 1/2 there; that could be for clamping into a 2X4, and another piece would have a screw and pad for a large "bar clamp".
 I'm thinking of drilling the front plate and adding a bolt or pin there to hold the end of the spring, so that I can put less tension, (approx. 1/3 turn), on it. A full turn seems somewhat excessive, according to my fingers when I'm trying to get it all back together.


 Slide has a little crack, i've seen worse, and the pin is seized in the jaw. I have not tried to get it out yet, it just doesn't lift out. Handle is gone but that can be made. Now I have 3 of these #20s (4.5")