
You are using an out of date browser. It may not display this or other websites correctly.
You should upgrade or use an alternative browser.
You should upgrade or use an alternative browser.
Between 265 & 485 SQ/FT Woody's Works Garage
- Thread starter Denwood
- Start date
Workspaces sized between 265 and 485 squarefeet.
drivesitfar
Well-known member
Woody: that ceiling idea is new to me. i've seen small railroad set ups lowered from ceilings but never a bed. sort of sounds like something 007 would have in one of his movies.
cheers
cheers
LegacyIndustrial
ALLIANCE MEMBER
Nice work Denwood!
CodeRedZ
Well-known member
awesome work!!
amx1041
Member
Just finished reading your thread. I must say I’m impressed with your attention to detail. Looking forward to the kitchen redo.
Scotty, Code, thanks for the props  Amx, anyone who read through 37 pages likely deserves a beer or three for their efforts.
So Kijiji (I guess our version of Craigslist) was "fruitful" over the last two days. I managed to find a very decent "Canwood" actual wood loft bed, that exactly matches the girls rooms. Canwood used to produce some very high quality product out of British Columbia (we have quite a few pieces in our home) but was sold to Storkcraft..now manufacturing in Asia. Regardless, my 7 yr old is pretty stoked with this find ...and so am I as new, this setup was $1500. I was all set to build a loft bed, but at $260, solid pine, and 2hrs of assembly..no point. I also found an Ikea "Stora" loft bed (also decent materials) for $160 which will need a few mods with the new chop saw to work in the next room
We did the entire floor in the house with 3/4" Maple, all of it reclaimed from a building demo that was taking place when we were working on the house. It was a monstrous pain (my back still hurts) to clean and nail down 1800 sq/ft, but the end result was excellent. The pic is a pano, so all the undulations/waves are photo induced ;-)
My wife and little one will need to spend some time sorting through the chaos I left behind.
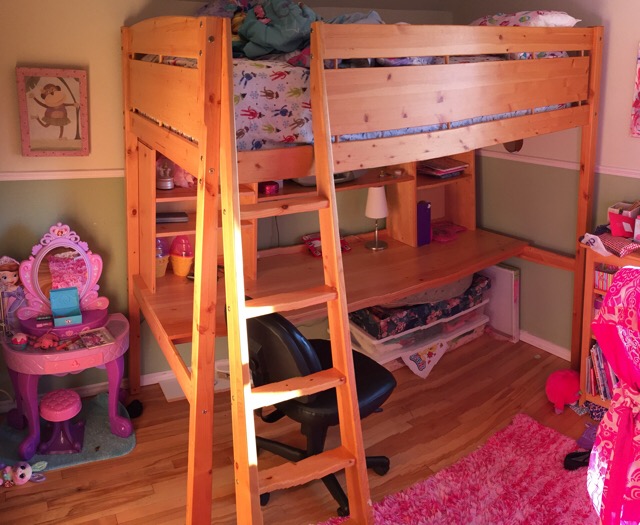
Amx, anyone who read through 37 pages likely deserves a beer or three for their efforts. So Kijiji (I guess our version of Craigslist) was "fruitful" over the last two days. I managed to find a very decent "Canwood" actual wood loft bed, that exactly matches the girls rooms. Canwood used to produce some very high quality product out of British Columbia (we have quite a few pieces in our home) but was sold to Storkcraft..now manufacturing in Asia. Regardless, my 7 yr old is pretty stoked with this find ...and so am I as new, this setup was $1500. I was all set to build a loft bed, but at $260, solid pine, and 2hrs of assembly..no point. I also found an Ikea "Stora" loft bed (also decent materials) for $160 which will need a few mods with the new chop saw to work in the next room
We did the entire floor in the house with 3/4" Maple, all of it reclaimed from a building demo that was taking place when we were working on the house. It was a monstrous pain (my back still hurts) to clean and nail down 1800 sq/ft, but the end result was excellent. The pic is a pano, so all the undulations/waves are photo induced ;-)
My wife and little one will need to spend some time sorting through the chaos I left behind.
Last edited:
sublime68charger
Well-known member
Very nice score Denwood!
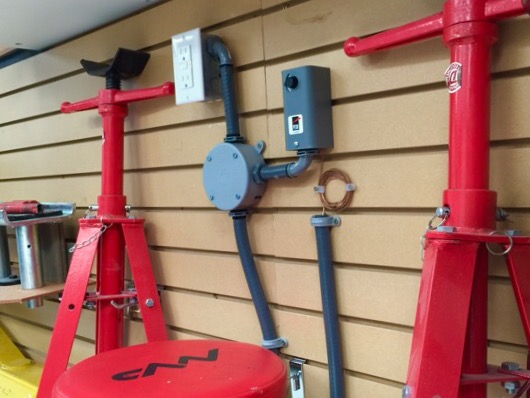
From a few pages back, I have my self regulating heat trace and garage drain all ready to go. I don't want this running all the time with respect to efficiency, so have sorted out a simple control from one of our local HVAC suppliers...ECCO.
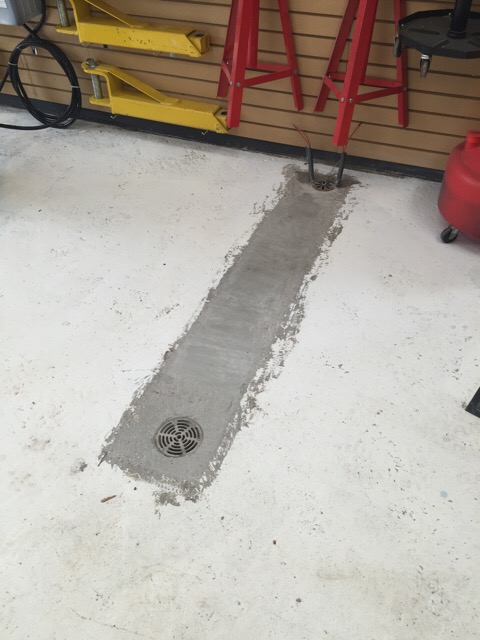
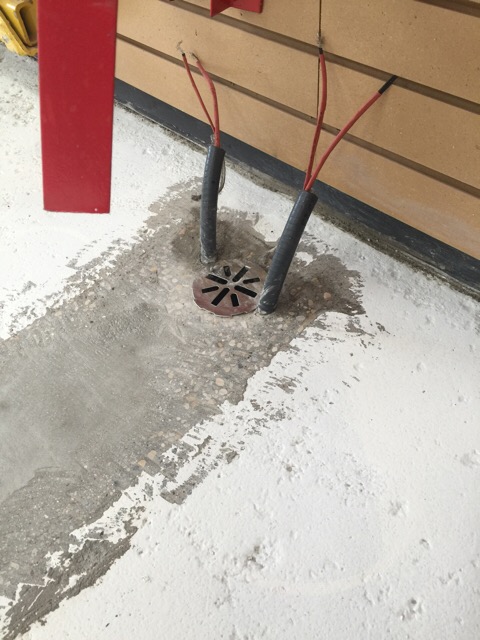
This is a simple line level control that can either open or close at the set temp. $100, so not cheap, but it will do the job. The 110 volt supply to the heat trace wires protruding from the drain area will be terminated in conduit box, and supplied power by the A19 unit. I'll set the temp right above freezing so the heat trace will only be energized when it needs to be.
http://www.industrialcontrolsonline.com/johnson-controls-a19-series

This is a simple line level control that can either open or close at the set temp. $100, so not cheap, but it will do the job. The 110 volt supply to the heat trace wires protruding from the drain area will be terminated in conduit box, and supplied power by the A19 unit. I'll set the temp right above freezing so the heat trace will only be energized when it needs to be.
http://www.industrialcontrolsonline.com/johnson-controls-a19-series
Last edited:
Very nice shop! And a great van. I own a blue 90 westy multi van. My shop, a 14x20 in Ann Arbor (thread title) could certainly use the overhead and the jacks! Very inspiring what you have accomplished. I posted my space a while ago when it was a disaster. Is your compressor shed on the outside wall of the shop or more remote?
Al, thanks for checking in. Posting pics (particularly before) gives you a nice reference moving forward...I often forget to take these I sold the Westfalia in the spring, as we've outgrown it. It was a sweet ride indeed with the extra 50hp the Audi 2.1L i4 added to the platform.
I have a 12x10 (unheated) general storage shed right beside the shop, spaced about 4ft away. I placed both compressors in the back of this shed so they don't take up too much space. In adding power to the shed for the compressors, I also gained some interior lighting for those dark winter nights when the snow blower has to come out and play. This has worked out very well. They're just audible in the garage so I can make sure both compressors come on under full load.
I had to change out the oil for each compressor and put in 5w30 synthetic as at -15C and colder, they don't start at all with conventional oil in place.
I sold the Westfalia in the spring, as we've outgrown it. It was a sweet ride indeed with the extra 50hp the Audi 2.1L i4 added to the platform.I have a 12x10 (unheated) general storage shed right beside the shop, spaced about 4ft away. I placed both compressors in the back of this shed so they don't take up too much space. In adding power to the shed for the compressors, I also gained some interior lighting for those dark winter nights when the snow blower has to come out and play. This has worked out very well. They're just audible in the garage so I can make sure both compressors come on under full load.
I had to change out the oil for each compressor and put in 5w30 synthetic as at -15C and colder, they don't start at all with conventional oil in place.
Last edited:
NewShockerGuy
Well-known member
Not sure if this has been mentioned or listed so I apologize if it's a repeat... however... the way you have the maxjax arms mounted on the wall intrigues me.
Is there any way you can take closer pictures of that by chance?
I actually plan on only doing that with my one post since the other is against the wall not really in the way. My only concern is the weight of the arms on the wall?
You think there would be any issues mounting some type of shelf or tabs off the 5/8" drywall into studs holding two arms?
Thanks,
-Nigel
Is there any way you can take closer pictures of that by chance?
I actually plan on only doing that with my one post since the other is against the wall not really in the way. My only concern is the weight of the arms on the wall?
You think there would be any issues mounting some type of shelf or tabs off the 5/8" drywall into studs holding two arms?
Thanks,
-Nigel
Jarhead0408
Well-known member
Nice build Denwood! Pretty amazing transformation from such a humble beginning.
Mind if I ask what brand those low-profile jack stands are?
Mind if I ask what brand those low-profile jack stands are?
Nigel, I had a similar request a few pages back on the jack stands and arm mounting. Just plain old slat wall hooks. They're inexpensive, and easy to reconfig. The MDF slat wall is surprisingly strong. Because the arms are fairly compact, they slide up close to the wall, so don't torque the hangars very much. A simple angle shelf bracket into a stud (x2) would be plenty strong. Just make sure there's a lip on the shelf arm edge so the arms can't fall off onto your toes
Jarhead, thanks for the kind words The only low profile jack stands I could find anywhere were at Greg Smith Equipment:
http://www.gregsmithequipment.com/2-Ton-Tripod-Stand-SHORT
The arms and stands are just sitting on two slat wall hooks each:
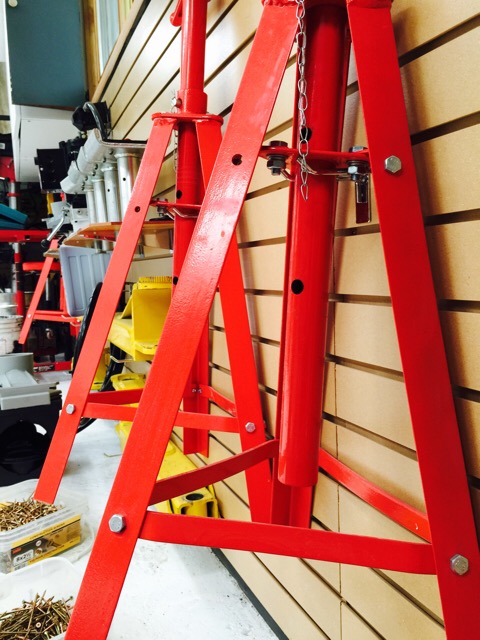
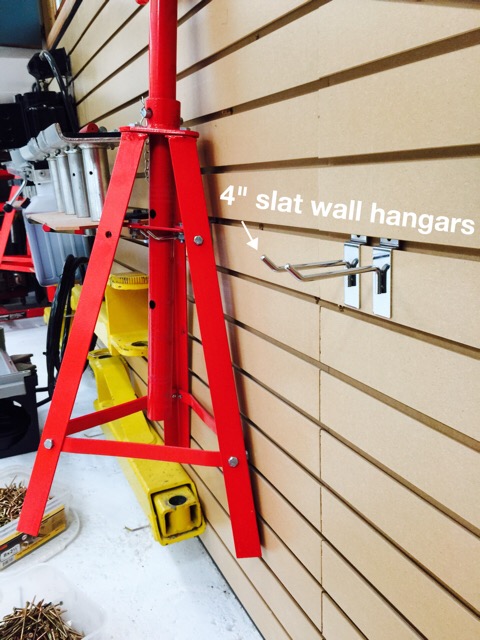
The stands are about perfect for the MaxJax.
I find them very useful when supporting, or pressing objects under the car is necessary. I used one of the jack stands combined with a lift extension column to pop these OEM lift points into place on my A3. Normally you'd use a floor jack to do it. These lift points eliminate the need to lift from the rocker panels...something I hate doing.
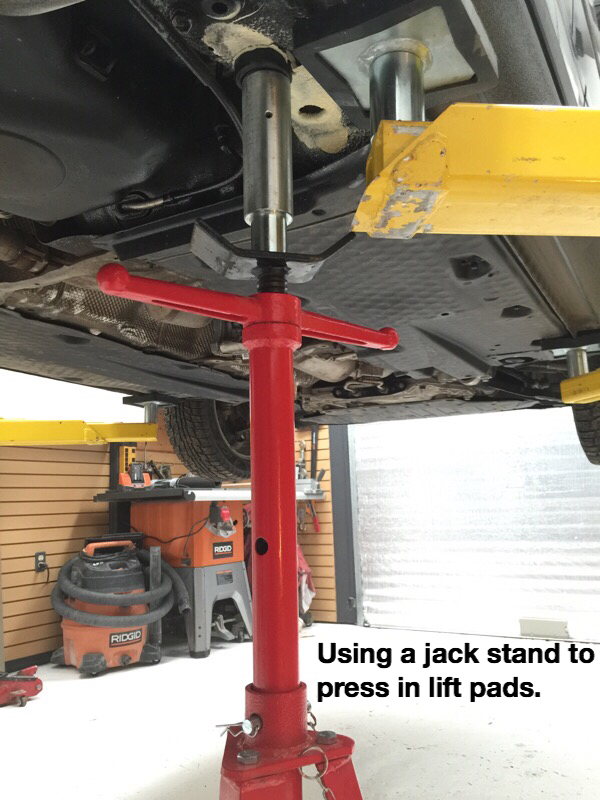
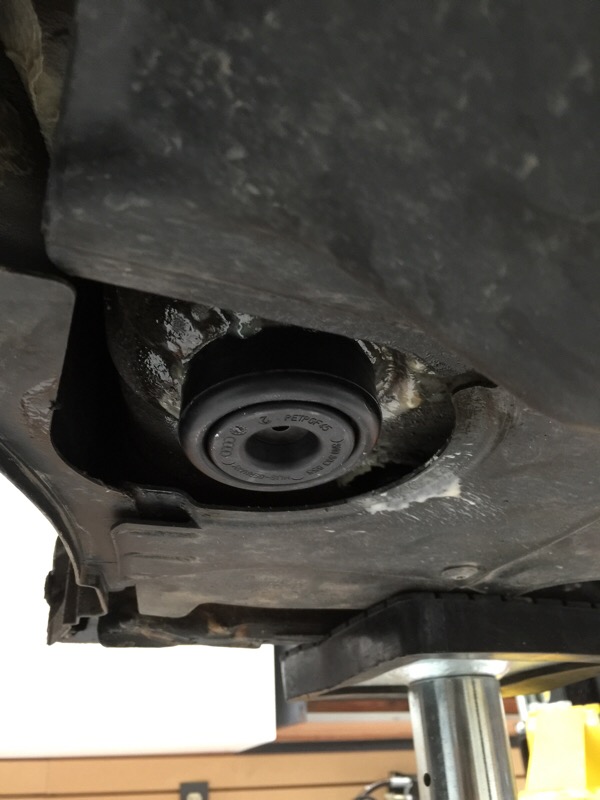
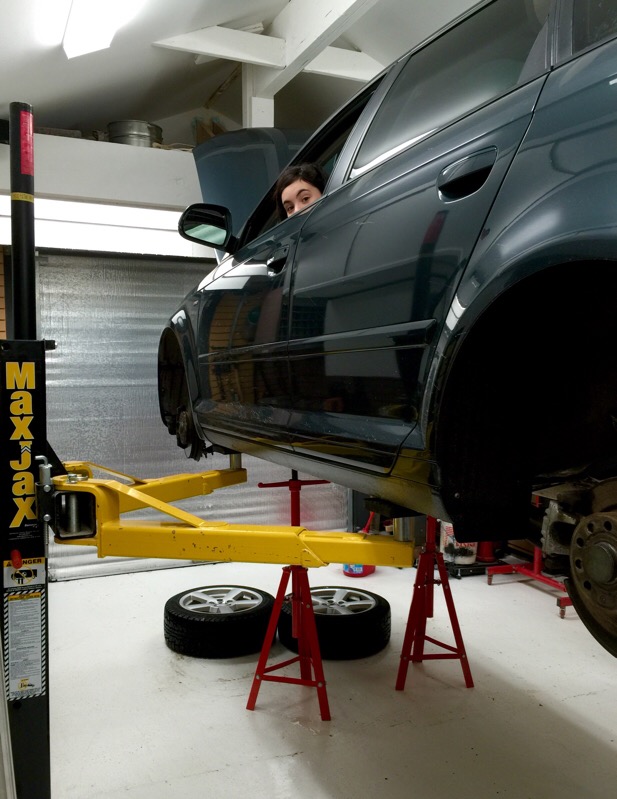
A car on the hoist with safety bars in place, and jack stands added is about as safe as it gets:
I've finally decided on a drainage solution for snow melt. I've got an 8'x18' parking pad coming from RaceDeck in alloy/graphite/black. The ramp edges will be sealed to the floor, and direct snow melt to the new drain. Should be interesting.
Jarhead, thanks for the kind words
The only low profile jack stands I could find anywhere were at Greg Smith Equipment:http://www.gregsmithequipment.com/2-Ton-Tripod-Stand-SHORT
The arms and stands are just sitting on two slat wall hooks each:
The stands are about perfect for the MaxJax.
I find them very useful when supporting, or pressing objects under the car is necessary. I used one of the jack stands combined with a lift extension column to pop these OEM lift points into place on my A3. Normally you'd use a floor jack to do it. These lift points eliminate the need to lift from the rocker panels...something I hate doing.
A car on the hoist with safety bars in place, and jack stands added is about as safe as it gets:
I've finally decided on a drainage solution for snow melt. I've got an 8'x18' parking pad coming from RaceDeck in alloy/graphite/black. The ramp edges will be sealed to the floor, and direct snow melt to the new drain. Should be interesting.
Last edited:
1/2 Cup
Member Emeritus
Looking great Dennis, 
Your thermostat should work a treat.
Regards
Your thermostat should work a treat.
Regards
drivesitfar
Well-known member
Woody: self regulating and now self draining too. i do like to watch as your plans come together with another successful ending. will the girls and their friends still be able to dance on your new race deck flooring?
Hope you are having a great weekend.
Hope you are having a great weekend.
Jarhead0408
Well-known member
Thanks Denwood! I wasn't expecting such a fast response.
That's a pretty good price for those stands. $50 bucks a pop sounds pretty good to me.
Currently I just have a scissor lift, but having one or two of these positioned on a rear axle would go along way towards increasing the stability of the vehicle while it's in the air. It's pretty stable already, but these stands couldn't hurt. Greg Smith carries a good line of products.
I thought about redoing the joist in my garage like you've done to yours, but since I plan to move in a few years; I think I'll just make do.
Keep us updated my friend, you've done an excellent job so far.
That's a pretty good price for those stands. $50 bucks a pop sounds pretty good to me.
Currently I just have a scissor lift, but having one or two of these positioned on a rear axle would go along way towards increasing the stability of the vehicle while it's in the air. It's pretty stable already, but these stands couldn't hurt. Greg Smith carries a good line of products.
I thought about redoing the joist in my garage like you've done to yours, but since I plan to move in a few years; I think I'll just make do.
Keep us updated my friend, you've done an excellent job so far.
JohnnieMo
Well-known member
Re: Woody's Works Garage - rebirth!
I'm interested to see this parking pad. Where did you buy from? Direct from Racedeck?
Sent from my Passport
I'm interested to see this parking pad. Where did you buy from? Direct from Racedeck?
Sent from my Passport
1/2, all I need to do is figure out a line level LED so we'll know when the manual control is actually energizing the heat trace.
Drive, as you know, I've been trying to figure out the most efficient way to direct snow melt on my side slope floor, not keep the shop heated unless in use, have it safe and require no late night squeegee sessions. The added drain with heat trace, an elevated pad that allows drainage and border containment (when I seal the Racedeck edges to my floor) should do the job nicely.
The Racedeck pad will be a nice dance floor too when the girls are partying it up in there.
Jar, the stands will add a lot of stability and safety for sure. I would consider them an essential part of the lift safety compliment, particularily if you're wrestling with parts on the car or doing trans/engine work.
Johnnie, yes ordering from Racedeck directly. The RaceDeck samples I received are miles better in terms of quality compared to some cheaper drain tiles I found at Home Depot. The FreeFlow product sits just over .5" so will elevate the car and people up from the salt/water/sand that will invariably be depositing on the floor. If you mention the GJ, there's a price break...and their UPS shipping rates are very good with brokerage included. The exchange right now is not good at all..just wish I ordered the tiles last year You may have better luck in Calgary if a company there actually stocks some tile. No such luck here.
Drive, as you know, I've been trying to figure out the most efficient way to direct snow melt on my side slope floor, not keep the shop heated unless in use, have it safe and require no late night squeegee sessions. The added drain with heat trace, an elevated pad that allows drainage and border containment (when I seal the Racedeck edges to my floor) should do the job nicely.
The Racedeck pad will be a nice dance floor too when the girls are partying it up in there.
Jar, the stands will add a lot of stability and safety for sure. I would consider them an essential part of the lift safety compliment, particularily if you're wrestling with parts on the car or doing trans/engine work.
Johnnie, yes ordering from Racedeck directly. The RaceDeck samples I received are miles better in terms of quality compared to some cheaper drain tiles I found at Home Depot. The FreeFlow product sits just over .5" so will elevate the car and people up from the salt/water/sand that will invariably be depositing on the floor. If you mention the GJ, there's a price break...and their UPS shipping rates are very good with brokerage included. The exchange right now is not good at all..just wish I ordered the tiles last year
You may have better luck in Calgary if a company there actually stocks some tile. No such luck here.
Last edited:
bonecrrusher
Well-known member
Dennis - are you doing the whole floor in RD?
How about around where the posts go for the Maxjax?
How about around where the posts go for the Maxjax?
Bone, the parking "pad" will be 8' x 18', so will fit between the posts. The remaining area of the 16x24 shop will remain as is...a clean white floor The pad (with edges sealed to the floor) will keep salt/melt/water from getting to the side wall of the shop where a 1" side slope is directing water right now. The new floor drain has two drain grates, one at the rear/low side of the park pad, and one right next to the wall. If all goes well, the drain near the wall should see little or no water ever, while providing access to the trap/clean out which is a few feet down.
The pad (with edges sealed to the floor) will keep salt/melt/water from getting to the side wall of the shop where a 1" side slope is directing water right now. The new floor drain has two drain grates, one at the rear/low side of the park pad, and one right next to the wall. If all goes well, the drain near the wall should see little or no water ever, while providing access to the trap/clean out which is a few feet down.So a slight diversion. The world's first wind-up time lapse motion control system. I've been working on this product for nearly two years. It's designed for remote/travel where there is no power. This is a 60 second clip we released on Friday...the last 10 seconds are pretty amazing.
https://vimeo.com/144119728
CNC machined aluminum in anodized black, with some laser'd logo. Never get tired of the visuals The tiny camera on there is a Sony A7s with a full 24x36mm sensor. Crazy low light performance..and perfect for time lapse as well as video.

https://vimeo.com/144119728
CNC machined aluminum in anodized black, with some laser'd logo. Never get tired of the visuals
The tiny camera on there is a Sony A7s with a full 24x36mm sensor. Crazy low light performance..and perfect for time lapse as well as video.
Last edited:
drivesitfar
Well-known member
Woody: i was just getting ready to turn off my laptop and head out to the shop and saw you posted a video. awesome as per the usual. i'm going to have to pick your brain and have you give me a few lessons on shooting videos and maybe posting on GJ and YouTube. i'll send you a PM when i'm ready to learn if you wouldn't mind and i'll probably need to buy some of your cool equipment too.
your video is top notch just like the others you've posted. nice looking design for the stand too.
great news that the race deck floor is on its way. also that the girls will be able to play on it too.
your video is top notch just like the others you've posted. nice looking design for the stand too.
great news that the race deck floor is on its way. also that the girls will be able to play on it too.
Thanks Drive...of course I'll help when you're ready to go I decided on an alloy center section (it's bright) with graphite border, and black 3" ramp edge to go around the entire pad. Dubber was kind enough to post up some pics of the RaceDeck ramp edge underside for me, so the challenge will be making the edge watertight to the floor.

I decided on an alloy center section (it's bright) with graphite border, and black 3" ramp edge to go around the entire pad. Dubber was kind enough to post up some pics of the RaceDeck ramp edge underside for me, so the challenge will be making the edge watertight to the floor.
Last edited:
Grumblebum
Well-known member
That's a cool bit of camera kit there Den.
The RD pad should look nice, looking forward to seeing your ice/snow mitigation plan in action!
Cheers Grumblebum.
The RD pad should look nice, looking forward to seeing your ice/snow mitigation plan in action!
Cheers Grumblebum.
drivesitfar
Well-known member
Woody: thanks for volunteering to help once i need some. not that i have a lot of youtube or videos to make, but a few for sure.
not sure what to tell you about sealing the race deck to your old cement and painted floor. maybe silicone or epoxy? or build up the edge of the wall so if any does escape from under the race deck it will drain out the front of the garage if your garage floor slopes that way.
good luck
not sure what to tell you about sealing the race deck to your old cement and painted floor. maybe silicone or epoxy? or build up the edge of the wall so if any does escape from under the race deck it will drain out the front of the garage if your garage floor slopes that way.
good luck
3pedal
Well-known member
Just finished reading about your build, it was a great way to spend some time, and focus me back on mine. I have been out playing all summer, ignoring the garage. I need to update my build thread and get moving again.
Your camera rig is very interesting, I can see a couple uses for it. Might need to find out some more about it.
Your camera rig is very interesting, I can see a couple uses for it. Might need to find out some more about it.
1/2 Cup
Member Emeritus
Awesome work on the motion control system Dennis
Last edited:
Grumb, my wife's first park in the shop last winter (after fresh snow) was a bit of a flood, as almost 1" of water ended up at the side wall, frozen. The drain setup is 100% necessary if anyone is going to park in the shop during winter here
Drive, I have though long and hard on how to seal the "park pad" from leaking around the edges. I figure I'll start simple with some urethane based waterproof flexible sealant that is designed to fill concrete expansion cracks. The Racedeck floor will expand/contract, so the product needs to be flexible. I have 60mil EPDM rubber that I may put underneath the entire pad, so the edges would not be sealed to concrete, but rather EPDM...that would prevent slip and allow thermal expansion/contraction.
3Ped, thanks for taking the time to browse the thread New products are a necessary way of life here, so there's always a few projects in the hopper. We have a new one coming next week again.
1/2, I know you of all people will appreciate the simplicity of taking things a bit old school. I had the opportunity to take a tour of David Copperfield's private museum in Las Vegas 2 years back (hosted by David himself..there were only six of us!) and was inspired by the 100 yr old automaton/wind up booths he had in his collection. One might say this inspired a retro approach to motion control with clockworks. It works very well in terms of keeping a very small/light footprint for travel. If you've been to Mr. Copperfield's show at the MGM in Las Vegas..you've seen our gear. They use quite a bit of it in the show.
Drive, I have though long and hard on how to seal the "park pad" from leaking around the edges. I figure I'll start simple with some urethane based waterproof flexible sealant that is designed to fill concrete expansion cracks. The Racedeck floor will expand/contract, so the product needs to be flexible. I have 60mil EPDM rubber that I may put underneath the entire pad, so the edges would not be sealed to concrete, but rather EPDM...that would prevent slip and allow thermal expansion/contraction.
3Ped, thanks for taking the time to browse the thread
New products are a necessary way of life here, so there's always a few projects in the hopper. We have a new one coming next week again.1/2, I know you of all people will appreciate the simplicity of taking things a bit old school. I had the opportunity to take a tour of David Copperfield's private museum in Las Vegas 2 years back (hosted by David himself..there were only six of us!) and was inspired by the 100 yr old automaton/wind up booths he had in his collection. One might say this inspired a retro approach to motion control with clockworks. It works very well in terms of keeping a very small/light footprint for travel. If you've been to Mr. Copperfield's show at the MGM in Las Vegas..you've seen our gear. They use quite a bit of it in the show.
Last edited:
drivesitfar
Well-known member
Woody: i'm sure you have a plan and i'm crossing my fingers that it works as well as you hope because you also had to figure in almost 100 degree temp changes.
i'm heading to ASU for my daughter's graduation in a couple months and we are stopping in Vegas on the way back to maybe catch a couple shows. we used to go every couple years, but since retired it's been maybe 10 years since i've been there. i doubt you can help me get a special tour of David's cool stuff, but if you have any tips of places to see or do while we are there for 3 days feel free to PM me or mention them here if you like.
it's starting to get into the 30's at night now here so guessing you are nearing freezing temps at your place. you got a lot done this year at home and at work so not to pat you on the back too much. WELL DONE!!
i'm heading to ASU for my daughter's graduation in a couple months and we are stopping in Vegas on the way back to maybe catch a couple shows. we used to go every couple years, but since retired it's been maybe 10 years since i've been there. i doubt you can help me get a special tour of David's cool stuff, but if you have any tips of places to see or do while we are there for 3 days feel free to PM me or mention them here if you like.
it's starting to get into the 30's at night now here so guessing you are nearing freezing temps at your place. you got a lot done this year at home and at work so not to pat you on the back too much. WELL DONE!!
Thanks Drive..I'll pm you a few Vegas ideas . I like your signature...wise words to live by
Missed the Racedeck delivery today from UPS :-(
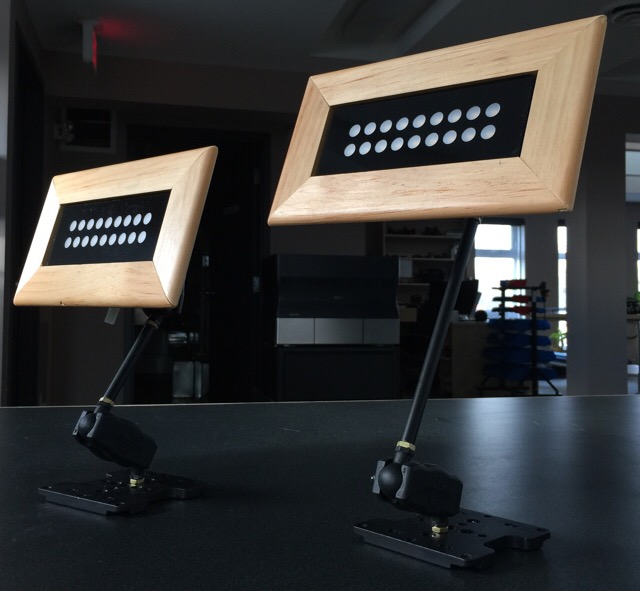
A little project to take an LED task light (it comes just as a flat strip) and create some reading lights for the girls. Their loft beds require something that will adjust, yet sit very close to the wall. I also noticed the strip lights get quite warm, so the new "lamp" has a much larger aluminum heat sink. The parts are from the Cinevate spare parts bin and the wood trim is a piece of pine molding I found at HD with a perfectly sized undercut at the back surface
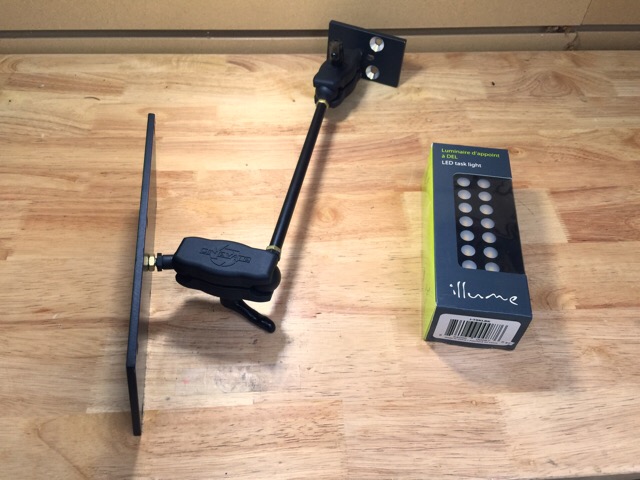
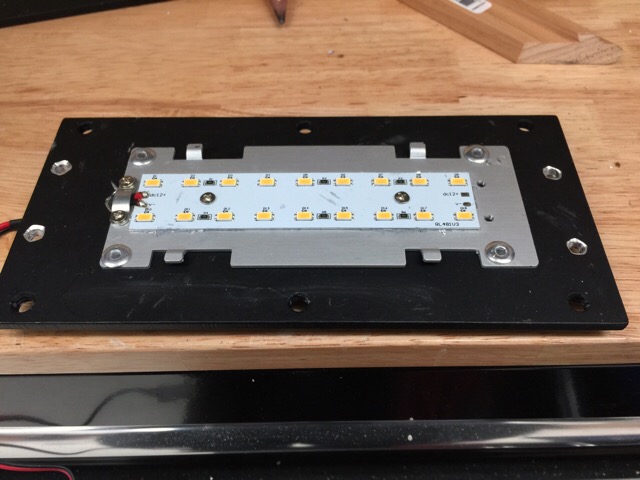
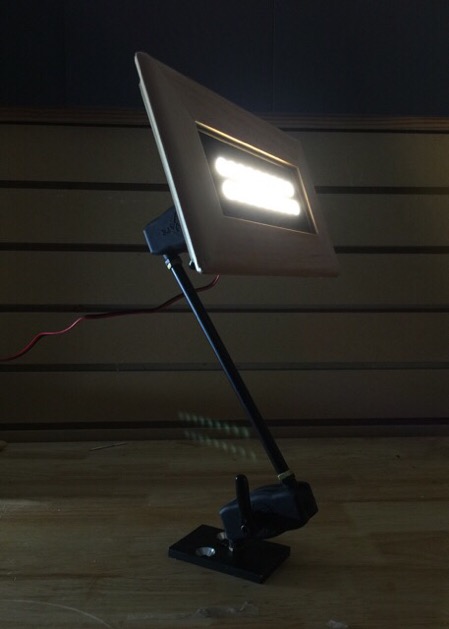
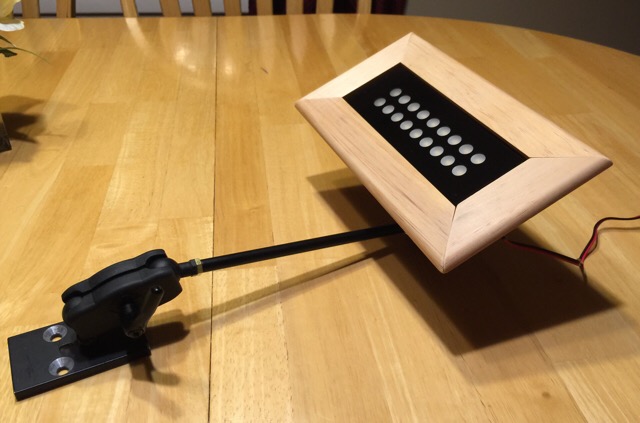
. I like your signature...wise words to live by Missed the Racedeck delivery today from UPS :-(
A little project to take an LED task light (it comes just as a flat strip) and create some reading lights for the girls. Their loft beds require something that will adjust, yet sit very close to the wall. I also noticed the strip lights get quite warm, so the new "lamp" has a much larger aluminum heat sink. The parts are from the Cinevate spare parts bin and the wood trim is a piece of pine molding I found at HD with a perfectly sized undercut at the back surface
Last edited:
1/2 Cup
Member Emeritus
Those lights are just fantastic Dennis.

drivesitfar
Well-known member
Woody: very cool lamp and another great project thought of and completed. 
I used to go to Vegas to try to add to my bank account, but the dice really have no home so far from a sure thing. anything you'd like to tell me about for a little fun in Vegas with my bride is appreciated. we just saw that San Andreas movie so trying to convince her to go with me to tour Hoover Dam isn't happening in my lifetime now for sure with her.
After 40 years of sales and customer service as a Realtor and other small businesses i've owned gave me those words to put in my signature. you are actually the first one to comment and i've got over 10,000 post on this forum.
thanks for the Kudos.
cheers and hope you are having a great weekend.
I used to go to Vegas to try to add to my bank account, but the dice really have no home so far from a sure thing. anything you'd like to tell me about for a little fun in Vegas with my bride is appreciated. we just saw that San Andreas movie so trying to convince her to go with me to tour Hoover Dam isn't happening in my lifetime now for sure with her.
After 40 years of sales and customer service as a Realtor and other small businesses i've owned gave me those words to put in my signature. you are actually the first one to comment and i've got over 10,000 post on this forum.
thanks for the Kudos.
cheers and hope you are having a great weekend.
anndel
Well-known member
Denwood, this is awesome! You make most commercial auto repair shops drool. I would love just to come and hang out, chat and drink beer outside as to not dirty your floor.
Thanks Anndel. Coffee is always on, and beers kept cold . You will see here that the floor is not always so clean...it's a working shop!
Getting the self regulating heat trace wired in and integrated with the line level thermostat control was tonight's project. The receptacle powering the system was changed over to a GFCI as per code. The control is very simple to wire. One set of contacts opens as temp rises over set point, the other set closes....so you use whichever works for your application.
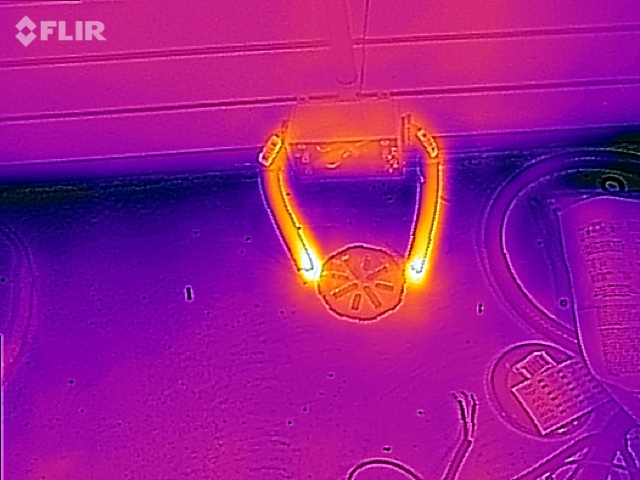
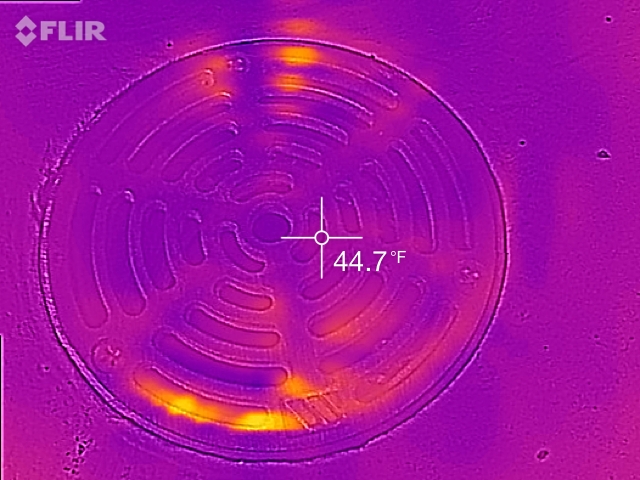
I fired up the FLIR to check the heat trace. The images were taken about 20 minutes after powering up the system. The self regulating heat trace uses less power as it heats up, so drops quickly from 60 watts, to 30 watts after about 15 min. It may drop further, but I've only tested it for shorter durations. Either way, the control thermostat will keep power use at 0 watts until the slab reaches the set point. I'll try setting it at about 35F. The Racdeck floor has arrived, so tomorrow we may have the final part of the snow melt/water drain solution in place.
Six weeks ago:
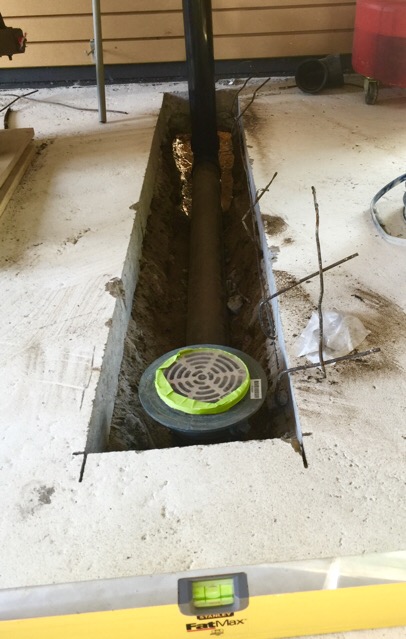
Four weeks back:

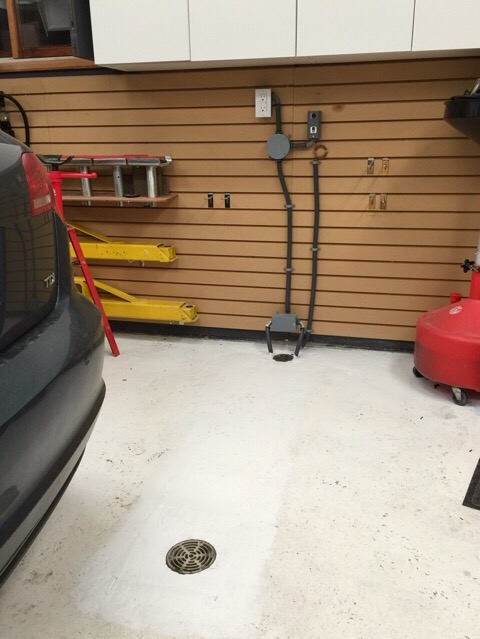
Today:
Looking down the wall drain/clean out.
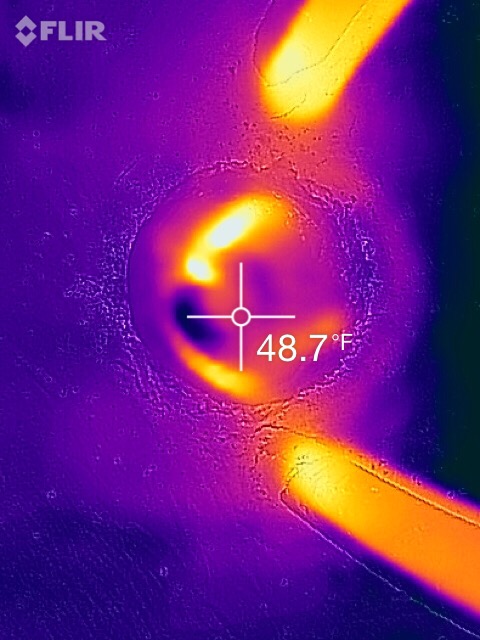
The floor drain..can be driven over.
. You will see here that the floor is not always so clean...it's a working shop!Getting the self regulating heat trace wired in and integrated with the line level thermostat control was tonight's project. The receptacle powering the system was changed over to a GFCI as per code. The control is very simple to wire. One set of contacts opens as temp rises over set point, the other set closes....so you use whichever works for your application.
I fired up the FLIR to check the heat trace. The images were taken about 20 minutes after powering up the system. The self regulating heat trace uses less power as it heats up, so drops quickly from 60 watts, to 30 watts after about 15 min. It may drop further, but I've only tested it for shorter durations. Either way, the control thermostat will keep power use at 0 watts until the slab reaches the set point. I'll try setting it at about 35F. The Racdeck floor has arrived, so tomorrow we may have the final part of the snow melt/water drain solution in place.
Six weeks ago:
Four weeks back:
Today:
Looking down the wall drain/clean out.
The floor drain..can be driven over.
Last edited:
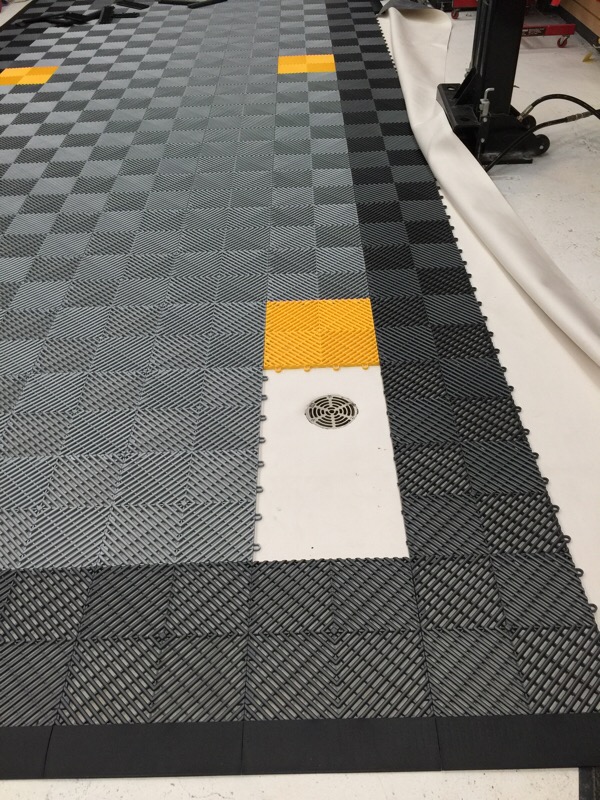
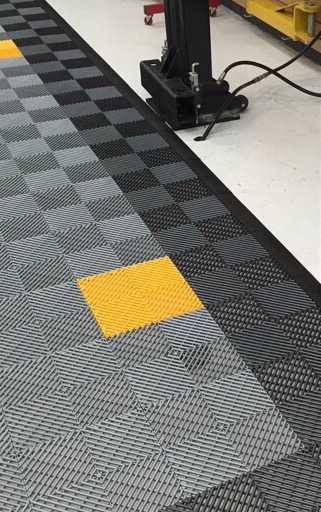
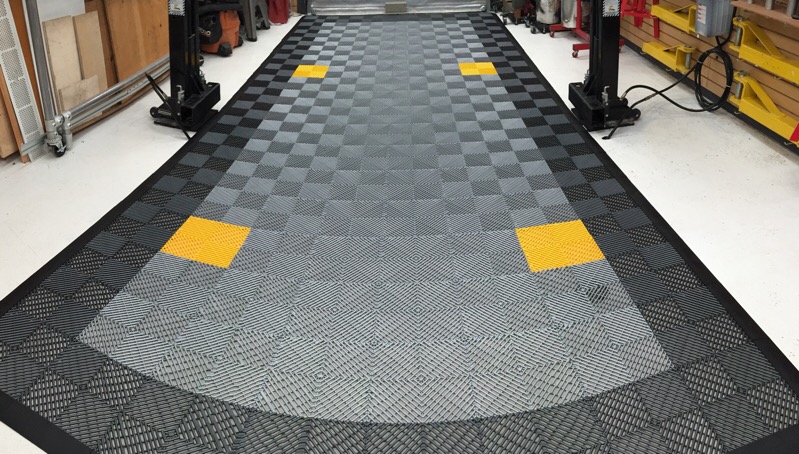
Racedeck floor time! I'm using 60mil EPDM rubber under the floor to contain snow melt, water, and to keep the floor from moving around. The edges of the Racedeck on the low side will be sealed to the EPDM so that water will stay in the pad, and be directed to the floor drain. Sealing the edges of the Racedeck to the flexible EPDM will decouple it from the floor, allowing the RD floor to expand and contract without buckling. The drain location on the floor is the low point. I added in the four yellow tiles to help centering vehicles on the hoist...and assist the missus with parking too.
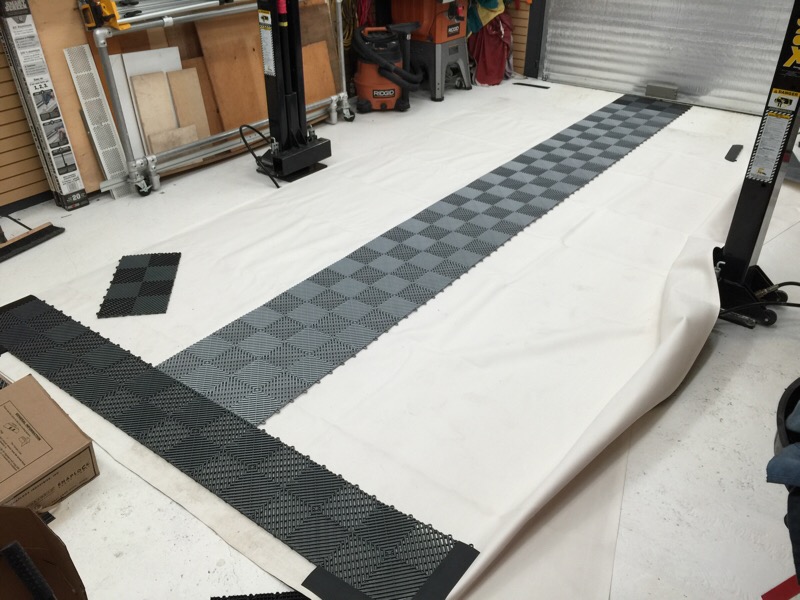
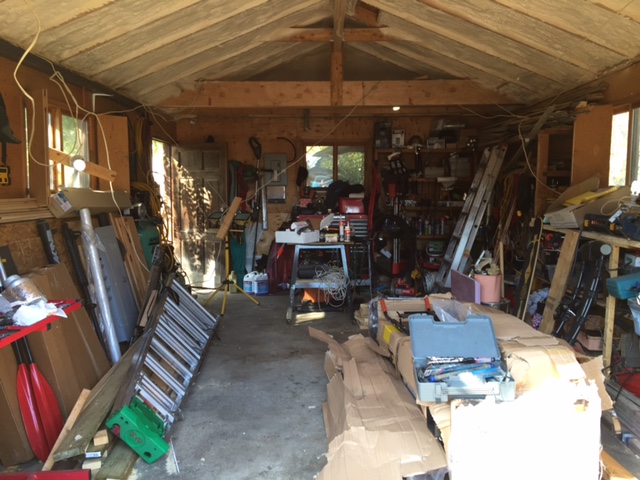
The mess before:
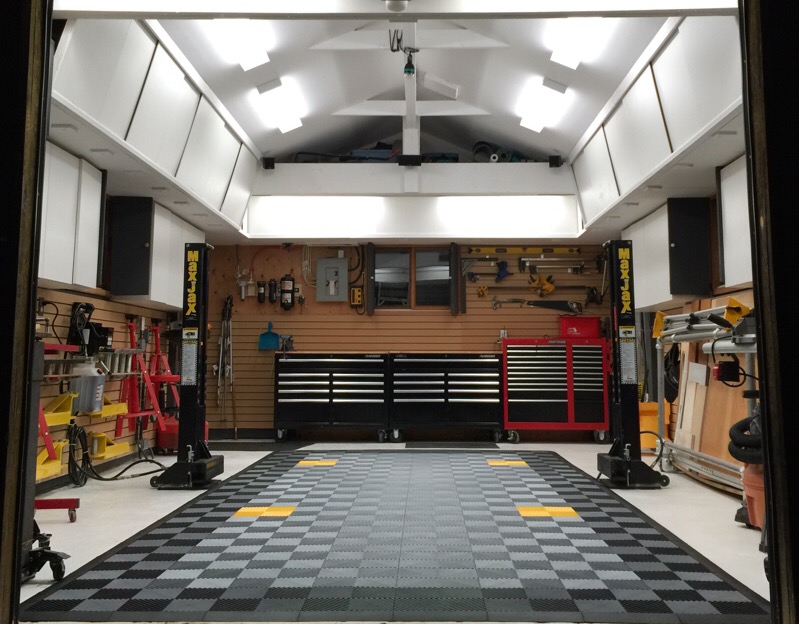
Obligatory pano shots:

The mess before:
Obligatory pano shots:
Last edited:
1/2 Cup
Member Emeritus
Wow Dennis, just awesome.
BBChevro
Well-known member
Great work Dennis.