To avoid these ads, REGISTER NOW!

The VISES of Garage Journal

Blue Frog

Well-known member
Joined
Jun 22, 2014
Messages
363
Location
Lynn Haven, FL
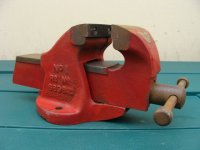
Might want to be careful with that depending on what you typically do. Those were designed for tool room use, final fitting, aka careful use by machinists. With the over hung jaws and thin towers it's not one that you want to clamp a caliper hanger in and go to town.


Thanks for the advice, but I don't use a vise as most of you do - I'm a woodworker, so any work that I do is considered light duty by most in this forum.

Blue
 
To avoid these ads, REGISTER NOW!

bagged89s10

Well-known member
Joined
Mar 13, 2005
Messages
4,607
Location
CT
Got me a Reed 104R again. This one won't get resold. Just have to wait for it to arrive via FedEx.
ImageUploadedByTapatalk1457288929.629472.jpg
 

slotard

Well-known member
Joined
Jun 21, 2012
Messages
137
Location
Alameda, CA
Well I found why the Reed has significant backlash, the nut has a tensioner and there's a significant gap between it and the nut. How should I get this moving... start with aircraft remover, then PB Blaster, then a manual impact driver?

5UaOHHHh.jpg
 

Fretters

Well-known member
Joined
Jan 25, 2014
Messages
4,217
Location
South Yorkshire, England
I would use a hand impact driver with large standard bit and a hammer. A few whacks should get that stud moving.

I'd personally be a bit leary of using any form of impact on something that skinny. Better to have a bit of meat behind something if impacting. Probably just cleaning the paint and any other **** off it would free it.
 

Fretters

Well-known member
Joined
Jan 25, 2014
Messages
4,217
Location
South Yorkshire, England
Those are (obviously) very soft, so I'd first try straightening it (I don't think I've ever seen one NOT bent at least a little). If it's beyond that, go to a hardware store with the heavy "spike" nails and see if one is the right size, or if not, just a tad larger and do what Get said.

I would not use a hardened pin for this use. you want that pin to have some give, as the castings don't...

The other thing is if the pin is not hard against the nut, being soft enough to bend allows you to bend it into the nut to keep it from walking.

Brazing rod or brass rod tend to be my choice with stuff like that, which is never going to see any real stress. As you say, keep it soft and something which is easy to bend, and a quick session with a file will easily get the end fitting into the hole if it's a tad oversize.
 

zkling

Well-known member
Joined
Jan 23, 2007
Messages
16,939
I'd personally be a bit leary of using any form of impact on something that skinny. Better to have a bit of meat behind something if impacting. Probably just cleaning the paint and any other **** off it would free it.

:+1: 
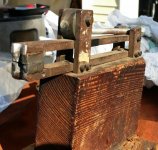
I'd back the screw out with a very good fitting screwdriver (may need to do some grinding), clean off all the threads and then thread it in further. If it seems too stuck as is, a little heat from a propane torch or even heat gun to soften the paint would help.
 

slotard

Well-known member
Joined
Jun 21, 2012
Messages
137
Location
Alameda, CA
It looks a hair bigger than a 3/8" coarse bolt that I held next to it, and quite a bit finer thread pitch. It could either be a funny size (unlikely that it's metric if late 40s to early 60s is right, which is what I was told) or just paint making it bigger. Not tiny by any means.
 

Outlawmws

Well-known member
Joined
Aug 9, 2011
Messages
39,264
Location
The Badlands
I'd personally be a bit leary of using any form of impact on something that skinny. Better to have a bit of meat behind something if impacting. Probably just cleaning the paint and any other **** off it would free it.


This^^^ - Don't start with any impact unless you have already tried normal means...
 

zkling

Well-known member
Joined
Jan 23, 2007
Messages
16,939
More than once I've snapped one of the "ears" off a slotted stud like that before. They are commonly used as gib adjustment screws on machine ways. A tight fitting screwdriver is a must.
 

slotard

Well-known member
Joined
Jun 21, 2012
Messages
137
Location
Alameda, CA
The paint wasn't done very well to begin with so I'm thinking I'll be stripping all of it anyway. I just picked up some stripper and BLO.

When I said manual impact I meant the kind you hit with a hammer... I'm always surprised how many people don't know such a thing exists.
 

zkling

Well-known member
Joined
Jan 23, 2007
Messages
16,939
The paint wasn't done very well to begin with so I'm thinking I'll be stripping all of it anyway. I just picked up some stripper and BLO.

When I said manual impact I meant the kind you hit with a hammer... I'm always surprised how many people don't know such a thing exists.

Yes, but the problem with those is you have to be careful what you use them on as they produce not only a rotational force but also quite a bit of inline/axial force. Which works great for keeping the bit seated, but if the structure can't take the blows, well then...
 

GETRIDAONE

Well-known member
Joined
May 21, 2013
Messages
1,549
Location
Auburn, GA
Fretters, I have been grinding with the drill making a handle knob for the Parkinson. I guess that's why I suggested the drill method. Speaking of the Parkinson, while taking the blue paint off there was some gray underneath. Would it have been gray color originally ?
Thank's
 

Fretters

Well-known member
Joined
Jan 25, 2014
Messages
4,217
Location
South Yorkshire, England
Fretters, I have been grinding with the drill making a handle knob for the Parkinson. I guess that's why I suggested the drill method.

It's as good a method as any. As with any task, there's usually multiple ways to skin a cat. :) Just personal preference more than owt, else availability of bits and tools, as to which method one uses. :)
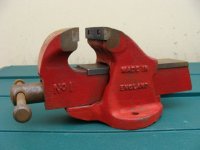

Speaking of the Parkinson, while taking the blue paint off there was some gray underneath. Would it have been gray color originally ?
Thank's

Red, if I recall. Their colours seemed to vary between orange and red, almost through to burgundy at times. If you send Dutchgray a message, (else search through his posts in the vices thread), I believe he has one in pretty much perfect original condition, including paint and sticker. He should be able to give you the best idea of original colour.
 

bagged89s10

Well-known member
Joined
Mar 13, 2005
Messages
4,607
Location
CT
Well I found why the Reed has significant backlash, the nut has a tensioner and there's a significant gap between it and the nut. How should I get this moving... start with aircraft remover, then PB Blaster, then a manual impact driver?

5UaOHHHh.jpg


I would soak it in a 50/50 mixture acetone transmission fluid. Then use a hand driver to get that screw moving.
 

Fretters

Well-known member
Joined
Jan 25, 2014
Messages
4,217
Location
South Yorkshire, England
Get', these are the photo's of that Handy. I had them saved on the computer. As far as I recall, that's original paint.
 

Attachments

  • handy_no1_1.jpg
    handy_no1_1.jpg
    37.4 KB · Views: 49
  • handy_no1_2.jpg
    handy_no1_2.jpg
    38.2 KB · Views: 41
  • handy_no1_3.jpg
    handy_no1_3.jpg
    34.8 KB · Views: 40
  • handy_no1_4.jpg
    handy_no1_4.jpg
    39.8 KB · Views: 50
Last edited:

slotard

Well-known member
Joined
Jun 21, 2012
Messages
137
Location
Alameda, CA
Huh, came across something odd on CL.

00303_52UZ5VJdJZK_600x450.jpg


It does look old (but China **** has been around long enough that it could too), and the screw/handle are big enough that it appears to be heavy duty and likely US made, but he claims there's no brand on it. I just asked about other markings too, as it would be very strange to be completely unmarked.

edit: he says no markings
 
Last edited:

Fretters

Well-known member
Joined
Jan 25, 2014
Messages
4,217
Location
South Yorkshire, England
It's US made, (can't recall the brand for that styling though, but one of the others will tell), but that has a welded swivel base and the rear jaw shelf is broken off.
 

slotard

Well-known member
Joined
Jun 21, 2012
Messages
137
Location
Alameda, CA
It's US made, (can't recall the brand for that styling though, but one of the others will tell), but that has a welded swivel base and the rear jaw shelf is broken off.
Yep, noticed the welding. He wants $30.

I don't understand quite what you mean by rear shelf.
 
To avoid these ads, REGISTER NOW!

Fretters

Well-known member
Joined
Jan 25, 2014
Messages
4,217
Location
South Yorkshire, England
He wants $30.

Unless something is seriously damaged, I'd say that's no bad price even with the welding and damage taken into consideration.


I don't understand quite what you mean by rear shelf.

The jaw insert on the rear jaw. The oblong hole visible in the middle rear of that insert. It appears the piece of cast which locates and supports that is broken off, (usually happens when people have been wailing away with a hammer), unless it's just the end portion which has broken off.
 

joe.striper

Well-known member
Joined
Sep 13, 2013
Messages
2,251
Location
agawam, ma
A few weeks back I picked up this odd little vise with rubber jaws and an eccentric lockdown mechanism. It is clearly home-made. There has been conjecture as to what it is for but we will never know.

On this restoration I worked hard to keep its integrity intact by keeping the original wood base (check out how tight that grain is) and not over-restoring it. I did build a new handle for it and used a modern knob, but as I removed layer after layer of grime I found a really lovely little thing (at least I think so). The closer you look at it the nicer it appears. I works GREAT and the jaws grip tight. You can judge it's size by the quarter it is holding.

Anyway, I just thought I'd share it. I really like this little guy...
 

Attachments

  • 141229_002.jpg
    141229_002.jpg
    132.9 KB · Views: 54
  • 20160306_144953[1].jpg
    20160306_144953[1].jpg
    144.7 KB · Views: 51
  • 20160306_144847[1].jpg
    20160306_144847[1].jpg
    144.3 KB · Views: 49
  • 20160306_144817[1].jpg
    20160306_144817[1].jpg
    143.1 KB · Views: 50
  • 20160306_144758[1].jpg
    20160306_144758[1].jpg
    140.5 KB · Views: 49
  • 20160306_144719[1].jpg
    20160306_144719[1].jpg
    142.6 KB · Views: 59
  • 20160306_144927[1].jpg
    20160306_144927[1].jpg
    128.8 KB · Views: 59

drivesitfar

Well-known member
Joined
Oct 23, 2013
Messages
36,032
Location
Pacific Northwest
Slotard: the jaws on that old vise look like a Rock Island and for $30 i'd buy it just because it has a good dynamic and maybe screw and vise nut. if you can fix the swivel base that has been welded and that missing piece behind the static's jaw isn't too bad you have a great old vise probably from the 1920's.

good luck
 

slotard

Well-known member
Joined
Jun 21, 2012
Messages
137
Location
Alameda, CA
It's a bit of a drive but if he still has it next weekend I'll buy it from him. Having to deal with storm stuff this weekend.
 

mrmiller

Member
Joined
Feb 22, 2016
Messages
17
Location
New York
Here are a couple shots of my Parker 5x all tore down. Like I said before I don't want to do a full blown refurb on this yet. I just want to get it good and functional because I plan on using it. What do you guys suggest I use to shine up the moving parts so it will work better? Wire wheel or sanding disc? I don't want to use something too aggressive I just want to shine it up and spray it down with some lube. Thanks!
 

Attachments

  • 100_1294 (640x480).jpg
    100_1294 (640x480).jpg
    41.4 KB · Views: 52
  • 100_1295 (640x480).jpg
    100_1295 (640x480).jpg
    34.9 KB · Views: 40

bagged89s10

Well-known member
Joined
Mar 13, 2005
Messages
4,607
Location
CT
+1 on what Fretters said. I like using the red Scotch Brite pads with lacquer thinner.


+1 on red scotch brite pads. I bought a bunch at a swap meet last summer. Most auto body supply places are the only places I usually find them.
 
Last edited:

bagged89s10

Well-known member
Joined
Mar 13, 2005
Messages
4,607
Location
CT
A few weeks back I picked up this odd little vise with rubber jaws and an eccentric lockdown mechanism. It is clearly home-made. There has been conjecture as to what it is for but we will never know.


On this restoration I worked hard to keep its integrity intact by keeping the original wood base (check out how tight that grain is) and not over-restoring it. I did build a new handle for it and used a modern knob, but as I removed layer after layer of grime I found a really lovely little thing (at least I think so). The closer you look at it the nicer it appears. I works GREAT and the jaws grip tight. You can judge it's size by the quarter it is holding.


Anyway, I just thought I'd share it. I really like this little guy...


Pretty nice! Any idea what that was used for?
 

KMScott

Well-known member
Joined
Feb 14, 2012
Messages
4,642
Location
Daufuskie Island, South Carolina
Ok thank you for the suggestions. Now this method will actually result in "shiny" metal?

It is best you try this yourself. This method removes rust, contaminates and years of crud. Thinner, kerosene or lamp oil all works as a cleaner. My version of shiny might be different then yours. I used to polish injection molds. Cleaning your spindle threads, the threads in the nut and the bottom of the Static jaw support will help more then cleaning the sides of the square slider in making the vise open and closing the vise. Do not forget to grease and lube all moving parts and the collar area.
 

nutsnbolts

Well-known member
Joined
Jan 15, 2016
Messages
1,576
Location
Seattle, WA
I am trying to figure out what this small vise belongs to. It looks as if it was meant to slide onto another piece of equipment? It has the markings "23 5246-2" and a triangle with an "A" inside. Allied?
 

Attachments

  • WP_20160306_18_49_04_Pro.jpg
    WP_20160306_18_49_04_Pro.jpg
    147.2 KB · Views: 33
  • WP_20160306_18_48_55_Pro.jpg
    WP_20160306_18_48_55_Pro.jpg
    145.6 KB · Views: 30
  • WP_20160306_18_48_49_Pro.jpg
    WP_20160306_18_48_49_Pro.jpg
    141.2 KB · Views: 33
  • WP_20160306_17_45_43_Pro.jpg
    WP_20160306_17_45_43_Pro.jpg
    141.4 KB · Views: 33
  • WP_20160306_17_45_23_Pro.jpg
    WP_20160306_17_45_23_Pro.jpg
    145.9 KB · Views: 33
  • WP_20160306_17_45_04_Pro.jpg
    WP_20160306_17_45_04_Pro.jpg
    148.7 KB · Views: 37
  • WP_20160306_18_55_15_Pro.jpg
    WP_20160306_18_55_15_Pro.jpg
    143.8 KB · Views: 30
To avoid these ads, REGISTER NOW!
Top Bottom