To avoid these ads, REGISTER NOW!

TXNinAZ's New Project

TXNinAZ

Well-known member
Joined
Oct 9, 2011
Messages
507
Location
Phoenix, AZ
Well I got my new house! After a million inside projects: gas line for range, gas cooktop install, new washer/dryer, 6 ceiling fans, kitchen faucet and garbage disposal, 14 gallons of paint, scrubbing and steaming tile by hand (ugh), new furniture shopping and buying, wifi thermostats...it has gone on and on...but now I'm working on the most important room in the house!

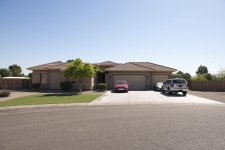
Currently have a 23x32' attached 3 car, which was slightly worse than empty- loose pegboard hanging on one wall, badly patched drywall and mismatched paint in a few spots, and a noisy garage door. The good: 10' ceilings, oversized doors- 18' and 9' instead of our area's standard 16' and 8'. Here's the front from the day our offer was accepted in December.
cbdb279f09a58dd50ec70439e4659eea.jpg

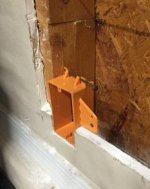
First was the lighting- standard, builder grade T8 fixtures that were filthy and weak. Started with a pair of Lithonia 2400 lumen LED replacements, then added 3 more to brighten things up. The big problem here was that the trusses above the garage are sheeted with 1/2" plywood, so access was limited to above the 2 bay side. Well, the electrical panel is on the exterior wall above the single bay, so I had to make a new access. First try wasn't successful, as the joists run the opposite direction than above the two bay, so I cut a hole right below a triangle of truss joints and had to make an adjustment [emoji36]. The cut in the wall is for dropping power for the compressor.
55610a9597aeebb4502c9f00f6452be1.jpg

Lighting in progress:
64631db46de5916d6e6800b273f4902f.jpg

Finished lighting as of today:
96769f8feae89a2b65e8ffb372edc776.jpg

Getting access to the whole attic meant that I could now run power to the air compressor, a line for the AC unit, and finish my lighting project.

Next I tackled the garage door insulation. My house faces west and down the street, so I'll get blasted all summer with AZ's finest heat, so I had to get this done before the AC. 1.5" Polyiso panels with an R9.6 rating, adhered with 3" metal foil tape. 6 foam panels did the trick, with enough left over to insulate the drywall access covers for the attic, and block off chunks for the louvered vents to outside. The table saw made quick work of this project- hallelujah.
c2d712d7c221bf45f588118348493c3b.jpg

Finished doors:
aee7e5a4aecaae8355b9f1616aa1578d.jpg
I'll have to get them balanced and may need new springs due to the extra weight, but we'll see.

As it starts to warm up this time of year, it was good timing to get the AC going, once I finally accepted how expensive it would be. Joe from Frigid Air came today to install an LG 2 ton mini split that should work perfectly.

f83f10028a1c392989b3beb1e26af7f6.jpg

I didn't want the lineset exposed to the sun more than necessary, so I opened drywall to run everything pretty and tidy (once I get the wall closed again).

Next on the schedule is getting water and a drain for this guy I picked up for $100 on CL:
95c40c3989066a8ce3e3846acebecafa.jpg

Was pretty nasty, but Meguiar's All Purpose Cleaner Plus did the job:
f6d408275bbbc4782f733ed763070465.jpg

I'll install it here, since the laundry sink is directly on the other side of the wall:
56dc28590f5271144e73ba14fd97981c.jpg

Epoxy floor, 2 more Strong Hold cabinets, and more coming soon!
 
To avoid these ads, REGISTER NOW!
OP
T

TXNinAZ

Well-known member
Joined
Oct 9, 2011
Messages
507
Location
Phoenix, AZ
Are you on the East side? I am in Mesa. Getting a mini split this week.


I'm over in Laveen. Buying online and having someone install it would save some money, but I just wanted to get it done so I bought it from my installer and didn't have to wait on shipping.
 

AZpilot

Well-known member
Joined
Sep 29, 2012
Messages
413
Location
Mesa, AZ
I'm over in Laveen. Buying online and having someone install it would save some money, but I just wanted to get it done so I bought it from my installer and didn't have to wait on shipping.

I figure I have about three weeks before I need it. Just hope I sized it right.
 
OP
T

TXNinAZ

Well-known member
Joined
Oct 9, 2011
Messages
507
Location
Phoenix, AZ
More work this morning between conference calls. Since my air compressor is on an outside wall, I wanted to route the drain outside so I don't go deaf opening the valve on top of spraying water all over the shop floor. With the drywall already open for the AC and wiring, now is the time to figure out a drain pipe setup. What I came up with is two electrical boxes, back to back through the wall, with a copper pipe running through them and a clean look courtesy of stainless outlet box cover plates.

Started with a low voltage box inside, but later scrapped it for a full box with the back cut off:

attachment.php


Then cut the chip board, tar paper, and foam from the inside. To cut the stucco I sacrificed an oscillating tool blade, since I didn't feel like getting out the angle grinder with a masonry blade. Another cutoff outlet box for the exterior side:

attachment.php


Should work out pretty well. I just need to decide if I want to set the pipe through the boxes and fill 'er up with spray foam. That would help keep bugs out, but make it more annoying to change things if I want to later. No rush on that.

Now, time to hang some drywall and seal in the AC lines and wiring. Just two pieces, and reminded me why I always take the time to cut full-width between studs and use a level to make my cuts straight. The AC guy cut jagged, crooked openings that would have been much more work to patch.

attachment.php


After sanding down the edges to remove the first inch or so of texture and leveling the wall with the patch board, time for some mud:

attachment.php


In a few hours I'll go lay some tape and start leveling the patch. Don't love doing drywall work, but I'm getting better at it through practice, so that makes it more bearable.
 

Attachments

  • Blue box.jpg
    Blue box.jpg
    12.7 KB · Views: 437
  • Drywall up.jpg
    Drywall up.jpg
    7.3 KB · Views: 420
  • First coat of mud.jpg
    First coat of mud.jpg
    8.6 KB · Views: 429
  • Orange LV box.jpg
    Orange LV box.jpg
    10.8 KB · Views: 436
OP
T

TXNinAZ

Well-known member
Joined
Oct 9, 2011
Messages
507
Location
Phoenix, AZ
Oh and here's the front of the house now. Been a lot of effort to get that grass looking better. The previous owner of the home had renters living in the house for about 3 years, and they didn't take care of anything. Full of crabgrass, some ice plant variety, and bare spots. The pepper tree turns a bright red in the winter, and above the courtyard are yellow bells growing up wood lattice to a wire canopy along with red bougainvilleas.

attachment.php
 

Attachments

  • Front of house now.jpg
    Front of house now.jpg
    147.9 KB · Views: 421
OP
T

TXNinAZ

Well-known member
Joined
Oct 9, 2011
Messages
507
Location
Phoenix, AZ
Here's how the AC guy left my wall [emoji23]. You can tell he's not the one having to patch it!

c4c8910557ef58b6a5c7ed5ad2b44f79.jpg
 
OP
T

TXNinAZ

Well-known member
Joined
Oct 9, 2011
Messages
507
Location
Phoenix, AZ
Looks great! What size did you get for the AC? Oops. I saw it. 2 ton. I can't read but pictures are pretty.


Yeah the garage is a little over 800 sq ft and the installer thought I could have easily gotten away with 1.5 tons since its pretty well sealed and insulated doors. We'll see once we get in to the 110s [emoji16]
 
OP
T

TXNinAZ

Well-known member
Joined
Oct 9, 2011
Messages
507
Location
Phoenix, AZ
Garage looks good so far, and it's nice to see another MR2 owner on here. :3gears:


Yay!! Probably can't see it in the pics but there's an e153 and gen4 engine in there waiting to be swapped into the car. Was all ready to do it at the old house and then decided to move. I'll get to it soon though!!
 

AZpilot

Well-known member
Joined
Sep 29, 2012
Messages
413
Location
Mesa, AZ
Yeah the garage is a little over 800 sq ft and the installer thought I could have easily gotten away with 1.5 tons since its pretty well sealed and insulated doors. We'll see once we get in to the 110s [emoji16]

My garage faces east, is double insulated, I paid the workers extra to stuff more in, and my door is insulated. I am going with a 18k btu unit. Because at 115, its still hot no matter where you face. :willy_nil
 
To avoid these ads, REGISTER NOW!
OP
T

TXNinAZ

Well-known member
Joined
Oct 9, 2011
Messages
507
Location
Phoenix, AZ
Very nice place.


Thanks! It's been a lot of work so far, but I'm to the point where I can start doing things in the garage, instead of just doing things to the garage.

Finished my attempt at a condensate discharge line for the compressor today. Couldn't decide on what material to use- a threaded adapter on the copper and then PVC out, copper all the way, something else maybe?? Then I realized the leftover lineset from the AC install answered my question for me.

a509dfafffb17a228da62b617343276d.jpg

Added a union near the valve so that moving the compressor wouldn't mean taking the whole system apart.

e1084346b5b240a1e7dd7c6c7d6a5f12.jpg

Used a step bit to drill a 1/2" hole in the faceplate and an o ring on the inside to seal it a bit.

00855e76f9202031975777badd458511.jpg

Still had t decided on keeping bugs out of the 'tunnel' and since I don't have any Roxul and didn't really want to spray foam, I went with cutting up a grout sponge and popping the pipe through it. Here's my test piece.

3c7e0159e618ab66cf5bcf56c1ef4223.jpg

On the outside I plan on cutting down the length and soldering on a 90 so that dust and occasional rain won't blow in as easily. I'll leave it like this for a few days to see if other adjustments to the system are needed.

13d6a93147c6b4aaac274ac294a303b5.jpg
 
OP
T

TXNinAZ

Well-known member
Joined
Oct 9, 2011
Messages
507
Location
Phoenix, AZ
Well, Craigslist strikes again! Been looking for short Lista/Vidmar cabinets for a while. Hoping to get a pair, put a bench across the top, and have a solid, multipurpose bench. Stumbled on these ACT cabinets that a guy got from the casino he works for. They've been out in the weather for 4-5 years, so they need some attention, but are actually more solid than my tall Lista. Haven't found anything about the company, so I'm guessing these are actually made by Stanley or someone and rebranded. The casino may have federal-like purchasing requirements to buy from historically underutilized businesses and so these had final assembly at a small company. Just guessing at this point.

Either way, they are incredibly solid. Weigh at least 500 lbs each and I can stand on the end of one of the fully opened drawers and the thing doesn't flex or budge. $300 for all three [emoji3]

6c86b0767d50f0e7ab91ebed07113e76.jpg
 
OP
T

TXNinAZ

Well-known member
Joined
Oct 9, 2011
Messages
507
Location
Phoenix, AZ
Making progress on restoring the cabinets, although space is limited for my overspray screen- don't want gray primer and paint on everything. Should have one set of drawers primed by tonight and painted tomorrow. Then on to the next box.

4e794cafd4567c641f94fac6b101c14c.jpg
 

rattle_snake

Well-known member
Joined
Jun 25, 2015
Messages
5,175
Location
Chandler, AZ
If you find some more of those cabinets you should let us (phx) people know. Or you can paint/restore them first then donate to me before buying newer, fancier ones for yourself. looking good.
 
OP
T

TXNinAZ

Well-known member
Joined
Oct 9, 2011
Messages
507
Location
Phoenix, AZ
If you find some more of those cabinets you should let us (phx) people know. Or you can paint/restore them first then donate to me before buying newer, fancier ones for yourself. looking good.


Ha this has been so much mess and work already, and I'm not doing it to my typical obsessive standards. Will probably be selling my 60" tall Lista now, since these and the new Strongholds will hold everything currently in the Lista. Would love for it to go to a GJ member.
 
OP
T

TXNinAZ

Well-known member
Joined
Oct 9, 2011
Messages
507
Location
Phoenix, AZ
Yay Craigslist. 140"x30" butcher block bench top. $150. Just needs a bit of sanding and will be perfect. And for less than I could build a top out of 2x2s and laminate them, since I'd need good, straight ones.

98f865da000c2538c9c5c4dccb25c4a1.jpg
 
OP
T

TXNinAZ

Well-known member
Joined
Oct 9, 2011
Messages
507
Location
Phoenix, AZ
Finally got my new Strong Holds home. With the wife's input, we decided to move things around. Since we have the 18' wide door, moving the cabinets to the wall next to her car would allow accessing them, and still park two cars in comfortably.

6834fc5bf8072a6d9ade7be35a40be3c.jpg

My bench top also ended up being longer than I planned, so I adjusted things to work out perfectly- having 49" between the old Listas for legs to hang and sit at the bench.

894fe77883625702c1a8eccc8a40bb28.jpg

Something I gave up on a long time ago was ever finding a bin type Strong Hold cabinet. But then the Craigslist gods delivered:

e3de6b18848e5045e880f712507c4451.jpg

Only one bin ever had anything in it- the rest are brand spanking new. And put together:

194f65a80c610ceb7852f729fb426040.jpg

Finally time to stop moving this pile of stuff around, and give everything a permanent home!

40704a7f1d41ba74a857840275854c7d.jpg
 
OP
T

TXNinAZ

Well-known member
Joined
Oct 9, 2011
Messages
507
Location
Phoenix, AZ
Also making progress on the bench top and building a backsplash for it.

82ce6d311f0d515f399acf24eef4bcea.jpg

I decided to go with a thick backsplash butted against the back edge of the top, to move the front edge out a bit. I hated not having a clamping edge on my bench at the old house, so that will be fixed with the new one. Went to a grown up lumber yard instead of the orange or blue stores. I figure that since I got such a good deal on the top, spending a bit for proper hard maple boards would be worth it. Got two 8/4x8"x11' boards to laminate together. Oh and a thickness planer to finish them after I rip the edges with the table saw. Should give about a 3" front lip and a 3 1/2" thick backsplash.

304dd91a3780bb5ea19fb414443a61cf.jpg

d020eee47b98230fd1d528a78efc672d.jpg
 
To avoid these ads, REGISTER NOW!
Top Bottom