OP

You are using an out of date browser. It may not display this or other websites correctly.
You should upgrade or use an alternative browser.
You should upgrade or use an alternative browser.
Above 1200 Sq/FT Speed Metal Garage - rattle_snake’s 34x40 shop build in AZ
- Thread starter rattle_snake
- Start date
Wokspaces above 1200 squarefeet.

OP
rattle_snake
Well-known member
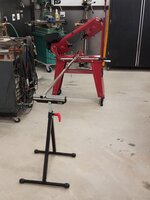
Although the HF bands saw stand isn't robust, it is minimally sufficient for it's intended use. It has several drawbacks, and as noted by others it is too short for support stands like the HF roller.
So like all the trucks I've owned, I lifted it.

I moved the wheels from the side to the bottom and built an extension for the front feet.


So instead of building a new stand for this saw, I am making one for my chop saw instead. More on that later.
So like all the trucks I've owned, I lifted it.
I moved the wheels from the side to the bottom and built an extension for the front feet.
So instead of building a new stand for this saw, I am making one for my chop saw instead. More on that later.
Attachments


Last edited:
zmotorsports
ALLIANCE MEMBER
Nice Justin.
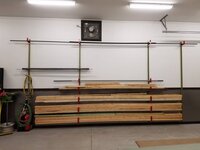
The materials rack turned out great.
Mike
The materials rack turned out great.
Mike
OP
rattle_snake
Well-known member
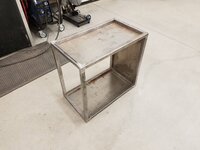
Made this cart shell for chop saw. Keeping options open for the lower part. could put plasma there or build cubes for remnants.
Built 2 rectangles using old picture frame jig I made long ago. Somewhere on GJ someone is cringing at the thought of using a wood jig for a metal project.

Then a cube, er rectangular prism..

Added some 16ga sheet on top/bottom/back only at this time.

Some paint and wheels

Sent from my SM-G930V using Tapatalk
Built 2 rectangles using old picture frame jig I made long ago. Somewhere on GJ someone is cringing at the thought of using a wood jig for a metal project.
Then a cube, er rectangular prism..
Added some 16ga sheet on top/bottom/back only at this time.
Some paint and wheels
Sent from my SM-G930V using Tapatalk
Attachments


Last edited:
OP
rattle_snake
Well-known member
Thanks. My back should like it too. Should have made it long ago.Nice! I mean that. I love the jig as well.
On to the next project.
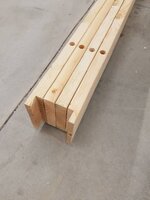
The big shelf. Starting with the support brackets. Contemplated lots of methods and materials in an attempt to make them look cool. Ended up using 4x4s from the 10' skid that some sheet metal came on, probably because they didnt cost anything.
This 'seasoned' wood has burn marks from the plasma cutter, curious to see how they come out after stain/sand/stain treatment.

Attachments

Last edited:
Big Dad
Well-known member
I love the chop saw cart ..I need to build one too
OP
rattle_snake
Well-known member
Don't wait. I have used chop saws on the ground, the hard way up until now. Get one or two of these roller stands to go with it. HF has em cheap.I love the chop saw cart ..I need to build one too
https://www.harborfreight.com/132-lb-capacity-roller-stand-68898.html
OP
rattle_snake
Well-known member
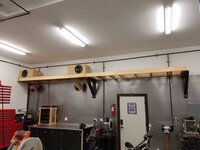
Progress on shelf supports.
I was concerned that the triangle piece would kick back out of the table saw and smack me in the goods. The are disconnected but don't need high velocity impact!
With blade all the way up it left just a 1/4" connected that I could knock out with a hammer. I used a construction adhesive and some fasteners to hold while the adhesive cured.
I realized that the scheme of using 2 supports yields 3 11' divided sections. This changes my lighting plan. Was going to use 4x dual T5 like ceiling. Now options are 6x dual or 3x 8' singles or 6x 4' singles, all which cost more. Dooh!

Rough sand and stained. I test mounted one on the wall.
The stain de-emphasized the existing stains, burns and roughness. oh well.

I was concerned that the triangle piece would kick back out of the table saw and smack me in the goods. The are disconnected but don't need high velocity impact!
With blade all the way up it left just a 1/4" connected that I could knock out with a hammer. I used a construction adhesive and some fasteners to hold while the adhesive cured.
I realized that the scheme of using 2 supports yields 3 11' divided sections. This changes my lighting plan. Was going to use 4x dual T5 like ceiling. Now options are 6x dual or 3x 8' singles or 6x 4' singles, all which cost more. Dooh!
Rough sand and stained. I test mounted one on the wall.
The stain de-emphasized the existing stains, burns and roughness. oh well.
Attachments


Last edited:
Finallygotit
ALLIANCE MEMBER
Good job but to me it looks kinda medieval. 
Bob Heine
ALLIANCE MEMBER
Justin, from that photo it appears you have done a fine job matching the trim around the man door. I am also certain that was your plan.

OP
rattle_snake
Well-known member
Yes they do....Good job but to me it looks kinda medieval.
Justin, from that photo it appears you have done a fine job matching the trim around the man door. I am also certain that was your plan.
Yes, they have the same stain colors. After 1st coat I sand edges and scuff all surfaces with sanding pad to give it a dull look. Then a little lighter stain on the exposed edges.
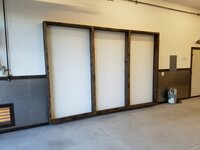
1st shelf section built. Cutout is for the air piping.

2nd section up and decking on the left side. Top is leftover 1/2 OSB, bottom will get drywall. 2x6 are all leftovers from building. Front fascia will be stained 2x8
Audio system had been on the floor for a long time, glad to get it up and out of the way. This is not going to be its permanent home. Eventually this shelf will have some sort of doors.

Attachments

Last edited:
OP
rattle_snake
Well-known member
'Finished' is a mythical state we strive for but never reach.Nice. My wife asked me the other day if the Jeep was finished. Bwhahaha! Kind of like is the workshop finished.
Got the 3rd section up and OSB done. Its good to see my plan coming together.
Next step is to locate electrical boxes and run wiring. I decided to go with two 16' 2x8s for the fascia. This will help tie the 3 pieces together but will be 1' short. The gap will be in the center, so I have to come up with something interesting to fill it with.

Sent from my SM-G930V using Tapatalk
Attachments

Last edited:
C_F
ALLIANCE MEMBER
I like those shelf supports, they look super tough!
This will help tie the 3 pieces together but will be 1' short. The gap will be in the center, so I have to come up with something interesting to fill it with.
Gun rack.
Finallygotit
ALLIANCE MEMBER
Boy that is coming together nicely!
OP
rattle_snake
Well-known member


nsula_country
Well-known member
Shelf project moving along. Installed the 2x8 fascia, completed wiring. Bottom surface is drywall, which I hope is the last time I get to work with it. Next steps are paint, trim and lighting.

You are inspiring me to get to building shelves...
CT
zmotorsports
ALLIANCE MEMBER
That turned out excellent Justin. Great job on the shelf.
Mike
Mike
poppinjohnnies
Well-known member
Nice!
Shelf project moving along. Installed the 2x8 fascia, completed wiring. Bottom surface is drywall, which I hope is the last time I get to work with it. Next steps are paint, trim and lighting.

Nice shelves. When does the a/c get installed?
Attachments

OP
rattle_snake
Well-known member
Thanks. Hopefully they support all the stuff I am force to hoard.I like those shelf supports, they look super tough!
Hmmm, had not though of that but I did make a gun rack recently.Gun rack.
It is getting there. Plan was to not do any large shop projects this summer. Somehow I got myself into another one. Have managed to go to the lake every other week, several camping trips, and a week fishing in Alaska.Boy that is coming together nicely!
Thanks sometimes I get a little carried away. Shop interior is almost nicer than the house.That turned out excellent Justin. Great job on the shelf.
Mike
Thanks for stopping in. Been following your thread.Nice!
HaHa. The heat this summer has been brutal and A/C is planned for next summer. Planning on placing mini split heads on walls adjacent to the metal one. The lines and wires would be hidden mostly by this shelf.Nice shelves. When does the a/c get installed?
Last edited:
OP
rattle_snake
Well-known member
Scored a 80cuft cylinder of C25 on CL today for cheap. Supposedly it is full. Since I saved so much $ on the tank I felt obligated expedite the purchase of another welder, a Miller 211
Also ordered a spoolmate 100 for Aluminum. Looks like they eat tips and may need to be machined for standard MIG tips.
Also ordered a spoolmate 100 for Aluminum. Looks like they eat tips and may need to be machined for standard MIG tips.
OP
rattle_snake
Well-known member
Finished up phase 1 of the shelf project over the weekend. Lighting came out OK and is bright enough. I debated the height of the shelf for a long time and the placement of the lights from the front edge. After a few day working in the shop they seem to work well. I sorted though both garage and shop cabinets and moved long term items (aka junk with no scheduled purpose) up on the new shelf.
Spent some time on the mill making chips with a neighbor who is a retired master machinist. He has a ton of practical knowledge, he enjoys sharing it and I benefit from learning.

Added another vertical unistrut to the shelf system and added 3 more pairs of brackets. This allows for material down to 3'. Plan to make another 4 pairs of brackets for hardwood and such.

Spent some time on the mill making chips with a neighbor who is a retired master machinist. He has a ton of practical knowledge, he enjoys sharing it and I benefit from learning.
Added another vertical unistrut to the shelf system and added 3 more pairs of brackets. This allows for material down to 3'. Plan to make another 4 pairs of brackets for hardwood and such.
Attachments


Last edited:
OP
rattle_snake
Well-known member
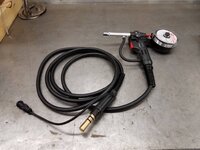
New metal melting toys have arrived. Miller 211 and a spoolmate 100. I attempted to weld with them last night and failed miserably. I have mastered Flux in my Lincoln so perhaps my expectation of beautiful 1st attempt welds was unrealistic.
The 211 is a little bit too long for my modified POS cart so it will get some changes. and the door is on the other side blocked by the PC filter.
But at least the blasphemy of a Miller and a Lincoln sharing the same cart is over. Not sure if that is worse than a Ford with a Chevy motor.


The 211 is a little bit too long for my modified POS cart so it will get some changes. and the door is on the other side blocked by the PC filter.
But at least the blasphemy of a Miller and a Lincoln sharing the same cart is over. Not sure if that is worse than a Ford with a Chevy motor.
Attachments

Last edited:
Finallygotit
ALLIANCE MEMBER
But at least the blasphemy of a Miller and a Lincoln sharing the same cart is over. Not sure if that is worse than a Ford with a Chevy motor.
Nothing is more heinous than a Ford with a chevy motor.

Nice score on the MIG. I have a flux core welder and am thinking real hard about going gas MIG. Flux core seems to spit **** everywhere.

OP
rattle_snake
Well-known member
Haha 'heinous' nice choice of words.Nothing is more heinous than a Ford with a chevy motor.
The spatter and cleanup effort was the main reason I chose to get another machine. I weld in a t-shirt and shorts when its over about 90* and the spatter isn't welcome. Everyone else should use proper PPE at all times.Nice score on the MIG. I have a flux core welder and am thinking real hard about going gas MIG. Flux core seems to spit **** everywhere.
Problem is, to weld the same thickness as flux core will, you have to get out your wallet and get a bigger capacity machine for GMAW. This deterred me for a good 10 years or more. I discussed these limitations with house manager long enough to break her down and move forward with the controversial purchase. I don't recommend this method as it can result in severe blowback costing 2-3x the original purchase.
Anyhow I think you should buy yourself a nice new welder, given how much money you have saved around the place doing things yourself.
Finallygotit
ALLIANCE MEMBER
Haha 'heinous' nice choice of words.
It took me a little bit to find the right word. Glad you approve!
OutlawDrifter
Well-known member
Same welder I've been eyeing for a long time, nice purchase!
Easy on the Chevy stuff...some of the fastest Ford's I've ridden in have been Chevy/GM powered...now a mopar in a Ford, or a GM product for that matter, makes me want to vomit!
Easy on the Chevy stuff...some of the fastest Ford's I've ridden in have been Chevy/GM powered...now a mopar in a Ford, or a GM product for that matter, makes me want to vomit!
OP
rattle_snake
Well-known member
Same welder I've been eyeing for a long time, nice purchase!
Easy on the Chevy stuff...some of the fastest Ford's I've ridden in have been Chevy/GM powered...now a mopar in a Ford, or a GM product for that matter, makes me want to vomit!
Not Chevy bashing, just joking with mismatching. My boats has a BBC so I guess I am part of the General's camp too. The one that gets me are 67-79 Ford bodies on a dodge frame (aka fummins). 90s plastic dodge dash looks hideous in an old ford.
OutlawDrifter
Well-known member
Not Chevy bashing, just joking with mismatching. My boats has a BBC so I guess I am part of the General's camp too. The one that gets me are 67-79 Ford bodies on a dodge frame (aka fummins). 90s plastic dodge dash looks hideous in an old ford.
No worries, I knew you were, it's difficult to banter back and forth through written word. I married into a Ford family, so I'm always the odd man out! All our dirt track cars are Ford chassis and Ford powered, but I've got my wife converted over to a Suburban.
I'd really like to do a 67 F100 SWB with a Crown Vic front suspension and a Coyote powerplant...someday.
OP
rattle_snake
Well-known member
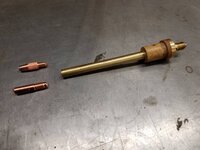
Tried a matrix of voltage and current/wire speed setting with spool gun but didn't have any success. So i started the contact tip upgrade. Now it uses same tips as mig gun. Also going to upgrade the crappy ground clamp the 211 came with.
#3 Drill on lathe

1/4 -28 tap

old and new tip style.

of course none of this helps the fact that I don't know what I am doing. Luckily there is a pile of info on the web. Just need to practice.
#3 Drill on lathe
1/4 -28 tap
old and new tip style.
of course none of this helps the fact that I don't know what I am doing. Luckily there is a pile of info on the web. Just need to practice.
Attachments


Last edited:
OP
rattle_snake
Well-known member
According to me summer is officially over. It is cooling off at night enough to get shop temp down to tolerable.

Spent last 2 weekends cleaning backyard, barn, garage and shop. Each time I go through my stash of **** I get rid of another 100 lbs or so. I decommissioned my vertical material storage rack and moved last of the **** to unistrut system. I moved all the sheet material from the garage back to the shop minus the scorpions and spiders. The rest of the remnants need to go into the cabinets so I picked up the material to get started on them. 1st will be the structure itself, then doors.
Non summer (only really 2 seasons here in AZ) project plan is as follows:
-Cabinets + doors
-Audio rack
-Finish speakers and subwoofer boxes
-Steevo workbench
-Pavers expansion
-Mustang hood door overhang
-Air compressor hut v2.0
-Welding table
-Air conditioning....
doubt I will get to all these...
OP
rattle_snake
Well-known member
Got started on the cabinet project. I can't seem to do anything the easy way. Normal people would just buy some cabinets and fill with junk. I need shallow (8") cabinets which aren't really availble so I am building my own.
I decided to use doors that were only 2' wide since the space is tight. This yeilded 3, 4'w x 8't sections so 12'. The hole I left was 13'4" so I patched in a piece of sheetmetal on the left side. I wanted a toe relief so the structure sits on top of the baseboard which also makes it easier to sweep the floor.
The structure is made out of 2x8s that are attached to the studs edgewise with 10" x 3/8 lag bolts. I contemplated many methods and I think the lags came out very clean.
I made a jig to accurately drill the deep holes with a 12" long 3/8 drill. To countersink the heads with a Forstner bit, I put a short lenght of dowel back in the 3/8 hole to start the Forstner. Worked pretty slick.
Because the center to center distance of the studs is 12' total, the cabinet frame itself had to be another 1-1/2". I chose to do a rabbet joint on the ends to use a regular 12' 2x8 for the top and bottom and have no exposed fasteners on the sides

After stain I assembled the frame on the shop floor using pipe clamps. Then positioned on wall and secured with the lags. The front facia is 3/4" pine ripped down to give the hinge gaps I want. It hides the lags, secures the shelves and gives some relief from the shelf front edge to the door face so the doors will close when crammed with stuff.

Next step is to build the shelving and dividers.
I decided to use doors that were only 2' wide since the space is tight. This yeilded 3, 4'w x 8't sections so 12'. The hole I left was 13'4" so I patched in a piece of sheetmetal on the left side. I wanted a toe relief so the structure sits on top of the baseboard which also makes it easier to sweep the floor.
The structure is made out of 2x8s that are attached to the studs edgewise with 10" x 3/8 lag bolts. I contemplated many methods and I think the lags came out very clean.
I made a jig to accurately drill the deep holes with a 12" long 3/8 drill. To countersink the heads with a Forstner bit, I put a short lenght of dowel back in the 3/8 hole to start the Forstner. Worked pretty slick.
Because the center to center distance of the studs is 12' total, the cabinet frame itself had to be another 1-1/2". I chose to do a rabbet joint on the ends to use a regular 12' 2x8 for the top and bottom and have no exposed fasteners on the sides
After stain I assembled the frame on the shop floor using pipe clamps. Then positioned on wall and secured with the lags. The front facia is 3/4" pine ripped down to give the hinge gaps I want. It hides the lags, secures the shelves and gives some relief from the shelf front edge to the door face so the doors will close when crammed with stuff.
Next step is to build the shelving and dividers.
Attachments
Last edited:
Finallygotit
ALLIANCE MEMBER
With only 8" of depth, what are you planning on storing in those cabinets?
OP
rattle_snake
Well-known member
Mostly same stuff that was in the original 6" deep versions. Fluids, paint, short remnants, odd shaped tools, clamps.With only 8" of depth, what are you planning on storing in those cabinets?
Maybe a ladder, broom.
Going to get some clear plastic bins for odd hardware, sander pads/belts, etc.
OP
rattle_snake
Well-known member
Been working on fixing some leaks in the air system. I have a Milton filter that is about 3yrs old, the plastic bowl has cracked. I had higher hopes for it. Instead of a replacement bowl, I replaced it and reg with another pneumatics plus mini combo same as the others.
The pop off value on the tank was tripping. It's set point is 140 but would open at end of cycle. I did increase upper limit on pressure switch, but only to 130 where factory setting should have been 125.
Didn't have luck finding replacement air filter on the compressor so I bought a more universal 1/2mpt type. Need to fabricate an intake adapter for it.
Really enjoying the cool weather. Finally have all the parts to service front forks on my motorcycle. Planned to get it done before riding season, but couldn't get motivated to work on it in the heat.
OP
rattle_snake
Well-known member
I took Zmotorsports advice and added a rubber hose to the lift air drop. The posts do move when loaded. Slowly trying to fix the half baked aspects of the air system.

New reg/filter. Would like replace hose barb/clamp hoses with crimped style.

New reg/filter. Would like replace hose barb/clamp hoses with crimped style.
Attachments


Last edited:
OutlawDrifter
Well-known member
Lookin' good Justin!