

You are using an out of date browser. It may not display this or other websites correctly.
You should upgrade or use an alternative browser.
You should upgrade or use an alternative browser.
What did you do "IN" your garage today?
- Thread starter mayhemman
- Start date

Freejack
Well-known member
Worked on finishing up a set of ******** boards. Primers down, just need to decide how to paint them. Considering a vintage racing livery like Martini given that is my wife's favorite drink.
 Untitled by Jacob Schnarre, on Flickr
Jake
Untitled by Jacob Schnarre, on FlickrJake
Vegaman_Dan
Well-known member
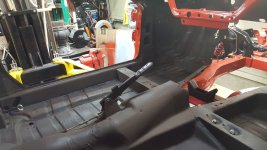
Finished the chassis for the Spitfire, ran out of things to do to it and finally put the body tub in place. I'll get it painted in one piece assembled, but the body tub got full paint inside and out as I don't want the shop to do jambs, dash, etc. They can scuff and paint the new paint on the exterior when the rest gets done as there are a couple of spots I burned through in buffing out the finish and need repaint anyways.
Of course now I can't find a parking brake Y bracket for the cable at the rear axle. I know I have it- I replated it and have stumbled across it multiple times since then.
Also got the radius arms on the rear axle in place. Years past this was a huge PITA as you have to try to pull the axle forward to get things lined up and it fights you all the way. Not sure why I never thought of it before, but I just used a couple of ratchet straps from the radius arm mount on the axle up to a frame cross member at the front of the car. A couple of ratchet clicks and everything lined right up, no fuss. Sheesh. Easy.
More stuff to do. Touch up the interior underbody coating in some spots, then see about refurbishing the fuel tank, parking brake assembly, pedals under the dash, heater- well, everything.
Of course now I can't find a parking brake Y bracket for the cable at the rear axle. I know I have it- I replated it and have stumbled across it multiple times since then.
Also got the radius arms on the rear axle in place. Years past this was a huge PITA as you have to try to pull the axle forward to get things lined up and it fights you all the way. Not sure why I never thought of it before, but I just used a couple of ratchet straps from the radius arm mount on the axle up to a frame cross member at the front of the car. A couple of ratchet clicks and everything lined right up, no fuss. Sheesh. Easy.
More stuff to do. Touch up the interior underbody coating in some spots, then see about refurbishing the fuel tank, parking brake assembly, pedals under the dash, heater- well, everything.
Worked on finishing up a set of ******** boards. Primers down, just need to decide how to paint them. Considering a vintage racing livery like Martini given that is my wife's favorite drink.
Jake
Strangely odd how in that setup ******** boards strongly resemble glory holes...

EOC_Jason
Well-known member
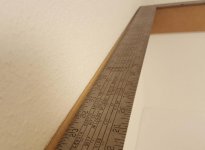
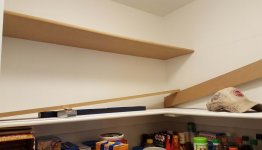
Now that my RAS is all tuned up I finally got around to building the additional shelf in my pantry that I wanted. There was so much room up top that was just wasted that I could use to store things like my empty mason jars (I do canning when the garden is in full swing), coffee, bags, etc, etc... Things that I don't have to worry about getting a little warm up near the ceiling.
I got the same material as the current shelves so I'm doing my best to mimic the existing.
Figured a good height based on my current stuff on the top shelf and marked off a level line. I checked the shelf below to make sure it was level too.
Test fit the support boards, everything was a nice friction fit. None of the walls were square, anywhere from 1/8" to 1/4" just for the 12" deep shelf... Got the shelves cut and fit snug too.
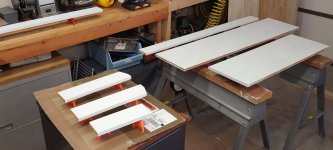
Finally gave everything a good coat of primer in the garage. Tomorrow I will paint them and eventually they will get installed in the pantry and then only need some touch-up painting to cover the nail holes.
I got the same material as the current shelves so I'm doing my best to mimic the existing.
Figured a good height based on my current stuff on the top shelf and marked off a level line. I checked the shelf below to make sure it was level too.
Test fit the support boards, everything was a nice friction fit. None of the walls were square, anywhere from 1/8" to 1/4" just for the 12" deep shelf... Got the shelves cut and fit snug too.
Finally gave everything a good coat of primer in the garage. Tomorrow I will paint them and eventually they will get installed in the pantry and then only need some touch-up painting to cover the nail holes.
Attachments


dave_dj1
Well-known member
I spent some quality time in my garage today picking up some past projects and putting a lot of "stuff" upstairs. I had recently built three mini Whelen 4 strobe light M9000 bars so I have boxes of left over parts and some aluminum frames. I built a red, amber and a blue, someday I'll mount them in the garage just for fun 
I'm actually doing a woodworking project for a customer in there and I need the room, my garage is too small.
I'm actually doing a woodworking project for a customer in there and I need the room, my garage is too small.
cweidert03
Well-known member
Installed a small LED light bar on my Can-am.. went pretty smoothly.. I had to order some brackets to mount it and I still had to modify them a little to make them work.  . Have a trip this weekend. I also replaced the regular bulbs with auto bulbs. Should have much more light for when
 we don’t make it back before dark..
Sent from my iPhone using Tapatalk
. Have a trip this weekend. I also replaced the regular bulbs with auto bulbs. Should have much more light for when we don’t make it back before dark..Sent from my iPhone using Tapatalk
rayra
Well-known member
No Good Deed Goes Unpunished.
Helping the aged neighbor out a bit today. He's been working to repair his back fence (doing some sort of oddball fence post mounting) and yesterday he was clucking about not liking the sawhorse cleats? he bought, their not fitting his recouped 2x4s and their seeming to be a full 2x4". Took a look at things, the sawhorse fixtures were an actual 3-1/2" as they should be. Then he recalled having previously shaved down the 2x4s he'd used. So he wanted to re-do the sawhorse legs and dug out some heavily painted 2x6 from his junk heap between our houses and asked me to cut them down for a more snug fit. I readily agreed, I'm willing to help, have offered often.
I had a pair of similar sawhorse leg sets, which I offered for his use, which he declined. I looked thru my own scrap lumber pile and didn't have more than a couple pieces long enough to use as legs.
So today I look things over again, verify the dimensions, table saw some scrap to get a nice snug fence spacing. Then I go to cut the lengths on the 'recycled' lumber he'd give me. They were almost like staves off a stakebed truck or something. Had rounded ends, too. So I set to trimming one end square on all the pieces, planning to then see what the lowest max length was going to be.
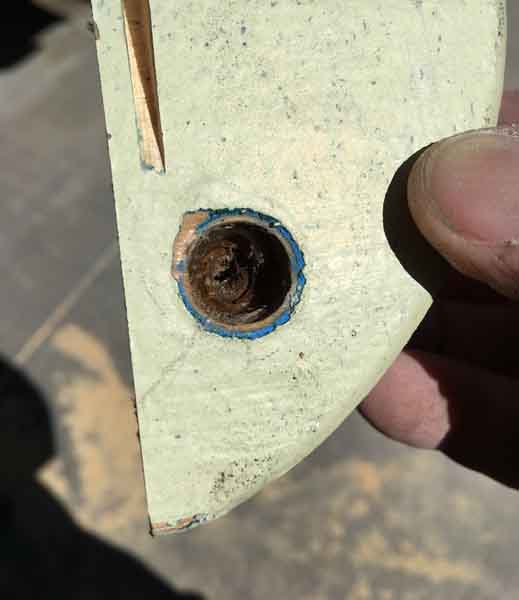
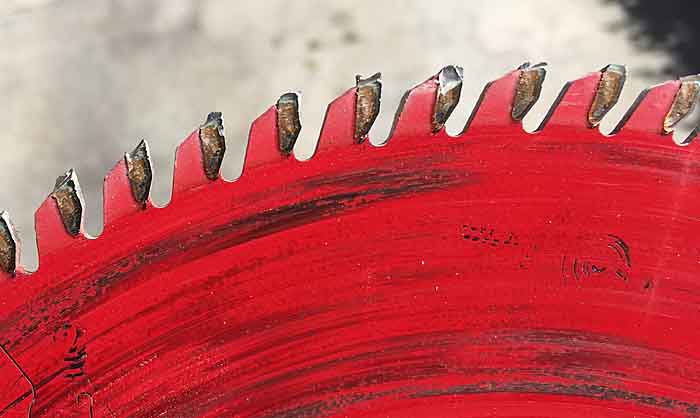
Then it happens. Third cut, I hit some hidden hardware and in an instant I've turned a $50 Freud 80 tooth carbide fine carpentry blade into garbage. Tore up most of the fine carbide teeth, shattered all over.
I'd thought to change the blade but brain farted and forgot it was threaded the opposite direction and very quickly quit fighting it and thought 'ah, it's just 16 cuts, get it over with'. :bashing:
Tried a couple more cuts, too dulled to deal with it. So went back to changing the blade to an older coarser rough carpentry carbide cross-cut and finished the length cuts then trimmed those 2x6 down to the size he wanted.
Rest of the project I was pissed at both of us. Guy trying to save $15 for 4 new 2x4s gives me his scrap wood to cut and I didn't inspect it well enough. I saw bolt holes in the ends and no other sign of hardware and I strip all the hardware out of my own recouped lumber, so I ***-u-me'd things were ok.
As it stands I think he owes me half a saw blade.
/as further insult, Lowes is <2mi from our houses
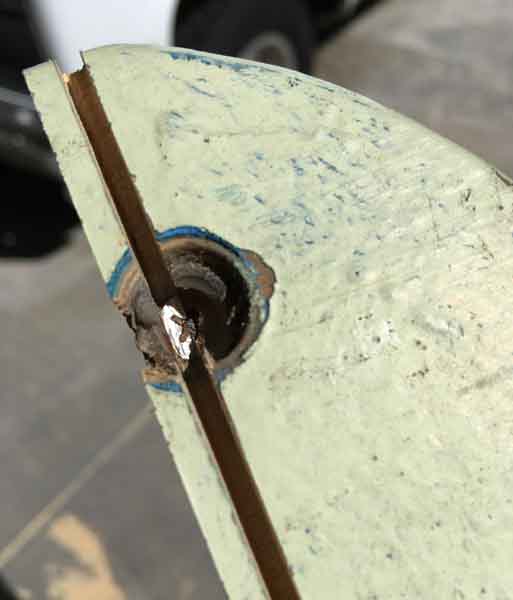
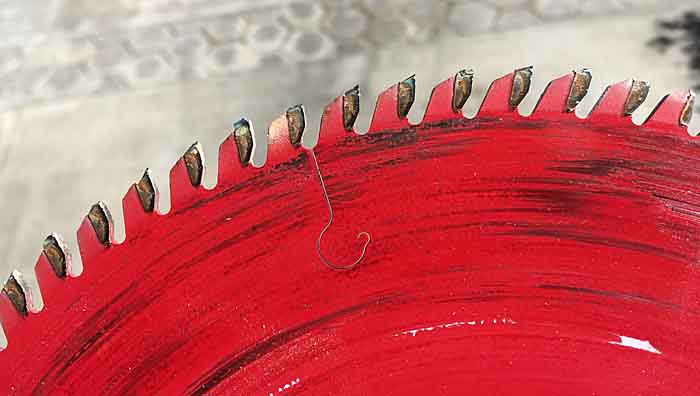
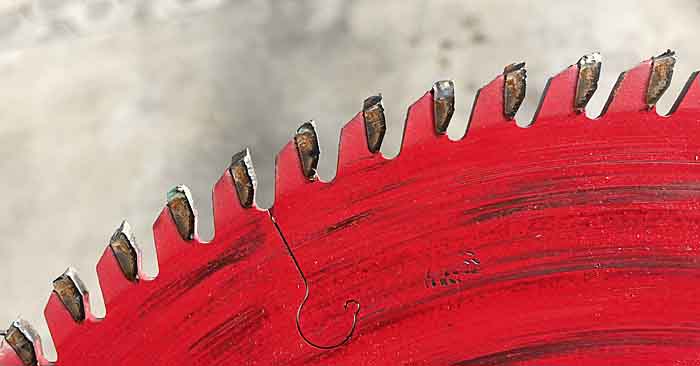
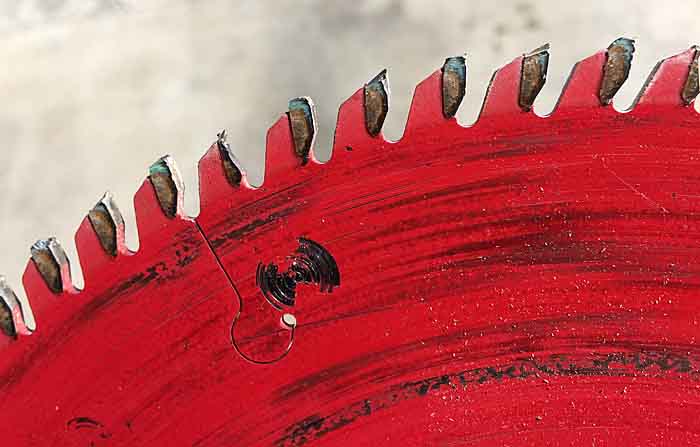
Helping the aged neighbor out a bit today. He's been working to repair his back fence (doing some sort of oddball fence post mounting) and yesterday he was clucking about not liking the sawhorse cleats? he bought, their not fitting his recouped 2x4s and their seeming to be a full 2x4". Took a look at things, the sawhorse fixtures were an actual 3-1/2" as they should be. Then he recalled having previously shaved down the 2x4s he'd used. So he wanted to re-do the sawhorse legs and dug out some heavily painted 2x6 from his junk heap between our houses and asked me to cut them down for a more snug fit. I readily agreed, I'm willing to help, have offered often.
I had a pair of similar sawhorse leg sets, which I offered for his use, which he declined. I looked thru my own scrap lumber pile and didn't have more than a couple pieces long enough to use as legs.
So today I look things over again, verify the dimensions, table saw some scrap to get a nice snug fence spacing. Then I go to cut the lengths on the 'recycled' lumber he'd give me. They were almost like staves off a stakebed truck or something. Had rounded ends, too. So I set to trimming one end square on all the pieces, planning to then see what the lowest max length was going to be.
Then it happens. Third cut, I hit some hidden hardware and in an instant I've turned a $50 Freud 80 tooth carbide fine carpentry blade into garbage. Tore up most of the fine carbide teeth, shattered all over.
I'd thought to change the blade but brain farted and forgot it was threaded the opposite direction and very quickly quit fighting it and thought 'ah, it's just 16 cuts, get it over with'. :bashing:
Tried a couple more cuts, too dulled to deal with it. So went back to changing the blade to an older coarser rough carpentry carbide cross-cut and finished the length cuts then trimmed those 2x6 down to the size he wanted.
Rest of the project I was pissed at both of us. Guy trying to save $15 for 4 new 2x4s gives me his scrap wood to cut and I didn't inspect it well enough. I saw bolt holes in the ends and no other sign of hardware and I strip all the hardware out of my own recouped lumber, so I ***-u-me'd things were ok.
As it stands I think he owes me half a saw blade.
/as further insult, Lowes is <2mi from our houses
EOC_Jason
Well-known member
No Good Deed Goes Unpunished.
As soon as you said 'dug out from his junk heap' I knew exactly where that was going... Sorry to hear about your blade, been there done that. Only takes one time to learn your lesson, I know I have...
Not in the shop, but for the shop. After getting tired of being ripped off by our local energy transmission and distribution company, I decided to cut my losses and lose the 2nd meter. My last bill was $109 just for the shop and I only used $4.89 in electricity. I was charged $89 in delivery fees alone! Tried to get it changed from commercial and they said since no one lives in the shop, it's a commercial building and I have to pay commercial rates. I decided I really don't need 200 amps in the shop.
So far, I've dug about 80 ft of the 130 ft distance. I tried "boring" under the driveway with high pressure water, didn't work. Made it about 3 ft in 2 hours. Had to resort to an axe and trenching shovel. 4.5 hours to go 25 feet and my body's feeling it. Hopefully I'll get the rest of the trench dug on Friday and pull the wire Friday night. It's supposed to rain again Saturday and I want to be able to "work" in my shop again. Going on 2 weeks now without my shop.
So far, I've dug about 80 ft of the 130 ft distance. I tried "boring" under the driveway with high pressure water, didn't work. Made it about 3 ft in 2 hours. Had to resort to an axe and trenching shovel. 4.5 hours to go 25 feet and my body's feeling it. Hopefully I'll get the rest of the trench dug on Friday and pull the wire Friday night. It's supposed to rain again Saturday and I want to be able to "work" in my shop again. Going on 2 weeks now without my shop.
EOC_Jason
Well-known member
Ah yes, the good old "demand / KVA charge" they **** commercial accounts with... Even if you have a brief spike in demand for only a few minutes it takes months before it tapers off... Back before they had the smart meters I would go around to all our buildings and reset them a few days before the meter reader would show up. Hehe...
Not in the shop, but for the shop. After getting tired of being ripped off by our local energy transmission and distribution company, I decided to cut my losses and lose the 2nd meter. My last bill was $109 just for the shop and I only used $4.89 in electricity. I was charged $89 in delivery fees alone! Tried to get it changed from commercial and they said since no one lives in the shop, it's a commercial building and I have to pay commercial rates. I decided I really don't need 200 amps in the shop.
smalltown
Well-known member
Picked up this little girl, now she follows me everywhere especially when I trying to pack to go work out of town again.
Molly’s 3.
Good for you Phantom ! You've done a good thing.
kaymccampbell
Well-known member
Grabbed a screwdriver and pliers from the toolbox.
EOC_Jason
Well-known member
Got a couple coats of paint on my shelves yesterday... Used the paint that was leftover with the house and OMG those painters thinned it down to practically water! No wonder there was so much leftover.  I couldn't even use a regular brush I had to use a foam brush. I almost want to go buy that cheap little HF HVLP sprayer and give it a try...
Second coat went on a little better than the first. Probably need a couple more coats today, so then hopefully tomorrow or Friday I can install them in the pantry.
I couldn't even use a regular brush I had to use a foam brush. I almost want to go buy that cheap little HF HVLP sprayer and give it a try... Second coat went on a little better than the first. Probably need a couple more coats today, so then hopefully tomorrow or Friday I can install them in the pantry.
ARFLY
Well-known member
The paint used in my house was super thin like that also.
EOC_Jason
Well-known member
Got a 3rd coat on this morning. The other cans of paint were okay in viscosity, I don't know why they did the white so much more. As soon as I finish a few other things I'm going to get it nailed up and caulked, then tomorrow I can do a final touch-up.
Smiles79
Well-known member
Got my first welding project finished up the other day!


Sent from my Pixel using Tapatalk
Sent from my Pixel using Tapatalk
Ben Buck
Well-known member

rburke65
Well-known member
Finished wiring and assembly of my second ceiling fan. Done!
SgtHawkUSMC
Well-known member
Drilled and tapped my Gen 6 block to accept a Gen 5 timing cover, installed the new timing chain set and started setting up the heads.
 20180304_164701 by Dave H, on Flickr
 20180304_133801 by Dave H, on Flickr
20180304_164701 by Dave H, on Flickr
20180304_133801 by Dave H, on FlickrMilton Shaw
Well-known member
- Joined
- Feb 11, 2011
- Messages
- 4,844
Replaced the front rotors and hubs on my 2005 F150. I had a dragging sound cornering and brakes were new to 30% worn and were not making the noise. One front bearing had 1/4 inch plus wobble in it so I was going to just replace the bearings, but , bearing only were $63 each, bearing and rotor already together were $89 each and didn't require pressing together. Replaced them both. Axle nuts torque to 295 foot pounds and none of my torque wrenches went past half of that, so I ordered a 3/4 " torque wrench off amazon since I could not find one to rent or borrow from any friends or rental places.
Then had to fix garage door. A trim board between the bottom of the header and the door had come loose and was making the door hang up. Had to cut the board in too after loosening the door tracks and getting a little play in the door. To replace this piece will require taking the door down and off the tracks. Don't think I will do that. It basically was to help the seal at the top of the door when closed. Guess I will wait and see how much cold air comes in. This is a 10x10 roll up door that weights upwards of 500 lbs and was a ****** to put up 25 years ago, when I was 25 years younger which makes a difference now.
Then had to fix garage door. A trim board between the bottom of the header and the door had come loose and was making the door hang up. Had to cut the board in too after loosening the door tracks and getting a little play in the door. To replace this piece will require taking the door down and off the tracks. Don't think I will do that. It basically was to help the seal at the top of the door when closed. Guess I will wait and see how much cold air comes in. This is a 10x10 roll up door that weights upwards of 500 lbs and was a ****** to put up 25 years ago, when I was 25 years younger which makes a difference now.
glider
Well-known member
Got my first welding project finished up the other day!
Sent from my Pixel using Tapatalk
Looks like a great project. I am no welder but would like to learn. Good for you.
Smiles79
Well-known member
Thanks glider! In pretty happy with how it turned out.
Sent from my Pixel using Tapatalk
Sent from my Pixel using Tapatalk
I finished up a project of converting my $80 HF flux core welder from AC to DC negative today.
A popular mod to get a supposedly 90% reduction of spatter and better penetration, by adding an 150 amp rectifier and 50 VDC capacitor.
The results lived up to the hype...no more spatter!
low setting 0.035 wire, wire brushed to remove slag/flux

High setting 0.035 wire, wire brushed to remove slag/flux

I loosely followed this guy's (Matt Heere) vid series on utube, although somewhat drawn out, there is good info in the vids, but I just skipped ahead to get what I needed.
I bought this 150 amp rectifier (added a heat sink to it), he used a 100 amp that got hot when welding:
https://www.ebay.com/itm/US-Black-M...e=STRK:MEBIDX:IT&_trksid=p2057872.m2749.l2649
I bought this capacitor:
https://www.ebay.com/itm/MALLORY-CG...e=STRK:MEBIDX:IT&_trksid=p2057872.m2749.l2649
I did some other stuff different from the vids, I'll share it upon request if anyone is interested.

A popular mod to get a supposedly 90% reduction of spatter and better penetration, by adding an 150 amp rectifier and 50 VDC capacitor.
The results lived up to the hype...no more spatter!
low setting 0.035 wire, wire brushed to remove slag/flux
High setting 0.035 wire, wire brushed to remove slag/flux
I loosely followed this guy's (Matt Heere) vid series on utube, although somewhat drawn out, there is good info in the vids, but I just skipped ahead to get what I needed.
I bought this 150 amp rectifier (added a heat sink to it), he used a 100 amp that got hot when welding:
https://www.ebay.com/itm/US-Black-M...e=STRK:MEBIDX:IT&_trksid=p2057872.m2749.l2649
I bought this capacitor:
https://www.ebay.com/itm/MALLORY-CG...e=STRK:MEBIDX:IT&_trksid=p2057872.m2749.l2649
I did some other stuff different from the vids, I'll share it upon request if anyone is interested.
Last edited:
outlawz2004
Well-known member
- Joined
- Nov 3, 2009
- Messages
- 270
Cleaned mine from all the stuff that piled up over the winter. Threw away all the old cleaners and chemicals, washed the floor, etc. Seems like so much room now. Time to get to work on other projects now.
dittle fart around
Well-known member
Got my first welding project finished up the other day!
Sent from my Pixel using Tapatalk
That's every welders first project. Mine didn't turn out as well as yours

Carcaboodle
Member
- Joined
- Jan 8, 2018
- Messages
- 10
Turbo swap and a chilled beer to relax
kaymccampbell
Well-known member
Shredded a multifunction printer. Lots of nice little bits to fix other things.
matthew.lassig
Member
- Joined
- Mar 17, 2017
- Messages
- 8
Re: What did you do "IN" your garage today?
Sent from my XT1585 using Tapatalk
Man that's awesome! I spent the first 3 years of my aviation career inside Navy p3 tail sections at L3 in Waco TX. Good to see the p3 is still goin elsewhere.Not my garage but I volunteer at an aviation museum that has just taken ownership of an AP-3C Orion care of the Royal Australian Air Force, we have started refitting the leading edges on the horizontal stabilizers. The air force disassembled and trucked the aircraft to the museum, eventually it will be a complete bomber again, very soon we hope... oh that's not me in the pic...

Sent from my XT1585 using Tapatalk
Last edited:
cjcocn
Well-known member
Drove the Cherokee out and started cleaning up.
driftpin
Well-known member
I've been reading/watching about the mods on youtube, if you want to post-up what you learned and your results, w/the links like you did, I'll read them! I have one of the HFT flux-wire welders I bought as an open-box deal, I think it was $36, & all-there, for the parts. I've only used it a couple of times.
I have an old 120 V AC buzz-box Craftsman stick welder I got from a friend on the fire dept, & yesterday when I was cleaning out some stuff in storage, I found the welding rods & a slag hammer. Now I'm gonna have two welders to try-out.
In my detached garage I recently got, I had the electrician install three 240 V circuits, and have room for more. One is for the compressor, one for my 12" radial arm saw, and one would be for any other 240 V accessory, like a welder. I also have a 240V mini-split I haven't installed, trying to get stuff cleaned-out/discarded/recycled, so I can finish the work on the house & detached garage.
So stuff around the house, I had a hurricane shutter that had come-apart, an older install, prior to my house purchase, by the original owner. It's the roll-up style, done by a hand crank. It took a bit of cussin', but I got it fixed, and squirted the whee out of it w/silicone spray, and vacuumed the sliding glass door tracks, and siliconed them too. Everything seems to slide "like buttah."
In the course of doing some other spring cleaning, I moved some porcelain tile I had stored-away on the rear porch, and who should I find residing in the narrow space behind the boxes of tile, but a 18"+ long lizard! Not one of the bright-green iguanas that have populated south Florida during the last twenty years (escaped pets), but a dirty-brown one. I had on heavy leather gloves, and was able to capture it w/no trauma, and took it down the street to let it loose, there's a golf course there, so he's got plenty of space to terrorize the golfers, now.
I have an old 120 V AC buzz-box Craftsman stick welder I got from a friend on the fire dept, & yesterday when I was cleaning out some stuff in storage, I found the welding rods & a slag hammer. Now I'm gonna have two welders to try-out.
In my detached garage I recently got, I had the electrician install three 240 V circuits, and have room for more. One is for the compressor, one for my 12" radial arm saw, and one would be for any other 240 V accessory, like a welder. I also have a 240V mini-split I haven't installed, trying to get stuff cleaned-out/discarded/recycled, so I can finish the work on the house & detached garage.
So stuff around the house, I had a hurricane shutter that had come-apart, an older install, prior to my house purchase, by the original owner. It's the roll-up style, done by a hand crank. It took a bit of cussin', but I got it fixed, and squirted the whee out of it w/silicone spray, and vacuumed the sliding glass door tracks, and siliconed them too. Everything seems to slide "like buttah."
In the course of doing some other spring cleaning, I moved some porcelain tile I had stored-away on the rear porch, and who should I find residing in the narrow space behind the boxes of tile, but a 18"+ long lizard! Not one of the bright-green iguanas that have populated south Florida during the last twenty years (escaped pets), but a dirty-brown one. I had on heavy leather gloves, and was able to capture it w/no trauma, and took it down the street to let it loose, there's a golf course there, so he's got plenty of space to terrorize the golfers, now.
I finished up a project of converting my $80 HF flux core welder from AC to DC negative today.
A popular mod to get a supposedly 90% reduction of spatter and better penetration, by adding an 150 amp rectifier and 50 VDC capacitor.
The results lived up to the hype...no more spatter!
low setting 0.035 wire, wire brushed to remove slag/flux
High setting 0.035 wire, wire brushed to remove slag/flux
I loosely followed this guy's (Matt Heere) vid series on utube, although somewhat drawn out, there is good info in the vids, but I just skipped ahead to get what I needed.
I bought this 150 amp rectifier (added a heat sink to it), he used a 100 amp that got hot when welding:
https://www.ebay.com/itm/US-Black-M...e=STRK:MEBIDX:IT&_trksid=p2057872.m2749.l2649
I bought this capacitor:
https://www.ebay.com/itm/MALLORY-CG...e=STRK:MEBIDX:IT&_trksid=p2057872.m2749.l2649
I did some other stuff different from the vids, I'll share it upon request if anyone is interested.
driftpin
Well-known member
My last H-P multi-function printer, was shown the power of a size 12 workboot, when it started going haywire. That was very satisfying. I tried for a week to upload new patches, and finally decided there was much entertainment in providing a dose of shoe leather/tread to it.
Shredded a multifunction printer. Lots of nice little bits to fix other things.
Joshua_Russo
Well-known member
Rite of passage, I guess. Nice work!That's every welders first project. Mine didn't turn out as well as yours
[emoji481]
Sent from my VS988 using Tapatalk
Yesterday got to break out my little craftsman snowblower to blow about 8" of snow off the driveway, I got it for free from my across the street neighbor, he trash picked it and fixed it (he does this often for fun/learning).
one of these guys
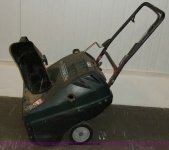
It was wet snow and I was a little worried but it made quick easy work of my 2 car driveway. I look over and my neighbor lady has her monster self propelled out doing hers and I did her sidewalk then notice shes stuck. Must have sheared the pin or whatever cause she had no spinny blades when engaged. So I did her driveway too.
one of these guys
It was wet snow and I was a little worried but it made quick easy work of my 2 car driveway. I look over and my neighbor lady has her monster self propelled out doing hers and I did her sidewalk then notice shes stuck. Must have sheared the pin or whatever cause she had no spinny blades when engaged. So I did her driveway too.
Vegaman_Dan
Well-known member
ARGH!
I *KNOW* I have the parking brake cable equalizer bracket. I just know I do. I remember taking it off the chassis when I was taking the car apart for restoration. I remember seeing it in plastic tubs as I moved. I remember seeing it just a month ago while cleaning the garage.
No clue where it is now.
I've emptied every box in the garage, the two sheds, etc. Gone. Vanished. And this is not a reproduced part for the Triumph Spitfire. I checked Ebay- no dice. Well fooey. That's it. Project cancelled. Give up.
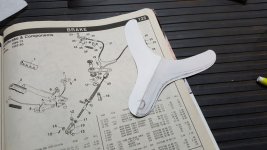
But wait, I have a hot metal glue gun (aka MIG) and scrap steel. Hmm. I know the shape and size. Looked it up in a catalog as well, made a paper template. Snagged some 3/16" sheet stock in my bin and cut out the two sides, then cut a strip and welded it all up to form the bracket. Cleaned it up, smoothed all the lines and painted it.
Huh. It works. It is more than strong enough, fits the space, and looks pretty darn close to the original.
I really like being able to just fabricate parts or address challenges like this without really sweating over it. About 45 minutes start to finish and I have a usable part. This is what garage time is all about.
I *KNOW* I have the parking brake cable equalizer bracket. I just know I do. I remember taking it off the chassis when I was taking the car apart for restoration. I remember seeing it in plastic tubs as I moved. I remember seeing it just a month ago while cleaning the garage.
No clue where it is now.
I've emptied every box in the garage, the two sheds, etc. Gone. Vanished. And this is not a reproduced part for the Triumph Spitfire. I checked Ebay- no dice. Well fooey. That's it. Project cancelled. Give up.
But wait, I have a hot metal glue gun (aka MIG) and scrap steel. Hmm. I know the shape and size. Looked it up in a catalog as well, made a paper template. Snagged some 3/16" sheet stock in my bin and cut out the two sides, then cut a strip and welded it all up to form the bracket. Cleaned it up, smoothed all the lines and painted it.
Huh. It works. It is more than strong enough, fits the space, and looks pretty darn close to the original.
I really like being able to just fabricate parts or address challenges like this without really sweating over it. About 45 minutes start to finish and I have a usable part. This is what garage time is all about.
Attachments

stonesfan68
Well-known member
ARGH!
I *KNOW* I have the parking brake cable equalizer bracket. I just know I do. I remember taking it off the chassis when I was taking the car apart for restoration. I remember seeing it in plastic tubs as I moved. I remember seeing it just a month ago while cleaning the garage.
No clue where it is now.
I've emptied every box in the garage, the two sheds, etc. Gone. Vanished. And this is not a reproduced part for the Triumph Spitfire. I checked Ebay- no dice. Well fooey. That's it. Project cancelled. Give up.
But wait, I have a hot metal glue gun (aka MIG) and scrap steel. Hmm. I know the shape and size. Looked it up in a catalog as well, made a paper template. Snagged some 3/16" sheet stock in my bin and cut out the two sides, then cut a strip and welded it all up to form the bracket. Cleaned it up, smoothed all the lines and painted it.
Huh. It works. It is more than strong enough, fits the space, and looks pretty darn close to the original.
I really like being able to just fabricate parts or address challenges like this without really sweating over it. About 45 minutes start to finish and I have a usable part. This is what garage time is all about.
The things members of this forum do in their home shop never cease to amaze and inspire me!
oldmxracer
Well-known member
ARGH!
I *KNOW* I have the parking brake cable equalizer bracket. I just know I do. I remember taking it off the chassis when I was taking the car apart for restoration. I remember seeing it in plastic tubs as I moved. I remember seeing it just a month ago while cleaning the garage.
No clue where it is now.
I've emptied every box in the garage, the two sheds, etc. Gone. Vanished. And this is not a reproduced part for the Triumph Spitfire. I checked Ebay- no dice. Well fooey. That's it. Project cancelled. Give up.
But wait, I have a hot metal glue gun (aka MIG) and scrap steel. Hmm. I know the shape and size. Looked it up in a catalog as well, made a paper template. Snagged some 3/16" sheet stock in my bin and cut out the two sides, then cut a strip and welded it all up to form the bracket. Cleaned it up, smoothed all the lines and painted it.
Huh. It works. It is more than strong enough, fits the space, and looks pretty darn close to the original.
I really like being able to just fabricate parts or address challenges like this without really sweating over it. About 45 minutes start to finish and I have a usable part. This is what garage time is all about.
Nice job, now the old one will show up ! It always seems to work that way!
Bob Heine
ALLIANCE MEMBER
Vegaman_Dan, I know where it is. It's next to where I put the A/C compressor hose for my Corvette. And I have no idea where that is either.ARGH!
I *KNOW* I have the parking brake cable equalizer bracket. I just know I do. I remember taking it off the chassis when I was taking the car apart for restoration. I remember seeing it in plastic tubs as I moved. I remember seeing it just a month ago while cleaning the garage.
No clue where it is now.
kaymccampbell
Well-known member
Cleaned the central vac, tuned the lathe chuck, made a couple morse tapers for an R8 milling head.