

You are using an out of date browser. It may not display this or other websites correctly.
You should upgrade or use an alternative browser.
You should upgrade or use an alternative browser.
What did you do "IN" your garage today?
- Thread starter mayhemman
- Start date

PhantomEB
Well-known member
Started up ‘Beer Money Inc.’ Just an endeavour to kill some days off with some extra under the table cash doing side jobs like oil changes and brake jobs for neighbors and local people.
Soon to pick up a truck so I can do dump runs for those who don’t have access to do so. Jobs will result in stockpiling my liquor cabinet and beer fridges.
Back to tidying it all up in a brake job that earned me 2 flats of beer yesterday.
Soon to pick up a truck so I can do dump runs for those who don’t have access to do so. Jobs will result in stockpiling my liquor cabinet and beer fridges.
Back to tidying it all up in a brake job that earned me 2 flats of beer yesterday.
Paulmust50lx
New member
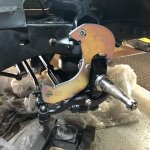
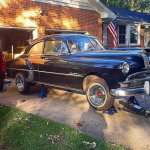
Rebuilding the front suspension on my 49 Pontiac Cheiftain and updating the front brakes.
Attachments



isb cornbinder
Well-known member
Grabbed my rivet gun so I could reattach the door to my mailbox. The force of the snow coming off the plows was more than it could handle, they aren't made like they used to be. I'm thinking about making my own box this year out it some plate.
Sent from my SAMSUNG-SM-G930A using Tapatalk
A local bus mechanic for the transit system built a mailbox that looked like a transit bus. He had a local sign shop do a wrap on the bus/mailbox. He installed the mailbox when he got home from work and the mailbox was missing when he left for work the next morning.
One of our farmer neighbours had his mailbox on a cable and pulley system. When the mail was delivered the Postee would press a lever to activate a motor and the box would take off for the house.
J_J_
Well-known member
did you put dropped spindles on too?, looks good who's kit? Dad has a couple 50' 4 dr Pontiacs, fast back and a coupeRebuilding the front suspension on my 49 Pontiac Cheiftain and updating the front brakes.
Paulmust50lx
New member
did you put dropped spindles on too?, looks good who's kit? Dad has a couple 50' 4 dr Pontiacs, fast back and a coupe
Yes, went with the fatman fab dropped uprights. Love the fast backs mines a 2 door sedan
Attachments
crewchief888
Well-known member
cut up some twigs and branches for one of the wifes centerpiece "projects
then went through the backyard on "landmine duty"....
man, this dog leaves some impressive piles....
i swear someone's got a pet moose that runs free at night
took a little trip to a couple local pawn shops and a junky flea mkt.

then went through the backyard on "landmine duty"....
man, this dog leaves some impressive piles....
i swear someone's got a pet moose that runs free at night
took a little trip to a couple local pawn shops and a junky flea mkt.
ARFLY
Well-known member
I put the kids basketball goal together. I just have to get the sand put in the base. Before I got home with the sand, it started raining.
Outlawmws
Well-known member
Don't those just get filled with water?
Freejack
Well-known member
Finished my ******** board set with a Martini Racing paintjob! Think they turned out pretty nice. I just need to touch up a couple places were I ended up with some overspray.
 Untitled by Jacob Schnarre, on Flickr
 Untitled by Jacob Schnarre, on Flickr
Jake
Untitled by Jacob Schnarre, on Flickr
Untitled by Jacob Schnarre, on FlickrJake
Bamafan
Well-known member
Finished my ******** board set with a Martini Racing paintjob! Think they turned out pretty nice. I just need to touch up a couple places were I ended up with some overspray.
Jake
Love it! I picked up a Martini racing jersey at last year’s USGP. Too bad they’ve dropped their sponsorship.
kaymccampbell
Well-known member
Cleaned, made a shelf, fixed a toolbox, fixed a training collar, sorted screwbits, filled out my drill index.
Outlawmws
Well-known member
Fixed the inside lock latch on the DD rig. Sharpened knives, looked for the door striker plastic sleeve for the new bird. Packed a lamp for shipping.

d.mcfarland
Well-known member
Figured out what I would need to order for an fittings. Nothing wrong with my fuel line now, but I'm proactively replacing it before the 19 year old rubber goes bad.
Yes, went with the fatman fab dropped uprights. Love the fast backs mines a 2 door sedan
Fantastic looking car there

NewShockerGuy
Well-known member
Those new blue dolly wheels look great!
Looks good!
BTW, what are the little "ears" poking out of either side of your hood? I apologize if you explained it before & I missed it.
It's one of those hood lights. Like this:
https://www.amazon.com/dp/B002J8RTF0/?tag=atomicindus08-20
The one I have I don't think they make anymore. I'd have to search my amazon orders from a couple years back.
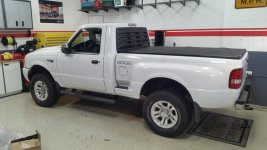
FINALLY the truck is done. I am going to drive it today and hope it doesn't explode being my luck.... Everything went together much easier than it came apart and with the help of ant seize if I ever have to take stuff apart it should go way quicker. I might paint the rear brake drums black since it's in the garage and that would be really quick thing to do. We'll see how today goes.
-Nigel
Attachments
Caught up on ye old neglected BMW. We were at the beach friday/saturday then had my kids vball tourney Sunday. We got home about 6 last night, still had a smidge of daylight and the BMW has been collecting a few different problems over the last few weeks. so....
Topped off about 3/4 quart of oil, just to get through till an actual oil change that will be done very soon.
Replaced a headlight bulb that burned out this week.
Topped off windshield washer fluid.
Cleaned windshield, the warm day we had like 2 weeks ago condensated the inside i guess and it was gross.
like new money now hahah
Still waiting on all the suspension parts to arrive and deciding if I am doing it or taking it to a shop. Eibach pro kit springs, Koni FSD shocks, bump stops, upper strut mounts, new end links.
Needs an oil change.
Needs a trans fluid, filter, etc change too.
Topped off about 3/4 quart of oil, just to get through till an actual oil change that will be done very soon.
Replaced a headlight bulb that burned out this week.
Topped off windshield washer fluid.
Cleaned windshield, the warm day we had like 2 weeks ago condensated the inside i guess and it was gross.
like new money now hahah
Still waiting on all the suspension parts to arrive and deciding if I am doing it or taking it to a shop. Eibach pro kit springs, Koni FSD shocks, bump stops, upper strut mounts, new end links.
Needs an oil change.
Needs a trans fluid, filter, etc change too.
Vegaman_Dan
Well-known member
Installed a few restored bits on the Spitfire. Been cleaning, media blasting, painting, rebuilding stuff so long, it is nice to put things *back on* the project.
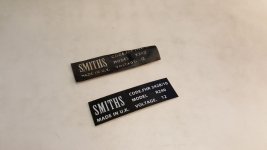
I have a Brother P-Touch that connects to the PC that lets me print some labels that are very hard to get, or like the heater blower on that simply does not exist. Was able to reproduce and print up that one in about 10 minutes of fiddling.


Sent from my SAMSUNG-SM-N920A using Tapatalk
I have a Brother P-Touch that connects to the PC that lets me print some labels that are very hard to get, or like the heater blower on that simply does not exist. Was able to reproduce and print up that one in about 10 minutes of fiddling.
Sent from my SAMSUNG-SM-N920A using Tapatalk
EOC_Jason
Well-known member
Washed my Truck yesterday. I was trying to squeeze it in the afternoon window between when the sun was getting blocked by clouds and the line of storms was supposed to hit.
Needless to say my timing was a bit off... Thankfully only light rain as I was about halfway done washing. Backed it into the garage afterwards and wiped it off... Really needed to just get the dirt off and wash underneath well, didn't need to be perfect spotless... Hopefully in a week we'll have warm weather again and I can give it a good wash and wax...
Needless to say my timing was a bit off... Thankfully only light rain as I was about halfway done washing. Backed it into the garage afterwards and wiped it off... Really needed to just get the dirt off and wash underneath well, didn't need to be perfect spotless... Hopefully in a week we'll have warm weather again and I can give it a good wash and wax...
polexican23
Banned
Assembled the kiddos new ride. I even wiped it down with some CG VRP to protect the plastic.
It hit 60 today near Chicago so we got some vitamin D.

Sent from my SM-N950U using Tapatalk
It hit 60 today near Chicago so we got some vitamin D.
Sent from my SM-N950U using Tapatalk
Bessy
Well-known member
Over the weekend the girlfriend asked if I could make a "wheel of fortune" wheel for a work function they are having at her office... I told her that wouldn't be a problem, so long as they were ok with me doing it with whatever I had on hand so i didn't have to go out and get any materials.
So I got to work, routed out a more or less circular shape with the router, sanded everything down, pressed a 24mm OD bearing assembly into the middle of the plywood and stuck a 5/16" bolt through it with some tape so that it wouldn't spin in the inner race.
Hinged two pieces of 12.5mm ply (I have tried to do this whole project using the metric system, to some limited success) together, cut out a relief for the other end of the bolt so you can tighten it up as needed or to remove the wheel for storage.
I've got three things left to hammer out:
1) Paint and install the pegs for the wheel itself
2) Measure and mount the flapper (I've got some plastic courtesy of an old blue bin)
3) test and fine tune the action to ensure that it spins, ticks and stops with some manner of consistency.
So I got to work, routed out a more or less circular shape with the router, sanded everything down, pressed a 24mm OD bearing assembly into the middle of the plywood and stuck a 5/16" bolt through it with some tape so that it wouldn't spin in the inner race.
Hinged two pieces of 12.5mm ply (I have tried to do this whole project using the metric system, to some limited success) together, cut out a relief for the other end of the bolt so you can tighten it up as needed or to remove the wheel for storage.
I've got three things left to hammer out:
1) Paint and install the pegs for the wheel itself
2) Measure and mount the flapper (I've got some plastic courtesy of an old blue bin)
3) test and fine tune the action to ensure that it spins, ticks and stops with some manner of consistency.
Vegaman_Dan
Well-known member
Update on making your own sticker/labels as there were questions:
Some Brother P-Touch printers have a USB computer connection. With their label software, you can import images or designs to the labeler. The label I was making was the same size as the 18mm TZ Tape available. I had some white on black already, so used that. I scanned the original label into Photoshop and decided to remake it new instead of using the scanned image for anything more than just scale/placement of the lettering.
I found the font for SMITHS and was able to mimic that. The rest I had to eyeball and it looks pretty good to me. Since this label is not reproduced, I was happy to be able to make this label. I'll have to make some warning labels for other bits of the car as I find a use for it.
Some Brother P-Touch printers have a USB computer connection. With their label software, you can import images or designs to the labeler. The label I was making was the same size as the 18mm TZ Tape available. I had some white on black already, so used that. I scanned the original label into Photoshop and decided to remake it new instead of using the scanned image for anything more than just scale/placement of the lettering.
I found the font for SMITHS and was able to mimic that. The rest I had to eyeball and it looks pretty good to me. Since this label is not reproduced, I was happy to be able to make this label. I'll have to make some warning labels for other bits of the car as I find a use for it.
Attachments
Last edited:
Fyrme
Well-known member
To be fair, we started this Friday, but finished up today.


OccupantRJ
Well-known member
Nice job on the label.
StormcrowAz
Well-known member
Normally I don't post here because I'm not on the computer till the day after I've done something in the shop but I ran out of shielding gas for the welder so I've got a little extra time tonight and thought I'd try doing this upload via the phone.
Making fence panels for the front of the property. Finished tacking one more togetger, 4 down and 16 more to assemble.
 20180319_164501
Making fence panels for the front of the property. Finished tacking one more togetger, 4 down and 16 more to assemble.
20180319_164501
Last edited:
doityerself
Active member
Started up ‘Beer Money Inc.’ Just an endeavour to kill some days off with some extra under the table cash doing side jobs like oil changes and brake jobs for neighbors and local people.
Soon to pick up a truck so I can do dump runs for those who don’t have access to do so. Jobs will result in stockpiling my liquor cabinet and beer fridges.
Back to tidying it all up in a brake job that earned me 2 flats of beer yesterday.
sounds like a plan!!
isb cornbinder
Well-known member
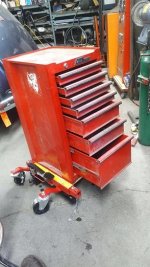
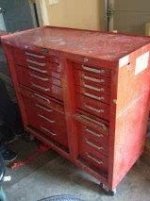
I saw a Vintage MAC side cabinet on Craigslist this morning. The asking price was little more than scrap price. I started the inspection and cleanup.
This is one of the dirtiest cabinets I have ever spent money on. The other and dirtiest cabinet had dozens of hypodermic needles in the bottom along with about $100 in loose change.
This is one of the dirtiest cabinets I have ever spent money on. The other and dirtiest cabinet had dozens of hypodermic needles in the bottom along with about $100 in loose change.
Attachments
Last edited:
PurpleZj
Well-known member
Unboxed my new husky 60” tool box for the shop. Started getting all my tools transferred over and organized. Just have to move some stuff around in the shop and I should have it in place by the end of the week.

Sent from my iPhone using Tapatalk
Sent from my iPhone using Tapatalk
Boilerhouse
Well-known member
Had a look at the Corolla's cabin filter, saw some debris sitting on it's surface so vacuumed it out before removing and replacing it. Ended up sucking out a mouse nest and two frozen mousies. Had a long overdue performance review with the cats.
zmotorsports
ALLIANCE MEMBER
I didn't get much done in the shop last night as I didn't want to start anything too large due to a guy bringing a Jeep by that I will be fabricating a new rear bumper and tire carrier for.
I have needed a small tab for an air nozzle storage over next to my lathe so I cut a piece of .5" drill rod and a mounting tab out of .125" strap, TIG welded them together and drilled/tapped my 6' workbench to secure it to. While I was TIG welding the holder, my welder's third hand broke and I needed to repair that as well. At least it broke while I already had the TIG welder strung out.
By the time the guy brought the Jeep by my shop it was getting late so I put it on the lift and figured I would start the project tonight.
I have needed a small tab for an air nozzle storage over next to my lathe so I cut a piece of .5" drill rod and a mounting tab out of .125" strap, TIG welded them together and drilled/tapped my 6' workbench to secure it to. While I was TIG welding the holder, my welder's third hand broke and I needed to repair that as well. At least it broke while I already had the TIG welder strung out.
By the time the guy brought the Jeep by my shop it was getting late so I put it on the lift and figured I would start the project tonight.
After 13yrs of ownership got my HF 4x6 bandsaw to finally cut perfectly square!  Yes, I purchased this as one of my two very first metal fabrication tools back in 2004, along with my Hobart welder. It never cut square no matter what I tried, I gave up on it and bought an abrasive saw, then a plasma cutter but always found the bandsaw more convenient especially for bar stock and tubing. Then recently upon looking into it again (after a few years of metal experience lol) I realized that the reason it never cut square was because it's missing two major adjustment points, the upper and lower blade guides don't twist/swivel to allow the blade to be vertical. So I checked the other HF saws and sure enough they all have this adjustment. It baffles me why this 'Taiwanese' saw didn't have one? Then as I started thinking about shimming it to get the blade correct I happened upon someone's YT video who came up with this idea and it works great. He drilled and tapped two holes and used set screws for the twisting adjustment. Sure enough, that got me pretty close but now I was on a mission so I did the same thing for the upper guide and I couldn't believe how accurate this saw cuts now even with an old blade that's been cutting at the wrong angle for years
The set screws are on the (black) upper and lower blade guides - near the knob and the hex bolt respectively:

The blade sits perfectly square to the vise now- parallel and perpendicular:

A test cut, flipped the cut piece 180deg and the fit-up is about as perfect as a bandsaw can make:

Hope this helps those with these odd-ball HF 4x6 37151 bandsaws from the past (presumably a bad run?)

Yes, I purchased this as one of my two very first metal fabrication tools back in 2004, along with my Hobart welder. It never cut square no matter what I tried, I gave up on it and bought an abrasive saw, then a plasma cutter but always found the bandsaw more convenient especially for bar stock and tubing. Then recently upon looking into it again (after a few years of metal experience lol) I realized that the reason it never cut square was because it's missing two major adjustment points, the upper and lower blade guides don't twist/swivel to allow the blade to be vertical. So I checked the other HF saws and sure enough they all have this adjustment. It baffles me why this 'Taiwanese' saw didn't have one? Then as I started thinking about shimming it to get the blade correct I happened upon someone's YT video who came up with this idea and it works great. He drilled and tapped two holes and used set screws for the twisting adjustment. Sure enough, that got me pretty close but now I was on a mission so I did the same thing for the upper guide and I couldn't believe how accurate this saw cuts now even with an old blade that's been cutting at the wrong angle for years The set screws are on the (black) upper and lower blade guides - near the knob and the hex bolt respectively:
The blade sits perfectly square to the vise now- parallel and perpendicular:
A test cut, flipped the cut piece 180deg and the fit-up is about as perfect as a bandsaw can make:
Hope this helps those with these odd-ball HF 4x6 37151 bandsaws from the past (presumably a bad run?)
Outlawmws
Well-known member
Nuthin. I'm coming down with something. Hope it's not the bad stuff. (Had my shot...)
Pathfinders
Well-known member
Fixed the latches on the MR2 top.
Put my Saylor Beall crank and 2 bearing races in the freezer.
Then at 10 O'clock installed bearings and races.Need to press a race out maybe 1/16" for a bit tighter end play.I finally feel like I'm getting some where.Lots of prep work.
Then at 10 O'clock installed bearings and races.Need to press a race out maybe 1/16" for a bit tighter end play.I finally feel like I'm getting some where.Lots of prep work.
Last edited:
glider
Well-known member


XJSuperman
Well-known member
Wirewheeled a bunch o junk Ive picked up in the last couple weeks. C-clamps, adjustable wrenches, etc.
Bessy
Well-known member
Finished up the game wheel tonight as far as I need to for the girlfriend to paint it. I'll deliver it to her Friday hopefully if all goes well. The rest of this week will consist of packing the essentials for my move into temporary living quarters (staying with extended family) in order to start my new job Monday as a Funding Analyst. Then it's on to looking for housing in the Mississauga/Milton/Burlington/Oakville area.
Anyways, I **** at taking process pictures, so here's a semi-finished (unpainted) shot of the wheel.

Sent from my Pixel using Tapatalk
Anyways, I **** at taking process pictures, so here's a semi-finished (unpainted) shot of the wheel.
Sent from my Pixel using Tapatalk
ptgarcia
Well-known member
Cleaned the brake rotor and bolted up a new sprocket on the rear wheel of my dual sport.
Sent from my SM-N910T using Tapatalk
Sent from my SM-N910T using Tapatalk