To avoid these ads, REGISTER NOW!

ZMotorsports Shop Projects 2.0

OP
Z

zmotorsports

ALLIANCE MEMBER
Joined
Oct 20, 2009
Messages
21,441
Location
Northern Utah
I think that's the sign of a good welder... always looking for ways to improve and perfect it. It's harder when you have to fabricate the pieces before welding. A lot of the instagram guys are just cranking out welds all day so they've got an advantage. I think half the fun is making the pieces, though!

Thank you. Those guys on Instagram are some amazing weldors but you're right, they are just hammering out welds day in and day out on pieces that are pre-cut and ready to jig up and weld. Not taking anything away from them, but cutting the parts out on a onesie, twosie basis and then fitting and welding is a bit different.

I still wish I could turn out welds looking like some of those guys. I look at their welds for inspiration many times.

Thanks for checking in on my projects and commenting.
 
To avoid these ads, REGISTER NOW!

Bodj Built

Well-known member
Joined
Feb 3, 2016
Messages
1,167
Location
Moorpark, CA
Thank you. Those guys on Instagram are some amazing weldors but you're right, they are just hammering out welds day in and day out on pieces that are pre-cut and ready to jig up and weld. Not taking anything away from them, but cutting the parts out on a onesie, twosie basis and then fitting and welding is a bit different.

I still wish I could turn out welds looking like some of those guys. I look at their welds for inspiration many times.

Thanks for checking in on my projects and commenting.

Exactly. It's tough, especially when you're hands are still buzzing from having just cut something with the angle grinder and then throw in welding out of position... It all adds up. Keep up the good work!
 

Ohmthis

Well-known member
Joined
Jan 20, 2013
Messages
3,018
Location
Outside of Louisville KY
Mike do you save your old gears for “rainy day, you never know when I might need them” or scrap/sell them. Also, do you have a video on your YouTube channel about setting up gears? I understand the shims, but I’m not quite getting the preload torque part. Thanks
 
OP
Z

zmotorsports

ALLIANCE MEMBER
Joined
Oct 20, 2009
Messages
21,441
Location
Northern Utah
Mike do you save your old gears for “rainy day, you never know when I might need them” or scrap/sell them. Also, do you have a video on your YouTube channel about setting up gears? I understand the shims, but I’m not quite getting the preload torque part. Thanks

I seem to hold on to gears for a while but generally no one wants used gears. Used gears are also a bit more temperamental to set up because they already have a wear pattern and if you don't get them set up exactly the same way they will howl a bit. I've held on to gears for several years and still end up tossing them but I will probably still hold onto these for a bit as they are still in excellent condition.

As for videos, I do have a couple of videos on my channel where I am building axles. I have an older one where I was beefing up (sleeving and gusseting) an OEM Dana44 out of a 2009 Wrangler Rubicon and then I have a video of when I built my new Dynatrac ProRock 44 last year. They aren't a step by step video per' se but they do give a good overview and show things to look for and be aware of.

Thanks for following along.
 
OP
Z

zmotorsports

ALLIANCE MEMBER
Joined
Oct 20, 2009
Messages
21,441
Location
Northern Utah
So kind of a ****** week as far as getting anything accomplished. My son and his girlfriend bought us tickets for a Christmas concert on Tuesday night in which I didn't feel well at all and then my boss from corporate was in town this week which ended up in a couple of 14-hour days so not much shop time to get anything accomplished this past week.

My front axle has been at the ready for installation since Monday night.

Tonight I had a couple of hours is all after work so I relocated my power steering oil cooler that I installed earlier this year when I installed my PSC XD2 gearbox. It appeared to be awfully close to the new path of my flipped drag link so I opted to move it to the small crossmember just behind the bumper.
506e306c7036de18b6b898f0884f3cd0.jpg

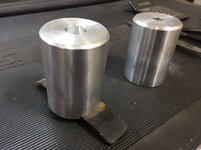
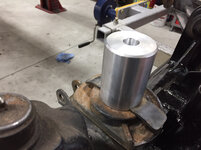
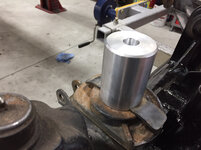
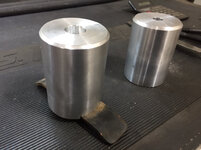
After relocating my oil cooler I machined a couple of new 3” bumpstops for the front to keep my drag link from contacting the frame.

After machining the OD and facing I put them in the mill vise one at a time to counterbore the holes for socket head capscrews as well as machined a slot to the underside to capture the straps that I made as coil spring retainers.
c43901b8cd060e4e9c053917e5547479.jpg

8d48b379c66e22f7095413450e4c1917.jpg

7314c0c145a40d182f4c00cc9b9118c5.jpg

2c52edf14c9f4e06cca5fed816cc23d8.jpg

daf2c7ec69a8195cd579465a4ae48e36.jpg

b5f59af4b9266342d05d954e05e014b9.jpg

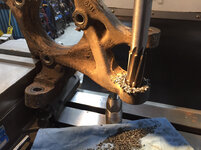
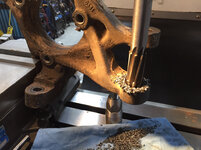
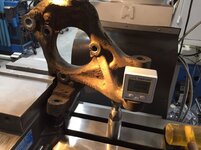
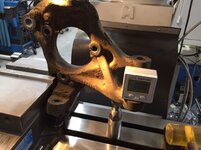
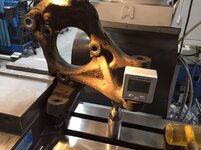
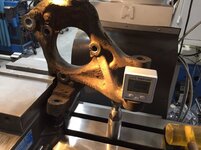
Lastly while I already had a mess in the machining area of the shop I figured I would ream out the right side steering knuckle in order to accept the flipped drag link.
ad0a00df14e78b6f8226a76aa9e58ae6.jpg

2bc27aa1745cdd8378e11c5f7e25172a.jpg

58b41dadc48c09d1fcba063742f9cab8.jpg

Thanks for looking.
 

Attachments

  • b5f59af4b9266342d05d954e05e014b9.jpg
    b5f59af4b9266342d05d954e05e014b9.jpg
    720.2 KB · Views: 0
  • ad0a00df14e78b6f8226a76aa9e58ae6.jpg
    ad0a00df14e78b6f8226a76aa9e58ae6.jpg
    789.8 KB · Views: 0
  • 2bc27aa1745cdd8378e11c5f7e25172a.jpg
    2bc27aa1745cdd8378e11c5f7e25172a.jpg
    824.5 KB · Views: 0
  • 58b41dadc48c09d1fcba063742f9cab8.jpg
    58b41dadc48c09d1fcba063742f9cab8.jpg
    749.4 KB · Views: 0
  • daf2c7ec69a8195cd579465a4ae48e36.jpg
    daf2c7ec69a8195cd579465a4ae48e36.jpg
    676.9 KB · Views: 0
  • 2c52edf14c9f4e06cca5fed816cc23d8.jpg
    2c52edf14c9f4e06cca5fed816cc23d8.jpg
    700.9 KB · Views: 0
  • 506e306c7036de18b6b898f0884f3cd0.jpg
    506e306c7036de18b6b898f0884f3cd0.jpg
    665.6 KB · Views: 0
  • c43901b8cd060e4e9c053917e5547479.jpg
    c43901b8cd060e4e9c053917e5547479.jpg
    721.9 KB · Views: 0
  • 8d48b379c66e22f7095413450e4c1917.jpg
    8d48b379c66e22f7095413450e4c1917.jpg
    664.3 KB · Views: 0
  • 7314c0c145a40d182f4c00cc9b9118c5.jpg
    7314c0c145a40d182f4c00cc9b9118c5.jpg
    759.4 KB · Views: 0
Last edited:
OP
Z

zmotorsports

ALLIANCE MEMBER
Joined
Oct 20, 2009
Messages
21,441
Location
Northern Utah
I didn’t get as much accomplished today as I had hoped to. I was hoping to get the front end finished up and move onto disassembling the rear axle. I barely got the front end in.

Knuckles installed and sleeve pressed in place for the flipped drag link.
a74687c638ed235c41727b29ea7668dd.jpg

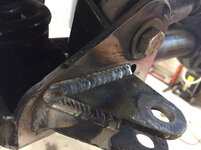
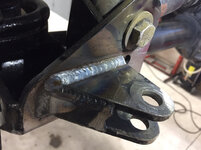
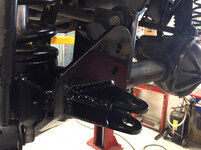
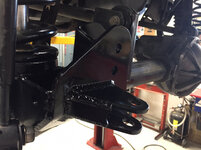
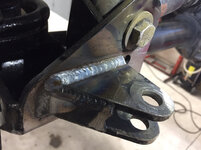
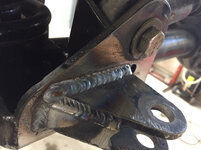
Tabs welded onto the Artec raised heavy duty track bar bracket for the steering ram.
41f963f44b78c04278b55ac83d1526a9.jpg

b0e8230875f2f165335e3f3c2b85d2c8.jpg

d16a555b47478dfd39e2e397816ac9b6.jpg

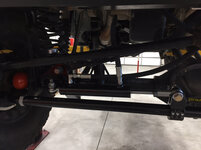
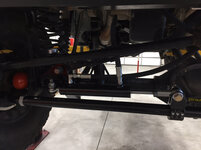
Steering ram and hoses installed.
f4aa5681d8a35d33c3298ab107ad89f6.jpg

I’ve changed the hose routing on the one pointing straight up. I’ve added 90-degree elbows to each to lay the hoses down in order to avoid rubbing under droop or compression.
58bc72a9ef7f411e4bae306f636278b7.jpg

All that seems to be left on the front end is to fill and bleed the steering system and then adjust the tie rod and drag link to straighten the steering wheel.
 

Attachments

  • 58bc72a9ef7f411e4bae306f636278b7.jpg
    58bc72a9ef7f411e4bae306f636278b7.jpg
    613.8 KB · Views: 0
  • f4aa5681d8a35d33c3298ab107ad89f6.jpg
    f4aa5681d8a35d33c3298ab107ad89f6.jpg
    614.1 KB · Views: 0
  • d16a555b47478dfd39e2e397816ac9b6.jpg
    d16a555b47478dfd39e2e397816ac9b6.jpg
    689 KB · Views: 0
  • b0e8230875f2f165335e3f3c2b85d2c8.jpg
    b0e8230875f2f165335e3f3c2b85d2c8.jpg
    699.3 KB · Views: 0
  • 41f963f44b78c04278b55ac83d1526a9.jpg
    41f963f44b78c04278b55ac83d1526a9.jpg
    726.8 KB · Views: 0
  • a74687c638ed235c41727b29ea7668dd.jpg
    a74687c638ed235c41727b29ea7668dd.jpg
    708.1 KB · Views: 0
Last edited:
OP
Z

zmotorsports

ALLIANCE MEMBER
Joined
Oct 20, 2009
Messages
21,441
Location
Northern Utah
I know the feeling...‘Tis the season...

I love those kind of Mill Set-ups!!!

Thanks Pat. I thoroughly enjoyed going to the concert with my son and his girlfriend but I could have done without my boss being here all week and cutting into my evening shop time.:mad:

As for the mill setup, as you know sometimes you just have to get creative to get the job done. I was trying to keep it simple as I didn't want the setup to take up much more time than the job dictated. This probably could have been done just as easily on the drill press or even on the Jeep. I've seen guys on the Jeep forums merely use a hand drill and drill the knuckle to accept the bushing while still on the vehicle but I wanted a bit more precision.

Thanks for stopping by and checking things out Pat. I hope you're having a great holiday season playing in that white stuff you enjoy so much.:lol_hitti
 

rattle_snake

Well-known member
Joined
Jun 25, 2015
Messages
5,221
Location
Chandler, AZ
I'm not familiar with JK stuff, but it looks like you moved the tie rod from the 'top' the knuckle to below. I assume this is to make clearance for the ram. The flip kits I see go the other way, to move the TR up. Interesting.
Do you hope the power steering fluid temps to drop off-road/aired-down since the system isn't struggling any more?
 
OP
Z

zmotorsports

ALLIANCE MEMBER
Joined
Oct 20, 2009
Messages
21,441
Location
Northern Utah
I'm not familiar with JK stuff, but it looks like you moved the tie rod from the 'top' the knuckle to below. I assume this is to make clearance for the ram. The flip kits I see go the other way, to move the TR up. Interesting.
Do you hope the power steering fluid temps to drop off-road/aired-down since the system isn't struggling any more?

Justin, the tie rod is actually in the stock location, I moved the drag link from an under the knuckle mounting style to over the knuckle so it drops down into the knuckle. This was two-fold, first to create enough clearance for the hydraulic ram and secondly to flatten out the drag link. The cutoff seems to be around the 4" of lift point where the drag link is at a bit of an angle and can induce some bumpsteer into the steering so by moving the drag link to the top mounting position it flattens the angle out as well as creates just enough clearance for a hydraulic cylinder.

As for fluid temps, the hydraulic assist alone would allow the system to work easier and thus reduce temps but I already had a Derale heat sink style cooler so I wanted to keep it and just relocated it further away from my drag link. This cooler will just provide a little extra cooling for the steering system.

The PSC gearbox I had installed worked much better than the OEM gearbox as far as turning my tires when aired down off-road although still pretty stiff with the front axle locked but I don't lock my front axle all that much. I purchased the gearbox earlier in the year knowing I would be installing the LS V8 sometime within the year or two but what I didn't realize was that the first generation of PSC gearbox was in fact compatible with the LS V8 swap, but the second generation however was not. I did not find this out until after I had the PSC Big Bore gearbox installed for several months and was collecting parts and pieces for my engine swap when I realized they drastically changed the size of the gearbox from gen I to gen II.

My only options at that time were use GM accessories rather than my OEM Jeep accessories which I wanted to keep for ease of swap as well as keep my smart charging through the TIPM with the OEM alternator as well as keep the Jeep A/C compressor and power steering pump. The GM A/C compressor mounts on the other side which was an option but again, I want to stay with the Jeep compressor and other accessories. My real only option was to reinstall the factory power steering gearbox but I worried about the small sector shaft (which was the #1 reason I installed the bigger gearbox to begin with). To combat the 37" tires I will be running I figured I may as well go hydro-assist to alleviate the strain on the factory gearbox.

Had I dug deeper into the PSC gearbox swap earlier in the year I probably would have discovered that it was not going to work with my engine swap and at that time I probably would have just gone hydro-assist but instead I wasted some time and money and now I'm back to installing hydro-assist.:headscrat

Live and learn I guess.

Thanks for following along Justin.
 
OP
Z

zmotorsports

ALLIANCE MEMBER
Joined
Oct 20, 2009
Messages
21,441
Location
Northern Utah
When I arrived home from work I ran to my buddies shop and evacuated the A/C system in preparation of the motor swap.

I then put the Jeep back on the lift and hurried and swapped out my slightly sagging BDS rear coil springs for some new Currie 4.5” expedition coils that are a dual rate spring and supposed to help compensate for the heavy *** end of my Jeep.
ddf5f7241b4be4971d8673c2de05d9d5.jpg

ff7edd957d0deef28ce197af29477747.jpg

After swapping out coil springs I removed the diff cover to let it drain and removed my rear driveshaft.

Looks pretty good for having 90k plus driven miles and another approx. 40k flat towed miles.
f2a58f54670247cf746b81b900f5fb1c.jpg

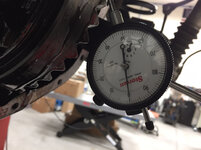
Wear pattern looks good and here are my specs that I engraved exactly 7-years ago. Dated 12/29/2011 with .007” backlash. Now after all those miles it only changed .002” with a total now of .009” backlash.
8fd673a11c2df561cfc6789b875e4757.jpg

0316ef5f5ae0e1ea4c016cc7801769e9.jpg

8e800ec3ff835c407a1ddfbad3887197.jpg

Thanks for looking.
 

Attachments

  • 0316ef5f5ae0e1ea4c016cc7801769e9.jpg
    0316ef5f5ae0e1ea4c016cc7801769e9.jpg
    624.1 KB · Views: 0
  • 8e800ec3ff835c407a1ddfbad3887197.jpg
    8e800ec3ff835c407a1ddfbad3887197.jpg
    620.3 KB · Views: 0
  • 8fd673a11c2df561cfc6789b875e4757.jpg
    8fd673a11c2df561cfc6789b875e4757.jpg
    703.7 KB · Views: 0
  • f2a58f54670247cf746b81b900f5fb1c.jpg
    f2a58f54670247cf746b81b900f5fb1c.jpg
    716.4 KB · Views: 0
  • ff7edd957d0deef28ce197af29477747.jpg
    ff7edd957d0deef28ce197af29477747.jpg
    683.3 KB · Views: 0
  • ddf5f7241b4be4971d8673c2de05d9d5.jpg
    ddf5f7241b4be4971d8673c2de05d9d5.jpg
    729.5 KB · Views: 0
Last edited:
OP
Z

zmotorsports

ALLIANCE MEMBER
Joined
Oct 20, 2009
Messages
21,441
Location
Northern Utah
I pulled my rear end down tonight and cleaned it up in preparation to swap the new ring gear over to the carrier and start test fitting everything back together.

Bearings all looked very good with the exception of one. Here’s the carrier bearing and race. Look great for 125k-ish miles.
5668c222f64a77cea8f0cfe48a14e584.jpg

Inner pinion bearing looks great.
fb9ba81d4db3b6a0a4d29460c5c6aaf9.jpg

As does the pinion gear itself.
6ee758e756ee897335600a11f86817ad.jpg

Ring gear also looks great.
51255a9440c219e601513924656046ff.jpg

Outer pinion bearing not so much. About seven of the rollers suffered from stress spalling.
b3a2beb03dca5cbeb06c4c592068079c.jpg

I looks like it was good timing to tear the axle down for a re-gear and catch that outer pinion before it got any worse. No noises yet but if any more rollers began to come apart I don’t think it would be long for this world.

Thanks for looking.
 

Attachments

  • 5668c222f64a77cea8f0cfe48a14e584.jpg
    5668c222f64a77cea8f0cfe48a14e584.jpg
    778.8 KB · Views: 0
  • fb9ba81d4db3b6a0a4d29460c5c6aaf9.jpg
    fb9ba81d4db3b6a0a4d29460c5c6aaf9.jpg
    684.3 KB · Views: 0
  • 6ee758e756ee897335600a11f86817ad.jpg
    6ee758e756ee897335600a11f86817ad.jpg
    679 KB · Views: 0
  • 51255a9440c219e601513924656046ff.jpg
    51255a9440c219e601513924656046ff.jpg
    676.5 KB · Views: 0
  • b3a2beb03dca5cbeb06c4c592068079c.jpg
    b3a2beb03dca5cbeb06c4c592068079c.jpg
    668.2 KB · Views: 0
Last edited:

LXCam

ALLIANCE MEMBER
Joined
Apr 23, 2013
Messages
19,175
Location
AZ
That was great timing Mike, those weren't far from making one hell of a mess. Everything is looking great as usual bud. And here's to Santa bringing you some unencumbered shop time thru the holidays. :beer:
 
OP
Z

zmotorsports

ALLIANCE MEMBER
Joined
Oct 20, 2009
Messages
21,441
Location
Northern Utah
That was great timing Mike, those weren't far from making one hell of a mess. Everything is looking great as usual bud. And here's to Santa bringing you some unencumbered shop time thru the holidays. :beer:

Thanks Cam. Yeah, I'm glad I decided to gears now otherwise I wouldn't have discovered this until it was too late as I had no other reason to tear into the rear end. It's odd that it was so hit and miss on the rollers. In the past when I've seen spalling issues from either lubrication or stress loaded it was more uniform around the bearing, not only on about a third of the rollers. Makes me suspect maybe an issue with that one particular roller that was the worse and it contaminated a few of the others with debris. Same with lubrication, if it were a lubrication issue it would have been more uniform around the entire bearing not only on seven of the rollers. Oh well, at least it was caught in time before it self destructed and left me somewhere. With all of the forces I put on these axles off road it probably would have been a good idea to tear it down around 100k anyways for an inspection or at least bearing replacement, I'll have to make sure to add that to my maintenance program for the next 100k miles checkup.

I'll try to get out in the shop a bit but probably won't start on the actual engine swap until after Christmas. I hope to have the rear axle done tomorrow unless I get pulled away, then probably drive it around for a few days before tearing it down for the engine swap. I have to do brakes on my sister's Acura MDX while she is in town for the holiday so once I get the Jeep off of the lift I'll get her MDX done before tearing into my LS swap. The lift has kind of made me lazy over the years as I don't like working off a creeper anymore.:lol_hitti

Merry Christmas to you and your family as well Cam.
 
To avoid these ads, REGISTER NOW!
OP
Z

zmotorsports

ALLIANCE MEMBER
Joined
Oct 20, 2009
Messages
21,441
Location
Northern Utah
Tonight after work I cleaned all of the parts as well as the diff housing in preparation of setting up the new gears.

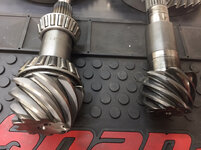
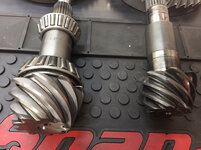
New 4.56’s on the left and old 5.38’s on the right.
0dc5f99fa3e45a5e8063d255178b66c2.jpg

2781302d0b1201dc21a34336c8a96cd4.jpg

cf58b2ee8c4e82fb10fc9fdc8d734b3b.jpg

Ensuring there are no burrs to impede fully seating the parts together.
198072920f860ada1a673a730c0a766c.jpg

Thanks for looking.
 

Attachments

  • 198072920f860ada1a673a730c0a766c.jpg
    198072920f860ada1a673a730c0a766c.jpg
    789.7 KB · Views: 0
  • 0dc5f99fa3e45a5e8063d255178b66c2.jpg
    0dc5f99fa3e45a5e8063d255178b66c2.jpg
    745.5 KB · Views: 0
  • 2781302d0b1201dc21a34336c8a96cd4.jpg
    2781302d0b1201dc21a34336c8a96cd4.jpg
    725.4 KB · Views: 0
  • cf58b2ee8c4e82fb10fc9fdc8d734b3b.jpg
    cf58b2ee8c4e82fb10fc9fdc8d734b3b.jpg
    734.6 KB · Views: 0
Last edited:
OP
Z

zmotorsports

ALLIANCE MEMBER
Joined
Oct 20, 2009
Messages
21,441
Location
Northern Utah
I finished up the assembly of my rear axle today.

I sure like my 3/4” drive EZ-Red extendable ratchet for a little extra leverage. Comes in handy to set the preload on crush sleeve axles.
2cdc2ae12dc792beaa664ca062e7be05.jpg

fe55c283500d33918cc52a5bde41d301.jpg

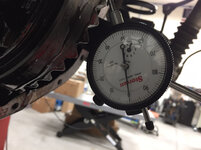
Only took me four combinations to land on the perfect wear pattern and .006” backlash.
79e84a4b1a14cdb32cf4a768867dfa01.jpg

Beautiful looking pattern on both drive and coast side.
b3dd625836cb56a7eb3fefd6aa2132b0.jpg

d13ab79bfe42c7e3ec5dbd9c90f42b5d.jpg

After getting the rear axle completed I wanted to tweak my hydraulic assist steering a bit. I noticed the pressure seemed a bit low when I drove it the other night. When up against a curb it would bind up rather easily so I thought maybe it was up against the pressure relief valve a bit premature so I removed the valve assembly, removed one .033” shim and stretched the spring a bit. That’s all she needed. Now I can put a tire up against the curb and actually push the Jeep away from the curb slightly and make it all the way to the stops. I went just a little bit as I didn’t want to bump my pressure too high, just enough to not open the pressure relief so soon.
85e6a44cb66684260a88d1cf7e6b2d10.jpg

I’ve driven it a few times this afternoon to put the gears through a few heat/cool cycles and the wife and I just returned from dinner where I got it up to 65 MPH and she’s smooth as smooth and nice and quiet. Ready for the next phase of the buildup. I think I’ll drive it for a few days then get the body ready to lift off the frame for the engine swap.

Thanks for looking.
 

Attachments

  • 85e6a44cb66684260a88d1cf7e6b2d10.jpg
    85e6a44cb66684260a88d1cf7e6b2d10.jpg
    820.4 KB · Views: 0
  • d13ab79bfe42c7e3ec5dbd9c90f42b5d.jpg
    d13ab79bfe42c7e3ec5dbd9c90f42b5d.jpg
    745.9 KB · Views: 0
  • b3dd625836cb56a7eb3fefd6aa2132b0.jpg
    b3dd625836cb56a7eb3fefd6aa2132b0.jpg
    792.2 KB · Views: 0
  • 79e84a4b1a14cdb32cf4a768867dfa01.jpg
    79e84a4b1a14cdb32cf4a768867dfa01.jpg
    687 KB · Views: 1
  • fe55c283500d33918cc52a5bde41d301.jpg
    fe55c283500d33918cc52a5bde41d301.jpg
    674.8 KB · Views: 0
  • 2cdc2ae12dc792beaa664ca062e7be05.jpg
    2cdc2ae12dc792beaa664ca062e7be05.jpg
    749.8 KB · Views: 0
Last edited:

Ohmthis

Well-known member
Joined
Jan 20, 2013
Messages
3,018
Location
Outside of Louisville KY
I completely understand not wanting to lay on a creeper anymore! I wouldn’t call it lazy though, merely working smarter. Jeep is coming along, can’t wait for the engine swap. Merry Christmas to you and your family!
 
OP
Z

zmotorsports

ALLIANCE MEMBER
Joined
Oct 20, 2009
Messages
21,441
Location
Northern Utah
I completely understand not wanting to lay on a creeper anymore! I wouldn’t call it lazy though, merely working smarter. Jeep is coming along, can’t wait for the engine swap. Merry Christmas to you and your family!

Thank you.

Merry Christmas to you as well.
 

Bob Heine

ALLIANCE MEMBER
Joined
Oct 24, 2009
Messages
10,707
Location
Boca Raton, Florida
Mike, I love the progress you are making on the axles. The old gears look good enough to put in another axle. Are you one of us and plan to put them in a box 'just in case'?

Merry Christmas and Happy New Year to you and yours!
 

Duker

Well-known member
Joined
Sep 25, 2010
Messages
10,861
Location
Livingston, TX
Mike, I hope you and your family have a great day and an even better New Year. Looking forward to seeing the Jeep out there in action again tearing up the trails!


Sent from my iPad using Tapatalk Pro
 
OP
Z

zmotorsports

ALLIANCE MEMBER
Joined
Oct 20, 2009
Messages
21,441
Location
Northern Utah
Thank you everyone for the Christmas wishes. I wish you and your families all the best this Christmas and safe and prosperous New Year.

I'm excited to say that this Christmas has already been a very exciting one as our son asked for his girlfriend's hand in marriage last night. Looks like we will be having a wedding this summer and welcoming a new member into our little family. My wife and I are truly feeling blessed today.

Merry Christmas everyone.
 

LXCam

ALLIANCE MEMBER
Joined
Apr 23, 2013
Messages
19,175
Location
AZ
Thank you everyone for the Christmas wishes. I wish you and your families all the best this Christmas and safe and prosperous New Year.

I'm excited to say that this Christmas has already been a very exciting one as our son asked for his girlfriend's hand in marriage last night. Looks like we will be having a wedding this summer and welcoming a new member into our little family. My wife and I are truly feeling blessed today.

Merry Christmas everyone.


Indeed you guys are truly blessed Mike. Here's to a very merry Christmas and happy new family :beer:
 
OP
Z

zmotorsports

ALLIANCE MEMBER
Joined
Oct 20, 2009
Messages
21,441
Location
Northern Utah
Congratulations Mike! Happy times indeed.


Merry Christmas!. xmas


:beer:

Indeed you guys are truly blessed Mike. Here's to a very merry Christmas and happy new family :beer:

Thanks guys. I hope each of you had a great Christmas and wish you the very best in 2019.

My wife and I are looking forward to 2019 but really can't complain about 2018 as it was pretty good to us.

I am looking forward to getting some projects completed in the very near future and hopefully being able to do some traveling and a bunch of Jeeping throughout the year despite the wedding that will be taking place.

My son mentioned that he wants to have all of his vehicles in pristine condition and pretty much completed by the time the wedding comes around so I want to help him as much as possible to accomplish that. Our shop time together may be diminishing and I want to make the most of it while it lasts.
 

C2tuck

Well-known member
Joined
Apr 22, 2015
Messages
663
Location
North Texas
Thanks guys. I hope each of you had a great Christmas and wish you the very best in 2019.


My wife and I are looking forward to 2019 but really can't complain about 2018 as it was pretty good to us.


I am looking forward to getting some projects completed in the very near future and hopefully being able to do some traveling and a bunch of Jeeping throughout the year despite the wedding that will be taking place.


My son mentioned that he wants to have all of his vehicles in pristine condition and pretty much completed by the time the wedding comes around so I want to help him as much as possible to accomplish that. Our shop time together may be diminishing and I want to make the most of it while it lasts.


If my dad had a shop like yours and the skills you have...I’d still be over there all the time.


Sent from my iPhone using Tapatalk
 
OP
Z

zmotorsports

ALLIANCE MEMBER
Joined
Oct 20, 2009
Messages
21,441
Location
Northern Utah
If my dad had a shop like yours and the skills you have...I’d still be over there all the time.


Sent from my iPhone using Tapatalk

Thanks. My hope is he will still come around to work on projects and hang out but I realize he is starting his new life and have to be respectful of that. He even mentioned that it would be ridiculous to build a large shop and buy tools and equipment when we have all of them at the ready. I eagerly agreed.:bounce:
 
OP
Z

zmotorsports

ALLIANCE MEMBER
Joined
Oct 20, 2009
Messages
21,441
Location
Northern Utah
A little LS update.

I have nearly 300 miles on my new 4.56 gears as I have been driving the hell out of it for the past week and all is good with the axles. The Jeep is smooth as silk going down the highway and I have my hydraulic assist steering sorted out which is now rock solid going down the road as well.

Yesterday on the way home from work I went to a car wash and pressure washed the undercarriage as well as the body of the Jeep and pulled it into the shop to begin the engine swap.

Tonight when I arrive home, if I don't have snow to shovel, I will commence the teardown of the Jeep in preparation to separate the body from the frame.
 

LXCam

ALLIANCE MEMBER
Joined
Apr 23, 2013
Messages
19,175
Location
AZ
A little LS update.

I have nearly 300 miles on my new 4.56 gears as I have been driving the hell out of it for the past week and all is good with the axles. The Jeep is smooth as silk going down the highway and I have my hydraulic assist steering sorted out which is now rock solid going down the road as well.

Yesterday on the way home from work I went to a car wash and pressure washed the undercarriage as well as the body of the Jeep and pulled it into the shop to begin the engine swap.

Tonight when I arrive home, if I don't have snow to shovel, I will commence the teardown of the Jeep in preparation to separate the body from the frame.

Pressure washed what??!!, gezzis mike I could eat off your frame as it was. :spit:


Oh boyyy, let the fun begin. :beer:
Do you have any time off thru next week? And why is it I have this feeling that you've done you're homework so well this thing will be running within a couple weeks.
 
To avoid these ads, REGISTER NOW!
Top Bottom