To avoid these ads, REGISTER NOW!

What's going on in my little Garage....

OP
K

Keyblazer

Well-known member
Joined
Jul 30, 2009
Messages
1,471
Location
Irvine, CA
So, with the Motor kinda at an impasse, I went back to other stuff trying to make some space, and progress.

I stripped the Rare Factory Hardtop off the Alfa, and put it on a cart, and tucked it away for later.

Then I stripped all the stuff I had stashed in the interior out so I could see what I was up against...

It was pretty much as it was 15+ years ago when I got the car.
Floors are gone...

This is RH rear looking forward..


This is LH rear looking forward..


The front part of the driver and Passenger floor are pretty much the same.
I will be cutting it all out and replacing it with good OEM panels from a donor car...
These.


There are a couple of areas that will need to be patched, but its 95% good. The only panels that are now available are aftermarket and Im told the fit like ****...
 
Last edited:
To avoid these ads, REGISTER NOW!
OP
K

Keyblazer

Well-known member
Joined
Jul 30, 2009
Messages
1,471
Location
Irvine, CA
I knew the floors were gone... I also knew the tail panel was toast, and some small rocker bubbles... the floors and rockers are common as the convertible tops leak and floors are OEM rubber floor mats... perfect rust breeding ground! Also, the tops have a drain channel, and that drains.... into the rockers!

So, 15 years ago, when I had stripped the convertible top, I spotted that the drain tube had obviously been blocked and the channel was rotted out on the drivers side...


Because I knew this, I cut those parts off the donor car...


OP
K

Keyblazer

Well-known member
Joined
Jul 30, 2009
Messages
1,471
Location
Irvine, CA
However, I thought I better see how bad it was...
I checked the other side and it was better, but the back wall of the channel feels thin, so I was thinking I would do both sides to be sure..


However, there was a lot of surface rust caused by the water sitting in the channel.
I needed to look closer, and stripped the plastic off...
Oh boy... this was the first thing I saw... Holes...


I stripped off the Stainless trim and its ugly...


Passenger side too..


I went at it with a wire brush and the edge of the rear scuttle panel is toast...


Luckily, that Scuttle panel is available, from Europe, and I have the donor drain channels, so I dont have to fabricate anything from scratch!
https://classicalfa.com/products.php?product=ST127-REAR-SCUTTLE-PANEL,-OUTER-SKIN
 

bad_idea

Well-known member
Joined
Jun 11, 2011
Messages
4,334
Location
Pasquotank, NC
That looks like a bucket full of work. Has it occurred to you to kick that thing down the road and buy a Ford?


:lol: Just kidding. It keeps it interesting some guys building unique/different vehicles.
 
OP
K

Keyblazer

Well-known member
Joined
Jul 30, 2009
Messages
1,471
Location
Irvine, CA
I know it looks grim, and I already found more rust than I was expecting.
The truth is, this car was virtually given to me, and I have a lot of panels and parts already.

So, yes, its work, but I have the tools, most of the body panels, and I've done floors and panels before, so not scared. The car owes me very little... maybe less than $500 total, and values of Series 2 Spiders are rising.

For the Non Alfa people, The Series 1 cars are the "Round Tails", or Duetto, and they are going thru the roof value wise...
Series 2 are called "Kamm Tails" because the tail was chopped off compared to S1 Spider, but it gets deeper than that...
The '74s, like mine are considered the pinnacle, as they had the biggest, most powerful engine(2 Liter, twin cam with 130+HP), are Pre Smog, and the lightest prettiest body(2300lb), before they added the Federal bumpers and heavy structure to support them.

So, worth saving!

Some of the expensive parts I already have, are a replacement rear bumper, and that tail panel. Picked them up over the years at far less than they are now, or they are NLA.
There is a OEM Alfa tail panel on Ebay right now for almost $1000...
I paid like $120 shipped.

Plus I have this...
I think it would make a great wall art piece too!


The bumpers are sought after, so rare, and $$. Rear one, on Ebay for $1300..
I paid $100 or so 10+ years ago.

Paint will be the greatest expense, as always, but I have done my fair share of blocking, so might be able to present a straight, bodyworked, epoxy primed body to the painter, mounted on a rotisserie.
 
Last edited:
OP
K

Keyblazer

Well-known member
Joined
Jul 30, 2009
Messages
1,471
Location
Irvine, CA
Some distraction...

I was having trouble putting studs close together with the H&S Autoshot stud welder... The studs also fall out as you are getting ready to weld them in place, if you are not careful!

Found a solution that kills both birds...

The H&S Autoshot Eliminator tip, with Stud ease.... whatever that is..


Anyway, it takes the tip of the stud welder from this:


To this:


That allows you to get the studs as close as the center electrode allows by using the cutouts, on the outer ring, and also the new center tip has a magnet in it so the studs dont fall out!!!
 

Kevin54

MEMBER EMERITUS
Joined
Jan 12, 2005
Messages
29,341
Location
Urbana, Ohio
Keyblazer…..I am impressed. You have some serious skills. One thing when you are forming sheetmetal, remember two things.....Learn the different alloys. Just like the 5052 aluminum you used...H32, H34... you'll have 1/4 hard. 1/2 hard, you'll have "O" which is softer....

And all sheetmetal has a grain direction. Sometimes you have to bend it with the grain, sometimes against the grain, and sometimes 45 degrees to the grain. It makes a difference on what the metal will do and not do.
 
OP
K

Keyblazer

Well-known member
Joined
Jul 30, 2009
Messages
1,471
Location
Irvine, CA
Thanks for the Complements, but I still have a lot to learn.
Metal was not my medium, but i'm tryin!

Thanks for the info... some of that I didn't know or wasn't sure!
 
OP
K

Keyblazer

Well-known member
Joined
Jul 30, 2009
Messages
1,471
Location
Irvine, CA
More work on that Gas tank...

Inside was degreased and pressure washed, as much I could reach to flush any debris etc out.

This is what was left...
IMG_7925_zps0xro4mve.jpg

Wanted to do a test on Metal Rescue... so tipped in a gallon and left it for 6 hours...

IMG_7929_zpstdidfoex.jpg

Result...
IMG_7935_zpswwkfcld2.jpg

You can see where it came up to!
IMG_7938_zpsc8utxaio.jpg

Like it!
 

bad_idea

Well-known member
Joined
Jun 11, 2011
Messages
4,334
Location
Pasquotank, NC
White vinegar will do the same thing. No idea what the cost is on the Metal Rescue, but you can buy white vinegar by the gallon real cheap at the grocery store. Submerge the part in vinegar for a day or two or ten (varies based on level of corrosion) and it will come out looking freshly sand blasted.
 

Muggzy

Well-known member
Joined
Jun 29, 2013
Messages
583
Location
Orange Co., NY
My experience with vinegar is it still needs some scrubbing. Throw a couple of handfuls of sharp gravel in with the vinegar and shake it hard a few times during the soak.
White vinegar will do the same thing. No idea what the cost is on the Metal Rescue, but you can buy white vinegar by the gallon real cheap at the grocery store. Submerge the part in vinegar for a day or two or ten (varies based on level of corrosion) and it will come out looking freshly sand blasted.

Sent from my Pixel XL using Tapatalk
 
OP
K

Keyblazer

Well-known member
Joined
Jul 30, 2009
Messages
1,471
Location
Irvine, CA
Got it.
I will buy a few gallons and test.

Meanwhile...
I need to get moving on my "Wet Blasting" project..

Gun arrived...
IMG_E8075_zpsd0yapsa4.jpg

Have a aquarium pump that might output enough, and some fresh 80g Glass media...
 
OP
K

Keyblazer

Well-known member
Joined
Jul 30, 2009
Messages
1,471
Location
Irvine, CA
Early test phase of Wet Media Blasting...

Bought 25lb of fresh 80g Glass bead and 25lb of Aluminum oxide from HF.

Put about 10lb of glass media in HD 5 gallon bucket, and filled with water.
Dropped my 3000L/750g/ per hour pump in.

Fired that up.
Slurry flow seemed good.
IMG_8135_zpskbd3ngwz.jpg

Added 60 PSI of air pressure to the upper input on the Gun Head, and tested.

Alfa engine front cover section was the test piece...
Forgot to take a before pic, but here is after...
IMG_8138_zpsh6zldsxu.jpg
IMG_8139_zpsweoukv6n.jpg
IMG_8137_zpstyo8thwh.jpg

Cleaned it ok, But:
It was slow... could have dry blasted it as good in 20% of the time.
Finish was not the "Burnished, Semi Gloss" I see on Vapor Blasting videos...

Dont have $ Thousands to spend on a pro cabinet, so I guess I gotta keep experimenting...
 
OP
K

Keyblazer

Well-known member
Joined
Jul 30, 2009
Messages
1,471
Location
Irvine, CA
Been busy with stuff I sold on Fleabay... boxes to make etc..

Up side was I got a Lenco QPK-20 out of the funds...
This is the attachment that goes on the Panelspotter, and uses the 'Star" studs. You weld the tip of the star on the panel, pull the dent with the built in slide hammer, twist to release, and move to the next spot. No studs to cut off and grind down.
Should make the process faster.

http://www.lencoautomotive.com/qpk-20.html


Also bought some plans for making a Wet Blasting cabinet...
Planning to convert my DeeBlast 38.
Beginning to amass parts for that.
Gun I already have, and pump was ordered... going cheap, so we will see how it works and lasts.
Will report on my progress, as I go.

Did slip in some Powdercoating...
Chassis Clamp...
Decided on cheap HF Red powder, so I might be able to see it coming if it flies off!:lol_hitti

IMG_8158_zpsxoylvd5y.jpg
IMG_8161_zpsbi7njbir.jpg
IMG_8166_zpsqe2lcm9l.jpg

Good enough!
IMG_8167_zpsnnptpyfa.jpg
 
OP
K

Keyblazer

Well-known member
Joined
Jul 30, 2009
Messages
1,471
Location
Irvine, CA
Been a busy few weeks with my Business(Health Insurance), so less to report.

Bought a Pump for the wet blasting cabinet conversion... got some fittings, and have the basics in place, but awaiting the waterproof LED lighting and then I can remove all the dry blasting stuff and get to the gritty, but wet bits... :bounce:

The Lenco QPK-20 dent puller conversion arrived... but awaiting a conversion plug before I can install and test it on my Panelspotter.

IMG_8217_zps4walzyiu.jpg

This tip, allows you to weld, pull with the built in slide hammer, twist to release and move to the next spot. Should allow me to move the dents better.

IMG_8218_zpsuzdcksoi.jpg

Also bought the Swag Offroad HD Finger Brake kit for my HF 20t Press..
That arrived today, and I am totally blown away by this innocuous looking USPS flat rate box.... and I havn't even opened it yet! :drool:
IMG_8248_zpsifbrtt8d.jpg

I am glad I warned my USPS guy it was coming....
I cannot write here what he said about it, because there were many cussing words... :) :thumbup:

Maybe this is the reason he was laughing and giving me ****...
Yes, that box weighs 67.4LB...
Kudos to Swag as the weight limits is 70lb :bowdown:

IMG_8245_zpslrlewm5z.jpg

Oh, also I bought some Red Wrinkle Powder to do a project...
I had this Honda V6 cover laying around, and its Powdercoat was scuffed up and peeling.
Blasted it clean, wiped it down and went for it...

IMG_8249_zpspfpfvbfm.jpg

IMG_8250_zpsqr4icxem.jpg

IMG_8251_zpsxizygmjz.jpg

IMG_8263_zpsztzzimot.jpg

Looks good... onto the real project now I proved it works!
IMG_8267_zpsd2aqauuj.jpg
 
Last edited:

andsonsvd

Well-known member
Joined
Feb 7, 2012
Messages
169
Location
Mandurah, Western Australia
Awesome thread mate!

I have alot of the same tools, sadly I have more money than time and most have never been opened!

I am always hesitant to 'try' something, if I am shown how to do it or look on youtube etc for instructions I will give it a go!

If only I could buy more time!

Keep up the good work!

Shane
 
OP
K

Keyblazer

Well-known member
Joined
Jul 30, 2009
Messages
1,471
Location
Irvine, CA
Thanks!
I would love to help you with your dilemma.
Let me know what tools you have that are still boxed, and I can help you.
Put them in the mail to me, and I will inbox them and post instructions on how you should assemble and use them when you buy them again!
Glad to be of service!
 
To avoid these ads, REGISTER NOW!
OP
K

Keyblazer

Well-known member
Joined
Jul 30, 2009
Messages
1,471
Location
Irvine, CA
That powder coated Honda cover sure came out nice!

Thanks!
As much luck as skill!

What was interesting was that the texture didn't appear until it began to cool...
This is how it looked as I took the IR heater away...


So, what do you guys think...
Sand the raised Logo back to bare aluminum or leave it?
I dont own a Honda, so this will go on fleabay... to fund more stuff I do need!
 
Last edited:
OP
K

Keyblazer

Well-known member
Joined
Jul 30, 2009
Messages
1,471
Location
Irvine, CA
Been a little distracted with life...

Did a couple of there trans mounts Powdercoated Semi Gloss Black...

IMG_8301_zpsbrgze09t.jpg

IMG_8310_zpsrv5daqkm.jpg

IMG_8315_zpssqqpibh0.jpg

IMG_8320_zpsyifu47jy.jpg

IMG_8323_zpsvkvgmj5e.jpg

Finally got to Open my SWAG Box...

IMG_8364_zpsg2qnsedj.jpg

IMG_8366_zpsshgm5lhp.jpg

IMG_8367_zpslgtpzzsf.jpg

Thinking I might Powdercoat some of it after its welded!
 
OP
K

Keyblazer

Well-known member
Joined
Jul 30, 2009
Messages
1,471
Location
Irvine, CA
Well, Happy New Year to everyone!

I've been a little distracted with a new project...

My DD is a 1984 Mercedes 190d... it just chugs along(222,000 miles) and does 35 mpg no matter what I do, and suits me fine, but, like me, it has its limitations..
But my GF worries every time I go out in it... No ABS, no Airbags, or such...
Even tho I think the 190 is a tough little car!

She has been harassing me, a little, to get something better/safer. etc.

I'm cheap... and Cheerful:), but when she says she will chip in to make this happen, my ears perked up...:bowdown:

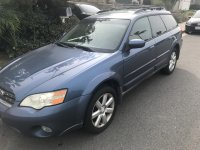
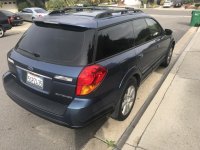
That was a few months ago, and in December, I was helping some family friends diagnose one of their kids 2006 Subaru Outback issues. The prognosis was grim... 155k miles, lost compression, and was running rough, CEL's etc. The Mechanic said the engine was toast, and to dump it.

What I saw, was a quite nice Subaru Wagon, which would work for my needs, with a bad motor... and I know how to build Subaru motors! The friends planned to send it to the Junkyard or donate it.... or offered it to me for $500..

attachment.php


attachment.php


My last Subi Motor build was about $1000, so in my mind, I was on it!

Then the GF spoke...
NO.
She said.
Too much work, for you... I have things I need done around the house and that would be a distraction for weeks...

Now, like every Man, in the house, I have the last word.
Yes Dear!:)
So, the Subaru was donated...
Probably Scrapped...:(

I was a little miffed.
So, she asked me what I really wanted..

I said, a if I could drive anything, it would be a Volkswagen Golf Wagon with the TDI Diesel, and a Manual Transmission...

She gave me a budget, and told me to find what I wanted...
Well, the budget was not enough...
But I looked and looked, and finally I found something... that almost fit.

2012 VW Sportwagon with the TDI, but a DSG Auto....
Big news was it was way inside that budget she set!

Yes, it had 119,000 miles, one family owned...
But the service history was spotty, or absent... and it had not passed smog, because the owner said it was flashing a CEL, and registration was in arrears, and it needed the BIG 120k service(VW says $2300, for Timing belt, engine and transmission service), AND it was kinda scruffy, inside and out..:headscrat
.

BUT... It was cheap... and it was "almost" what I wanted...
I need a car to carry our Doggies around, and go to the Junkyard, and Metal store, etc...

We went and looked at it...
It had had its VW Dieselgate fix...
New Turbo, Intake manifold too....


I scanned the OBD2 port... and weirdly it was showing no codes, all the Smog items were set, and it was ready to go...


It drove GREAT, and so I pointed out all the issues, crunched the numbers, and factored in what it needed...
The seller wanted it gone, and we came to a very favorable number, and I drove it away!

I was worried, tho.
3x what I paid for my last car... but 1/4 what similar cars with lower miles and service history.
Plus what it might need!

Took it, and filled it with fresh diesel, and went to my local Smog station...
It passed smog, no issues! We went and did the registration, and It's good to go, legally!

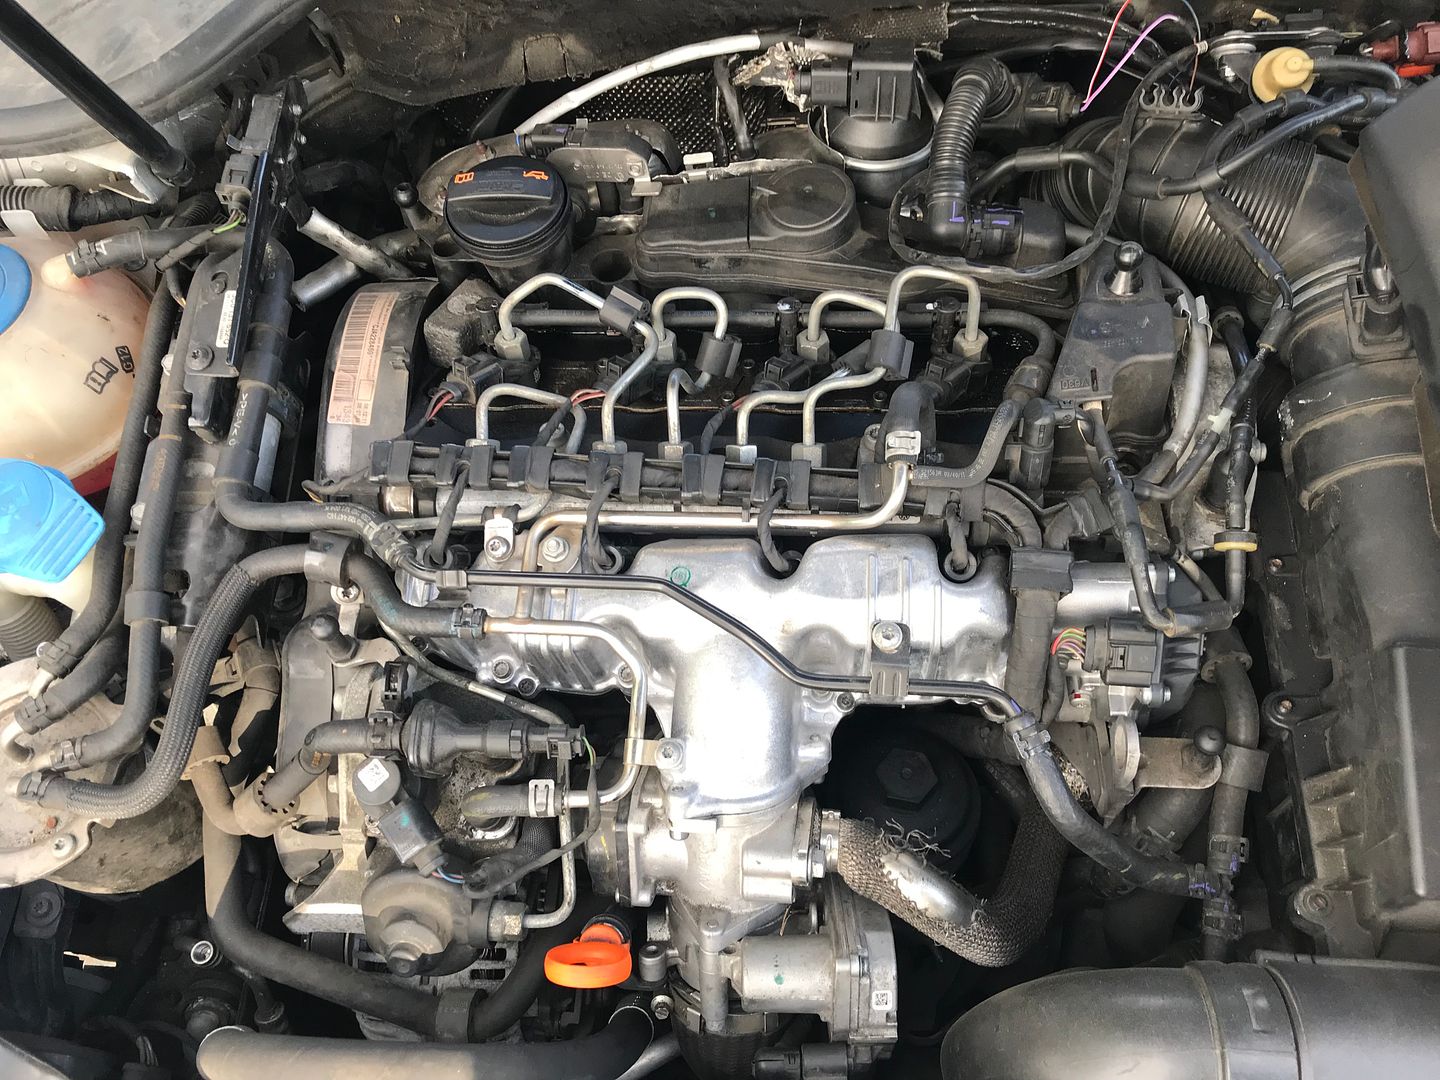
So far so good, the last couple of weeks, I've been scrubbing it clean and doing all the outstanding service items.

Today, I did Engine oil, filter, air filter, fuel filter, DSG Transmission Filter and fluid, and that gave me the chance to really get to know the cars secrets...
Timing belt is due at 130k, and I will be doing that in the next few weeks!
 

Attachments

  • IMG_8408.jpg
    IMG_8408.jpg
    151 KB · Views: 412
  • IMG_8410.jpg
    IMG_8410.jpg
    151.3 KB · Views: 413
Last edited:
OP
K

Keyblazer

Well-known member
Joined
Jul 30, 2009
Messages
1,471
Location
Irvine, CA
Oh, and it does STELLAR MPG!

I got this on a 25 mile run yesterday.. Yes, it was one way and a little downhill...
IMG_8747_zpsiterbolb.jpg

However, the whole 56 mile loop with some traffic and such netted me 46mpg average!
 
OP
K

Keyblazer

Well-known member
Joined
Jul 30, 2009
Messages
1,471
Location
Irvine, CA
The VW is working out great for me.
A 1,000 mile roadtrip netted 42.5mpg average.:)

I've been kinda waiting for the "Other shoe to drop" as the PO said the Check Engine Light" kept coming on...
But I think I know what the story is...
My scanner said there was no recent CEL events, and 19 warmup cycles since the reset. and the car had been driven 270km(150+ miles).


I now believe that the CEL she described, may have been the "Service Now" indicator, and she was confused, as the car was almost at its 120,000 mile service requirement... :headscrat


I have had a CEL since I got the car, and it says the EGR flow was low... this is common and maybe caused by the DPF failing, and coking up the EGR...
It will be covered by the VW Extended warranty... which covers everthing for 4.5 years and 55k miles from teh time the emissions mod was done...
 
OP
K

Keyblazer

Well-known member
Joined
Jul 30, 2009
Messages
1,471
Location
Irvine, CA
So, I've been focused on getting the car "Clean"... and it needed it...:wtf:

Roof liner...
IMG_8840_zpsbpg4vvjr.jpg

During...
IMG_8847_zps5ftnwslg.jpg

After...
IMG_8860_zpshhhhbbsx.jpg

Under the shifter...:eek:
IMG_8837_zpsypysans8.jpg

Spare wheel well...

IMG_8597_zps0gmpiuav.jpg
IMG_8598_zpsemg4lx4c.jpg

Lots of Hot water, detergent, and scrubbing..
IMG_8599_zpswisszypd.jpg

Better...
IMG_8608_zpsqhmabpin.jpg
IMG_8609_zps8tknm55a.jpg
 
OP
K

Keyblazer

Well-known member
Joined
Jul 30, 2009
Messages
1,471
Location
Irvine, CA
Just SHOUT Foaming Car Interior Cleaner. It’s about $5 a can from Walmart. Took 3 passes to get that roof liner clean.
I also got a Tornado style cleaner which is helping get all the sand out of the carpets.
 

BajaScout

Well-known member
Joined
May 1, 2011
Messages
4,608
Location
San Diego, CA
The VW is working out great for me.
A 1,000 mile roadtrip netted 42.5mpg average.:)

I've been kinda waiting for the "Other shoe to drop" as the PO said the Check Engine Light" kept coming on...
But I think I know what the story is...
My scanner said there was no recent CEL events, and 19 warmup cycles since the reset. and the car had been driven 270km(150+ miles).


I now believe that the CEL she described, may have been the "Service Now" indicator, and she was confused, as the car was almost at its 120,000 mile service requirement... :headscrat


I have had a CEL since I got the car, and it says the EGR flow was low... this is common and maybe caused by the DPF failing, and coking up the EGR...
It will be covered by the VW Extended warranty... which covers everthing for 4.5 years and 55k miles from teh time the emissions mod was done...

I bought a 2015 TDI wagon in 2017 from the dealer with 20 miles on it. Sat in the back while the diesel gate was getting resolved. Smog is guaranteed for 11 years.
 
OP
K

Keyblazer

Well-known member
Joined
Jul 30, 2009
Messages
1,471
Location
Irvine, CA
I feel very honored for you to visit my page Robert!

Currently I’m using the HF Pipe threader, directly connected to the shaft, and the super cheap HF speed controller.
With the speed controller on its lowest setting, I’m getting about 11/12 rpm free running, but with the power restricted, the speed drops again dependent on load. It doesn’t stop the Pipe Threader tho.
I’d like it to go slower tho, so I’m thinking I might add some gearing. I have some old V belt pullies around I might use.
 
To avoid these ads, REGISTER NOW!
Top Bottom