To avoid these ads, REGISTER NOW!

In ground flush mount scissor lift

OP
C

Cyclehead

Well-known member
Joined
Jan 19, 2017
Messages
85
Location
Georgia
I can't tell if you've got your limit switches set up or not, but that can definitely affect the lowering behavior....That switch should serve to stop the lowering a few inches above grade so you can make sure the extensions are retracted before lowering the platform the rest of the way into the pit.

Lowering a car on which you pulled out the extensions would require you to let the wheels of the car hit the floor, lower the platform a bit further, manually push the extensions back in, then complete the lowering cycle.

Sent from my SM-G960U using Tapatalk

Good question! I got one limit switch loose with the lift (wired up, but not installed to anything). No idea where/how to install it. When I close the switch with my fingers, it disables the pump. I haven't tried to see if it also stops venting to the reservoir (when I lower the lift). I was guessing it was an upper travel limit switch. There are no more limit switches in the whole system. I'm finding that I seem to have the "bare bones" model - no warning buzzers, and no "pause before park" feature (?).
 
To avoid these ads, REGISTER NOW!

jtbinvalrico

Well-known member
Joined
Jan 2, 2010
Messages
1,375
Location
Tampa FL
One thing I'm glad to have out of the way is figuring out the placement and adjustment of the limiting switches before install. The instructions weren't clear at all.

Perhaps yours is some type of combination switch. Mine are identical to each other, but are assembled and mounted differently according to their respective functions, those being height and lowering.

I've got concrete coming in a week. I would not want to be doing the initial limit switch install reaching down into a pit. Do it now so you can index and mark everything in advance....and maybe address some of the concerns you have.

Sent from my SM-G960U using Tapatalk
 
Last edited:
OP
C

Cyclehead

Well-known member
Joined
Jan 19, 2017
Messages
85
Location
Georgia
One thing I'm glad to have out of the way is figuring out the placement and adjustment of the limiting switches before install. ...I've got concrete coming in a week. I would not want to be doing the initial limit switch install reaching down into a pit. Do it now so you can index and mark everything in advance....and maybe address some of the concerns you have

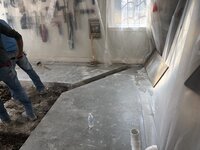
I just got on the fast track last night, contractor said he could cut concrete on Monday morning at 8:00 a.m. He showed up at 7:15 and it's underway! I'll probably hook up all the hydraulics one more time before I set the lifts into the holes. And try to figure out the limit switch before.

Wife and I hung plastic late last night. Guys were cutting concrete by 8:00 a.m.Cutting concrete.jpg
 
Last edited:
OP
C

Cyclehead

Well-known member
Joined
Jan 19, 2017
Messages
85
Location
Georgia
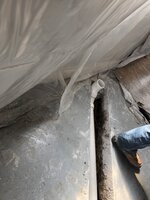
Wow, what a flurry of activity. After waiting 5 months for the lift to arrive, less than a week I have the lift in the driveway and test fired, today this crew of 6 guys has done some very careful and FAST work. They arrived at 7:15 a.m. this morning, cut the floor, dug the holes, built the forms, loaded re-bar in the hole, and the concrete truck is arriving 2:00 p.m. (any minute now!) I didn't think this would be a blow-by-blow thread!

i2M5Ehp.jpg

7wtGdOK.jpg

XbAHzg6.jpgCutting concrete.jpg

sfliGdT.jpg

pQjfGOx.jpg

X6btp5K.jpg
 
Last edited:
OP
C

Cyclehead

Well-known member
Joined
Jan 19, 2017
Messages
85
Location
Georgia
So what I learned by watching how it’s done:
Use a gas powered cutter with a masonry blade for the concrete cuts. Cool the blade and keep dust down using a little stream of water from a squirt bottle on each side of the blade. Switch to an abrasive cut off blade for cutting re-bar.
Two wheelbarrows to relay from the concrete truck into the garage.
Always have a little “extra” project in mind for left over concrete in the truck.
Make your layout marks on a nearby wall for the control console hydraulic line subterranean pipe. Any marks on the floor will be quickly wiped out.
Big hammer drill for re-bar in the old garage floor.
Small compactor for the bottom of the pits.
Cash on hand in case the cement truck or workers prefer that.
 
Last edited:
OP
C

Cyclehead

Well-known member
Joined
Jan 19, 2017
Messages
85
Location
Georgia
Bang. Done in one day! Form boards come out early tomorrow morning. Very happy with the crew that did this work!
And after watching them - I'm very glad I did not try to do this myself. It would have taken me 3 months, and I'm sure I would have screwed it up. I'm marking this down as money well-spent.Bunkers poured and ready to set lift in place.jpg
 
Last edited:

Dentaltec

Well-known member
Joined
Feb 19, 2017
Messages
363
Location
Redlands Ca
Bang. Done in one day! Form boards come out early tomorrow morning. Very happy with the crew that did this work!
And after watching them - I'm very glad I did not try to do this myself. It would have taken me 3 months, and I'm sure I would have screwed it up. I'm marking this down as money well-spent.


Looks like super fast work was made, big crew did they **** you on the price?
 

jtbinvalrico

Well-known member
Joined
Jan 2, 2010
Messages
1,375
Location
Tampa FL
Fantastic! You giving it 28 days for curing before dropping the platforms in?

Sent from my SM-G960U using Tapatalk
 
OP
C

Cyclehead

Well-known member
Joined
Jan 19, 2017
Messages
85
Location
Georgia
Fantastic! You giving it 28 days for curing before dropping the platforms in?

The contractor said it’s okay to drop the lifts in today - one day after pour. Not sure I’m going to cut it THAT close. But I do want to set them in and get the mount holes drilled before the cement gets....um...hard as rock. :)

Looks like super fast work was made, big crew did they **** you on the price?

Labor was $2100. 2 1/2 yards cement was $400. I have no idea if that’s a good price or theft.
 

bad_idea

Well-known member
Joined
Jun 11, 2011
Messages
4,335
Location
Pasquotank, NC
If you are happy with the investment, then it is a good price. I have found working with contractors - price is based on a handful of variables. How busy are they, do they want to do the work, complexity of the job, etc. That was not your typical driveway pour, little more involved. Looks like they did good work.

As far as schedule - they sound like my concrete guy. He squeezed me in when he had spare time. He had a bunch of bigger jobs going and did my garage foundation in between those. Told me he would be out in the next few weeks. Couple days later I get a call at 6PM - "Want us to do it tomorrow?" Sure. Cranked it right out.
 

jtbinvalrico

Well-known member
Joined
Jan 2, 2010
Messages
1,375
Location
Tampa FL
For all that work, done in one day.....that's a fair price.

Regarding the anchor holes, do you have to wait a certain amount of time before tightening the anchors? Is anchor tightening contingent on the concrete reaching a certain cure point?

Sent from my SM-G960U using Tapatalk
 
OP
C

Cyclehead

Well-known member
Joined
Jan 19, 2017
Messages
85
Location
Georgia
...
Regarding the anchor holes, do you have to wait a certain amount of time before tightening the anchors? Is anchor tightening contingent on the concrete reaching a certain cure point?

That’s my question too. I asked my contractor, and he said wait three days. I may set them in the holes and drill in three days (if I can find a 16mm masonry bit). But I’ll probably wait a month (?) before smashing the anchors into the holes.
 

jtbinvalrico

Well-known member
Joined
Jan 2, 2010
Messages
1,375
Location
Tampa FL
I'd be inclined to wait until full cure to torque those anchors down....Also, make certain that you've matched the masonry bit with the anchor. Sounds like you've done that with what's likely the metric anchors included with the lift.

I recall one person using a standard measure bit with a metric anchor and having some fitment issues.

Sent from my SM-G960U using Tapatalk
 

PoorOwner

Well-known member
Joined
Feb 10, 2007
Messages
5,032
Location
CA
I think I would wait the 28 days to drill too. It is not going to be that much harder to drill.
If there is any sign of moisture in the substrate the dust doesn't vacuum well.

How DEEP are you drilling? 16mm and 5/8" is difference of 0.0049". (16mm being bigger)

But if you want just go and buy some 5/8" anchors
 
OP
C

Cyclehead

Well-known member
Joined
Jan 19, 2017
Messages
85
Location
Georgia
Not sure how hard it is to find a 16mm bit. I was thinking of drilling while the concrete is a little green with 5/8 bit. Tapping the anchors in a place. Then waiting for “full cure” before driving the big nail to spread the anchor and wedge it. I hoped the 4 thou undersize would be okay if I hammer the sinkers into slightly green concrete. I have 8 inches of concrete on the floor. Anchors only need 4” or so. Does that sound like a good plan?
 
OP
C

Cyclehead

Well-known member
Joined
Jan 19, 2017
Messages
85
Location
Georgia
Silly Chinese TAPPED the base plate to match the anchor bolts. I can’t imagine how
They expected me to precision drill the holes without using the base plate as a template. Or maybe those tapped holes are for leveling bolts? I love a good puzzle.
 
Last edited:

PoorOwner

Well-known member
Joined
Feb 10, 2007
Messages
5,032
Location
CA
Silly Chinese TAPPED the base plate to match the anchor bolts. I can’t imagine how
They expected me to precision drill the holes without using the base plate as a template. Or maybe those tapped holes are for leveling bolts? I love a good puzzle.

Picture?

Just place the lift in place and drill in place. With a SDS drill it wouldn't matter you drill now or later, it will go into the concrete like a wafer..
 

jtbinvalrico

Well-known member
Joined
Jan 2, 2010
Messages
1,375
Location
Tampa FL
The tapped holes should be for leveling....odd the leveling bolts aren't in those holes. Are there no other holes in the platform bases for anchoring to the pad?

Here's a photo of mine for reference:
d90e6ee1a16da0e0e08a66b022931e98.jpg

Sent from my SM-G960U using Tapatalk
 

Attachments

  • d90e6ee1a16da0e0e08a66b022931e98.jpg
    d90e6ee1a16da0e0e08a66b022931e98.jpg
    60.7 KB · Views: 1
To avoid these ads, REGISTER NOW!
OP
C

Cyclehead

Well-known member
Joined
Jan 19, 2017
Messages
85
Location
Georgia
So I just lowered the lifts into the bunkers without any leveling bolts. They all check within .25 inches from side to side, front to back, left lift to right lift. Is that close enough?


I guess I could just thread the leveling bolts in from the top to dial them in close and hunt up some steel plate for shims.

I'm pretty impressed with my concrete guy. One bunker to the other is within 1/8"!! Water level worked like a charm for seeing what's high and what's low.

Hydraulics aren't hooked up yet so I can't lower them into the holes to see how they lie. More excitement to save for tomorrow!

I did order a pair of hydraulic velocity fuses to screw onto the actuators. Plus I found all the fittings are STANDARD 3/8 JIC. That is nice!


Last edited:

PoorOwner

Well-known member
Joined
Feb 10, 2007
Messages
5,032
Location
CA
Fit is very good!

The anchors look cheesy, buy a box of redhead or hilti 5/8" from home depot

When you tighten them the wedge expands.
 

jtbinvalrico

Well-known member
Joined
Jan 2, 2010
Messages
1,375
Location
Tampa FL
That's damned impressive concrete work at those tolerances. Nice progress.

Sent from my SM-G960U using Tapatalk
 
OP
C

Cyclehead

Well-known member
Joined
Jan 19, 2017
Messages
85
Location
Georgia
In the ground - in just over a week! That's the fastest anything has happened around here! I only cycled the slave two times and it's coming up within one inch of the primary cylinder. I'll bleed it a few more times this weekend. I was surprised it came out that good, I still don't understand how the air bubbles get chased out of that dead-end slave cylinder.

I have to round up some good anchors and a hammer-drill bit before I can get these things bolted down.

I'm off to the tractor supply this weekend for a horse-stall pad. I allowed a good inch extra in depth to accommodate. I want to trim the pad to fit the opening closely. (I think I'll use the new lifts as a big workbench.)

I ordered a collection of 6mm push-to-connect air fittings, and a little check valve. I plan to plumb my shop air supply into a small tank next to the control box (saw that trick on the forum!) My shop air bleeds down pretty quickly - I hid my compressor across my driveway in a storage building...and there are leaks. I plan for the shop air to charge up the tank whenever I rev it up. Then let the check valve hold the small tank pressure when the shop line bleeds down. I want to put it together and forget about it - not worry about charging up the tank.

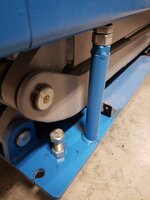
I found the single limit switch mounting point. It's at the bottom of the main lift at the end of the track. So it's a max height shutoff.

I have plans to drill two big holes in the face of the console for one hydraulic pressure gauge, and one air pressure gauge. I thought it would be fun to monitor what's going on with pressures.

Pictures show the lift surface is still a little low. I maxed out the top plate leveling bolts, until I get the stall pad installed. They'll still be pretty high - I think I was a little over cautious with the bunker depths. But as the forum pointed out - I can fix a bunker that's too deep. Too shallow can't be fixed. I also got the overall length a little bigger than needed. There's a gap at the back. I might park the extensions out a little bit, then hide it all with the stall pads.


Last edited:
OP
C

Cyclehead

Well-known member
Joined
Jan 19, 2017
Messages
85
Location
Georgia
I got my stall pad trimmed and put in place this afternoon. I'm still waiting for some 6mm air hose pieces before I can hook up my air tank, and start using the pneumatic lock releases. Meanwhile I tied a piece of string to each set of latch hooks and give them a yank when it's time to lower the lifts. The lift was handy for loading the lawn mower today - poor man's loading dock.

One question - my "economy" lift uses white nylon blocks instead of rollers for the sliders. What's a good lubricant for them? I've read that graphite is not - it embeds into the nylon and breaks it up. Silicone spray? Silicone grease?


PoorOwner

Well-known member
Joined
Feb 10, 2007
Messages
5,032
Location
CA
they are not nylon blocks but it is same as the plastic cutting boards, HDPE?

You probably don't want to use any lubricants on it since it is the lowest part of the garage and will become a sandpaper block real quick. Just some of the best car wax you use will be fine.

Same thing used on 4 post lifts, you wouldn't want a greasy post or something.
 
Last edited:
OP
C

Cyclehead

Well-known member
Joined
Jan 19, 2017
Messages
85
Location
Georgia
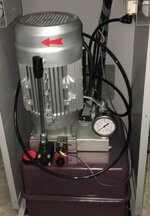
Modifications have already started. Hydraulic and air pressure gauges are drilled and mounted in the console face panel. A Harbor Freight compressed air reservoir is mounted to the side of the console cabinet and hooked up to feed the air solenoids. In-line air check valves are in place (my shop air system is leaky). And I need to rip axles out of my car already, so I need to get the lift completed. Pictures coming...
 

jtbinvalrico

Well-known member
Joined
Jan 2, 2010
Messages
1,375
Location
Tampa FL
I'm inclined to follow your lead and mount a hydraulic pressure gauge on the face of my control panel. My air system is airtight and loses very little air, so I don't need to monitor that.

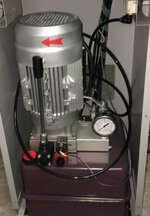
There's actually a pressure gauge inside the control box....The provision is there; just need to extend a line and mount the gauge. It's on the list.b7b23a0e7d4aba0fa258b17e9c4db8f1.jpg

Sent from my SM-G960U using Tapatalk
 

Attachments

  • b7b23a0e7d4aba0fa258b17e9c4db8f1.jpg
    b7b23a0e7d4aba0fa258b17e9c4db8f1.jpg
    40.4 KB · Views: 1
OP
C

Cyclehead

Well-known member
Joined
Jan 19, 2017
Messages
85
Location
Georgia
Yeah, you got the deluxe model. Mine came with no gauges anywhere. Though I do love my red and yellow switch....the one that's labelled "Switch"! (Edit. Photo shows the two gauges I added myself)

Console.jpg
 
Last edited:
OP
C

Cyclehead

Well-known member
Joined
Jan 19, 2017
Messages
85
Location
Georgia
I got the cheapest harbor freight rotary hammer for $60 with coupon. And the wrong drill bit from Lowe’s. Turns out the harbor freight drill uses SDS PLUS. Not that it says that anywhere on the box. Each hole took roughly 15 seconds to drill in slightly green concrete. Anchors were all easy to install until the next-to-last one...which spun!$&@. Apparently I was a little too aggressive hammering the anchor into place and buggered the top threads of the stud and nut (I put them together for driving). Finally cut a screwdriver slot using a 15$ abrasive cutoff grinder and got it to bite. Anchors are just extra insurance, the lifts are so stable. I had my car up to the ceiling without any anchors and it was very solid. Pictures on post #84.
 
Last edited:

mike93lx

ALLIANCE MEMBER
Joined
Dec 9, 2013
Messages
37,939
Location
Richmond, VA
I've always wondered with these lifts, do you just lift on the rocker panels/floor pan, or do you need something to lift at the pinch weld?on my flex, the doors wrap under the vehicle, so I'm not sure how one would work
 
OP
C

Cyclehead

Well-known member
Joined
Jan 19, 2017
Messages
85
Location
Georgia
I've always wondered with these lifts, do you just lift on the rocker panels/floor pan, or do you need something to lift at the pinch weld?on my flex, the doors wrap under the vehicle, so I'm not sure how one would work

My lift came with four rubber blocks, about 4 inches tall and maybe 5x8 inch base. You position them under the pinch welds to lift. My buddy says they will split pretty quickly, and he replaced with a polyurethane block that has a relief cut that accepts the pinch weld flange. They’re made for floor jack pads. I haven’t investigated them yet.

The alternative is to lift on a frame box or channel. Those are always closer together than the pinch welds. I spaced my lifts 26 inches apart, instead of the recommended 31 inches apart - thinking I may want to lift on frame rails instead of pinch welds. We’ll see how that pans out.
 
Last edited:

mike93lx

ALLIANCE MEMBER
Joined
Dec 9, 2013
Messages
37,939
Location
Richmond, VA
My lift came with four rubber blocks, about 4 inches tall and maybe 5x8 inch base. You position them under the pinch welds to lift. My buddy says they will split pretty quickly, and he replaced with a polyurethane block that has a relief cut that accepts the pinch weld flange. They’re made for floor jack pads. I haven’t investigated them yet.

The alternative is to lift on a frame box or channel. Those are always closer together than the pinch welds. I spaced my lifts 26 inches apart, instead of the recommended 31 inches apart - thinking I may want to lift on frame rails instead of pinch welds. We’ll see how that pans out.

Thanks :thumbup:
 
To avoid these ads, REGISTER NOW!
Top Bottom