To avoid these ads, REGISTER NOW!

Tool or technique for seating larger diameter PVC pipe and fittings

gahrajmahal

Well-known member
Joined
Dec 12, 2008
Messages
2,549
Location
Cincinnati, Ohio
Hey all, been doing 3” dia. PVC drains for a second floor bathroom installation today. After wrestling with getting the longer pieces to seat I was wondering if there was a better way, or a tool to use to help pull the two pieces together. Also, I have alignment issues usually when making the final pipe to fitting connections even after making a dry run, making alignment marks and carefully choreographing the assembly of the “system”.

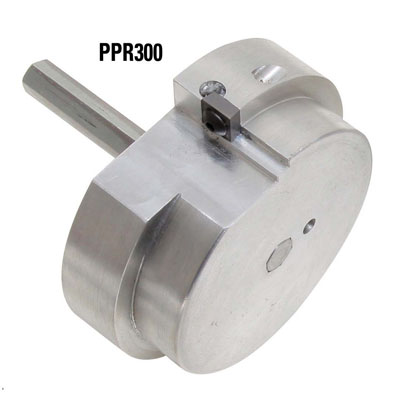
So, is there a tool to purchase that assists with pulling the pipe into the fitting? I did find a company selling a cordless router and a 15 degree cutter that will add a generous chamfer to the pipe end. This was shown on large (10”) diameter pipe. It seems that this would definitely help make that final connection, but might help by giving the excess glue a place to go as it scrapes it to the “seat” of the fitting.

Any tips for easier (read less messy) application of primer and glue are appreciated as are specific glue and primer preferences.

I don’t plan on doing much of this type of work, it just seems that whenever I am helping someone out at their house “plumbing” rears it’s evil head and I assist with straightening it out.

Thanks!
 
To avoid these ads, REGISTER NOW!

Balvar24

Well-known member
Joined
May 18, 2016
Messages
870
1. Make joints over a rag. If you're not making a little bit of a mess, you need more glue.

2. Clean until the letters are gone from the pipe.

3. Lots of glue on the pipe.

4. Thin film of glue in the socket (don't over do it.)

5. Keep a rage handy to clean the excess when done.

I like to do my fit up on a big table. I also mark my joints after doing a dry fit to make sure it goes back together the same way.
 

bob15

Well-known member
Joined
Dec 8, 2011
Messages
6,863
Location
Northeasten, CT
When you dry fit the pieces, mark each piece in several places with a Sharpie Mark to aid in relining everything back up.

As for the glue & primer and the floor: rags, drop cloth or even newspaper will help
 

iamrfixit

Well-known member
Joined
Dec 1, 2012
Messages
141
Location
Iowa
I've never had a problem getting the joints together, usually keeping them together is more of a problem as they'll try to slide back apart til the cement sets. Clean and apply cement to both the socket and the pipe, push it together with a slight twist and hold for a few seconds. For joining long pipe sections I hang the pipe support first, before I glue the connection. Joints are difficult with long sections if the pipe and socket get out of alignment.

I always build in a little extra when making my cuts because PVC pipe is extremely difficult to seat fully for test fitting. If you do get it to seat all the way, then it's a huge struggle getting it apart. I try to build my runs in smaller sections and glue them as I go, then make a final fit up so there's only a couple joints. Building a whole complicated setup and then trying to glue it all at once is asking for problems.
 

Jackfre

Well-known member
Joined
Dec 26, 2010
Messages
4,417
Location
N CA
You can lay it out and mark as necessary for alignment and penetration. Yes, you need a slower set glue and yes it is a bi**H when in position and not able to "get on" the pipe to get good force to make the joint. If you are unable to make a particular joint you may need to go with no hub couplingss in some places
 

Dagny

Well-known member
Joined
Jul 25, 2014
Messages
3,021
Location
Northern Wi.
slow setting cement means you have to hold it longer ,not for me. Don't even try to put it all the way in, do smaller sections and allow for complete insertion. Experience is very valuable. Hulk like arms and chest muscles come in handy.
 

kbs2244

Well-known member
Joined
Nov 11, 2006
Messages
14,065
Rubber mallet and a strap wrench (or 2)
For sure on the slow glue to get the marks aligned.
 

FSrepair&fabrication

Well-known member
Joined
Jul 28, 2017
Messages
908
Location
maryland
Grab the side you’re trying to push with a pipe wrench so you can get a handle on it. That’s what they’re made for lol, you can also beat on the pipe wrench with a hammer if it’s really tight. Sometimes you need a second person holding a pipe wrench on the receiving end so you don’t push it away.
 
OP
G

gahrajmahal

Well-known member
Joined
Dec 12, 2008
Messages
2,549
Location
Cincinnati, Ohio
Ok, thanks folks for all the suggestions. A bit more info I guess . This was probably the tenth time I put together a drain system of some sort, and yes al the tips you have gave are ones I typically use. Marking the fittings and pipe with alignment marks, working over a drop cloth, having a rubber mallet to help tap it home and hanging longer sections to assist with placement. Maybe I am getting older and weaker (I am), but I think it was just the awkward position I was in plus the full length 3” pipes I was connecting.

For the first part I ran a series of complicated fittings I could assemble at the table and installed it from the first floor down to the basement. Installation of that all went as planned. I was left with a 90 degree elbow at ceiling height with the plan to make two full length pipes run from the 90 to the existing stack on the other side of the basement. Loose metal strapping was hung at midpoint of the long pipe. Standing midway of my 12 ft ladder I was working overhead with the 10 feet of pipe supported by the strap. All I had to do was glue and push the pipe into the elbow. Alignment was good but not perfect. The adjusting you are able to do when sections are short, are really strenuous when you are trying to swing 10 ft. From one end. I did get reasonable seating but I had to wait until it was semi-adhered, climb down from the ladder. Move the ladder to the open end, then bop on the end with the rubber mallet getting it to seat some more.

So, taking your suggestions so far. Go with slow drying glue. Use hub less joints when practical (known as “repair couplings” correct?). Get a couple of strap wrenches and use them. Get bigger muscles, and or work with a helper.

Thanks for the replies so far!
 
Last edited:

56Mark

Well-known member
Joined
Oct 26, 2014
Messages
359
Location
Fall Branch, TN
Sometimes you have to use a repair coupling to slide onto one pipe, then insert the other and slide in place. I wouldn't use unless I had to. I don't think they have any taper in them. I hate them and have had a couple leak, but sometimes necessary. I use extra glue on those.

I agree with you. Looks like someone would make a couple of simple clamps you put on the pipe and fitting, pull a bar or lever and draw them together. Plumbing 3 and 4" stuff alone can be a biotch.
 

matt_i

Well-known member
Joined
Mar 14, 2008
Messages
10,753
Location
SE Michigan
I've experienced what you say. The glue acts as a lubricant which aids in seating thru the injection molding "taper" in the hub that can never be done in a dry fit. Also one can watch the straight pipe ease itself back out of the taper if its quickly seated and then immediately released.

If you make up some test joints, PVC is still pretty cheap, mark a line 1/2" back from the hub while assembled while dry. Then prime and glue it up and measure it again. Probably 1/8" difference, but when you learn about what that measurement will be you can plan for it ahead of time.

I also hold the pipe assembled with force and count to 20. That usually gets the glue to start setting and then I don't have to worry about the taper backing the straight pipe back out.

I have beveled the OD of the pipe with a rasp designed for wood.
 

rsizem

Member
Joined
Jul 20, 2010
Messages
10
Just went thru this, as we build our retirement home.

The glues cause pipe deformation/welding to occur.
Proper assembly utilizes this aspect. Consequently, the joint is designed as an interference fit...forcing a dry fit to the correct depth will actually deform the pipe and decrease the probability of a full strength joint.

calculate length of pipe needed using purchased fittings geometry.
cut the pipes, holding 90 degrees
deburr (I used Reed Tool DEB4 Deburring Tool for Plastic, 1-1/4 to 4-Inch)
utilize the printing on the tubing and the marks on the fittings (typically at 45 degree intervals) as an alignment aid.

swab primer on the fitting, then the tube.
while primer is still wet, swab adhesive on the fitting, then the pipe and then the fitting again...push tube to fitting together until fully seated...marking full depth of insertion provides good confirmatin (e.g. for my 4" DWV, it was 1.75").

One side note, there are different adhesives for different temperatures with the cutoff around 40F. At cooler temps, I let the pipes sit overnite to ensure full cure (more of concern at cold temps).

Occasionally, I would have a glitch which required application of a torque for a minute or two to twist the pipe and/or mallet impacts on the end of the pipe or fitting to finalize seating.

Good luck!
 

rsizem

Member
Joined
Jul 20, 2010
Messages
10
Oops, I forgot the gloves...we used the Milwaukee nitrile dipped gloves which gave us the gripping power of GECKOS.
 

59 wagon man

Well-known member
Joined
Oct 25, 2010
Messages
1,589
Location
hollywood fla
bevel the edge and twist as your putting it together. then hold it together for a few seconds. I use the wet or dry glue. it is normally blue in color and takes pressure quicker. forget the cleaner you need primer. if you have a helper you can line it up then use a scrap 2x4 to push it together prying against a floor joist
 
To avoid these ads, REGISTER NOW!

ard

Well-known member
Joined
Feb 16, 2015
Messages
4,391
Location
Sierra Foothills... California
OT, but thought you guys would find this useful....

Over the years, Ive had my share of PVC repairs to do. Typically you cut out old stuff, find a place to put int eh coupling, then add new parts.

But sometimes you are faced with (1) Inaccessible pipe, or (2) expensive parts. Say a 2: Jandy 3ay motorized valve for a pool.... or a coupling to a filter or pump or whatever. And you have no place to add a coiupling, and the pipe is already glued into a female end. You are looking at that ***** and thinking “Dremel?”

This tool:
00757033045262.jpg


Cut off square to the fitting...The smaller OD fits INSIDE the pipe...as you drill the adjustable cutter will shear off that pipe, but leave the female part of the fitting untouched.

Primer and glue.

An amazing tool, I found it late in life.... now have a bunch of sizes.


Edit... never used any tools for prepping PVC. As above, just clean and glue and hold. Laid a few miles of 8” PVC years ago. Just a rasp to bevel the ends. And two comealongs w ratchet straps on each slide to pull them tight. No leaks. ;)
 
Last edited:

Squankum

Well-known member
Joined
Mar 28, 2011
Messages
7,882
Location
Southeast
I ran into this as a novice replacing a section of shower drain last year. I was doing not-quite-a-U -- a down pipe, a 90 degree, a short section horizontal, then into a danged old drum trap. I was surprised at how much, once I was using glue, the pipe wanted to ooze right back out of the fitting I was trying to push it into.

I think I wound up using a medium sized bar clamp, but the problem is, can't get it parallel because of the rounded 90 degree corner on one end. So I still did it, but not hard at all, lest I force things into totally funky angles. Just enough to keep it in place.

It all worked out.

Something else could be done, with enough rope and the right knots.
 

Bert_

Well-known member
Joined
Dec 24, 2016
Messages
9,778
Location
NW Iowa
Dry fitting everything almost guarantees issues in my opinion. You won't have the pipe all the way into the hub so everything comes up short.

I don't do it every day but I found it's easiest to just glue as you put it together. Maybe dry fit a short piece of pipe to make sure you get the right angle on the fitting you are glueing.
 

wayne55

Well-known member
Joined
Oct 28, 2010
Messages
359
I'm not a plumber, but I always take a piece of sandpaper and smooth any burrs or rough edges.
 

Jack_Toepfer

Well-known member
Joined
Mar 27, 2017
Messages
114
Location
Lancaster NY
If I'm fighting to get it to fit, I didn't measure properly. Often times for me, the strain comes because I'm trying to stretch a pipe, straighten a bend, or bend a straight... instead of being able to assemble everything in a natural state.
 

fitter30

Well-known member
Joined
Jun 23, 2019
Messages
2,994
Location
Peace Valley,mo
Can use a pipe riser clamp to have something to pull against. For the bevel can use a course file or a small angle grinder. This is what a riser clamp looks like available at a plumbing supply house maybe at a box store. Any glue joints be sure to hold them together for a minute because they will back out a little.
https://www.mscdirect.com/browse/tn...MIr-fg3IL15gIVi4bACh2JyAPOEAQYAyABEgJqFfD_BwE
For pipe larger than 6" glue and primer comes in gallons and the brush is like a paint roller. With two people and two come a longs pull the pipe and fitting together unless the pipe is on pipe stands people are strong.
 
Last edited:

kbs2244

Well-known member
Joined
Nov 11, 2006
Messages
14,065
"Get a helper"
This is the best advice to yourself.

When I was in construction the rule was,
2 men can do 2.5 times the work of a single man.
 

metlmunchr

Well-known member
Joined
Sep 10, 2011
Messages
1,280
Thx ARD. The way I read the review, the blade shearing off was a common theme

The blade is a carbide insert. Carbide is amazingly durable when cutting, but it can't stand any impacts whatsoever. Chances are, a person who's having problems with the insert "shearing" is actually cracking the insert by bumping it against something with rough handling of the cutting tool, and then the cracked piece breaks off with the next use.

Looking at the picture, the insert looks like either a SCGT or a SCMT. If so, then it would appear that the manufacturer is using the wrong screw to secure the insert. They typically have a tapered hole and the correct screw seats in the taper. Its a screw specially made for holding carbide inserts. The screw in the pic looks like a standard button head. If the insert has a flat smooth top surface, the the button head is okay. But, most SCxx inserts have some ribs molded into the top surface for chip control. If that's the case with the inserts for this tool, and the button head is clamping against ribs, then the screw pressure can easily crack the insert.

If these inserts are breaking regularly, then something's definitely wrong as one insert ought to be able to make hundreds of cuts and still cut like new considering how freely pvc cuts.
 
OP
G

gahrajmahal

Well-known member
Joined
Dec 12, 2008
Messages
2,549
Location
Cincinnati, Ohio
Ok all, pictures, or it didn't happen

IMG_3242.jpg

IMG_3225.jpg
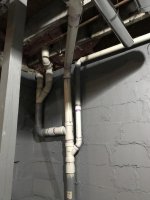
My starting point. Up until here it all went together very well. It was just working overhead with the full length pieces I had trouble pulling the joints together. So, once again thanks for all the helpful suggestions and tool recomendations.

IMG_3241.jpg

IMG_3239.jpg

You can see my coupling of the new 3" connection to the original stack. All of this was pretty straight forward.
 

Balvar24

Well-known member
Joined
May 18, 2016
Messages
870
Put the big pieces and as much of the other stuff together on the floor or on a table. Layout your work where you can plan the "position" joints.

Pipe is 1000% easier to deal with when you can reach it comfortably. With a little practice, you'll find that you make fewer and fewer joints "in position." You'll also learn to lay out where the "in position" joints are the easy joints to make rather than the one that you have to stand on your head to reach.

When I built my house, one of the best tools I had was an old heavy table like you'd find in a school. I could lay out pipe and fittings, and assemble parts and pieces square in front of me rather than struggling overhead. With 3" pipe, you don't have to chamfer much. If you can't get the pipe to slip together and then twist, you need more glue. One of the biggest mistakes people make is not enough glue. It really shows up on larger diameter pressure pipe when fittings start blowing off.

Very seldom do you want to manhandle a 20' stick of pipe overhead if you don't have too.

Pre-fab assemblies.

Hang them (loose) and make the final joint(s).

Tighten/adjust hangers to final position. Add hangers/supports if required.

Learning to measure with appropriate take-out is a must. When you dry fit, you typically don't want to slip the pipe completely into the socket because it's a pain to get it out.
 

stokefire7

Well-known member
Joined
Oct 5, 2011
Messages
616
One suggestion. Okay maybe two.
Laterals between joists . 2 x 4 blocking and graded for a solid support (especially transitioning from vertical to horizontal) .
If that pipe gets full of waste , what supports it ?
Every four feet would be adequate .
 

sberry

Banned
Joined
Jun 18, 2005
Messages
35,747
Location
Brethren, Michigan
I measure the slip fit sometimes and try to design with a little forgiveness in mind. Sometimes mark the dry fit and assemble to that depth if it's not fussy critical. Even make a final measurement in some cases.
 
To avoid these ads, REGISTER NOW!
Top Bottom