To avoid these ads, REGISTER NOW!

VISE REPAIR 101 all vise repairs, lubricants, sources for parts and the tricks to fix

Voi

Well-known member
Joined
Oct 10, 2010
Messages
5,151
Location
Western South Dakota
Thank you for the invite and welcome, Drives.

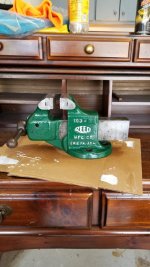
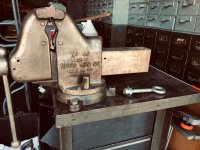
I bought a Wilton C1 at a service garage auction many years ago knowing full well it had issues. I got it for next to nothing. Being home with the kids during this Covid-19 quarantine has given me time for neglected projects so I decided to tear into it this morning.

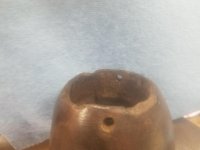
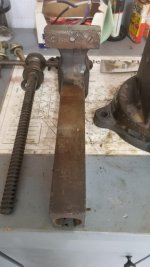
I assume the shop dropped this vise at some point and drilled two holes in the very back of the vise (part #6 on the diagrams that Drives re-posted) and installed a cotter pin for reasons I'm not really sure of.

I was able to back the main screw all the way out and remove the movable jaw body from the main body.

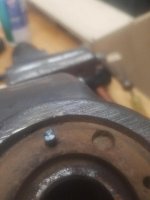
I was able to pull the main nut out of the body from the back without removing the pins. Upon further inspection I think the "pins" are actually welds the shop used to fill the holes. The pin holes in the main nut were just full of grease and gunk. So the main nut was not stabilized by pins for some period of time.

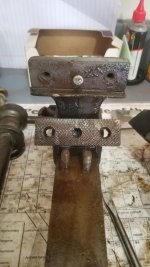
I was only able to get one of the screws holding the horseshoe washer removed and it was bent. The other two screws were badly stripped so I ground the heads off to remove the horseshoe washer. I now have that movable jaw face down in a tub of Evapo Rust in hopes I can use vise grips to back them out.

I have not yet been able to remove the jaw screws from the movable jaw body. Haven't really tried that hard yet.

I was able to remove both jaw screws from the main jaw body but the jaw is putting up a fight. It is also face down in a tub of Evapo Rust.

I'm still in the removing parts, cleaning and assessment stage so don't have a lot of questions but I'm clearly going to need guidance on this.

I guess what I need help with for now is:

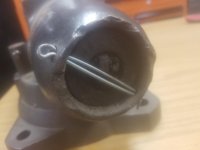
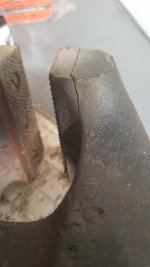
1) How to remove what is left of the two screws that held the horseshoe washer. See first picture below. I can't find my can of PB Blaster anywhere. Only have Evapo Rust.

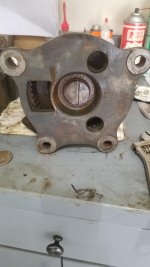
2) Do I try to drill out the welds in the old pin holes or drill new holes to stabilize the main nut with screws? See picture with drill bit pointing to what I think are welds that filled the old pin holes.

3) How to repair part #6 at the very back of the vise? My thoughts were to find a freeze plug that fits and then use JB Weld as filler and just make it look decent before paint. I'm not looking for a shop queen.

4) Do the pins that normally hold the main nut in place also hold part #6 onto the back of the vise? Do I even need to remove part #6 to restore this into a usable vise?

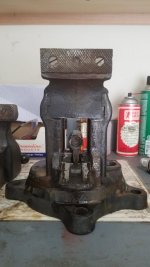
5) How to remove the swivel locks? They are stuck tight. Don't have enough Evapo Rust to soak it that deep.
 

Attachments

  • C1 Vise 2.jpg
    C1 Vise 2.jpg
    50.7 KB · Views: 35
  • C1 Vise 4.jpg
    C1 Vise 4.jpg
    49.6 KB · Views: 30
  • C1 Vise 1.jpg
    C1 Vise 1.jpg
    55.2 KB · Views: 33
  • C1 Vise 3.jpg
    C1 Vise 3.jpg
    60 KB · Views: 28
To avoid these ads, REGISTER NOW!
OP
D

drivesitfar

Well-known member
Joined
Oct 23, 2013
Messages
36,066
Location
Pacific Northwest
Voi: check out AE Numan's post #944 on this thread that shows how he changed out his pins that hold the vise nut in with screws to make it easier to take apart next time.

as far as some of the issues you have are you maybe able to set up a small electrolysis tank (5 gallon bucket should work) and if you need help ask. OR there is a great thread called HOMEMADE ELECTROLYSIS in general tools section that has all your answers.

some guys take a chisel to remove the jaws after the screws are removed, but i'm not a fan of that cause it can damage the cast holding the jaws sometimes. unless you were planning on changing out the jaws or screws i'd usually leave them in and either buy or make copper or aluminum jaw covers.

did you understand about drilling new holes in you end sleeve to hold the pins that hold the vise nut in place if the old holes are damaged?

good luck and keep taking pictures and asking questions if you have any. some of the members take apart and put together wilton bullets daily so maybe they have something to add to help you.

good luck
 

motorhead1977

Well-known member
Joined
Mar 10, 2020
Messages
48
Location
North Georgia
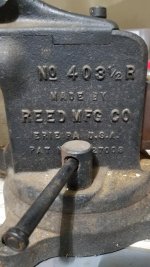
Reed 403 1/2 R

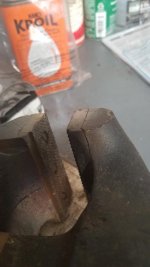
I finally got got around to removing my dads vise from his shop. I'm going to restore it and mount it to a stand. Just looking at it I have noticed that there is a crack under the dynamic jaw that will need to be repaired. I dont know how to braze cast but I'm going to learn. Also, can I but replacement jaws or should I have them made? If I can buy them can someone share a source?
 

Attachments

  • 20200325_203921.jpg
    20200325_203921.jpg
    100.7 KB · Views: 42
  • 20200325_203914.jpg
    20200325_203914.jpg
    57.8 KB · Views: 51

WhoWhatNow

Well-known member
Joined
Feb 22, 2011
Messages
1,891
Location
Collegeville, PA
Re: Reed 403 1/2 R

I finally got got around to removing my dads vise from his shop. I'm going to restore it and mount it to a stand. Just looking at it I have noticed that there is a crack under the dynamic jaw that will need to be repaired. I dont know how to braze cast but I'm going to learn. Also, can I but replacement jaws or should I have them made? If I can buy them can someone share a source?


That is a very nice Reed swivel jaw vise. I doesn’t look like it’s been used hard at all. Let’s see some pictures of the crack.
 

motorhead1977

Well-known member
Joined
Mar 10, 2020
Messages
48
Location
North Georgia
Pictures of crack in dynamic jaw

Pictures of below dynamic jaw crack? What's the best way to fix this? Braze it or could I use a casting alloy?
 

Attachments

  • 20200327_181929.jpg
    20200327_181929.jpg
    45.1 KB · Views: 48
  • 20200327_181917.jpg
    20200327_181917.jpg
    48.3 KB · Views: 46
  • 20200327_181905.jpg
    20200327_181905.jpg
    44.4 KB · Views: 44
OP
D

drivesitfar

Well-known member
Joined
Oct 23, 2013
Messages
36,066
Location
Pacific Northwest
Motorhead: so the crack you'd like to repair is the small one just under the removable jaw?

that REED swivel jaw vise is in very good shape and that damage looks minor to me. you certainly can remove the jaw and either try to weld the broken piece back together, take the broken piece out and use the vise or remove the piece and build up the missing area with some welding material.

another option i haven't tried on CAST IRON yet is this BONDICK glue that is like super glue and activated with a UV light.

personally if that vise was mine and it was special like my dad's or grand dad's I would just wipe it down with Simple green, grease the moving parts and then maybe put a couple light coats of BLO on it before mounting it and using it.

is the swivel jaw move free or is the pin and/or jaw rusted in place from sitting for a while?

nice looking vise
 

motorhead1977

Well-known member
Joined
Mar 10, 2020
Messages
48
Location
North Georgia
The pin seems like it's stuck. I just put some kroil on it so I'll check it in a bit. I wanted to completely restore it because it is so special to me. This vise will never be sold and will probably never be used again. I really would like to completely tear it down clean it up, paint it or BLO it and I'm going to have to learn to weld to make a stand. I never learned any of this stuff while my father was alive because our lines of work are so different. Also as a kid growing up, I had no interest. I have 60 years worth of tools to go through. Now that he isn't here I have taken an interest in his craft.....life is very funny sometimes.
 

motorhead1977

Well-known member
Joined
Mar 10, 2020
Messages
48
Location
North Georgia
Reed vise restoration

Here is another reed vise my dad had in his shop, it's a 103-N. It was a locked up mess when I got it. It was my first vise restoration. Before and after
 

Attachments

  • 20200322_123021.jpg
    20200322_123021.jpg
    84.7 KB · Views: 55
  • 20200310_182412.jpg
    20200310_182412.jpg
    148 KB · Views: 50
OP
D

drivesitfar

Well-known member
Joined
Oct 23, 2013
Messages
36,066
Location
Pacific Northwest
MOTOR: life has it's ups and downs and lots of twists and turns along the way and happy to hear you want to learn to use the tools that your dad did cause i bet he's got some good ones.

lots to learn here so keep posting pictures and asking questions on the threads that pertain to what you want to learn and if you can't find a thread you can ask one of us or start one and hosting one tends to make you learn more.

if you remove the dynamic jaw and the vise nut you might be able to push the pin up and out from down below. no guarantee that it will pop out by poking at it from below with a short punch or bolt, but some of the guys made a sort of tool out of a couple bolts and a coupler that you can put a wrench on to force it out a bit better.

good luck!!
 

motorhead1977

Well-known member
Joined
Mar 10, 2020
Messages
48
Location
North Georgia
Thanks, I really appreciate it. I'll keep posting pics of my progress. I've got a few ideas for that pin. Is there a restoration thread or is this one good to post to?
 
OP
D

drivesitfar

Well-known member
Joined
Oct 23, 2013
Messages
36,066
Location
Pacific Northwest
this is a good thread to post up before, during and after pics while you are asking questions and needing help.

there are several threads you can find in general tools that you might post your finished projects on or you can start your own restoration thread and just have it showing all your work either in garage gallery, vintage or general tools or general garage.
 

va.grouseman

Well-known member
Joined
Mar 26, 2011
Messages
4,965
Location
Southern-Central VA.
Motor, I wouldn't change those jaws, they're better than 60% of the jaws on vises that all the fellows post on here already.---Those have good teeth and a lot of life in them still.

On the welding issue, I'll refer you to the fellow who asked a service station attendant directions on how you get to Carnegie Hall.---To which the attendant replied, (" Practice, Practice, Practice").---Get you some old manifolds and start running beads.:thumbup:
 

motorhead1977

Well-known member
Joined
Mar 10, 2020
Messages
48
Location
North Georgia
Update, need some help

I've started to disassemble the vise but I'm running into a snag with the center bolt. Is there a trick to removing it?

Thanks for everyone's help in advance.
 

Attachments

  • 20200328_104508.jpg
    20200328_104508.jpg
    61.8 KB · Views: 25
  • 20200328_103410.jpg
    20200328_103410.jpg
    60.9 KB · Views: 24
  • 20200328_105055.jpg
    20200328_105055.jpg
    83 KB · Views: 22
  • 20200328_103405.jpg
    20200328_103405.jpg
    61.9 KB · Views: 22

Outlawmws

Well-known member
Joined
Aug 9, 2011
Messages
39,325
Location
The Badlands
A drag link Socket and a hammer impact is the best way, IMO.

A piece of steel bar and a Crescent is also an option. Get someone to help and hit the bar with a hammer on top for a pseudo hammer impact...
 

Voi

Well-known member
Joined
Oct 10, 2010
Messages
5,151
Location
Western South Dakota
as far as some of the issues you have are you maybe able to set up a small electrolysis tank (5 gallon bucket should work) and if you need help ask. OR there is a great thread called HOMEMADE ELECTROLYSIS in general tools section that has all your answers.

did you understand about drilling new holes in you end sleeve to hold the pins that hold the vise nut in place if the old holes are damaged?

I have a 50 year old model train transformer and should have a few power supplies from some old desktop computers I dismantled at work. Probably have to do a Walmart run this weekend regardless so I can pick up some washing soda. I have what is almost certainly a dead lawn mower so I can use the blade in the tank.

Covid-19 Home Schooling is still affecting computer time so hopefully I can get an E-tank set up.

I do understand about drilling the new holes. But my thought is still to drill out the old holes first. My thinking is that...

1) those holes lined up with the holes in the main nut originally anyways.

2) I can see them.

3) If drilling out those welds doesn't go well I can always plug/fill them again later. I have a lot of fill work on part #6 this vise regardless so two extra holes to fill won't be a big deal if they don't work out.

In the meantime, no new progress on the vise. Still soaking in my shallow tubs of Evapo Rust.
 
OP
D

drivesitfar

Well-known member
Joined
Oct 23, 2013
Messages
36,066
Location
Pacific Northwest
MOTO: here's a huge washer I ground off if you don't have a DRAG LINK or a piece of flat steel laying around to fit the slot on your Reed's screw. I used an eye bolt cause wrenches were in a box MIA as I was moving stuff, but an old monkey wrench or maybe a pipe wrench might have a better angle and more leverage. sometimes these are not on very tight and other times they are rusted in place so best of luck.

VOI: best of luck with the E tank and ask questions if you might need a little more help, but it sounds like you are heading down the right path. did you see and read AE Numan's post about changing out the pins for screws?

I hear you on drilling and maybe tapping holes in the old holes location if it matches and the material there (weld?) is solid and will hold a pin or threads for a screw.

good luck
 

Attachments

  • eye bolt with huge washer flat on one side to remove big screw under Reed 4c.jpg
    eye bolt with huge washer flat on one side to remove big screw under Reed 4c.jpg
    154.9 KB · Views: 27
  • 4CMOUN~1.jpg
    4CMOUN~1.jpg
    153 KB · Views: 25

va.grouseman

Well-known member
Joined
Mar 26, 2011
Messages
4,965
Location
Southern-Central VA.
Drive, you're a true Marine.---Improvising, adapting, and overcoming.---Sometimes a person can make better tools than they can buy.---My Dad had a separate tool box earmarked for nothing but specialty tools that he hand made for unique situations.---There were some real oddballs in there, but they worked.
 

Voi

Well-known member
Joined
Oct 10, 2010
Messages
5,151
Location
Western South Dakota
VOI: best of luck with the E tank and ask questions if you might need a little more help, but it sounds like you are heading down the right path. did you see and read AE Numan's post about changing out the pins for screws?

I did not read that post yet. Laptop time still at a premium for now with home schooling.

I probably won't have time to do much reading before we make a Walmart run. I'll have wires etc for the E tank.

Anything you can think of I might need other than washing soda?

I'm tempted to pick up a battery charger to be safe but we're trying to be frugal during this down time.

Is an old model train transformer enough for a C1 sized E tank? I assume it's a better & quicker place to start than a computer power supply. Also variable power which I recall being a plus.
 
To avoid these ads, REGISTER NOW!
OP
D

drivesitfar

Well-known member
Joined
Oct 23, 2013
Messages
36,066
Location
Pacific Northwest
VA: thanks for the good words. :thumbup:

Voi: do you have plenty of uncoated bailing wire and copper wire? you don't need much power to run the E tank and actually I hear running low voltage for a day or two or more can be better so it sounds like you have about everything once you have the washing soda (some guys use pool/spa wash or baking soda).

your mower blade should work if it doesn't have a coating on it or pieces of rebar or other old steel can work too. i hear putting coated (chrome, galvanized, nickel, ....) materials in the mix can cause issues and mainly make the mix toxic and you can't just dump in your flower beds.

if you have any more questions on E tank ask here and we'll try to help or ask on this Homemade Electrolysis thread that already has me and others asking a ton of questions that were answered by those that use these a lot.

https://www.garagejournal.com/forum/showthread.php?t=237752&highlight=homemade+electrolysis

good luck!!
 
Last edited:
OP
D

drivesitfar

Well-known member
Joined
Oct 23, 2013
Messages
36,066
Location
Pacific Northwest
Voi: that is to hang your parts in the tank with. i'm sure guys have used other material to hang stuff in their tanks, but it's best if it's not coated or painted.

copper is to go to the mower blade or pieces of steel that your charger hooks up too. also just an FYI the newer battery chargers need a battery in the loop cause if it doesn't sense the battery it turns off. in your case it sounds like you are using a different power source so you do whichever method you know and like that works and is safe.

just try and keep the copper wire out of the water too.

good luck!
 

Voi

Well-known member
Joined
Oct 10, 2010
Messages
5,151
Location
Western South Dakota
Voi: that is to hang your parts in the tank with. i'm sure guys have used other material to hang stuff in their tanks, but it's best if it's not coated or painted.

That makes sense and I now remember that from previous reading.

With a heavy part like the main body does that really need to be elevated off the bottom of the tank?
 
OP
D

drivesitfar

Well-known member
Joined
Oct 23, 2013
Messages
36,066
Location
Pacific Northwest
Voi: not unless your tank is metal and even then you could put rubber or a 2x6 under it. that said i'm not sure the piece sitting on the bottom will get fully de rusted so your call.

some have used baskets, but BEE CAREFUL if the basket is metal.
 

Voi

Well-known member
Joined
Oct 10, 2010
Messages
5,151
Location
Western South Dakota
Voi: not unless your tank is metal and even then you could put rubber or a 2x6 under it. that said i'm not sure the piece sitting on the bottom will get fully de rusted so your call.

some have used baskets, but BEE CAREFUL if the basket is metal.

I assumed the heavier parts would have to be rotated at some point during the process. I hadn't thought about the smaller parts, although for being a vise that's had a rough life it isn't horribly rusted, except for the rotating base assembly.

You don't need to worry about me being careful with electricity, lol.

My boys are dog are getting restless so I think I'll put this on the back burner for at least the day.
 
OP
D

drivesitfar

Well-known member
Joined
Oct 23, 2013
Messages
36,066
Location
Pacific Northwest
Voi: are you an electrician or just know that electricity and water are not a good mix?

take a bunch of pictures if you have time cause i'm sure we'd all like to see your set up either here and/or the Homemade E thread?

do you have snow outside or are you able to take walks with your dog and kids?

i've got to run too, but if you need something just ask cause like I mentioned several members not only take apart Wiltons quite a bit others also use their E tanks 24/7.

cheers
 

Voi

Well-known member
Joined
Oct 10, 2010
Messages
5,151
Location
Western South Dakota
Voi: are you an electrician or just know that electricity and water are not a good mix?

take a bunch of pictures if you have time cause i'm sure we'd all like to see your set up either here and/or the Homemade E thread?

do you have snow outside or are you able to take walks with your dog and kids?

i've got to run too, but if you need something just ask cause like I mentioned several members not only take apart Wiltons quite a bit others also use their E tanks 24/7.

cheers

Not an electrician. Just am cautious around it. As far as water and electricity, during my teenage years I walked through a puddle on a pool deck that happened to have an extension cord running through it. I was barefoot. I got zapped. That has probably made me cautious as much as anything.

My boys, dog and myself love the snow. Winter hiking is my passion. So the fact that it's warm today and the snow is melted or melting is actually a bad thing to everyone but my wife.

I might just have to put this project on the back burner. I thought since I was just tearing it down for parts it would be a logical next project to keep my busy/sane during isolation. I really don't want to be running around looking for things I need.

But having an E tank up and running during this isolation would still be a benefit so I'm not going to completely give up on that.
 

Outlawmws

Well-known member
Joined
Aug 9, 2011
Messages
39,325
Location
The Badlands
Voi, the train transformer should work fine at the lower settings. IIR most trains had a high end of 24V, but the lower setting should be lower voltages. I generally use my big charger on low, and 6V as well
 

Shiftless

Well-known member
Joined
Mar 9, 2014
Messages
14,590
Location
East Bay SFO
Voi, the train transformer should work fine at the lower settings. IIR most trains had a high end of 24V, but the lower setting should be lower voltages. I generally use my big charger on low, and 6V as well

(Retired Physics teacher here)

Outlaw is right. The lower “speed” settings on your transformer yield lower voltages. All other things being equal, lower voltages limit the current running through the wires and your e tank. Your train transformer will warm up as more current flows. At some point it will be damaged. The amount of current flowing will depend on the surface area of your electrode, the distance between the electrode and your vise parts, and the concentration of the washing soda solution.

Is there a circuit breaker on your transformer to protect against damage due to over current?

Start slow and monitor the situation until you have an acceptable situation. If you have a VOM, even a cheapie from HF, you can hook it up to monitor current flow and compare that with the specification plate on your train transformer. If you aren’t familiar with how to hook up an ammeter, just ask.
 
Last edited:

AngryBeaver

Well-known member
Joined
Jul 12, 2017
Messages
1,705
Location
Lake Milton Ohio
have a reed on the repair table.. Many here are anti welding. stay tuned for this one going on my new heavy fab table at my day job.....

attachment.php


attachment.php
 

Voi

Well-known member
Joined
Oct 10, 2010
Messages
5,151
Location
Western South Dakota
Is there a circuit breaker on your transformer to protect against damage due to over current?

I will check and post a picture. I've been working on a couple of other projects & still haven't made that Walmart run.

Only progress on the C1 is I got my better pair of vise grips from the cabin & was able to get the last two screws holding the horseshoe washer out. Even after two days in Evapo Rust they were in there tight. All the more reason to get an E tank going to get that swivel base removed.
 
OP
D

drivesitfar

Well-known member
Joined
Oct 23, 2013
Messages
36,066
Location
Pacific Northwest
AB: going to weld the pin holding the pipe jaw in place? good luck

Voi: glad to hear you got the stubs out so one less issue to deal with. E tanks won't derust or fix everything, but hopefully it will help you get your swivel moving enough to be able to take it apart.

good luck figuring out the power for your E tank and looks like the experts have posted a little help.
 

Maddog1337

Well-known member
Joined
Dec 6, 2019
Messages
84
Location
Plainfield, IL
Hello Vise Connoisseurs!

My first vise and my first vise restoration.

A $20 Craigslist find - The Ridge Tool Co Utility Vise 400-R. No idea on the age.

The M12 Fuel Right Angle Die Grinder with 2" 3M Roloc pads have been perfect for this job!

A couple of questions on the restoration:

Do people take the steel slide down to bare metal? I still have what I believe is classified as black mildew in the pitting. I think I have enough steel but don't want too much play in the slide.

On one side on the casting it looks like like it was just a bad mold, there's some excess material. I'm not sure if I should sand that down smooth, but then I'm not sure if I should do the rest of the vise body smooth like the slide. I couldn't do the lettering (would remain rough) so I think it would look off. What do you think?

Pictures:
script>


script>


script>


script>


script>


script>
 

Outlawmws

Well-known member
Joined
Aug 9, 2011
Messages
39,325
Location
The Badlands
Unless you are up for a full polish job, I'd get the vise boy clean and just paint. Some like the bare steel look and go with BLO.

Casting imperfections are just part of the game , removing leaves grind marks, leaving means the imperfections will show. Choices...

The PO or the factory painted the slide, generally the slides are left unpainted.
 

Maddog1337

Well-known member
Joined
Dec 6, 2019
Messages
84
Location
Plainfield, IL
Unless you are up for a full polish job, I'd get the vise boy clean and just paint. Some like the bare steel look and go with BLO.

Casting imperfections are just part of the game , removing leaves grind marks, leaving means the imperfections will show. Choices...

The PO or the factory painted the slide, generally the slides are left unpainted.

Thanks for the quick response. I guess thinking about it I should just Roloc disc the entire thing for a more permanent restoration. I don't want rust coming through the paint on the body down the road.

For the slide I'll leave bare metal thanks for the tip. I'll throw some Collinite metal polish or ATF on it.

Any tips on getting a polished finish in and around the lettering? The 2" Roloc disc obviously won't fit. I don't have a sand blaster. I'm not sure if a wire wheel would work?
 

Shiftless

Well-known member
Joined
Mar 9, 2014
Messages
14,590
Location
East Bay SFO
Looking good so far. A real deal at just $20 :beer:
Bare slides need rust protection. I like Fluid Film. There are other good ones available. Routine oiling will also work, but will attract and retain dirt, sawdust, etc.
Paste wax will also work.

As far as smoothing the cast iron in between the lettering, you might look at the tiny little stones available for the Dremel tool. ( I’m a big fan of Dremel... I have 3) Personally, I wouldn’t do it, but if you do, please post pics of before and after.

If you don’t have a mill, you can use a stationary belt sander to remove those gouges from the sides of the jaws if you want a fresher look.


.
 
Last edited:

cory52000

Well-known member
Joined
Jan 10, 2020
Messages
71
Location
southern oregon
Hello Vise Connoisseurs!

My first vise and my first vise restoration.

A $20 Craigslist find - The Ridge Tool Co Utility Vise 400-R. No idea on the age.

The M12 Fuel Right Angle Die Grinder with 2" 3M Roloc pads have been perfect for this job!

A couple of questions on the restoration:

Do people take the steel slide down to bare metal? I still have what I believe is classified as black mildew in the pitting. I think I have enough steel but don't want too much play in the slide.

On one side on the casting it looks like like it was just a bad mold, there's some excess material. I'm not sure if I should sand that down smooth, but then I'm not sure if I should do the rest of the vise body smooth like the slide. I couldn't do the lettering (would remain rough) so I think it would look off. What do you think?

Pictures:
script>


script>


script>


script>


script>


script>
My 2 cents. Slide should be bare. As to the finish I like to take a burr to the high spots and leave it rough. Bottom line it's your vise. Finish it the way you like

Sent from my LM-V405 using The Garage Journal mobile app
 

Shiftless

Well-known member
Joined
Mar 9, 2014
Messages
14,590
Location
East Bay SFO
I’m starting a restoration on a Red Arrow vise.

Is there a method of removing this split ring retainer without destroying it so it can be re-used?

If not, I suppose a Dremel cutoff wheel and then reassemble with a washer and an e-clip ?

Anybody have experience that they’d like to share?

Thanks in advance.
 

Attachments

  • 1B37BAAC-CDCA-4E49-B81E-91ABD1E7E990.jpg
    1B37BAAC-CDCA-4E49-B81E-91ABD1E7E990.jpg
    102.1 KB · Views: 42

Outlawmws

Well-known member
Joined
Aug 9, 2011
Messages
39,325
Location
The Badlands
I'd have a go at it with the pliers used to install piston rings?

You can also use two 1/4" screwdrivers and a spacer and just pry it open.
 
To avoid these ads, REGISTER NOW!
Top Bottom