Re: From losing everything to being cash-poor and shop-rich in "only" five years!
I can't decide whether to tell Bob that delicious looking animals are always welcome on this thread or warn him that this thread is no place for guys to post pictures of their meat...
Sophomoric humor dispensed with, it's time to catch up with shop projects as of a couple of weeks ago. Which was a time when I was still very much mired in actual job work, but was able to leave early one day and get some time on the mill. It was finally time to start cracking in earnest on getting Andrew's XR wired and running.
Before catching up in real time on that project, though, I thought it might be interesting to tell the story of that bike to date. If you're not interested in an extremely long-winded story of two guys building and rebuilding and rebuilding a motorcycle, feel free to skip to the next post. On the bright side, there will be plenty of pictures! (As of today, I am now hosting over 600 images for this thread!)
Okay, so Andrew started riding motorcycles before he could even drive. I believe he got his endorsement at the same time he got his license. I met him in college, and at that time he already had a really nice 1977 BMW R100 that was his daily driver:

At the same time, he shuffled through a series of play bikes, including a 600 streetfighter (authentically crashed, stripped of bodywork, and painted with no regard for sensible taste...) and a really cool Yamaha RD350 custom build that you could hear coming a mile away. What he REALLY wanted, though, from the day it was released in 2001 was a Honda XR650R with street tires and all the kit to make it road legal. Supermoto was in its heyday in Europe in the early 2000s and spread to the States a few years later. I guess he figured the biggest, baddest dirt bike around would make the biggest, baddest supermoto?
I tried to talk him out of it, steering him toward an easier conversion like a KTM EXC, but he never gave up the dream to own that XR. Finally, in July of 2014, he broke down and sold his beloved BMW to fund his dream XR supermoto build.
We found the donor bike in the Portland area and road-tripped down to pick it up. The bike was priced significantly lower than any of the others in the area because the owner had trouble starting it. It turns out this was a big understatement. On the sidewalk in front of the seller's house, we kicked that bike for nearly an hour trying to get it started, unsuccessfully. The seller was then gracious enough to let me tear the bike apart enough to do a compression test, and the result wasn't great. On the bright side, this convinced him to lower the price by another $1000, which I figured would cover the cost of a new top end if need be.
On the third day of ownership, here's his new XR on the lift in my old shop, getting the "once over":

The cylinder was scored, the piston was scored, the exhaust valves were burnt up, and the carburetor displayed the telltale signs of the air filter having failed and the bike eating a bit of sand:

The engine was buttoned back up with a fresh top end, new cylinder, new exhaust valves and re-cut seats. I also did all of the "uncorking" mods, removing an intake restriction and completely rebuilding the carburetor with upsized jets, an HRC needle, and removing the blown-engine-waiting-to-happen flapper plate from the choke plate. Which clearly made the carburetor very happy...

Last touch was Andrew insisting on swapping out the alien looking headlight assembly for a vintage round light and fly screen, and that's how he rode it while researching and procuring the rest of the parts for the build:

And here's a sample of said parts:


Some are purely cosmetic, but the big ticket items were a CRF250R front end and conversion bearings and a set of Warp-9 supermoto wheels shod with sticky sport rubber. We went with the wider 5" rear wheel in order to fit more commonly available and cheaper sport bike tires, which, in retrospect, may have been a mistake. More on that later.
The bike also needed a rewiring. Badly. After spending hours trying to trace the bike's wiring--which no longer resembled the factory wiring at all--I gave up and started cutting. What remained in the end was a short pigtail of wiring terminating in the CDI connector. Everything else was chucked, and started mapping out switches and wire colors with the multimeter...

...resulting in this crude wiring diagram:

The goal would be to make the front lights and rear lights connect via a single Deutsch connector each, making the assemblies easy to remove for track duty. I went nuts with Deutsch connectors in an effort to make the harness extremely modular, which was also probably a mistake. It made the tiny underseat area--the only free space on the bike--quite crowded:

After a lot of hours of soldering (another mistake) and heat-shrinking, the bike's central wiring was completed:

To facilitate this, I developed a better, more complete wiring diagram:

It was about his time a new addition found its way into the shop. I bought a drill press from woot.com of all places. Large, decently powerful, and variable speed. Pure Chinesium, but I liked it a lot.

With the addition of an XY table and a drill press vise, it was amazing the kinds of things I was suddenly able to make! Take this brake hose clamp, for instance:

Or this dash assembly, cut out on the table and miter saws out of blocks of 6061, then drilled and epoxied together:

All wired up for turn signal and high beam indicator lights...


...and installed on the bike:


Andrew then insisted on an even bigger, even heavier, even uglier giant round headlight on a steel frame. We debated this hotly, but in the end it's his bike, so I wired it up:

It actually worked out quite nicely, as the steel frame is suspended on rubber grommets mounted to the fork legs and held on by cotter pins. With the light, blinkers, and horn all mounted to a single Deutsch connector, it's two minutes to remove the whole shebang and replace with a number plate for the track. And, to be honest, the look has grown on me. Barely...

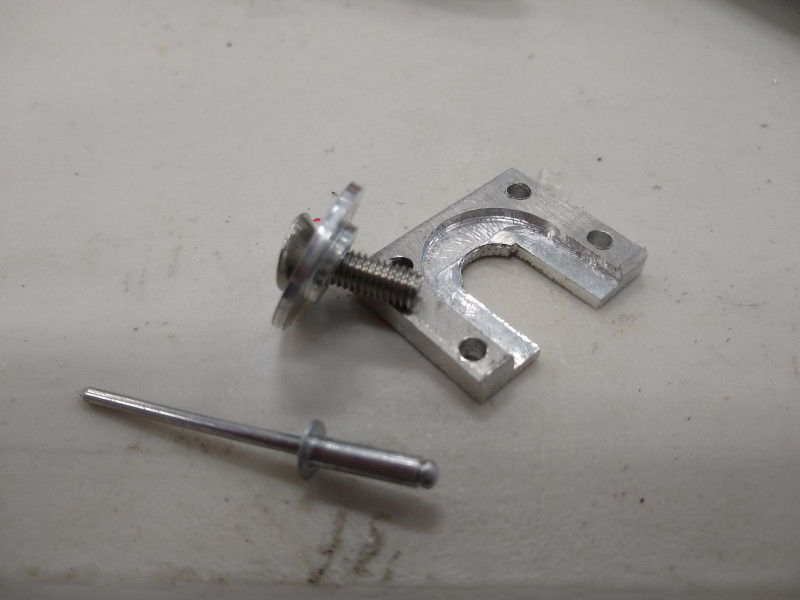
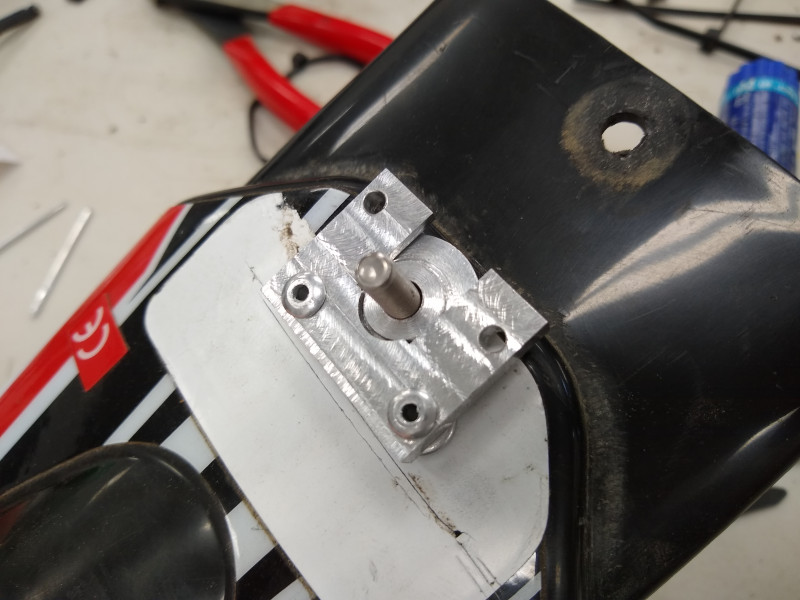
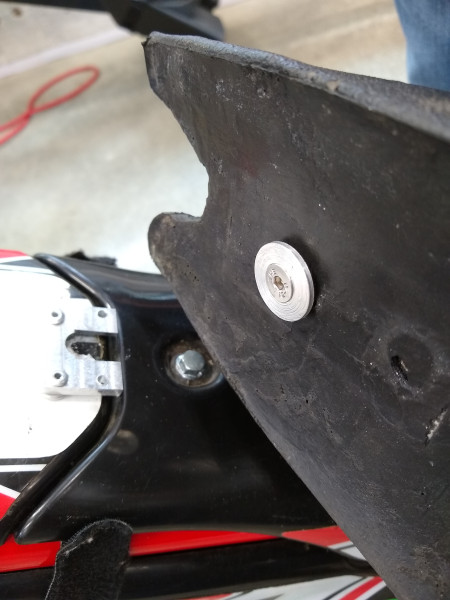
At this point, all that was left was a custom speedo sensor bracket...

...and we had a rolling bike!

Sort of.
As soon as the wheels were on, I knew we were in big trouble. All of our calculations for what would fit were based off of the tire's listed size (180). Turns out it's way wider in reality. The rear wheel would only go on with the axle backed out completely in the adjustment range, and the chain was hard up against the tire. A lot of this later...


...and we realized we were screwed. The wheels were custom, so no sending them back for a more narrow rear. The tires were also paid for. We looked into dishing the rim to the left and spacing the sprockets, but that was only possible to a small extent before running out of room, and it put the tire well off the bike's centerline.
After days of hemming and hawing, it was decided that the solution was going to have to be drastic. Allowing the wheel to move forward for chain adjustment was going to require dishing the swingarm, and keeping the chain off the tire was going to require flipping the countershaft sprocket and spacing the rear sprocket 7.38 mm to match.
After some debate as to how to go about doing it, this became the plan of action for the swingarm:


And all welded up:

Now, this was before reading about fellow GJer Sakurama's misadventure with welding a cast aluminum swingarm. His snapped, but it was also from heavy duty offroad riding on a 400+ pound bike. This XR swingarm is way overkill for street duty for a bike this light, so hopefully there's still more than enough strength without post-weld heat treating. It hasn't broken yet, so fingers crossed!...
With the swingarm sorted, it was time to move to the other side. And this is where we got extremely lucky. As in supernatural forces at play lucky. While searching all over the internet for a solution for spacing the rear sprocket, I found an eBay seller making exactly the spacer we needed out of his home shop. The only problem was his didn't match the required thickness by a couple of mm. Which is where the miracle luck comes into play: Turns out the guy lives 10 minutes up the freeway from us! After a quick back and forth, he agreed to make us up a custom spacer to exactly the thickness we needed at no extra charge. Shipping would, obviously, be super quick.
And here's said spacer in its new home:

The countershaft sprocket took a bit of problem solving. Flipping it over gave us the spacing we needed and then some. Too much. Putting the teeth right in the sweet spot required both flipping the sprocket and shimming it back in toward the bike. Worked perfectly.
But solving the chain spacing problem created several more. None of the chain guides lined up with the chain anymore.
The main chain guide that wraps around the front of the swingarm was made from scratch using nothing but a sheet of UHMW polyethylene and the table saw, and it came out awesome. New guide on the left (prototype above, final part below), OEM guide on the right:

Still kicking to this day, with very little wear.
Due to manufacturing limitations, this new guide couldn't include the OEM rear guide to keep the chain from flapping laterally. An overengineered replacement was in order. With the sole design criteria being to stick to only the OEM mounting holes in the swingarm, this was the solution we settled on:

And here it is in practice:

This little roller guide has definitely done its job, as there's not a single chain mark on that tire. On the other hand, the rollers are already completely toast, so it's taken a serious beating.
But, anyway, it all worked pretty well, and from March of 2015 (when this whole conversion was completed) until July of 2016, this bike was his daily driver.
What happened in July of 2016? A track day happened:

It was going pretty well until the engine locked up on him at 100 mph on the front straight. He quickly pulled the clutch lever in, but it didn't disengage, so he had to skid to a stop, miraculously without a crash.
So it promptly looked like this:

That picture is interesting, as it's the first in the series featuring the conspicuous absence of my old drafty and rotten shop. For the engine teardown, I emptied out the race trailer:

If you've been following this thread, you've already seen this engine rebuild. It's the one that took place on my dining room table. The culprit behind the engine grenade was a cheap clutch basket top hat bushing. It's a known issue, to the point where later model bikes came with a redesigned bushing. This was original 2001, though.
Damage to the engine was total. Only parts reused were the crankcases (and I even accidentally broke one of those and had to replace it with a new one) and transmission. The transmission had to be completely disassembled because every nook and cranny were full of bronze shavings. Because this engine is so tall, this bike has a dry sump lubrication system, with the oil tank residing in the frame downtube. This was also completely full of bronze shavings, requiring multiple kerosene rinses and new screens.
With so many parts needing replaced, we decided we might as well take the opportunity to chase some performance (I love spending other people's money!...), so 680cc big bore kit, high comp piston, replica grind HRC camshaft. Figured that oughtta do.
Narrator: "It didn't..."
We were never able to get the bike to run correctly after the rebuild. With all of the new parts, the jetting was always off. It would either start easily and run like **** or be nearly impossible to start but run alright afterward. I eventually caved and bought a wideband O2 sensor and gauge, and we had a bung welded on the collector. The readings from that sensor and gauge were so unbelievable that I assumed it was faulty. The bike would only run when the sensor claimed it was Danger-Will-Robinson lean. So we chucked the gauge and kept fiddling. It was during this fiddling that I discovered that backing out the exhaust valve clearance helped dramatically. They had to be backed out past their tolerance limit, though.
It was about this time that the bike decided it had had enough of running on a stand in the backyard and overheated in dramatic fashion, making a clacking sound like a chain slapping for some time after the engine was shut down. After investigating, we found the thermostat pin bent and the thermostat stuck closed. The radiator overflow vent was also pinched and plugged. Ouch.
But, after cooling down and with the exhaust valves backed way the hell off, it was a runner for a time while we debated what to do about it. It seemed to be making even less power than before all of the "upgrades," was still a bit hard to start, and the exhaust valves needing to be out of adjustment didn't sit well with me.
We finished the rebuild in October 2016, and sometime after was when it was badly overheated and the thermostat found to be faulty. In July of 2017, I finally convinced Andrew to have a look inside the engine. I'm glad I did, as it was destroyed. So destroyed that we shipped the cylinder to Millenium Technologies in Wisconsin, and they had to do weld repair before Nikasil replating. Not only was the piston shot, but it turned out that the website we ordered from sent us a standard compression piston instead of high comp. I also suspected the camshaft was improperly ground, so I chucked it and ordered a stage-1 cam from a reputable supplier. While we were at it, I also ordered a new exhaust and a Mikuni pumper carb. No way in hell it wasn't going to be an absolute monster with all of these parts.
One other thing came up during the previous rebuild that I've saved until now. In the process of tearing the bike down post track grenade, I noticed something disturbing under the seat:

The heat shrink over the battery pack had melted badly, and it was only a matter of time before that battery would fail. It was clear that the bike was running enough electronics that it both needed a bigger battery and we would need to locate that battery somewhere with room to breathe. Unfortunately, there's no such place that exists naturally on this bike. The only thing we could think to do was stuff the battery under the tail, above the rear tire. It would be high enough to not rub, but it wasn't ideal. You can see the shelf we built for it in this shot:

This would eventually be replaced by an uglier but more functional sealed Pelican case strapped to the subframe. Not ideal.
But ideal enough for it to get back on the road for a while. This is how it looked when it rolled out of the shop after all of those mods:

I thought the pumper carb would for sure put the power over the top, but it still felt exactly the same as it did before. He also started having electrical gremlins pop up after a while. The tail light kept burning out, brake lights and blinkers sometimes didn't work. It all added up to something being wrong with the wiring.
Which led to more research and the lesson learned that soldered connections aren't ideal in vibration prone applications. I also used way thicker wire than necessary, and this was partly the cause of space under the seat being at such a premium. Lastly, I wired the headlight through the handlebar switch, meaning
too small of a wire. A relay would be more appropriate.
I took the bike back in winter of 2017/2018 for a final re-wiring and tuning, and I've just been too busy with work and finishing the shop to get around to it since. This fact brings no small amount of guilt... So all of the parts, wire, shrink wrap, connectors, etc. have been purchased to finally wire up this bike right, and that's the current project.
First step is to relocate the battery and lighting relay to a custom box located behind the cylinder, in front of the frame, and below the carburetor. In this big empty space here:

Which is what I'm currently working on.


 Only if you use the wrong end...