To avoid these ads, REGISTER NOW!

Blackhawk S-4 Restoration

dayradebaugh

Member
Joined
Jul 10, 2018
Messages
24
Location
KS
I would say they are trying to rob me too. I'm going to retrieve the unit, pay them for their time so far, and do it myself. Do you know of a cheaper kit than $180?

I found one at Tools and Hydraulics for $121; do you know anything about these fellows?
 
To avoid these ads, REGISTER NOW!

Hiball

Well-known member
Joined
Apr 30, 2009
Messages
14,027
Location
Missery
I would say they are trying to rob me too. I'm going to retrieve the unit, pay them for their time so far, and do it myself. Do you know of a cheaper kit than $180?

I found one at Tools and Hydraulics for $121; do you know anything about these fellows?

Highly unlikely... there is a reason that the majority of Black Hawk S-4 “restorations” on Gj consist of Power washing and New Paint. It takes some OEM specialty tools to properly re-seal these jacks, if you have the skill set and a lathe they can be made though. It’s not a Jack for a beginner, the jack is likely to need some polishing/Metal work to accept a new seal kit and not simply chew it up. I’m all for the DIY crowd, it’s the reason I’ve spent so much time trying to help the community with countless posts/phone calls to help people thru there problems with hydraulic jacks. I’m definitely not saying that whomever has your jack is on the up and up and has the proper tools/skill set to repair your jack, but As I stated, it’s not a jack where you throw a handful of Orings at it and magic happens.

In regards to seal kits, be Leary of Old stock kits, they seem like a good deal till you pull the seals out and chunks of the seals start falling off. What shop in Kansas are you using?
 

dayradebaugh

Member
Joined
Jul 10, 2018
Messages
24
Location
KS
Carlson's in Wichita. They've done a number of jobs for me before (tractor rams, truck power steering rams). They're competent, but not as responsive as I would like. It's taken a couple of tries on some of the previous work, but they've been honorable, and fixed what they didn't get right the first time.

Appreciate your advice.

All the rest of the jack (handle, wheels, etc.) is easy, and is complete. I'm not going to worry about the headlight; I just need a dependable jack for my truck shop.
 

whateg01

Well-known member
Joined
Mar 13, 2006
Messages
11,250
Location
doo dah, kansas, usa
Carlson's in Wichita. They've done a number of jobs for me before (tractor rams, truck power steering rams). They're competent, but not as responsive as I would like. It's taken a couple of tries on some of the previous work, but they've been honorable, and fixed what they didn't get right the first time.

Appreciate your advice.

All the rest of the jack (handle, wheels, etc.) is easy, and is complete. I'm not going to worry about the headlight; I just need a dependable jack for my truck shop.

If you just need a jack, I've seen a few 4T Walkers on FB and CL over the past few months. Might be better off setting the S4 aside for later to be fixed as time/money allow and get something that works today. My 4T Walker was a CL ad about a year ago that some guy in Old Town had. I think I paid $75 for it because it didn't work. I put fluid in it and it's been working great since then. I bought a 10T Weaver a couple years ago, too, for $150 IIRC from a guy up by the Coliseum. So, there are other options besides fixing that S4. OTOH, if you decide to try to fix it yourself and need specialized tools made, I know a guy!

Dave
 

whateg01

Well-known member
Joined
Mar 13, 2006
Messages
11,250
Location
doo dah, kansas, usa
Hey, do you suppose I could take a look at your jack sometime? The threads on my light are buggered a bit so it's hard to use them as a gauge. I've been working toward casting new lenses, but want to make sure whatever I make will actually thread in. I'll send you a PM.

Dave
 

dayradebaugh

Member
Joined
Jul 10, 2018
Messages
24
Location
KS
Good points. I did not realize that specialized tools were required. I'm cautious about buying some used equipment; I may just be buying someone else's problems. Better to just fix my own.
 

whateg01

Well-known member
Joined
Mar 13, 2006
Messages
11,250
Location
doo dah, kansas, usa
Good points. I did not realize that specialized tools were required. I'm cautious about buying some used equipment; I may just be buying someone else's problems. Better to just fix my own.

That's sometimes the case, but one can still score a good deal if repairs can be made. Often, the previous owner just doesn't know that it can be fixed. I recently picked up a lawnmower that didn't run and needed a carb. Got it home and put a battery in it and it fired right up. I don't know why they thought it needed a carb. But, yes, it can be a surprise to find that a special tool is needed or parts can't be found anywhere. That's one of the things that keeps me in the garage at the lathe, mill, or welding bench - making parts that can't be found. I know not everybody has those at their disposal, but it sure is nice that I do.

Dave
 

dayradebaugh

Member
Joined
Jul 10, 2018
Messages
24
Location
KS
Got the jack back from Carlson's in Wichita. Even at $400 all in, glad I did it. Works great, I need it, don't think I could duplicate it from currently available jacks for that price, and it will likely outlive me.

It's a real beast!
 

2oolhound

Well-known member
Joined
Dec 18, 2010
Messages
5,918
Location
BC Canada
I bought my S4 about a year ago. Shortly after I broke a tie rod end off when I hit a rock in a field in my Jimmy. Towed it home but the problem was getting my Jimmy frontwise into the narrow driveway. Out came the S4, I jacked up the broken side and the tow truck driver steered the jack while I drove the Jimmy into the narrow driveway. I figured the jack paid for itself after that one. It still works great so don't plan any resto for it yet.
 

dayradebaugh

Member
Joined
Jul 10, 2018
Messages
24
Location
KS
I bought the seal kit, and they installed and tested it. Also did a couple of little repairs on the linkage. Don't intend to fiddle with the light.

I'm not used to a jack like this. I've only used 3 ton car jacks, which you can get going with short strokes. This one you just go slow and move that handle all the way up and down. There must be a huge mechanical advantage that you put into the pump with that long stroke. I suppose the shorter stroke jacks just make up for it with the multiplication between the primary and secondary cylinder. You end up getting the same amount of work done.

I tried it out on the front end of a pickup, which is probably around a ton, maybe ton and a half. I have much bigger trucks, and I think I'll test it on them. I'm leaving the pickup on the jack overnight to see if there is any leakdown. Curious to see how much this jack will really lift.
 

whateg01

Well-known member
Joined
Mar 13, 2006
Messages
11,250
Location
doo dah, kansas, usa
... Curious to see how much this jack will really lift.

I don't know the answer to that, but there is apparently a limit somewhere, as the left side of mine has a slight bow to it.

Glad you got it working, and it's nice to know that there are still places that fix stuff instead of just recommending that you throw it away.

Dave
 

CNGsaves

Well-known member
Joined
Sep 26, 2012
Messages
13,233
Location
KS and OK
Got the jack back from Carlson's in Wichita. Even at $400 all in, glad I did it. Works great, I need it, don't think I could duplicate it from currently available jacks for that price, and it will likely outlive me.

It's a real beast!

Congrats on getting great old Blackhawk floorjack restored.

Let's SEE pics of the finished product !!
 

dayradebaugh

Member
Joined
Jul 10, 2018
Messages
24
Location
KS
I think they did a good job. It wasn't quick, but I wasn't in a hurry. I'll take good over fast any time.
 

dayradebaugh

Member
Joined
Jul 10, 2018
Messages
24
Location
KS
Here it is. Not a beauty, but seems to work fine.

NveZEqekAPMU_qlGrFGVqd7wFauKbFHln32A7gzYdP2a2WbF93v1dFgiDQCYahWzXbnAYPJmr9G8Io8fJI8z_yd84AjeiGTyAZMjzUP7bc-seoxK9gOjJiACnGpw3hJ0p0W8P5zkxjgMAbt1tGlYUPbZpvnoratI0Kbv7vreKFYDzc2me2YEbTp_La2J2lk2Gg-yFAZyqPVmf3Lug3xpQhlSaRZonXNRzcOMv4uUpLxAFaLnPBOzKxkIS8zuF0Cv79MTYGiYZv3PquDXNg2nVJZir1N2v-AE0Ew3ZZF6fFb8zdFqIdrYf8R5mLhBkQvz2wyjfNdZXQV1U0sMjcZRbV2RzH2DY2R10F_eLQewORkBP2UJXj3uunJ5n8VPYVlznQpr3V4WSAK-EwKkAv6tU3Uen9H2P39VC63zvrfcGz0F5C1tfBzIlWr7dDlz2uMyjDWjHV9iJKl-6QaZYmIuXDUN1pb-10wu8expmxC5iN0jN4XcdZqRvBPIvvY0DCMUtUVCg3Zp8widYHNErliYE3UclyVhdtvlPLG6Xb_kv5PJSIywnpAUNR_QB3euUcyQXoScelb9cq_XoGS3ohF0KQTnI0chKZkMyc33L3ruCofgGyV0JXLPp6ZX77YjLJI=w2090-h1560-no


unlSegJbFJnonmtVZ4MrmSWwbKXt8vgFJMuUvc4_csljD-ePdoxe7kO9Bi19Y61wmsjgiNzIoR7PH0H-0OB_9AUnyGqMUsFP7Sil5VfYunSqVtuOZaI77hOF5Y48NZkkZoDUf3SX3e52c72Q8bSXtiEVkO0zzu587LG24OiVKGtbu51CgdkepoMwqydsBTmSYGGw9VJLCJDg-MBgBPeiG0MXNi5TIlgKIXvPk54vo6LSSOWEuRfatX2F_eAxbv-S3T2o3ny17vN2WyZ3RV8JZSO7SDILW1krnXqMbmCLgwH_hUZMBLjmQ74Tbk2_OHVKgsOm1VxGnOPfOF9EmEQvEExdfeleWiKfDp5UOihcJ9O4EsmfMir0CftHoQdj1VfTSD2t76Ae7ofX5d57TmbyZdeE28EA13_C784FNt1pLwj7sv9kSXvN4QbowU9rGiyEEoaQsAcV_XivFU797VnxkGlbTvkuDxdrclN4zj-db0cdgaCs9Eumhu5pKOLg4q-jEYTPrCky4vuMOI68ZEDEdpWu1YatJXQBZYPGETypUCiTIGu-_6wTSg383zQnIkrFJqjIH_cgvVr5-Tj4e4sqaVN7ZyCQIKfAA2AvR6N59nH5lJURxZI9KUFMu1BTA5w=w1280-h960-no
 
Last edited:

Paolo G

New member
Joined
Mar 20, 2019
Messages
1
Location
San Francisco Bay Area
I have an S-4 that I picked up years ago. I seems to work fine but is missing the U-joints and the front wheels. The side of the handle that holds the light switch is broken off. Is there a modern substitute or equivalent for the front wheels? I've looked for originals but no luck yet.

When Kimmerle Brothers still had a location in San Francisco they told me they had some in stock BUT that location closed down before I could get to them. Has anyone here done business with Kimmerle Brothers? There is a Santa Fe Springs location and a Fresno location listed online.
 

whateg01

Well-known member
Joined
Mar 13, 2006
Messages
11,250
Location
doo dah, kansas, usa
I have considered machining new u-joints for mine, but haven't gotten around to it. I've also begun making a mold to cast a new lens. Other hard parts are probably going to be reliant on finding one that somebody is parting out, though I'm sure with the right tools, new front wheels could be made.

Dave
 

Straightgrain

Well-known member
Joined
Jun 19, 2011
Messages
608
Location
North Texas
On the way home from work I drove by a company that repairs jacks, air tools, compressors, hose reels, and oil pumps, etc. They had a back lot full of old rusty vintage jacks including two Blackhawk S-4s and a Walker to name a few. The person I talked to estimated one of the Blackhawks (which was in serious need of a rebuild) would cost ~$300 as is. He said it would cost an additional $400-500 dollars to get it rebuilt and repainted.
 
To avoid these ads, REGISTER NOW!

RancherRob

Member
Joined
Jun 18, 2012
Messages
8
I tried having mine restored. Spent about $600 having it rebuilt. Leaks now worse than ever. So in the mean time I bought a nice new jack and am going to sell my Blackhawk s-4 in case anyone wants it that lives near me (SW Washington) or wants to arrange to have it picked up and shipped. If interested, send me a PM with email and I'll email back some pictures.
 

HoldenHR1966

Member
Joined
Nov 4, 2018
Messages
17
Location
Beijing
Hey Ranger Bob,

I would love an S-4. [email protected]

You may have read my earlier posts where I restored a very broken down S-23.

Only thing is I am a LONG way from you... I wonder what it would cost to ship it here...

I don't care how long it takes just keep the cost down... ha ha.....

Im am in a Suburb called Yokine in a City called Perth, Western Australia. Do yo even know where this is???
 

whateg01

Well-known member
Joined
Mar 13, 2006
Messages
11,250
Location
doo dah, kansas, usa
Finally getting back to the replacement lens for my s4. We now have two sla printers so I printed one to be used as a form to make a silicone mold. I may try just 3d printing it in a clear resin but so far the clear resin has turned cloudy for me.

attachment.php


Dave
 

Attachments

  • 20191026_123022.jpg
    20191026_123022.jpg
    69.9 KB · Views: 441

whateg01

Well-known member
Joined
Mar 13, 2006
Messages
11,250
Location
doo dah, kansas, usa
I have 3D printed a couple of prototypes to check fit. Machining them and getting the inside radii satisfactory wasn't going well at the time. I have since picked up a better lathe, so maybe my results would be better. But the 3D printed parts have been sitting on my desk waiting for my round-tuit to get here. I need to adjust the threads, as well. One of my recent tasks has been getting a Bridgeport mill into an already packed shop. So, the mill is in but there is still stuff that needs to be put back in the shop and that's been my focus the past month or so. Amid the things that got moved was my S-4 and I was reminded that it needs to move back up the list, so hopefully that will happen in the next couple months.

Dave
 

bobbys53

New member
Joined
Jul 6, 2020
Messages
1
Location
Egg Harbor City, NJ
Blackhawk S-4 Casters

I have a Blackhawk S 4 and the rear casters have been replaced with plate mount casters. Would someone who has one off these original casters please measure them and provide a sketch for me. I am a hobby machinist, and would like to attempt to make replacements.

Bob
 

whateg01

Well-known member
Joined
Mar 13, 2006
Messages
11,250
Location
doo dah, kansas, usa
Do you need just the wheel itself? Or the fork dimensions and stem? (I don't even remember now what the rest of it looks like, so I don't know what other dimensions there are.)

Dave
 

whateg01

Well-known member
Joined
Mar 13, 2006
Messages
11,250
Location
doo dah, kansas, usa
Just caliper measurements, but that's all the rough surfaces are good for anyway. I can send you the step file if you want, or a f3d file, if that works.

Here are the drawings of the frame and wheel. I didn't model the 1/2" pin or the retaining screw. The screw is a 1/4"-20 with a 3/8" diameter head. Also, I didn't dimension the arcs on the sides of the frame. They would have been approximations anyway. If you want, I can see what I traced them as in the sketch. I'm not sure if you planned to program the whole thing and let the computer machine the parts or if you were going to do it all manually.

I tried to take into account wear. The groove for the retaining screw isn't square anymore. So, I measured at the ID as well as I could. I think the ball bearings should be 1/4" but mine are all missing. I suspect that the wear in the groove as well as the pocket in the cast sides of the jack prevent everything staying in place correctly so I haven't replaced them yet. Some day I'll get the thing disassembled and on the mill so I can press in some bronze bushings and get it all tightened up and reassembled correctly. Anyway, I didn't model the bearing race, but you can see it in the photos. The outer race is in the side frame of the jack, of course. Modern times, I'd probably have designed it to use an AC cartridge bearing.

https://drive.google.com/file/d/1WI7bhwUHixxmNcR4JEo2L9zVJrcgGc31/view?usp=sharing
https://drive.google.com/file/d/1Wzh8M7UYuPCCSQY6uONSIX4m-s5IUyYQ/view?usp=sharing

Hope that helps. Let me know if you need more info on the parts.

Dave
 

Attachments

  • caster assembly_cr.jpg
    caster assembly_cr.jpg
    34.4 KB · Views: 39
  • 20200706_114825_cr.jpg
    20200706_114825_cr.jpg
    143.6 KB · Views: 37
  • 20200706_115809_cr.jpg
    20200706_115809_cr.jpg
    129 KB · Views: 38
  • caster_sm.jpg
    caster_sm.jpg
    82.8 KB · Views: 39
  • screw.jpg
    screw.jpg
    86.7 KB · Views: 39
  • wheel_cr.jpg
    wheel_cr.jpg
    32.2 KB · Views: 40
  • caster frame_cr.jpg
    caster frame_cr.jpg
    31.4 KB · Views: 39
Last edited:
OP
M

MBeaty

Well-known member
Joined
Feb 1, 2010
Messages
237
Location
Middle Tennessee
It has been a long time since I have checked back in with this thread I started. Ever since I bought this S-4 jack, I had always owned a "cheap" aluminum racing jack. That was a purchase I made when I was young and did not know much better, but it was always frustrating to me. I could not stand the lack of quality of the jack, as well as some annoyances with the reservoir becoming pressurized and pushing oil out of the release mechanism, which was sealed with a single poorly fitting O-ring. My S-4 was functional, so it saw the most use during this time and I was afraid of really digging into restoring the S-4 until I had a reliable second jack. Finally, last year I became frustrated enough with the racing jack, that I decided to buy a Compac 90530 2 ton jack. With the Compac in use, it was finally time to turn back to the S-4 and give it the repairs in needed.
If you can remember back to the original info in this thread, my jack had a few rough spots, but was otherwise functional. One of the big annoyances with the jack was the slop in the jack release mechanism. The majority of the slop came from the two universal joints and the pinned slider that connects the joints.

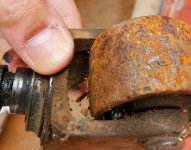
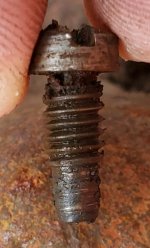
I was able to drill the pins out and fully disassemble both universal joints. I don’t know the year my jack was made, but this is likely what 60 years of wear looks like on the 1/8” pins and bores for the universal joints.

Worn%20Parts.jpg

It was not worth trying to repair any of these worn parts, so I started with some 5/16” square stock and ground and filed them to size, then drilled new holes.


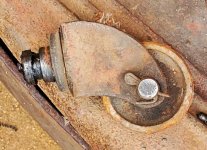
The original design of the slider section of the universal joint used a single round pin that interfaced with the slot. Of course, over time, the pin wore some and also wore the corners off the slot.

Worn%20Parts%202.jpg

To repair the slot, I welded a small bead on each side of the slot and then filed the surface back down with a small needle file.

Weld%20Buildup.jpg

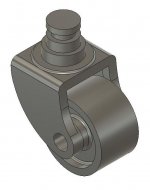
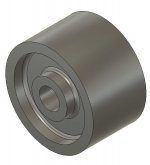
It would have been easy enough to simply put a new pin in and call it a day, but I could not help myself. I decided to convert the pin into a flat plate with a significantly larger surface area. This should spread the load over a wider bearing surface and should prevent it from getting sloppy for many more years. I will probably never appreciate this work, but one of my children may.

Flat%20Bar%20Modification.jpg

Before%20Welding.jpg

After%20Welding.jpg

With all of the parts repaired, I installed new 1/8” pins and hammered the loose ends over to rivet the joints back together. With everything fully assembled, both universal joints and the slider only have less than 1/16 of a turn of slop, which is a large improvement from the original ½ turn of slop between all the connections.

New%20Pins.jpg

Assembly.jpg

I have not decided yet if I want to try to repaint any of the parts or clean them up good and wax them or clear coat them. The main bod of the jack has original paint in decent condition, so I don't want to lead myself down the path of repainting everything to get a good color match.

I will continue to post as I make repairs, but I already ordered a new seal kit and will be completely going through the hydraulic unit for this jack.
 
Last edited:

whateg01

Well-known member
Joined
Mar 13, 2006
Messages
11,250
Location
doo dah, kansas, usa
It's amazing how one fairly simple repair like that can improve the feel of using a tool. I dunno if there were supposed to be pictures or not but I can picture it in my head well enough I suppose.
 
OP
M

MBeaty

Well-known member
Joined
Feb 1, 2010
Messages
237
Location
Middle Tennessee
It's amazing how one fairly simple repair like that can improve the feel of using a tool. I dunno if there were supposed to be pictures or not but I can picture it in my head well enough I suppose.

Odd, I can see the pictures from two different computers I checked it on. I wonder if anyone else can see them?

Moving onto the hydraulic unit, I wanted to figure out the function of all the various ports and ball checks in the unit. The original paperwork was a big help, but some of the ports were not clear. To determine the hydraulic flow path on these, I simply sprayed some carb cleaner though the ports or blew compressed air and watched where it came out.

Hydraulic%20Unit%20Components.png

These jacks have a few extra features compared to some of the simpler jacks I have worked on in the past. The pump on the S-4 is a two-speed pump, but both pumps are always engaged. The low-pressure high-volume pump has a dedicated suction port with a ball check valve and a dedicated discharge port with another ball check valve. In addition to the ball check the discharge of the low-pressure high-volume pump has a spring-loaded bypass valve. This valve opens at an adjustable set point when the hydraulic pressure is high enough, leading to the hydraulic fluid from this pump returning to the reservoir while the high-pressure pump takes over. The high-pressure low volume pump has its own dedicated suction and discharge ball check valve. Both the ball check valves for the high pressure and low-pressure pumps are ported together on the downstream side of the ball check valves and lead straight to the ram and the over pressure relief valve.

Section.png

Pump%20Ports.png

On the ram side of the system, there are 3 ports in the ram. One port is the discharge from the pump, one port leads back to the release valve, and the last port connects a passage in the ram to a passage leading back to the reservoir. When the ram extends to the end of its travel, these ports line up circumferential, allows additional pumped fluid volume to bleed back to the reservoir stopping the over travel of the ram.

Ram%20Ports.png
 
Last edited:
OP
M

MBeaty

Well-known member
Joined
Feb 1, 2010
Messages
237
Location
Middle Tennessee
With all of the packings and seals removed from the hydraulic unit, there is no wonder the seal kits on these jacks are so expensive. There are so many sealing elements, but I guess the proof is that a 60+ year old jack was not leaking. I was terrified of not getting the packings back in the proper orientation, so I made drawings of each one as I removed them. It turns out there are a few subtle differences from any of the Blackhawk drawings I saw. It looks like they may have made some slight changes from year to year

Here is some documentation about the arrangement of the various packing elements. Most of the are pretty straightforward, but the high pressure pump is a bit of an outlier. Because the pump seals act in both the pressurizing and suction direction there is a set of chevron seals facing each direction.

Main Ram Seals
Main%20Ram%20Packing.jpg

Static Pump Element Seals
Static%20Pump%20Packing.jpg

Dynamic Pump Element Seals
Moving%20Pump%20Packing.jpg

Release Valve Seals
Release%20Valve%20Packing.jpg
 

TheBadDog

Well-known member
Joined
Dec 9, 2012
Messages
112
Location
Phoenix
I see where there were pic issues earlier, and if those final 4 bold lines are supposed to be links (or pics?), they don't show anything to me except the bold text. I'm likely to be going into mine to fix some leak issues, and hoping that our local major seal/bearing supplier can provide generic alternatives (as opposed to ~$200 kit), so any reference is appreciated.
 

gilbo

Well-known member
Joined
Feb 1, 2010
Messages
716
MBeaty, any thoughts on how tight to pack the seals for assembly??
 
Last edited:
To avoid these ads, REGISTER NOW!
Top Bottom