To avoid these ads, REGISTER NOW!

ZMotorsports Shop Projects 2.0

OutlawDrifter

Well-known member
Joined
Jan 20, 2015
Messages
3,894
Location
KS
Glad to hear they took the time, Mike. I agree, that speaks volumes.

Classic Instruments is another company I hold in high regard for their customer service. I was having some issues with the gauges in my '49 GMC after installation and called the tech service line. The president of the company actually answered my call, gave me some things to try, and then spoke to me for about 40min afterwards about my thoughts on the product. Completely blew me away!

Early in the phone conversation I had commented about the difficult nature to install the gauges, and asked him to pass it up the chain of command for me...he laughed and said, "well, its actually as high as it can go, I'm the president of the company!"
 
Last edited:
To avoid these ads, REGISTER NOW!
OP
Z

zmotorsports

ALLIANCE MEMBER
Joined
Oct 20, 2009
Messages
21,441
Location
Northern Utah
Glad to hear they took the time, Mike. I agree, that speaks volumes.

Classic Industries is another company I hold in high regard for their customer service. I was having some issues with the gauges in my '49 GMC after installation and called the tech service line. The president of the company actually answered my call, gave me some things to try, and then spoke to me for about 40min afterwards about my thoughts on the product. Completely blew me away!

Early in the phone conversation I had commented about the difficult nature to install the gauges, and asked him to pass it up the chain of command for me...he laughed and said, "well, its actually as high as it can go, I'm the president of the company!"

That is good to hear Marc. I have purchased a lot of components from Classic Industries over the years and never really had an issue. Good to know if I ever did someone would address it.
 

LXCam

ALLIANCE MEMBER
Joined
Apr 23, 2013
Messages
19,180
Location
AZ
I just received an unexpected telephone call from FASS. The same tech I spoke with about my pressure issue had called me back to make certain everything was ok and I was not experiencing any further issues.

I have to say, THAT right there impressed me very much. THAT is customer service and to be honest makes this little hiccup that I had with my pump pretty much a non-event.

He wanted to know if there was anything else FASS could do for me pertaining to this issue or any other issues. I was honest and told him nothing more could be done as everything is fine, but the fact that he called me back a couple of days later to confirm everything was ok had been enough.

At this point I can't say enough about FASS and their customer service after the sale.

That is very impressive Mike, kudos to them.
 
OP
Z

zmotorsports

ALLIANCE MEMBER
Joined
Oct 20, 2009
Messages
21,441
Location
Northern Utah
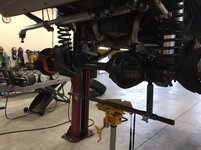
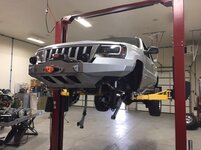
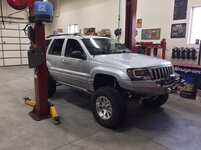
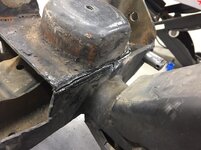
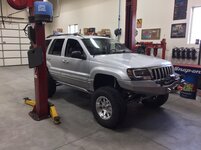
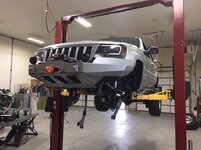
Finished up my son’s WJ tonight and got it back on the road again.

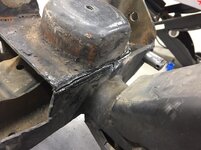
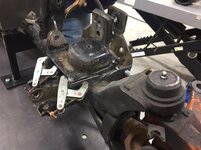
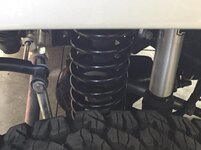
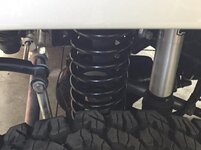
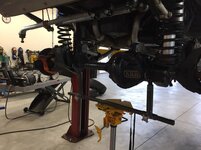
The front coil springs had quite a bit of arch to them as we didn’t correct the spring buckets when we clocked the knuckles last year.

Usually a little arch isn’t too bad but his was severe enough that the inside of the coil was making contact with the jounce stop bucket and making some noise. It took us a little bit to locate the noise as is was so intermittent.

3fc0af2d48d4e3d3a5d4a23926ac80bd.jpg

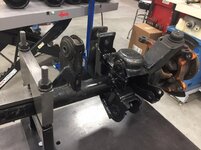
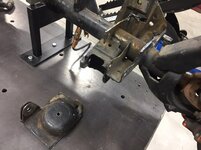
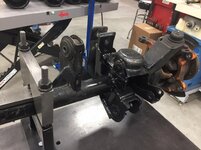
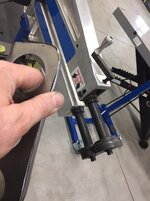
Axle adapter for transmission jack came in handy again. Had the axle out in no time.
ab75c6e856d4ccdddd06bd076bf3487d.jpg

a99ad63a2a1dee6b952cf328cedf3794.jpg

Axle fixture worked awesome.
eb2452d9151a762f37fc23b0dd5ea5f0.jpg

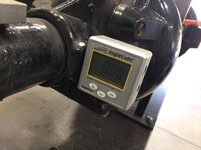
It worked great to set the axle to zero and lock it solid to the table and then do our cutting and welding off of that dimension.
ca539aff29f0bfe8ee5e56d50ae609d9.jpg

29fe90423fd70089dddb4a84b522c724.jpg

2e801cba526db8583fc6bc8741f71c6b.jpg

8492cd529f77a80e675fc8dde418e51c.jpg

57f394a6d6b478db87d7f46b715a5af2.jpg

a7b6c3e0366d6a86fc1860f55d5d89d9.jpg

596ea07d5c9159f6b7b80b375bc4d706.jpg

4f4976c7d60cecd0b49a72f2c8d82a64.jpg

We could have taken a bit more time and cut everything off and started from scratch on the front bracketry but a quick cut with the plasma cutter and weld everything back together compensating by about 6.5 degrees was all that was needed and it was back on the road. No sense in dragging it out longer or making it more complicated than necessary.
 

Attachments

  • eb2452d9151a762f37fc23b0dd5ea5f0.jpg
    eb2452d9151a762f37fc23b0dd5ea5f0.jpg
    115.7 KB · Views: 1
  • ca539aff29f0bfe8ee5e56d50ae609d9.jpg
    ca539aff29f0bfe8ee5e56d50ae609d9.jpg
    65.6 KB · Views: 1
  • 29fe90423fd70089dddb4a84b522c724.jpg
    29fe90423fd70089dddb4a84b522c724.jpg
    93.7 KB · Views: 1
  • 2e801cba526db8583fc6bc8741f71c6b.jpg
    2e801cba526db8583fc6bc8741f71c6b.jpg
    83.9 KB · Views: 0
  • 8492cd529f77a80e675fc8dde418e51c.jpg
    8492cd529f77a80e675fc8dde418e51c.jpg
    91.8 KB · Views: 0
  • 57f394a6d6b478db87d7f46b715a5af2.jpg
    57f394a6d6b478db87d7f46b715a5af2.jpg
    91.3 KB · Views: 0
  • a7b6c3e0366d6a86fc1860f55d5d89d9.jpg
    a7b6c3e0366d6a86fc1860f55d5d89d9.jpg
    59.9 KB · Views: 0
  • 596ea07d5c9159f6b7b80b375bc4d706.jpg
    596ea07d5c9159f6b7b80b375bc4d706.jpg
    82.2 KB · Views: 0
  • a99ad63a2a1dee6b952cf328cedf3794.jpg
    a99ad63a2a1dee6b952cf328cedf3794.jpg
    87.3 KB · Views: 0
  • ab75c6e856d4ccdddd06bd076bf3487d.jpg
    ab75c6e856d4ccdddd06bd076bf3487d.jpg
    87 KB · Views: 1
  • 3fc0af2d48d4e3d3a5d4a23926ac80bd.jpg
    3fc0af2d48d4e3d3a5d4a23926ac80bd.jpg
    70.6 KB · Views: 0
  • 4f4976c7d60cecd0b49a72f2c8d82a64.jpg
    4f4976c7d60cecd0b49a72f2c8d82a64.jpg
    85.8 KB · Views: 0
Last edited:

Bighead38

Well-known member
Joined
Nov 11, 2012
Messages
5,612
Location
Rockland County NY
Thanks. Can't remember what the other valve was right off the top of my head. You may have to remind me.

I was confident the problem didn't come from the install and I figured the new pump was the place to look, especially after I drug the information out of the tech about how they control pressure. To be honest, I really didn't think that little burr would have been enough to cause the high pressure and was quite surprised when I reassembled the shuttle valve, spring and fitting and the pressure was right where it was supposed to be.

As for the landscaping rake, I hope he's happy with it. I haven't talked to him and just put it in his truck at work yesterday morning.


Most of the older diesels had hand pumps vs. the electric lift pumps of today. The CAT 3208 in our last coach was in a 1991 38' Beaver Contessa and the engine was a 1990 model year. It did not have an electric lift pump and the manner in which to prime the new filters were to unscrew the manual lift pump and pump it about 20-30 times until it filled the filter.

Even on the Duramax engines where they don't have a lift pump they have a manual prime pump to pull fuel from the tank up to and through the filter to purge the air prior to starting. I believe the Ford Powertroke and the Dodge Cummins light duty trucks are the only ones with electric lift pumps to prime the fuel system.

Cummins states right in their manuals to not fill fuel filters externally on these engines but to use the lift pump once the new filters are installed. Cycling the key a couple times is usually all it takes.

I get that a lift pump can fill the filters but what harm would be done if you filled the filters before installing them?
 
OP
Z

zmotorsports

ALLIANCE MEMBER
Joined
Oct 20, 2009
Messages
21,441
Location
Northern Utah
Clean work !


Sent from my iPhone using Tapatalk

Never occurred to me to do it that way, slick and WAY faster Mike. Nice job.

Now that's the difference in having the tools and knowledge to make that a quick job. Well done!

Thanks guys, I appreciate the comments. This job would have been completed on Saturday but we had our power go out Saturday afternoon as we were wrapping up the job so had to complete it last night. All in all it went rather quick and yes, having the lift, the axle adapter for the transmission jack and the fixtures that bolt to the fabrication table to hold the axle sure made the job go much quicker.

I really should have built those tools years ago when I first thought to build them rather than keep putting them off. I can think of many jobs they would have worked out great on.

Thanks for following along and for the comments guys.
 
OP
Z

zmotorsports

ALLIANCE MEMBER
Joined
Oct 20, 2009
Messages
21,441
Location
Northern Utah
I get that a lift pump can fill the filters but what harm would be done if you filled the filters before installing them?

On the modern diesel engines to achieve today's high pressures at the injectors (approx. 30k PSI) the tolerances are so precise that any debris will kill an injector in short order, and possibly even damage the high pressure pump. All of the manufacturers now advocate to absolutely not fill filters externally for fear of introducing foreign material into the fuel system. The new Davco priming pump we just purchased at work will filter down to 7 microns during the priming process whereas the filters on the Detroit engines are an 8 micron so they even have us filtering finer during he priming process.
 

aka Larry

Well-known member
Joined
May 2, 2012
Messages
8,086
Location
Eastern, NC
Nice work again Mike. I was almost surprised you broke out the plasma cutter since I know that is not you favorite tool.

I still love the custom bumpers you built on your son's Jeep. They really do look awesome.
 

OutlawDrifter

Well-known member
Joined
Jan 20, 2015
Messages
3,894
Location
KS
Mike, I have/use the same cube angle finder in my projects such as this.

Great job on the son's Jeep, there is nothing wrong with the KISS method!
 
OP
Z

zmotorsports

ALLIANCE MEMBER
Joined
Oct 20, 2009
Messages
21,441
Location
Northern Utah
Nice work again Mike. I was almost surprised you broke out the plasma cutter since I know that is not you favorite tool.

I still love the custom bumpers you built on your son's Jeep. They really do look awesome.

Thanks Vincent. I really tried to get a die grinder with a cutoff wheel in there but there simply was no way so I had to break out the plasma cutter. Although it's not my favorite method to cut metal with, I have to admit it was quick and required very little cleanup with a Roloc disc on either side prior to welding.

Thanks for the comments and for continuing to follow along.
 
OP
Z

zmotorsports

ALLIANCE MEMBER
Joined
Oct 20, 2009
Messages
21,441
Location
Northern Utah
Mike, I have/use the same cube angle finder in my projects such as this.

Great job on the son's Jeep, there is nothing wrong with the KISS method!

Agreed Marc. Kept this one very simple and the little cube angle finder works great for tasks such as this.

Thanks for following along Marc.
 
To avoid these ads, REGISTER NOW!

quadrcr87

Well-known member
Joined
Jul 5, 2013
Messages
1,036
Location
Travelers Rest, SC
Those coils look much happier now. Do you think the bind they were in was affecting the spring rate at all. Seems like it could have stiffened up the ride some under tension all the time.
 
OP
Z

zmotorsports

ALLIANCE MEMBER
Joined
Oct 20, 2009
Messages
21,441
Location
Northern Utah
Those coils look much happier now. Do you think the bind they were in was affecting the spring rate at all. Seems like it could have stiffened up the ride some under tension all the time.

Yes they appear "happier".:bounce:

I don't know if the arch affected the spring rate per se, but I definitely think the arched coils affected the ride height which in turn affected the ability to properly transfer forces linear from the axle to the chassis.

When off-roading, the arch really didn't seem to negatively affect droop as the coil straightened out until it hit the limiting strap but upon full stuff (compression) I think they were slightly binding on the jounce stop buckets so straightening them should greatly affect the off-road characteristics as well as the pavement manners.
 

Bighead38

Well-known member
Joined
Nov 11, 2012
Messages
5,612
Location
Rockland County NY
On the modern diesel engines to achieve today's high pressures at the injectors (approx. 30k PSI) the tolerances are so precise that any debris will kill an injector in short order, and possibly even damage the high pressure pump. All of the manufacturers now advocate to absolutely not fill filters externally for fear of introducing foreign material into the fuel system. The new Davco priming pump we just purchased at work will filter down to 7 microns during the priming process whereas the filters on the Detroit engines are an 8 micron so they even have us filtering finer during he priming process.

Interesting. Thanks for answering.
 

Graham08

Well-known member
Joined
Dec 10, 2007
Messages
713
Location
Iron Station, NC
Yes they appear "happier".:bounce:

I don't know if the arch affected the spring rate per se, but I definitely think the arched coils affected the ride height which in turn affected the ability to properly transfer forces linear from the axle to the chassis.

When off-roading, the arch really didn't seem to negatively affect droop as the coil straightened out until it hit the limiting strap but upon full stuff (compression) I think they were slightly binding on the jounce stop buckets so straightening them should greatly affect the off-road characteristics as well as the pavement manners.

They look better for sure, and will repay you with much longer life. Bending a spring like that affects rate, much more so when the coils start contacting each other with travel. If run like that for an extended period, they will take a permanent set in that shape.

Nice work on correcting the perch angles! Not everything has to be a masterpiece...which is still something I'm struggling to learn.
 
OP
Z

zmotorsports

ALLIANCE MEMBER
Joined
Oct 20, 2009
Messages
21,441
Location
Northern Utah
They look better for sure, and will repay you with much longer life. Bending a spring like that affects rate, much more so when the coils start contacting each other with travel. If run like that for an extended period, they will take a permanent set in that shape.

Nice work on correcting the perch angles! Not everything has to be a masterpiece...which is still something I'm struggling to learn.

Thanks Graham. I agree about the level of finish work. When I was teaching my son years ago as he had a tendency to overdo everything. I would tell him this needs to be a 6 or this can be a 5. He would cut a bolt off and spend half an hour making sure the chamfer was even all the way around and I would get on him and tell him "we're not building piano's or fine watches, that doesn't need to be a 10." It got to the point when I would ask him to do something he would stop and ask me "dad, does this need to be an 8 or a 2?" It's become almost a game now with us after 15+ years of this.

When we dropped the axle and got it on the bench I told him I really wish we had the time to just cut everything off and start over and he told me "dad, this only needs to be a 5, it just needs to work not be a masterpiece."

While like you Graham, I try to do everything to a high level of finish work, but I've found that not everything needs to be done to the same degree in order to function and serve its purpose. At first when I started my business I told myself I would never sacrifice quality and when I didn't do every single item to the highest degree I would feel like I was cutting corners. It took me listening to my mentor who I admired to tell me that when you're in business making money you have to realize that time is money and some things don't have to be perfect. A lesson I have had to learn as well.

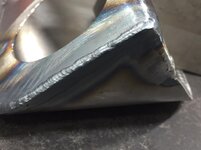
My welds are one area that I am simply never satisfied with. I want every ripple to be perfect like those Instagram welds that I drool over. Unfortunately I don't know if I weld enough to ever make that happen. Fortunately however, my welds have improved a hundred fold over the past decade because of my trying.
 
OP
Z

zmotorsports

ALLIANCE MEMBER
Joined
Oct 20, 2009
Messages
21,441
Location
Northern Utah
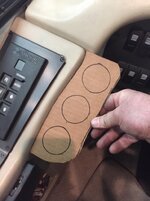
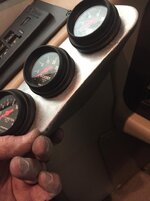
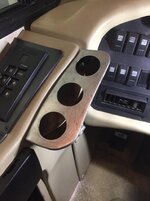
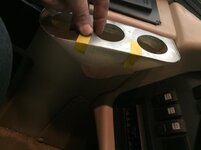
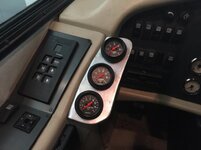
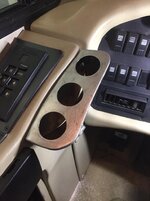
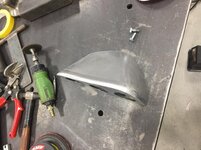
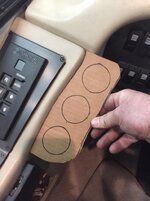
I was able to complete the fabrication of my gauge console for the coach last night so I can drop it off to my upholstery guy.

Started with more CAD.
33fba46210a94f37054359eb2e3fa11a.jpg

10dc141765d3793ba8af575a0bb332f4.jpg

ed898bcf4a15f72cf38016597b440e35.jpg

Transferred the pattern to some 16-gauge P&O.
04d3f49788fd4d6eabc2ee2ef33c1f82.jpg

Fed it through my tipping die.
7f0ed8934bffc6d792d3b8812cc8ffab.jpg

Then to the shrinker.
86796e2cb1375629b2d410ac9fea6d6c.jpg

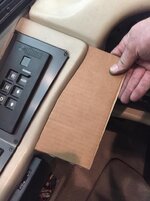
More test fitting.
972e193e7eb51b13ccf671833310c22c.jpg

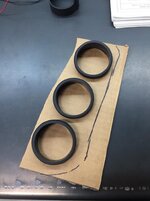
Gauges mocked up to determine location and angle.
2dde2cb06577e6f0778c617eedef35a1.jpg

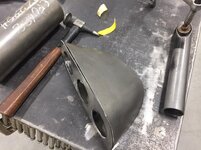
I wanted it completely closed off and not merely an open panel with exposed wiring. More CAD to the rescue.
9c585415f6cf0ccdf0a425ac6863f2b4.jpg

That will work.
ed2b8b5c825a1bbbc18dddfc802d1958.jpg

f8c1e202a1a60e622625fd95122eaf71.jpg

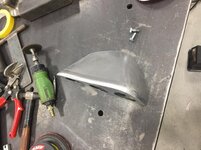
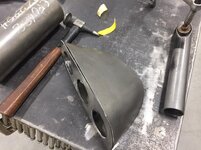
Transferred to some 18-gauge and cut out.
fc2c7aef1f9122295f34870048bc5e04.jpg

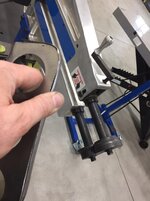
Used a couple of different diameter stock and tube to confirm the radius on each side.
ed68a45d60dfbe221fa668951cc402e9.jpg

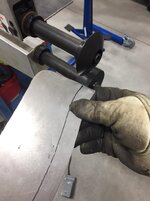
I then made a couple of passes through the bead roller with my tank roll dies to create a rolled edge or soft edge prior to welding.
0798946d4d66933a1ce4f315e421ea09.jpg

f351ef2bbf0a4a2c91d9ae31dfa954da.jpg

9e277b5e977f13be3a5ef61386f57e68.jpg

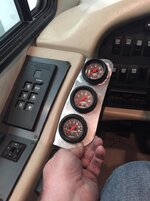
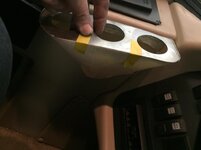
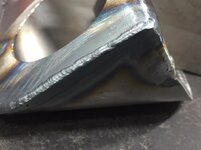
After the welds were knocked down and some metal finishing.
ca39d285aaf022bd508496746aaf6e6a.jpg

Not exactly to Robert’s level (MP&C) but I’m happy with it.
c1cc5b70c0b9b9cf70d9c20f3109df9f.jpg

a0035fb5d728ea6987aa36953fd99cd5.jpg

392564d670adc8399d1e0d72306a1670.jpg

04024a83e00fc688001906aa0c049221.jpg

f60586045706fbb789c18db6ed68abfe.jpg

90c222b415ad5f065393b312c262bdb0.jpg

And it doesn’t even interfere with my cup holder. [emoji12]
 

Attachments

  • ed68a45d60dfbe221fa668951cc402e9.jpg
    ed68a45d60dfbe221fa668951cc402e9.jpg
    105.7 KB · Views: 1
  • fc2c7aef1f9122295f34870048bc5e04.jpg
    fc2c7aef1f9122295f34870048bc5e04.jpg
    66.4 KB · Views: 0
  • f8c1e202a1a60e622625fd95122eaf71.jpg
    f8c1e202a1a60e622625fd95122eaf71.jpg
    45.1 KB · Views: 0
  • ed2b8b5c825a1bbbc18dddfc802d1958.jpg
    ed2b8b5c825a1bbbc18dddfc802d1958.jpg
    33.9 KB · Views: 0
  • 9c585415f6cf0ccdf0a425ac6863f2b4.jpg
    9c585415f6cf0ccdf0a425ac6863f2b4.jpg
    45.7 KB · Views: 0
  • 2dde2cb06577e6f0778c617eedef35a1.jpg
    2dde2cb06577e6f0778c617eedef35a1.jpg
    79.3 KB · Views: 0
  • 972e193e7eb51b13ccf671833310c22c.jpg
    972e193e7eb51b13ccf671833310c22c.jpg
    64 KB · Views: 0
  • 86796e2cb1375629b2d410ac9fea6d6c.jpg
    86796e2cb1375629b2d410ac9fea6d6c.jpg
    72.1 KB · Views: 0
  • 7f0ed8934bffc6d792d3b8812cc8ffab.jpg
    7f0ed8934bffc6d792d3b8812cc8ffab.jpg
    72.1 KB · Views: 0
  • 04d3f49788fd4d6eabc2ee2ef33c1f82.jpg
    04d3f49788fd4d6eabc2ee2ef33c1f82.jpg
    64 KB · Views: 0
  • 0798946d4d66933a1ce4f315e421ea09.jpg
    0798946d4d66933a1ce4f315e421ea09.jpg
    72.5 KB · Views: 0
  • f351ef2bbf0a4a2c91d9ae31dfa954da.jpg
    f351ef2bbf0a4a2c91d9ae31dfa954da.jpg
    60.3 KB · Views: 0
  • 9e277b5e977f13be3a5ef61386f57e68.jpg
    9e277b5e977f13be3a5ef61386f57e68.jpg
    95.7 KB · Views: 1
  • 90c222b415ad5f065393b312c262bdb0.jpg
    90c222b415ad5f065393b312c262bdb0.jpg
    81.1 KB · Views: 1
  • f60586045706fbb789c18db6ed68abfe.jpg
    f60586045706fbb789c18db6ed68abfe.jpg
    66.9 KB · Views: 1
  • 04024a83e00fc688001906aa0c049221.jpg
    04024a83e00fc688001906aa0c049221.jpg
    79.4 KB · Views: 0
  • 392564d670adc8399d1e0d72306a1670.jpg
    392564d670adc8399d1e0d72306a1670.jpg
    61.9 KB · Views: 0
  • a0035fb5d728ea6987aa36953fd99cd5.jpg
    a0035fb5d728ea6987aa36953fd99cd5.jpg
    72.9 KB · Views: 0
  • c1cc5b70c0b9b9cf70d9c20f3109df9f.jpg
    c1cc5b70c0b9b9cf70d9c20f3109df9f.jpg
    106.4 KB · Views: 0
  • ca39d285aaf022bd508496746aaf6e6a.jpg
    ca39d285aaf022bd508496746aaf6e6a.jpg
    108 KB · Views: 0
  • ed898bcf4a15f72cf38016597b440e35.jpg
    ed898bcf4a15f72cf38016597b440e35.jpg
    71.6 KB · Views: 0
  • 10dc141765d3793ba8af575a0bb332f4.jpg
    10dc141765d3793ba8af575a0bb332f4.jpg
    66.9 KB · Views: 0
  • 33fba46210a94f37054359eb2e3fa11a.jpg
    33fba46210a94f37054359eb2e3fa11a.jpg
    75.9 KB · Views: 1
Last edited:
bigdave_185

Well-known member
Joined
Feb 14, 2021
Messages
443
Location
Utah
Who do you use up this way for Upholstry? Iv used Mingos but I’m not sure if they are open still


Sent from my iPhone using Tapatalk
 
OP
Z

zmotorsports

ALLIANCE MEMBER
Joined
Oct 20, 2009
Messages
21,441
Location
Northern Utah
Mike,

Your OCD won't be bothered by the fact your new gauges have a black background and the RV gauges have a white background? :lol_hitti

Ha ha Mark.:lol:
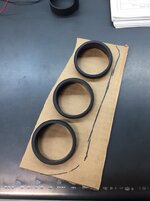
No, I think I'll be fine. I actually browsed through Auto Meter's website to try and find some with a gold ring that matched closer but couldn't find exactly what I wanted so I figured the good ole' standard Z-Series in black should match the black dash panel and side panel and tie everything together.

A guy on irv2.com added a fuel pressure gauge to his dash and he contacted a gauge manufacturer and they matched his perfectly but he had space in his dash for another gauge and was only using a single gauge. I didn't even try to reach out for something custom made as these will work perfectly.

I thought about mounting them up on my A-pillar but didn't want to create a blind spot as my A-pillar is already about 5" wide. Plus I worried about sun glare whereas this is right next to my switch panel and a quick glance to my side and they are easily viewed.
 
OP
Z

zmotorsports

ALLIANCE MEMBER
Joined
Oct 20, 2009
Messages
21,441
Location
Northern Utah
Who do you use up this way for Upholstry? Iv used Mingos but I’m not sure if they are open still


Sent from my iPhone using Tapatalk

I use Mike Gallagher @ Fabric Magic Upholstery in Kaysville. He's been doing all of my upholstery work for the past 25+ years now. Street rods, Harley's, snowmobiles and sand drag quads all were done by him.

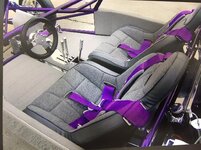
Here are a few pictures of the sandrail that I built that he did for me. I guess I went overboard and continued the street rod theme through to the sand toys.
a74664895bd509801aaf1f3d41cee68c.jpg

42630128d5a1b9c865f7ba8e101f3f4c.jpg
 

Attachments

  • 42630128d5a1b9c865f7ba8e101f3f4c.jpg
    42630128d5a1b9c865f7ba8e101f3f4c.jpg
    115.6 KB · Views: 1
  • a74664895bd509801aaf1f3d41cee68c.jpg
    a74664895bd509801aaf1f3d41cee68c.jpg
    116.6 KB · Views: 0

bigdave_185

Well-known member
Joined
Feb 14, 2021
Messages
443
Location
Utah
Because you did tweed? Why do you at your carries the theme? Looks great to me:)

Did you run with a Gary Mc... lives up in north ogden ?


Sent from my iPhone using Tapatalk
 
OP
Z

zmotorsports

ALLIANCE MEMBER
Joined
Oct 20, 2009
Messages
21,441
Location
Northern Utah
Because you did tweed? Why do you at your carries the theme? Looks great to me:)

Did you run with a Gary Mc... lives up in north ogden ?


Sent from my iPhone using Tapatalk

Thanks. It was tricky to keep clean but I liked the full interior theme carried throughout. On the driver's side inside panel he even did a small net pocket for holding a couple of small items in. I had a towel that I would throw down on the floorboard when getting in/out and then tuck it down between the seat and interior panel when driving. In the trailer I kept a small wall mounted cordless/rechargeable dust buster style vacuum that once we got back to camp I'd vacuum out any sand as soon as possible. It looked just as nice the day I sold the car as when I built it but having full interior wasn't easy in a sand car.

Mike @ Fabric Magic did our first motorhome back in mid-90's and then all of our toys and client's projects up until current. I think I ruined him though because when I asked him to redo the couches and the pilot/co-pilot seats in our current coach two years ago he agreed but when I picked them up he told me to never ask him to do another motorhome as those were the most difficult pieces he had ever recovered.


As for Gary, that name doesn't sound familiar.
 

bigdave_185

Well-known member
Joined
Feb 14, 2021
Messages
443
Location
Utah
Yeah that sounds like a lot of work to keep clean for sure, love the colors either way, grey and that purple was good lookin for sure.

I’m in need of seats in my LBZ redone maybe I’ll give them a visit


Sent from my iPhone using Tapatalk
 

Mr.zippy

Well-known member
Joined
Apr 27, 2020
Messages
2,221
Location
Wyoming
Nice work Mike! You know, when you get ready to sell that rig, someone is going to have a really nice setup!
 
OP
Z

zmotorsports

ALLIANCE MEMBER
Joined
Oct 20, 2009
Messages
21,441
Location
Northern Utah
Yeah that sounds like a lot of work to keep clean for sure, love the colors either way, grey and that purple was good lookin for sure.

I’m in need of seats in my LBZ redone maybe I’ll give them a visit


Sent from my iPhone using Tapatalk

Yeah, I just talked to him and dropped off my small gauge panel and he mentioned it was a bit slow this year. Usually he's busy as hell the first quarter of the year because everyone's getting their street rods ready for the show season but he mentioned this year's been different so far.

Tell him I recommended you and he'll take care of you. Don't let the clutter and size of his shop fool you though, he does amazing work.

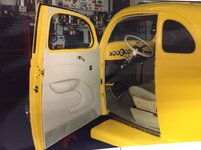
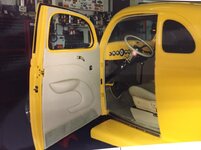
Here is my red 1940 Chev Coupe and a yellow 1936 Ford Coupe that I built for a client about 20 years ago and Mike did the interior of the '36 Ford.
6a2d54fff65e1958c0bf60be7d872374.jpg

The owner wanted real leather, and that is what Mike delivered on. It turned out fantastic and the owner was ecstatic.
58af750c2627bb68ee2a9535f512c3a7.jpg
 

Attachments

  • 58af750c2627bb68ee2a9535f512c3a7.jpg
    58af750c2627bb68ee2a9535f512c3a7.jpg
    63.7 KB · Views: 0
  • 6a2d54fff65e1958c0bf60be7d872374.jpg
    6a2d54fff65e1958c0bf60be7d872374.jpg
    70.8 KB · Views: 0

Bodj Built

Well-known member
Joined
Feb 3, 2016
Messages
1,167
Location
Moorpark, CA
Great work on the axle and gauge pod! That axle jig sure is nice. It's incredible how nice, easy, and quick the right tools makes a job.

How is the gauge pod attached? I see a couple of holes in the side, but how do you get to them?
 
To avoid these ads, REGISTER NOW!
Top Bottom