To avoid these ads, REGISTER NOW!

What did you do "IN" your garage today?

LS6 Tommy

Well-known member
Joined
Dec 27, 2013
Messages
26,162
Location
Northern NJ
Yesterday, actually. Put all my dried out fishing tackle back in the bag, put the poles back in the storage case and put it all away in the boiler room. Then I finished a minor rebuild of a set of 440 Six Pack carbs, and continued cleaning up, reorganizing stuff and putting it in the new cabinets.

Tommy
 
To avoid these ads, REGISTER NOW!

Flat Thunder Channel

Well-known member
Joined
May 4, 2020
Messages
402
Location
Ohio
Yesterday I continued work on the window. I only had a short amount of time before the cookout, but I did get the opening sheeted and siding installed. I hope to get some sort of aluminum flashing installed today. It gets interesting when you do not own a brake or forming tool. Going to fashion something with leftover fascia aluminum.
 

larry4406

Well-known member
Joined
Jan 27, 2006
Messages
20,018
Location
Northern Virginia
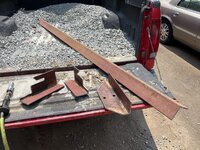
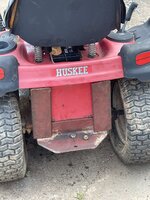
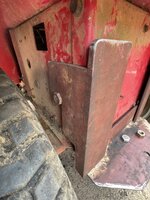
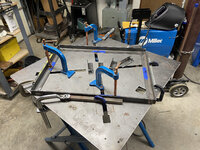
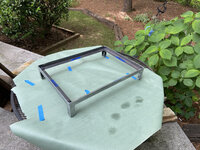
Started building a hitch for the garden tractor. Still need welding, 2” receiver hitch for “normal trailers”, and brackets for sprayer.
 

Attachments

  • 7FB9EB2A-84F8-46D9-B235-CC4A60EC6685.jpeg
    7FB9EB2A-84F8-46D9-B235-CC4A60EC6685.jpeg
    505.2 KB · Views: 82
  • 2D20BA0B-3752-4D0F-87EE-8BD9636DB0CC.jpeg
    2D20BA0B-3752-4D0F-87EE-8BD9636DB0CC.jpeg
    585.7 KB · Views: 49
  • 01B531D1-E40A-4A14-A8E8-24F2939409ED.jpeg
    01B531D1-E40A-4A14-A8E8-24F2939409ED.jpeg
    351.5 KB · Views: 50
  • 3587DFD5-E8EF-49A4-8C5C-34802A97C060.jpeg
    3587DFD5-E8EF-49A4-8C5C-34802A97C060.jpeg
    354.7 KB · Views: 57
Last edited:

Outlawmws

Well-known member
Joined
Aug 9, 2011
Messages
39,440
Location
The Badlands
Tried to lop some more limbs lopped but the pinion gear in the power pole saw is slipping, so I opened the saw, disfigured the pinion shad and used Super glue to help hold it once pressed onto the upsets. In a couple of days I'll see if it holds.
 

mrobins297aaa

Well-known member
Joined
Sep 20, 2010
Messages
3,283
Location
south east michigan
added some R22 to the house AC, not really in the garage but i did have to go to the barn to get the tools.

My 21 year old AC has a small leak that takes about 5 years to show up in the way of frosting up the coil and condenser.
The inside conditions were: WB temp 62 deg, DB 75 deg, hum = 49%

this is what i had when i started:
high side line 235 psi/ 112 deg f
low side 48 psi/ 24 deg f
Suction line temp 63 deg - 24 deg = 39 deg super heat

this is what I had when I finished:
outdoor temp 90 deg
High side line 260 psi/ 120 deg
low side 65 psi / 38 deg
suction line temp 42 deg -38 = 4 deg super heat

I added just over 1 pound of r22, I didn't weigh it in I just weighed the jug before and after.
 
Last edited:

vertguy

Well-known member
Joined
Apr 6, 2010
Messages
1,263
Location
SE WI
Installed the window A/C and after it did its thing, welded up a replacement tool rest bracket for one of my CM blocks along with just hanging out for a while enjoying some quiet time.
 
To avoid these ads, REGISTER NOW!

Bogie1632

Well-known member
Joined
Feb 18, 2018
Messages
1,303
Location
Southeastern Wisconsin
Put my tools away, swept, and got stuff organized for the 5 projects I have going right now.

Got tired of stepping over stuff and not finding what I need because my kids don't put anything away.

Pretty soon I have to get outlets, switches, and wiring moved around and make room for a couple new toolboxes I bought.

V/R
Bogie
 

ambenz

Well-known member
Joined
Dec 12, 2010
Messages
4,249
Location
NW Chicago Suburbs
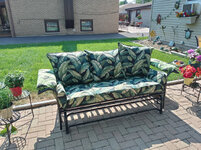
Well, to be honest, it's been a undocumented project of mine, I finally finished and it costed about as much as a new one, if you can find one that seats three persons.
I found an old patio glider in the trash and ripped off all the rotten rattan leaving me a tan pipe skeleton.
I painted the frame gloss black and replaced the seized 9"glider bearing arms, I found/bought on fleabay.
I bought Arden Selections Onyx Cebu Outdoor Deep Seat cushions on overstock website but still had to find material for the armrests I made to replace the rotten rattan.
So went to our local fabric store and found a very close match to the fabric, ON SALE!!!!
Score!!!! I couldn't believe it! So...I bought enough to do the armrests and another bench we had in the yard since we bought the house, over 27 years ago.
Here is the finished glider.....
0706210927d-HDR.jpg

The arm rests are a little lighter green on the leaves.....
0706210927-HDR.jpg

And the bench I painted and recovered to match the glider.....
0706210927c-HDR.jpg


The whole project came out pretty good and I found myself finding ANOTHER used Glider of a different design for the front porch...Jeezes! More to come....
 

vertguy

Well-known member
Joined
Apr 6, 2010
Messages
1,263
Location
SE WI
It was time once again to swap the serpentine belt on the Mustang. But what should normally take about 5 minutes is a PITA with the supercharger installed. This style SC (which looks very stealthy with screw/pulley on the bottom) required relocating the alternator and reversing it so it faced the motor. As a result, the alternator requires removal and about 60 minutes later the job is completed.
 

Dan in Pasadena

Well-known member
Joined
Feb 18, 2009
Messages
13,212
Location
Pasadena, CA
Ambenz that came out really pretty. Nice work.


No pics but I broke out the MIG welder for the first time in a very long time today. Spent more time getting the wire to advance without making a bird nest than the actual welding.

The legs on a new, galvanized wheeled beer/soda cooler we bought from Amazon have a small tab on the bottom for each caster to mount. One broke off so I tack welded it back and while there did the other three legs too. It's a good thing I'm a better "flap-wheeler" than welder, ha ha. Primed and painted silver afterward. No one will ever know except me.

Natch, the Amazon return window closed at the end of May so we were out of luck.
 

smackey05

Well-known member
Joined
Oct 21, 2009
Messages
792
Location
Massachusetts
Wife's Audi A4 has a HID bulb out and a CE light.

Ordered the new bulb and started looking around for a boost leak.... Hoping it's not the turbo.
 

ambenz

Well-known member
Joined
Dec 12, 2010
Messages
4,249
Location
NW Chicago Suburbs
If you saw my glider post above, you will remember I ended it with a "stay tuned" teaser and promised to share with you my second project, another patio glider!
Found it on a local social media sale page for $10, about 9 miles SW of me.
Being a glutton for punishment, I decided this project was good enough to fit on the front porch and light enough to move to the backyard patio if we ever needed extra seating. You see, it is almost all aluminum tubing or an extrusion.
0707212026.jpg


The seat section has metal roller bearing wheels and the lower "track" is a rail the wheels ride on. The spring loaded fork keeps it all together and returns the glider to its neutral position....
0707212027.jpg

The wheels are concave and ride on a round fiberglass type tube held in place by the base of extruded aluminum. The bearings stay clean with a fiber washer. Repacked the bearings and replaced the wheels....
0707212031a.jpg

That fiberglass rod the wheels ride on looked pretty worn and you could hear the wheels digging into the aluminium base. I needed a new fiberglass rod or "rail" for the wheel to ride on. Looks like these fiberglass driveway markers I use during the winter time might just fit the bill! The wont slide into the extruded channel but no big thing....
0707212035.jpg

The wheels would ride good on the taller round cylinder and I could just cut to size and screw the ends into the base!
0707212038.jpg

I made sure the "springed fork" had enough clearance to afford a taller rail...

0707212053.jpg

The whole assembly rides taller off the base and nothing grinds...just a smooth glide!
Since I bought cushions for the last glider, I did make sure I could find cushions for this glider too.
These red cushions match the swivel chair cushions already on the front porch....even have a matching cover for the winter time.
0707212117a.jpg

Another small project finished to serve our needs for the rest of the time we spend "gliding" on the front porch, watching the traffic go by.
 

nateo

Well-known member
Joined
Jul 4, 2018
Messages
187
Location
Embrun, ON
As the next step in my "I can probably figure out wood turning" journey I made this little guy. It's made from some cottonwood that I cut down in my yard this spring. Lots of grain figure which apparently common in cottonwood due to it fast growth and relatively low strength. Some tearout on the end grain portions but we can chalk that up to a combination of the wood and my inexperience (both in technique and sharpening). Plenty of room for improvement but I'm still smiling!

Coffee mug included for scale, the bowl is about 4" in diameter.

20210708_101136.jpg20210708_101042.jpg
 

DeeDubz

Well-known member
Joined
Nov 20, 2019
Messages
1,455
Location
Socal
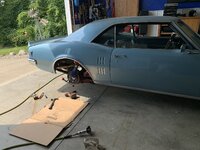
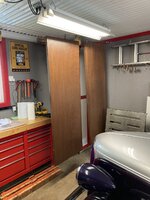
Added some tin sheets to my work bench / mobile bar. The next day I had to figure out why my F250 was over heating. It appears that I was down 2 gallons of coolant. Im not sure where the coolant went but it didnt drop on the ground and my truck isn't blowing smoke. Oil looks normal as well. Today I'll be rotating my tires.
 

Attachments

  • IMG_2628.JPG
    IMG_2628.JPG
    390.9 KB · Views: 49

Swanny1953

ALLIANCE MEMBER
Joined
Jul 28, 2010
Messages
1,093
Location
Lucas, TX
One of our driveway entry lanterns tipped over as the grout the anchors were mounted in crumbled away. Tried replacing the grout with concrete patch, but it wouldn't set hard enough to hold the lantern in place. So, decided to create a mount for under the lantern that would attach to the electrical box. Got to play with my plasma cutter and MIG welder (attaching the nuts for the hold downs). Got 3 of the 4 hold down nuts positioned properly, had to do a little grinding on the lantern base for the 4th to work. All back in place now and I know what I need to do when the next one tips over!!
 

niget2002

Well-known member
Joined
Oct 2, 2012
Messages
11,420
Location
Josephine, TX
In the process of putting in a fence to keep the chickens confined to one corner of the yard. Decided to weld up a steel gate. Worked on that most of the day until I ran out of welding wire.
 

welder4956

Well-known member
Joined
Apr 8, 2010
Messages
3,103
Location
Birmingham, AL USA
Cleaned up a bit, drilled a center hole in the new vibration pads for the air compressor (would have drilled holes for the anchors, but no 3/8 masonry bit), moved some stuff from the basement garage to make room for the garage door replacement on Monday.
 

PhantomEB

Well-known member
Joined
Feb 6, 2006
Messages
6,944
Location
Medicine Hat, AB, Canuckistan
Gathered tools to do a trailer mod project tomorrow at moms. It’s not out of the box yet but it’s a diamond plate box to house a battery or two for a future winch and LED lights on the back side plus my chains and load binders.
 

BlakeTheCarGuy

ALLIANCE MEMBER
Joined
Oct 10, 2018
Messages
9,423
Location
Roanoke Virginia
Put tools away from going to work on dads truck after work which wore me out even more lol. We had someone helping us who ended up leaving his antique multimeter on the radiator and called after we got going down the road so had to turn around and luckily it was still on there. I was going to keep it but it was the kids grandfathers multi meter so we gave it back. If he would not have called it could of been too late because it would of either melted or fell off and got run over.
 

Bogie1632

Well-known member
Joined
Feb 18, 2018
Messages
1,303
Location
Southeastern Wisconsin
All these great projects being completed... Me, not so much.

The release switch for the glass on my '12 suburban lift gate fell apart. No problem... A new switch online was $26+shipping. I went local to the dealer and paid $45. 🤦‍♂️ I should have waited.

So, if you don't know, that switch is located in a cover on the outside of the lift gate. The retaining nuts for that cover are accessed from inside after removing the trim panel. The designer...one I'd like to choke right now...has one of the 4 nuts buried up under the wiper motor. No prob...take the motor out. That's a bad design on its own, but out it comes with no issue. Going back in...FML. I get it mounted and start tightening down the wiper motor retaining nut by hand and the SOB snaps off. Now I'm awaiting a new wiper motor...@ $168, shipped. :mad:

But at least the glass release switch is in and works so that's something. Hope I don't brake the new wiper motor.

There are days I wonder why I don't drink anymore.

V/R
Bogie
 

ambenz

Well-known member
Joined
Dec 12, 2010
Messages
4,249
Location
NW Chicago Suburbs
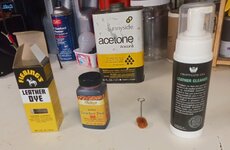
Re-stained the genuine Naugahyde Grabber Orange inserts in my Mustang as my jean shorts start to bleed dye when I sweat in temp's over 90F. I was able to remove the blue but I damaged the die on the skin of the inserts....
0217211542b.jpg

Acetone to remove any impurities, leather cleaner to neutralize the acetone, and Fiebings Orange Naugahyde dye to make it look like new! I wonder if Nauga's are a delicacy because I never had ate one yet...they must be expensive! ...like Kobe beef or something.
0217211542a.jpg
From now on, in warmer temps, I am going to be sitting on a towel so I don't stain the seats with the jeans I am wearing!!!
Curious if this happened to anyone else with there leather seats? I imagine white would be a real PITA to keep pristine!
Off to cream the seats as I noticed in the picture, they look dry.
 
To avoid these ads, REGISTER NOW!
Top Bottom