To avoid these ads, REGISTER NOW!

What did you do "IN" your garage today?

To avoid these ads, REGISTER NOW!

Magnum440d100

Well-known member
Joined
Dec 2, 2018
Messages
3,581
Location
Indiana
Made some room on the bench.

I bought this Kennedy a couple/few years back for the tools inside (to finish a set of mine) then used the box for my grampas tools.

I was able to get the rest of my grampas tools, including his 2 tool boxes, so this Kennedy wasn’t necessary.

My brother came over to help me load and deliver a car, and after, we also “fixed” my well. So, as night approached, I cleared this Kennedy 526 and gave it to him. He is a diesel “technician” (what his company calls him), and though he has a big box at work, he just recently bought a house with not only a garage, but a shop attached to the backside. He didn’t have a garage prior (except a very small single car at his apartment), so no tool boxes at home. Between this Kennedy, and an old no name lower, he now has a decent stack to start organizing his home shop. It’s not the greatest, but it gets his tools in one spot.

Now to start sorting through the OTHER boxes haha
 

Attachments

  • F7D7D887-C9A7-4544-B99B-A646053CC8CD.jpeg
    F7D7D887-C9A7-4544-B99B-A646053CC8CD.jpeg
    418 KB · Views: 114
  • 12527CA4-6925-40FA-B68D-5D3AFC19F244.jpeg
    12527CA4-6925-40FA-B68D-5D3AFC19F244.jpeg
    443.9 KB · Views: 86

jask

Well-known member
Joined
Jul 4, 2009
Messages
314
Location
Gods Country, B.C.
Rearranged some stuff. Flung a few things. Moved a customer sander from the metalshop to the woodshop to prep for bringing the dead Journey inside.

Damn!! I have a few customers I would like to run through a sander... what Grit do you use? ;)
 

BetterDays

Well-known member
Joined
Mar 26, 2005
Messages
2,948
Location
Ohio
Cigar.
Finally added carpeting to the step that leads into the house. I rebuilt it as a landing last year and never finished it.

Unboxed my new HF Band Saw. Ended up buying it NIB for almost 50% off from Craigslist.

Played around with my shop-vac dust collection plan. I think it will work ok, but ky inexpensive and aging tools do not have the greatest dust collection. I may need to create my own additional collection based on the tool being used.

Continued on pegboard organization.

Ordered new belts and handle for the shopsmith.

Listened to the Bungles win the game.
 

Bessy

Well-known member
Joined
Dec 18, 2012
Messages
995
Location
Ontario, Canada
No photos (again) but after getting a path back to the garage with the snow blower, I dove into the brake job on the SportWagen and was met by a case of Murphy's Law. I started on the passenger's side and after some coaxing (with a floor jack to give me the force necessary to turn the bolts out) I got the caliper carrier off the passenger's side. Very little rust on this vehicle despite being nearly 7 years old, but the caliper carrier is flaky and pitted. After cleaning up the caliper carrier, installing new slide pins and guide boots, I should have quit for the day because I was still winning...

What came next:
1) I destroyed the plastic coating on my 3lb HF deadblow (it was previously cracked) trying to coax the old rotor off. It did eventually break loose... And that's where I REALLY should have quit for the day.

2) Somewhat marred up the screw that holds on the new rotor. The rotor turned on me and the torx bit slipped.

3) I can't for the life of me get the piston to retract! It will turn with some coaxing, but it WILL NOT retract. I cracked the bleed screw and let of some (not a lot) of pressure (maybe this is my issue?) But I can't seem to get enough in-force and simultaneously turn the piston clockwise. I've since ordered the proper toolset, and I'm REALLY hoping I don't need to replace the caliper completely.

I'll give the other side a go tomorrow seeing as the car's not going anywhere soon. I'll try and take some pictures as I go, but I'm likely on hold on the passenger's side until I get the caliper piston tool set.

I'm curious about Motive Power Bleeder setups? Are they worth the price? Seem to be between $80-$100 online, but I'm hesitant to go that route if I can do it for less? Are there any other options out there for a better value?

B.
 

FMB4

Well-known member
Joined
Jan 19, 2017
Messages
2,926
Checked the fuids on my 2019 Honda CMX 500 twin and ran it for 15 minutes or so. Topped off the fuel tank afterwards. Roads are icy around here, so no riding for me. Probably be late Feb or early March before I start riding again.
 

stoich

Active member
Joined
Apr 9, 2021
Messages
32
Location
Chicagoland
Replaced the alt and starter in the 06 CRV. Original factory parts, made it 235K miles. Alt stopped putting out a decent charge and did the starter while I was in there since it's been a tad sluggish the last couple years.
 

Attachments

  • alt.jpg
    alt.jpg
    192.7 KB · Views: 30
  • starter.jpg
    starter.jpg
    346.7 KB · Views: 97

Jogyver62

Member
Joined
Feb 16, 2020
Messages
18
Location
Oak Forest IL
I’ve been acquiring more big tools and my garage isn’t getting any bigger. So I made a vertical cable lift for my monster bead roller. Now I have more floor space.
 

Attachments

  • 1D3B6654-7F50-4896-94EB-5636050CCFF7.jpeg
    1D3B6654-7F50-4896-94EB-5636050CCFF7.jpeg
    356.6 KB · Views: 102
  • D9159672-CBD7-4481-B6ED-4F3C3E55D3A2.jpeg
    D9159672-CBD7-4481-B6ED-4F3C3E55D3A2.jpeg
    394.8 KB · Views: 113

BetterDays

Well-known member
Joined
Mar 26, 2005
Messages
2,948
Location
Ohio
After sledding in the backyard with the dog and seeing the snow on the floor after driving to the store this morning, I realized two things:
1 - I need to relevel the garage floor so everything flows to the drain.
2 - I want car mats under each of the cars and the snowblowers to maintain that water and maybe, just maybe, direct it to the drain.
3 - I wonder if my old AC / Dehumidifier would work without outside air to help dry out the garage.
4 - The more I look in the garage, the more I see that needs done. Might need to look at the gains we have made, not the gaps we have left.
 

LS6 Tommy

Well-known member
Joined
Dec 27, 2013
Messages
26,162
Location
Northern NJ
Looked for my cheepo 4 C cell Costco flashlight again. I have NO idea where it went. Probably in the same spot as my O-ring pick set. I used it last year and can't remember where...


Tommy
 

Bessy

Well-known member
Joined
Dec 18, 2012
Messages
995
Location
Ontario, Canada
I'm chalking this ongoing brake job saga as a learning experience. While I'm currently into the project for more than the shop quoted ($470) I'm still ahead (or that's what I'm trying to tell myself) because a good chunk of the cost is tools...

Here's where we are at:

$230.80 in parts
$316.51 in tools (brake fluid included in this total because it comes with the Power Bleeder)

Like I said, I'm telling myself this is still a learning experience and I'll be prepared and quicker the next time I have to do brakes...

Passenger's Side:
The caliper carrier has been removed, soaked in brake clean, flaking rust and the likes cleaned off, and reinstalled finger tight;
On the same side, I've installed the new rotor, slightly mucking up the new keeper screw in the process because the rotor slipped as I was tightening it. It's not right tight in there so I'm just going to not muck with it any further in the hopes that I may be able to remove it at a later time if need be.
I'm waiting on the caliper rewind kit (Monday delivery) and Motive Power Bleeder (Wednesday - Friday delivery window) before I rewind the caliper and reinstall everything, hopefully without discovering the caliper is buggered. As I mentioned in my last post, the PS caliper rotates with reasonable torque (I can turn it with pliers or the ratchet on the cube), I just can't get enough inward force to push it in as I twist. I only bled a little fluid off and stopped before I went too far down that path, without a reasonable way to refill and bleed the system properly.

Driver's Side:
Figuring that I'm stalled on the PS, I moved over to the DS and, after some reading I figured out that you can get the rotor out without removing the carrier - after I removed one of the carrier bolts, that is... The second carrier bolt has very little clearance between the head of the bolt and the stupid bracket welded to the control arm (I think it holds a sensor wire?).
So I'm buying another set of low profile triple squares, because it's not that much more to buy the full set on sale, as it is to buy a single one. If I had 240 at the garage here, I'd grind that damn bracket off, and booger it on three inches forward, but alas I'm a novice welder at best and I don't have 240 access at this garage, which is probably for the best. Sockets arrive Tuesday...

Let the saga continue.
 

Attachments

  • IMG_20220123_151221.jpg
    IMG_20220123_151221.jpg
    349.2 KB · Views: 103
  • IMG_20220123_151232.jpg
    IMG_20220123_151232.jpg
    356.4 KB · Views: 70

BonzoHansen

Well-known member
Joined
Jun 24, 2005
Messages
1,742
Location
NJ
I installed a new shower head. Now I'm resting from that effort, watching football.

Also flipping to MT TV at commercials. I've watched just enough episodes to know the roadkill guys are hacks lol
 

65ranchero

Well-known member
Joined
Dec 16, 2020
Messages
5,087
Location
Danville, VT left NJ forever
I'm chalking this ongoing brake job saga as a learning experience. While I'm currently into the project for more than the shop quoted ($470) I'm still ahead (or that's what I'm trying to tell myself) because a good chunk of the cost is tools...

Here's where we are at:

$230.80 in parts
$316.51 in tools (brake fluid included in this total because it comes with the Power Bleeder)

Like I said, I'm telling myself this is still a learning experience and I'll be prepared and quicker the next time I have to do brakes...

Passenger's Side:
The caliper carrier has been removed, soaked in brake clean, flaking rust and the likes cleaned off, and reinstalled finger tight;
On the same side, I've installed the new rotor, slightly mucking up the new keeper screw in the process because the rotor slipped as I was tightening it. It's not right tight in there so I'm just going to not muck with it any further in the hopes that I may be able to remove it at a later time if need be.
I'm waiting on the caliper rewind kit (Monday delivery) and Motive Power Bleeder (Wednesday - Friday delivery window) before I rewind the caliper and reinstall everything, hopefully without discovering the caliper is buggered. As I mentioned in my last post, the PS caliper rotates with reasonable torque (I can turn it with pliers or the ratchet on the cube), I just can't get enough inward force to push it in as I twist. I only bled a little fluid off and stopped before I went too far down that path, without a reasonable way to refill and bleed the system properly.

Driver's Side:
Figuring that I'm stalled on the PS, I moved over to the DS and, after some reading I figured out that you can get the rotor out without removing the carrier - after I removed one of the carrier bolts, that is... The second carrier bolt has very little clearance between the head of the bolt and the stupid bracket welded to the control arm (I think it holds a sensor wire?).
So I'm buying another set of low profile triple squares, because it's not that much more to buy the full set on sale, as it is to buy a single one. If I had 240 at the garage here, I'd grind that damn bracket off, and booger it on three inches forward, but alas I'm a novice welder at best and I don't have 240 access at this garage, which is probably for the best. Sockets arrive Tuesday...

Let the saga continue.
Do your self a favor (if it's not been done yet) pull the caliper slide pins and remove the boots ,clean all the grease off, regrease with silicone brake grease, reinstall boots and slide pins back in to the bracket make sure the they slide in and out smoothly.
 

65ranchero

Well-known member
Joined
Dec 16, 2020
Messages
5,087
Location
Danville, VT left NJ forever
Went in to the shop walked out the back and shoveled a path to the deck and cleared the Rinnai heater exhaust of snow around it .
Shoveled the deck stairs and went in side and started the $125 5/24 Toro snow blower from the '80s and backed it up the deck stairs and cleaned the deck.
Filled the bird feeders
 

PelicanPines

ALLIANCE MEMBER
Joined
Apr 30, 2014
Messages
38,140
Location
New Jersey, USA, Earth, My own reality
Tore apart my Dyson DC17... replaced the Hepa Filter and cleaned the "washable" prefilter only to tear it while trying to re-install it. Replaced the prefilter as a result. Blew out the whole machine. The cyclones in the dust container are "Accumulators" I needed a wire hook to pull some of the junk out of them. Not bad enough to pull the dust bin apart. (It's a job)

Cleaned the roomba as well. Replaced the spinny thing and washed the two rollers completely. Wiped the whole thing down with an Orange Wipe... it smells pretty now.

CPAP... disinfected the Hose, Mask etc. Wiped down the whole machine and replaced both sets of filters.

Vacuumed the bedroom. Handed off the remaining job to the clean Roomba.
 

nadogail

Well-known member
Joined
Jan 23, 2009
Messages
32,049
Location
Coronado, CA
My Physical Therapist came at at Noon today and Observed/Supervised my walk to and from my Workshop, this was my first visit to the shop since early December, prior to my hospitalization. She said it reminded her of the area in her fathers Kansas barn where we did things. I sent her home with a bag of lemons from the backyard tree.
 

619DioFan

Well-known member
Joined
Apr 9, 2013
Messages
3,617
Location
San Diego , Ca.
I'm chalking this ongoing brake job saga as a learning experience. While I'm currently into the project for more than the shop quoted ($470) I'm still ahead (or that's what I'm trying to tell myself) because a good chunk of the cost is tools...

Here's where we are at:

$230.80 in parts
$316.51 in tools (brake fluid included in this total because it comes with the Power Bleeder)

Like I said, I'm telling myself this is still a learning experience and I'll be prepared and quicker the next time I have to do brakes...

Passenger's Side:
The caliper carrier has been removed, soaked in brake clean, flaking rust and the likes cleaned off, and reinstalled finger tight;
On the same side, I've installed the new rotor, slightly mucking up the new keeper screw in the process because the rotor slipped as I was tightening it. It's not right tight in there so I'm just going to not muck with it any further in the hopes that I may be able to remove it at a later time if need be.
I'm waiting on the caliper rewind kit (Monday delivery) and Motive Power Bleeder (Wednesday - Friday delivery window) before I rewind the caliper and reinstall everything, hopefully without discovering the caliper is buggered. As I mentioned in my last post, the PS caliper rotates with reasonable torque (I can turn it with pliers or the ratchet on the cube), I just can't get enough inward force to push it in as I twist. I only bled a little fluid off and stopped before I went too far down that path, without a reasonable way to refill and bleed the system properly.

Driver's Side:
Figuring that I'm stalled on the PS, I moved over to the DS and, after some reading I figured out that you can get the rotor out without removing the carrier - after I removed one of the carrier bolts, that is... The second carrier bolt has very little clearance between the head of the bolt and the stupid bracket welded to the control arm (I think it holds a sensor wire?).
So I'm buying another set of low profile triple squares, because it's not that much more to buy the full set on sale, as it is to buy a single one. If I had 240 at the garage here, I'd grind that damn bracket off, and booger it on three inches forward, but alas I'm a novice welder at best and I don't have 240 access at this garage, which is probably for the best. Sockets arrive Tuesday...

Let the saga continue.
With the troubles you having with stuck fasteners . calipers and the like I would bet the shop estimate would go up since the tech would have to spend more time dealing with these issues as well. wouldn't expect a tech to work extra for free ( FYI - I don't work on cars for a living )
 
To avoid these ads, REGISTER NOW!

Bessy

Well-known member
Joined
Dec 18, 2012
Messages
995
Location
Ontario, Canada
Do your self a favor (if it's not been done yet) pull the caliper slide pins and remove the boots ,clean all the grease off, regrease with silicone brake grease, reinstall boots and slide pins back in to the bracket make sure the they slide in and out smoothly.
Yes. I replaced the PS caliper slide pins with fresh grease yesterday; They were a cheap replacement to do while I had everything apart, so I just ordered them with the rest of the brake parts. The old ones really weren't bad, but I did it no less because I had the parts. The DS will be done as well, once I get the caliper carrier off.
With the troubles you having with stuck fasteners . calipers and the like I would bet the shop estimate would go up since the tech would have to spend more time dealing with these issues as well. wouldn't expect a tech to work extra for free ( FYI - I don't work on cars for a living )
I can't confirm whether the calipers are stuck yet or if I just can't get enough pressure on them by hand (I really hope they're not stuck because they are $200+/pc when I last quickly looked. I'll have to shop around some.

I only bled a little bit of fluid off to see if it made any difference, and decided to stop until I get fluid to refill the system. I'll bleed the rears completely when the power bleeder shows up and see where I'm at then. The power bleeder (which ironically is now out of stock - seems I got one of the last ones) comes with 1L of (sic) Typ 200 Dot 4 fluid, but what I am reading online is that the car takes 1.2L... akin to eight hotdogs per pack but only six buns. :cautious: Any issues mixing brands if they are both dot 4 fluids?
 

niget2002

Well-known member
Joined
Oct 2, 2012
Messages
11,240
Location
Josephine, TX
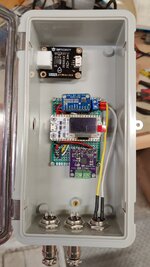
Got my cnc running again. Then spent a good chunk of time wiring up my aquarium controller. Still have a bit to go before it'll be done.

0123221732.jpg
 

LS6 Tommy

Well-known member
Joined
Dec 27, 2013
Messages
26,162
Location
Northern NJ
Got my cnc running again. Then spent a good chunk of time wiring up my aquarium controller. Still have a bit to go before it'll be done.

0123221732.jpg
I'm curious as to what all you're controlling. I see a PH monitor in there. Is it for CO2? My heater, filter and U/V clarifier run 24/7. Both of my lights are LED, the Fluval Plant 3.0 has a bluetooth app and the Current USA Serene System has a timer with an infrared remote. The CO2 solenoid and CO2 reactors are each on one of my old programmable appliance timers leftover from when I ran everything on five of them. I don't use a controller for the CO2, I just estimate the bubble count by studying the livestock for signs of O2 deprivation and just set it high enough to keep algae at bay and the plants happy and pearling.

Tommy
 
Last edited:

kaymccampbell

Well-known member
Joined
Feb 27, 2015
Messages
29,619
Location
Upstate New York
Put the Burgman and the Dingo out. Brought the Journey in. Did the battery, oil n filter, thermostats, plugs, wipers, and checked the brakes, lights, n suspension. Replaced some bulbs, jiggled a loose connector. Kicked it out, brought the bike n Dingo back in. Replaced the wheel, fixed the guard on the bench grinder after the old one started throwing chunks and bent the guard. The chunks also knocked a measuring cup down and broke it. Reassembled the wheel dresser, after I put it to the wheel upside down and it unscrewed itself, and threw all the disks on the floor. I'd forgotten that they do that.
 

mikegt4

Well-known member
Joined
Sep 12, 2005
Messages
3,277
Location
sw ohio
Looked for my cheepo 4 C cell Costco flashlight again. I have NO idea where it went. Probably in the same spot as my O-ring pick set. I used it last year and can't remember where...


Tommy
Have you noticed your hair turning gray, thinning or perhaps falling out? Welcome to old age. Don't worry, once you retire you won't know what day it is much less were you left your tools.
 

niget2002

Well-known member
Joined
Oct 2, 2012
Messages
11,240
Location
Josephine, TX
I'm curious as to what all you're controlling. I see a PH monitor in there. Is it for CO2? My heater, filter and U/V clarifier run 24/7. Both of my lights are LED, the Fluval Plant 3.0 has a bluetooth app and the Current USA Serene System has a timer with an infrared remote. The CO2 solenoid and CO2 reactors are each on one of my old programmable appliance timers leftover from when I ran everything on five of them. I don't use a controller for the CO2, I just estimate the bubble count by studying the livestock for signs of O2 deprivation and just set it high enough to keep algae at bay and the plants happy and pearling.

Tommy
Are you making and programming your own controller?
Yes. I made my own controller.

I'm monitoring pH for turning the co2 on/off. There's a good chance I'll just have the bubble count set so that the co2 is on all day, but this gives me a fail safe to turn the co2 off so the fish don't get stressed if something happens.

I'm also monitoring temperature. I'm using an ehiem heater, but I had a problem one time where a heater didn't turn off. By using my own controller, I have a little fail safe. The heater itself will be set 2f higher than the controller. If the controller sticks on, then the tank won't get too hot.

The biggest thing the controller is doing is sending the values to an ELG stack. I'll have Grafana monitoring values and sending me an alert if any of them go way out of range.

I picked up a Fluval planted 3.0 also. The current tank has a finnix, but I wanted to try something different.

My last tank was fully automated : https://reef.wallings.net
 

Duster346

Well-known member
Joined
Mar 11, 2013
Messages
316
Location
Castle Rock, CO
Figuring out how to vibratory tumble polish some small 6061 pieces. Top part is the finish after deburring in the green plastic pyramids for about an hour. Bottom part is polishing in crushed walnut media for about 6 hours.
 

Attachments

  • 20220123_204325[1].jpg
    20220123_204325[1].jpg
    497.9 KB · Views: 63
  • 20220123_204037[1].jpg
    20220123_204037[1].jpg
    385.5 KB · Views: 85

npp

Well-known member
Joined
Dec 6, 2012
Messages
296
Looked for my cheepo 4 C cell Costco flashlight again. I have NO idea where it went. Probably in the same spot as my O-ring pick set. I used it last year and can't remember where...


Tommy
“Man” if I had a dollar for every time I put something somewhere and said I would remember that it is there I would have retired years ago.
 

bugnut

ALLIANCE MEMBER
Joined
Jul 14, 2012
Messages
3,998
Location
Central Ohio
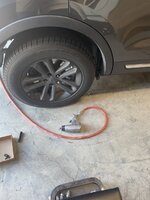
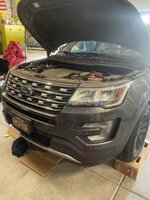
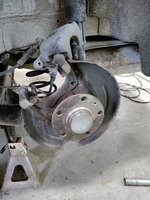
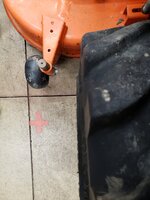
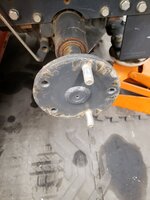
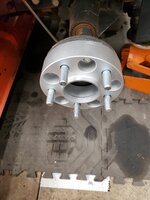
Continued work on the new to me Kubota, installed rear wheel spacers and started to straighten a bent mower deck. Sometime something got hit hard with the deck! Forgot the after install tire pic, ugh!
 

Attachments

  • 20220123_105317.jpg
    20220123_105317.jpg
    323.9 KB · Views: 76
  • 20220123_105322.jpg
    20220123_105322.jpg
    360.5 KB · Views: 54
  • 20220123_105631.jpg
    20220123_105631.jpg
    211.7 KB · Views: 51
  • 20220123_105645.jpg
    20220123_105645.jpg
    223.6 KB · Views: 58

Arne73

Well-known member
Joined
Mar 20, 2010
Messages
1,477
No photos (again) but after getting a path back to the garage with the snow blower, I dove into the brake job on the SportWagen and was met by a case of Murphy's Law. I started on the passenger's side and after some coaxing (with a floor jack to give me the force necessary to turn the bolts out) I got the caliper carrier off the passenger's side. Very little rust on this vehicle despite being nearly 7 years old, but the caliper carrier is flaky and pitted. After cleaning up the caliper carrier, installing new slide pins and guide boots, I should have quit for the day because I was still winning...

What came next:
1) I destroyed the plastic coating on my 3lb HF deadblow (it was previously cracked) trying to coax the old rotor off. It did eventually break loose... And that's where I REALLY should have quit for the day.

2) Somewhat marred up the screw that holds on the new rotor. The rotor turned on me and the torx bit slipped.

3) I can't for the life of me get the piston to retract! It will turn with some coaxing, but it WILL NOT retract. I cracked the bleed screw and let of some (not a lot) of pressure (maybe this is my issue?) But I can't seem to get enough in-force and simultaneously turn the piston clockwise. I've since ordered the proper toolset, and I'm REALLY hoping I don't need to replace the caliper completely.

I'll give the other side a go tomorrow seeing as the car's not going anywhere soon. I'll try and take some pictures as I go, but I'm likely on hold on the passenger's side until I get the caliper piston tool set.

I'm curious about Motive Power Bleeder setups? Are they worth the price? Seem to be between $80-$100 online, but I'm hesitant to go that route if I can do it for less? Are there any other options out there for a better value?

B.
Thumbs up on the Motive Power bleeder. I bought and used one on a complete brake line replacement job last winter, much better than "pump, hold etc".
 

BuffettFan

Well-known member
Joined
Jul 11, 2017
Messages
10,920
Location
Central Illinois
I cut my hair, in my garage. after being in lock down i learned to cut my own hair. Now i save money and then just vacuumed up the mess.

I've been doing the same thing since 2014.
My barber was getting harder and harder to get in to see as he didn't make appointments.
When I did get in, it would be 1 to 2 hours for a 10 minute cut.
$15
The places that did make appointments were $30 to $40.
$30 for a Wahl clipper from WallyWorld 7 years ago. Still going strong!
 

gmcgeo

Well-known member
Joined
Mar 11, 2019
Messages
3,701
I've been doing the same thing since 2014.
My barber was getting harder and harder to get in to see as he didn't make appointments.
When I did get in, it would be 1 to 2 hours for a 10 minute cut.
$15
The places that did make appointments were $30 to $40.
$30 for a Wahl clipper from WallyWorld 7 years ago. Still going strong!
I have to admit, my wife straightened the back up on my neck lol but other then that! yeah i dislike going to the barber. and it was always disappointing when i paid the $30 and walk out looking worse then what i could have done it myself
 

stonesfan68

Well-known member
Joined
Apr 19, 2012
Messages
2,764
Location
Houston, TX
I only bled a little bit of fluid off to see if it made any difference, and decided to stop until I get fluid to refill the system. I'll bleed the rears completely when the power bleeder shows up and see where I'm at then. The power bleeder (which ironically is now out of stock - seems I got one of the last ones) comes with 1L of (sic) Typ 200 Dot 4 fluid, but what I am reading online is that the car takes 1.2L... akin to eight hotdogs per pack but only six buns. :cautious: Any issues mixing brands if they are both dot 4 fluids?
I've never had any issues with mixing DOT4 fluids from different manufacturers.
 

bctexas

Well-known member
Joined
Sep 6, 2015
Messages
671
Location
Aubrey, TX
Have you noticed your hair turning gray, thinning or perhaps falling out? Welcome to old age. Don't worry, once you retire you won't know what day it is much less were you left your tools.
I retired 5 years ago. I worried when I started losing track of what day it was. Until I realized it didn't matter - when you are retired, every day is Saturday! :)
 
To avoid these ads, REGISTER NOW!
Top Bottom