To avoid these ads, REGISTER NOW!

What did you do "IN" your garage today?

Magnum440d100

Well-known member
Joined
Dec 2, 2018
Messages
3,581
Location
Indiana
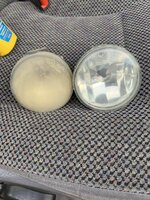
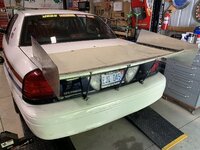
Started polishing out the fog lights for the new bumper.


And while I would LOVE to do some sort of Bedliner or something, this bumper is stupid rare. And I will be eventually upgrading to a MOVE bumper or ranch hand type bumper. So this one will be sold. Gotta keep it “salable”.
 

Attachments

  • 5F32427E-4740-442C-9403-6E3109EF931D.jpeg
    5F32427E-4740-442C-9403-6E3109EF931D.jpeg
    556 KB · Views: 55
  • DC6B921A-7710-4FFA-A10E-042676F7EABD.jpeg
    DC6B921A-7710-4FFA-A10E-042676F7EABD.jpeg
    534.1 KB · Views: 29
To avoid these ads, REGISTER NOW!

DGersic

Well-known member
Joined
Mar 12, 2017
Messages
6,432
Location
DeKalb, IL
Looked at / mocked up a clamp for mounting my A/C line better.

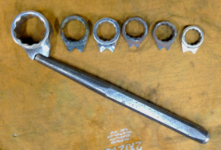
Started looking at how to fix Dad’s vacuum pump. The coupling between motor and pump crumbled in use the other day.

7EBAF4C8-6419-4C4C-B2DA-3C562FF4BB68.jpeg

From the layers of electrical tape, over a layer of masking tape, it seems like this has failed before.

Looks like I need one of these.

F63C71EB-665C-429A-8406-99E3DDB7A0F8.jpeg

But now I also have a “while you’re in there” going. The oil sight glass has always leaked, so it’s always low on oil.

3A5C13F5-83FE-441F-A38A-49515EE3B9E9.jpeg

I need a bottle of oil to refill it. Would be nice to fix the leak, too.
 

Bessy

Well-known member
Joined
Dec 18, 2012
Messages
1,000
Location
Ontario, Canada
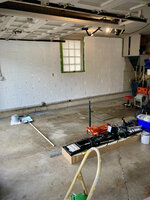
A big day today in the shop progressing and finishing some projects.

Finished projects:
- Repaired a loose gate hinge on the back of the shop that really just leads to dead space in the back corner of the lot. Done.
- Cleaned out the back of the car of all of the stuff that's been floating around back there since the move. 90% Done.
- Shined up my craftsman tool chest/cabinet combo and listed on Kijiji (sold in less than a day, $250). The money will be put towards financing a few of the tools that I used to share with my Dad in his shop, but no longer have reasonable access to, having moved 55 mins away.
-Put a few things away, slowly but surely making progress on organizing the new space.

Of those tools I mentioned, I was almost going to go look at a $500ish DeWalt table saw, but I managed to pick up a $40 Delta 9" table saw instead, about 10 mins from home. For that price I figured it was worthy of a second shot at life and wasn't going to break the bank if it was a dud. After SWMBO helped me lift the little saw onto its stand, I used it to rip some 1-1/2" strips of plywood for a project for my sister and it worked quite well, even with the well used junker blade. Given the success was motivating me, I broke out the track saw and got to breaking down about half (40×48") of a sheet of 5/8 ply with the track saw for the same project. Tomorrow I'll tackle the last six cuts in the morning and start looking at assembly in the early afternoon.

Still on deck, I need to install the trailer wiring harness in the back of the GSW and get that sorted out and get the shop organized to a point where I can actually bring the boat home to work on through the fall.
 

buzzworth

Well-known member
Joined
Oct 22, 2007
Messages
936
Location
Louisville, KY
6:42 AM. Wife calls me on her way down the driveway, never a good thing. Gate won't open. Battery on solar gate has given up the ghost. I need to show her how to pull the pin. (Yeah, right)
At least it's not the coldest day of winter this time.
Is Lowes open yet?
 

Flat Thunder Channel

Well-known member
Joined
May 4, 2020
Messages
402
Location
Ohio
Worked on the grocery getter's front tire. Discovered you cannot spin the front tire of an AWD with only one tire off the ground and in neutral. First time working on this old girl in a long time. Must be clutch packs or something locking it? Amateur! 2001 Mercury Mountaineer
 

DeeDubz

Well-known member
Joined
Nov 20, 2019
Messages
1,455
Location
Socal
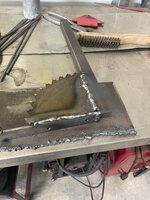
a little metal work in the garage. Making a little hard hat rack.
 

Attachments

  • IMG_4434.JPG
    IMG_4434.JPG
    314.3 KB · Views: 52
  • IMG_4437.JPG
    IMG_4437.JPG
    356.5 KB · Views: 54

Lassen Forge

Well-known member
Joined
Apr 26, 2014
Messages
15,661
Location
The romantic hills of central Umbria, Italy,
Italy! Wow! What brought that on Lassen?
Been planning it for a while now... Wanted to retire there since the first time I went, we have olives and grapes and a hardwood forest... historic buildings... the problem was the one liveable structure (requred to relocate) on the property wasn't ours... then the owner (now former owner) decided to sell, so it made it all possible again. The rules had changed so we had to battle with the Italian Bureaucracy for a bit, but finally got the residency visa so yep, arrivaderci!! Add the current wildfires, and, well, it's a no brainer. (Stone buildings don't burn easily!)

The worst part (for me) is the change of voltage/Hz of the electricals, and getting everythign over there - probably going to take 2 shipments - but other than that, it's pretty much done.
 

rayra

Well-known member
Joined
Dec 1, 2014
Messages
4,724
Location
Escaped from Los Angeles
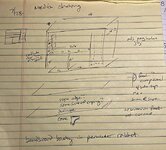
Furniture building commences.

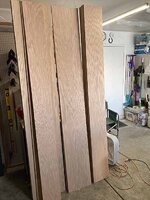
We got the four oak-veneer plywood sheets ripped into strips per the cut plan. Now a break in the AC while I triple-check the cut lengths I want.

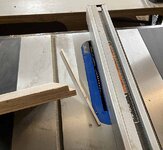
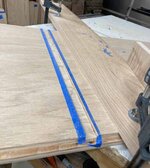
I need a proper track saw or even an improvised one. So I can make straight cross cuts with my circular saws. I'll have to check how wide a stroke I can make with my compound sliding miter saw. I've got ripped strips of plywood in 17.5", 14" and 11" widths that need to get cut down to the proper lengths. Will probably move the 80 tooth blade from table saw to sliding miter. And I usually put some blue tape over the oak veneer when I am making such crosscuts to prevent splintering of the oak. But with the 80 tooth I can probably lightly score the surface before cutting thru and get away without taping.

I'll have a few slot and notch rabbets to cut in the furniture pieces as I refine them. As well as the shelf peg holes. And my first 'production' use of a biscuit cutter.

I'm trying for some efficiencies via batch processess. All the rip cuts. All the cross cuts. All the rabbets. All the shelf peg drilling. Can save a lot of setup time this way. BUT if you get something wrong, you can screw up a lot of pieces in a hurry, too.

Anyway, hoping to get all the flat materials cut down to size today, before I quit for the day. Still looking at afternoon thunderhead formation and relatively high humidity and sweating all over the raw oak isn't helpful.

The new Delta 10" 'contractor' table saw was a delight. Smooth, solid / steady. I should have waxed both tables.


eta
Got the ripped lengths diced down to their proper length dimensions. Tomorrow it's rabbets, grooves, trimming some interior frames and shelves to make room for the beadboard backings and drilling the arrays of shelf pin holes. And maybe get the first bookcase glued up.
 

Attachments

  • diagram office shelves 220728.jpg
    diagram office shelves 220728.jpg
    82.4 KB · Views: 45
  • diagram media cabinet 220728.jpg
    diagram media cabinet 220728.jpg
    97.9 KB · Views: 24
  • furniture cut plan projects 1-4.jpg
    furniture cut plan projects 1-4.jpg
    86.3 KB · Views: 17
  • furniture 1-4 plywood rip cuts.jpg
    furniture 1-4 plywood rip cuts.jpg
    66.8 KB · Views: 17
  • furniture 1-4 cut to lengths.jpg
    furniture 1-4 cut to lengths.jpg
    71.4 KB · Views: 14
Last edited:

Bob Heine

ALLIANCE MEMBER
Joined
Oct 24, 2009
Messages
10,711
Location
Boca Raton, Florida
Been planning it for a while now... Wanted to retire there since the first time I went, we have olives and grapes and a hardwood forest... historic buildings... the problem was the one liveable structure (requred to relocate) on the property wasn't ours... then the owner (now former owner) decided to sell, so it made it all possible again. The rules had changed so we had to battle with the Italian Bureaucracy for a bit, but finally got the residency visa so yep, arrivaderci!! Add the current wildfires, and, well, it's a no brainer. (Stone buildings don't burn easily!)

The worst part (for me) is the change of voltage/Hz of the electricals, and getting everythign over there - probably going to take 2 shipments - but other than that, it's pretty much done.
@Lassen Forge, I wish you the best. You probably already know there's an adjustment period when you discover all the down-side things. We took about 6 months to adjust to life in Australia. Then 18 months of loving every minute there. Then regretting having to leave -- if they had offered me a permanent position, I'd be writing this from somewhere down under.

You probably already know this but be prepared for stupid stuff to annoy you beyond the electricals. Throw your table lamps away or find conversion kits for the plugs and sockets. Sometimes it's a food you are used to has a very different flavor added. Sometimes it's an ingredient you thought would be available is nowhere to be found. Sometimes it's a stupid taste of home you didn't know you missed -- we ate at McDonald's more in two years down under than we have eaten there in 60 years in the US. Much of the beef in Australia was excellent but it had a flowery flavor from being grass/pasture-fed rather than corn-fed before slaughter.

Don't sweat the small stuff and do your best to live the life of a wealthy retired Italian.
 

ZRX61

Well-known member
Joined
Aug 15, 2006
Messages
28,716
Location
Solar Blight Valley, SoCal
About lost the will to live...

The kickstand on the ZX11 attaches to a bracket that bolts to the frame with two bolts.
The front bolt is a bit loose.
To tighten it you have to pull the exhaust system
To remove the exhaust systen you need to remove the lower fairings
You also need to remove the radiator
To remove the radiator you need to drain the coolant...
I can get a finger on the bolt, but the route my finger took isn't possible with a tool that would require turning.

The goddamn bolt can fall out for all I care.

I could just barely get on the aft bolt from the other side of the bike with a 1/4in drive wobble socket on a 12in extension.

This ******* bike makes working on inaccessible **** on aircraft seem like a walk in the park.
 

Magnum440d100

Well-known member
Joined
Dec 2, 2018
Messages
3,581
Location
Indiana
Got the bumper repair stuff spread on the bumper. I know it’s not smooth, but that’s ok as 99% of it is thicker than necessary anyway. It’ll be sanded smooth.

Gotta head to “work”, so that’ll give this the rest of today and most of tomorrow to dry.
 

Attachments

  • 69976F86-6936-4F81-B151-6BDA66E49799.jpeg
    69976F86-6936-4F81-B151-6BDA66E49799.jpeg
    599.1 KB · Views: 36

Outlawmws

Well-known member
Joined
Aug 9, 2011
Messages
39,421
Location
The Badlands
Been planning it for a while now... Wanted to retire there since the first time I went, we have olives and grapes and a hardwood forest... historic buildings... the problem was the one liveable structure (requred to relocate) on the property wasn't ours... then the owner (now former owner) decided to sell, so it made it all possible again. The rules had changed so we had to battle with the Italian Bureaucracy for a bit, but finally got the residency visa so yep, arrivaderci!! Add the current wildfires, and, well, it's a no brainer. (Stone buildings don't burn easily!)

The worst part (for me) is the change of voltage/Hz of the electricals, and getting everythign over there - probably going to take 2 shipments - but other than that, it's pretty much done.
That's awesome that you are getting to "live your Dream"! Best of luck with it!
 
To avoid these ads, REGISTER NOW!

Flat Thunder Channel

Well-known member
Joined
May 4, 2020
Messages
402
Location
Ohio
Unloaded approximately 1500#'s of steel for the fencing project. Best part is I had to had carry each piece into the garage as I walked by the broken forklift. I need to move 'all' my priorities to the front of the line! 🙄
 

Kenstone1

Well-known member
Joined
Oct 2, 2015
Messages
734
About lost the will to live...

The kickstand on the ZX11 attaches to a bracket that bolts to the frame with two bolts.
The front bolt is a bit loose.
To tighten it you have to pull the exhaust system
To remove the exhaust systen you need to remove the lower fairings
You also need to remove the radiator
To remove the radiator you need to drain the coolant...
I can get a finger on the bolt, but the route my finger took isn't possible with a tool that would require turning.

The goddamn bolt can fall out for all I care.

I could just barely get on the aft bolt from the other side of the bike with a 1/4in drive wobble socket on a 12in extension.

This ******* bike makes working on inaccessible **** on aircraft seem like a walk in the park.
PunchBoxWrench.png
might work.
:dunno:
.
 

Old Man Roger

Well-known member
Joined
Apr 6, 2017
Messages
18,093
Location
Palm Coast Florida
About lost the will to live...

The kickstand on the ZX11 attaches to a bracket that bolts to the frame with two bolts.
The front bolt is a bit loose.
To tighten it you have to pull the exhaust system
To remove the exhaust systen you need to remove the lower fairings
You also need to remove the radiator
To remove the radiator you need to drain the coolant...
I can get a finger on the bolt, but the route my finger took isn't possible with a tool that would require turning.

The goddamn bolt can fall out for all I care.

I could just barely get on the aft bolt from the other side of the bike with a 1/4in drive wobble socket on a 12in extension.

This ******* bike makes working on inaccessible **** on aircraft seem like a walk in the park.
Can you just loosen the exhaust, rather than remove it? I suspect you can unbolt the radiator but leave the hoses attached. Should give you enough room to move the exhaust?

I don’t have to tell you the bolt will need to be tightened, you know you couldn’t live with it being loose, even if you do have to take half the bike apart..lol
 

ZRX61

Well-known member
Joined
Aug 15, 2006
Messages
28,716
Location
Solar Blight Valley, SoCal
PunchBoxWrench.png
might work.
:dunno:
.
No access for the punch, let alone the hammer. However, I like that idea & have mentally filed it away.

I've had four "Ah HA!" moments where I've thought of a work around, only to be foiled when I went back out to the garage.
At one point I got a stubby ratchet wrench on it, but the open end aligned perfectly over a bolt on the engine thereby ensuring that I couldn't move the ratchet wrench at all.

I think the simplest way is to pull the lower fairing, clutch slave cylinder & front sprocket cover.. then I'll be able to get at it (he says....).

That can be tomorrows project.
 

ZRX61

Well-known member
Joined
Aug 15, 2006
Messages
28,716
Location
Solar Blight Valley, SoCal
Can you just loosen the exhaust, rather than remove it? I suspect you can unbolt the radiator but leave the hoses attached. Should give you enough room to move the exhaust?

I don’t have to tell you the bolt will need to be tightened, you know you couldn’t live with it being loose, even if you do have to take half the bike apart..lol
Can't get to the middle two exhaust clamp nuts on the head with the rad installed. (discovered that last week).
 

kaymccampbell

Well-known member
Joined
Feb 27, 2015
Messages
29,689
Location
Upstate New York
Fought with my ****** network hardware.
IMG_20220802_164709.jpg
Moved the hose reel for the 3rd time.
IMG_20220802_164646.jpg
Tripped over the pallet racking boxes.
IMG_20220802_164739.jpg

Helped a friend figure out better ways of processing some materials she brought by.
 

Kenstone1

Well-known member
Joined
Oct 2, 2015
Messages
734
No access for the punch, let alone the hammer. However, I like that idea & have mentally filed it away.

I've had four "Ah HA!" moments where I've thought of a work around, only to be foiled when I went back out to the garage.
At one point I got a stubby ratchet wrench on it, but the open end aligned perfectly over a bolt on the engine thereby ensuring that I couldn't move the ratchet wrench at all.

I think the simplest way is to pull the lower fairing, clutch slave cylinder & front sprocket cover.. then I'll be able to get at it (he says....).

That can be tomorrows project.
Instead of punch 24" or 36" long 1/4" or 5/16" diameter rod...
Even putting a bow into it could help...
:unsure:
.
 

Crowbarman55

Well-known member
Joined
May 22, 2021
Messages
1,095
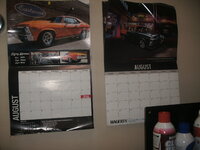
I hung this Chevrolet 409 clock that a good friend gave me.I pulled the battery from the clock so it is always0E1910EE-F6A4-45E5-B9C0-65063E80949D.jpeg 4:090E1910EE-F6A4-45E5-B9C0-65063E80949D.jpeg
I am going to steel your idea. I have a 1955 Chevy so I will set my clock at 7:55 pm. Or maybe 3:50 for the engine I have in it? It's not as cool as a 409 but it's what I have to work with.😂
Todd
 

Uncle murph

Well-known member
Joined
Jan 28, 2021
Messages
1,486
Location
Harford county
I need to pick some up. Have to go to the local bike shop today on what will probably be a futile exercise in looking for some sort of back armor/brace. Need something owing to a shitload of spinal compression fractures. Nurse mentioned them to me last week, didn't occur to the useless ******* quack Dr to tell me in the three years since my last spinal MRI.... Could have done something about them in that time...
My feelings on Drs exactly.
 

rayra

Well-known member
Joined
Dec 1, 2014
Messages
4,724
Location
Escaped from Los Angeles
Fought with my ****** network hardware.
IMG_20220802_164709.jpg

I'm not sure I'd put my wifi equipment hard adjacent to my electrical panels or to a doorbell transformer. The amount of electrified metal has got to be both blocking signal AND generating RFI. The area right behind those two router / wifi devices is chock full of romex, just inches from your antenna. That's like trying to look thru the gaps in a wood fence, in terms of signal blocking.

Is there somewhere far from all that where you can put your wifi, at least for a test? All you need is an outlet and a long Cat5 cable. And you might find out your wifi doesn't actually ****.
 

NUTTSGT

Super Moderator
Staff member
Joined
Sep 14, 2009
Messages
51,284
Location
Northern Central Ohio
Was going to to put the rearend back in the Mustang or start to. Decided I should refill the fuel tank and check for leaks in the new lines and fittings.


First, find the fill hose for the VP jugs.
Second, spill fuel because the little flapper in the fill neck is in the way.
3rd, remove little flapper (15 minutes later) and dump in first half full jug.
then switch caps to fill from full jug. . . . but it's filling ?

vent cap off, cap and fill hose are fine. . . . Still not wanting to drain or drain slowly. Heck it's not even spilling out of the vent.

:unsure:

Well hell, look at that. They didn't drill the hole for the vent hole deep enough. So after drilling that hole, I have to run the race gas through a paint filter into the empty jug to catch any plastic pieces. Dump fuel into tank. Redrill vent hole again to make sure it's good to go and rinse all the plastic out of the jug.

Some days you can't win. I said screw it and went back in the house. I go to work for a 16hour OT spot before my regular shift tomorrow.
 

ZRX61

Well-known member
Joined
Aug 15, 2006
Messages
28,716
Location
Solar Blight Valley, SoCal
Mission accomplished!!
Needed a prybar to separate the clutch slave cylinder from the sprocket cover. Some of the bolts were corroded & apparently installed by Golaith's big brother.

IMG_20220803_102036370.jpg

After:

IMG_20220803_102537607.jpg


This pile of tools got the job done, paint stick was to protect finish on sprocket cover from the prybar.

IMG_20220803_103257725.jpg

Got a wrench on the loose bolt..

IMG_20220803_101246246.jpg

All back together...

IMG_20220803_105150800.jpg
 

rayra

Well-known member
Joined
Dec 1, 2014
Messages
4,724
Location
Escaped from Los Angeles
Good Times in the Sawdust Palace. Cutting / rabbet-making operations going well. And got a lot of shelving and interior partitions also trimmed down by 5/16", all to accommodate the beadboard backing I'm using for the units.
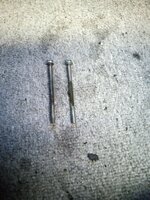
I've got a few proper rabbet-trenches to cut in some of the media center panels and possibly in the bottom of the sideboard piece, have to double-check that.

And then it's the shelf peg holes with the pegboard template. I think I've figured out some easy supports to use in conjunction with the drill press, the plastic totes I used to organize my firearms-related stuff. There about one size up from shoe boxes. If the heights work in conjunction with the drill press deck and drill bit lengths, I'll be in business to very easily drill all those holes.

The new table saw continues to please. Very smooth, very quiet, seems to have a soft-start feature. One early alarm as the motor seemed to quit as I leaned in on a long cut. But I'd just hit the OFF paddle switch with my left hip.
 

Attachments

  • furniture 1-4 free stickers.jpg
    furniture 1-4 free stickers.jpg
    55.7 KB · Views: 20
  • furniture 1-4 colony of rabbets.jpg
    furniture 1-4 colony of rabbets.jpg
    52.4 KB · Views: 19
  • furniture 1-4 beadboard fitment.jpg
    furniture 1-4 beadboard fitment.jpg
    36.7 KB · Views: 19
  • furniture 1-4 killer rabbet.jpg
    furniture 1-4 killer rabbet.jpg
    64 KB · Views: 26
  • workshop sawdust palace.jpg
    workshop sawdust palace.jpg
    86.3 KB · Views: 32

nadogail

Well-known member
Joined
Jan 23, 2009
Messages
32,152
Location
Coronado, CA
Fit and bolted one end of two brackets, stopped for lunch to sit and wait for the report on Mrs Nadogail’s dental procedure. She swapped a tooth for an implant.
 

rayra

Well-known member
Joined
Dec 1, 2014
Messages
4,724
Location
Escaped from Los Angeles
well all the cuts and rabbets are done for the four pieces of furniture I'm working on. But I still need to rig up a jig and drill press and make 24 series of holes for adjustable shelves. Series / strings, not total holes. And I'm too tired. Working a 95deg garage is sapping.
Tomorrow morning and several hours this weekend are taken up with appts and things being done for my folks. But maybe I can manage to get all four pieces assembled by the end of the weekend and get the staining and finishing finished during next week.
 

Attachments

  • furniture 1-4 rabbet season.jpg
    furniture 1-4 rabbet season.jpg
    54.2 KB · Views: 78
  • furniture 1-4 tuck season.jpg
    furniture 1-4 tuck season.jpg
    49.8 KB · Views: 34
  • furniture 1-4 double rabbet.jpg
    furniture 1-4 double rabbet.jpg
    90.8 KB · Views: 39
  • furniture 1-4 sad clown.jpg
    furniture 1-4 sad clown.jpg
    82.5 KB · Views: 47
To avoid these ads, REGISTER NOW!
Top Bottom