To avoid these ads, REGISTER NOW!

Between 485 & 705 SQ/FT Bob Heine's Auto Emporium

Workspaces between 485 and 705 squarefeet.

Wiz02

Well-known member
Joined
Jul 13, 2007
Messages
2,399
Location
Southeastern PA
@Wiz02, thank you so much for the offer. I've made a mental note (not real reliable) as well as a note in my Corvette parts document directory.
No problem, I also have the "bread box" and other parts, going from my memory which isn't what it used to be. Oh yeah, I have exhaust parts too, only cost would be shipping, which may still be a deal breaker to ship down to you, but just let me know.
 
To avoid these ads, REGISTER NOW!

4 FN 27

ALLIANCE MEMBER
Joined
Oct 19, 2015
Messages
4,635
Location
Minnesnowta
Bob Edison figured out over a thousand ways not to make a light bulb. You only figured out 2 ways not to make a Vacuum Line. I am impressed...and with one hand tied behind your...well you know what I am saying...:)

My Motto: If you are dumb enough too try something you have the opportunity for success. If you are too smart to try you will never succeed.

Nice work!!!

Hint if you ever get into Solid Modeling or good ol'fashion hand layout, 50% is a great starting point for Neutral Axis development (Assuming minimal deformation of the tube through the bend area).
 
OP
B

Bob Heine

ALLIANCE MEMBER
Joined
Oct 24, 2009
Messages
10,711
Location
Boca Raton, Florida
We bought this house 26 years ago and the air conditioning system has always been screwed up. The master suite, great room and kitchen stay at the thermostat set temperature but the two bedrooms and bath at the other end of the house are always a few degrees warmer. Most recently the system has had trouble keeping any part of the house below 80°F. Had a couple of companies take a look and give me estimates. One offered to simply replace the outdoor condenser and indoor air handler/evaporator for $9,000+. Another suggested the condenser was too small (2.5 ton) for the air handler/evaporator (3 ton) and the 1,680 square foot conditioned space. He also suggested the return duct was too small (17.5" x 23.5" filter). I agreed when he suggested a second return for the two bedroom and bath end of the house.

We enjoyed 7 hours of increasing warmth in the house and they fired up the new system when the house was 86°F. The new setup is dramatically quieter (no roar at the old return duct and we have had to turn the thermostat up to 79° to avoid a chill. At $7,625 it wasn't cheap but they increased the 2 bedroom/bath supply duct size (from 10" to 12") for the three registers and added a 12" return duct from the end of the house where none existed before. They also put in a new line set (high and low pressure copper lines) between the condenser and evaporator.

We chose a family business run from home right here in Boca Raton. I'm tired of the slick sales pitches from the national companies for stuff I don't need and no concern for my satisfaction. "We're big so you know we'll service you" sounds a lot like a breeding program.
 
OP
B

Bob Heine

ALLIANCE MEMBER
Joined
Oct 24, 2009
Messages
10,711
Location
Boca Raton, Florida
No problem, I also have the "bread box" and other parts, going from my memory which isn't what it used to be. Oh yeah, I have exhaust parts too, only cost would be shipping, which may still be a deal breaker to ship down to you, but just let me know.
@Wiz02, I never know what I'm going to need but one of my favorite things is doing exhaust. I bought OBX stainless headers for the car and it wasn't all a bolt-on project. The headers have a thick flange but the original manifold had large bolt bosses so everywhere something mounted on the manifold I had to fabricate thick wall stainless tubing spacers.
Spacers.jpg
Had to fabricate a new alternator brace because the original brace wouldn't clear the #1 cylinder exhaust tube. Decided it needed to be polished stainless because I had the MIG set up with 98/02 Ar/Co2 gas and solid stainless wire. Not a pretty sight but I'm a better grinder/polisher than welder. Don't wait until you're 63 to try welding.
Alternator Brace.jpg
Driver Side Bling.jpg
 
OP
B

Bob Heine

ALLIANCE MEMBER
Joined
Oct 24, 2009
Messages
10,711
Location
Boca Raton, Florida
Bob Edison figured out over a thousand ways not to make a light bulb. You only figured out 2 ways not to make a Vacuum Line. I am impressed...and with one hand tied behind your...well you know what I am saying...:)

My Motto: If you are dumb enough too try something you have the opportunity for success. If you are too smart to try you will never succeed.

Nice work!!!

Hint if you ever get into Solid Modeling or good ol'fashion hand layout, 50% is a great starting point for Neutral Axis development (Assuming minimal deformation of the tube through the bend area).
Pat, my first try was the one with all the extra turns that weren't needed. The second one was an attempt to fix a bend in the wrong direction, resulting in a kink. I used about 5.5 feet of the 25-foot coil so I'm happy. It was definitely a 'fun to watch' process. I clamped one handle of the tubing bender in a vise so it wasn't crazy time. I also quit after the second try and picked it up again the next day -- a little rest helps my mood and attention.

I have always been the idiot who tried something and although not always successful, it was really wonderful when it worked out. I couldn't get up on water skis with two arms but I figured failing with one would earn me a pass. Turned out I could get up and stay up quite easily. My big mistake was buying a boat -- I ended up on the wrong end of the tow rope all the time.

I have a small project that I should be able to turn into a major CF. With the dream of bumping the horsepower from the '72 Big Block, I started fabricating a 1/2" stainless hard line for the fuel. Not crazy about a braided line running the full length of the frame but there are some crazy bends if I want to mimic the stock lines. I might be filling the line with sand to keep the bends from kinking.
 

Squankum

Well-known member
Joined
Mar 28, 2011
Messages
7,977
Location
Southeast
Congrats on that AC progress. Did they run that ducting in the attic?

As they say in places where Andy Griffith is still part of the civic religion, sometimes you just have to call the man.


(In Aunt Bea's case, it was a failing refrigerator.)

I do like the copper vacuum tubing. I would spray paint it black... but... have you considered polishing it?
 

rharman

Well-known member
Joined
Apr 22, 2012
Messages
9,009
Location
SoCal
< snip >

Next up is the exhaust air supply line. The original line connected to the exhaust manifold with a flared end held in place with an oetiker clamp.

This connection was almost impossible to seal without a pair of Knipex oetiker clamp pliers. Mine are a few years older so it's embossed with SYSTEM OETIKER rather than FOR EAR CLAMPS.
Knipex Oetiker Plers 1.jpg

I needed these pliers because they were the only ones I could find with side jaws and the location down in the side of the engine right next to the A/C evaporator housing made plain jaw nippers impossible to squeeze. The side jaws were the answer to my exhaust leak.
Knipex Oetiker Plers 2.jpg

< /snip >

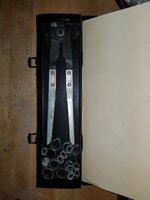
So THAT's what they're called! I sold thousands of them back in my HD parts days. Still have a few as well the HD factory tool. This is from over 40 years ago!!! Even today, I could still tell you the part #'s for them too (now, what did I have for breakfast? :()

HD Clamp Pliers 1 of 3.jpgHD Clamp Pliers 3 of 3.jpg
 

Squankum

Well-known member
Joined
Mar 28, 2011
Messages
7,977
Location
Southeast
So THAT's what they're called! I sold thousands of them back in my HD parts days. Still have a few as well the HD factory tool. This is from over 40 years ago!!! Even today, I could still tell you the part #'s for them too (now, what did I have for breakfast? :()

HD Clamp Pliers 1 of 3.jpgHD Clamp Pliers 3 of 3.jpg

So that's what those pliers are for! :D

Bought a pair at an auto parts store decades ago, said they were for CV boot clamps, but they sure didn't crimp the squeezy zone on my German car's CV boot clamps like the axle factory had done, and never could figure out how they, uh, worked, especially the sliding anvil (?) in between the jaws.
 
OP
B

Bob Heine

ALLIANCE MEMBER
Joined
Oct 24, 2009
Messages
10,711
Location
Boca Raton, Florida
Bob, I think your welds look more than fine, however, I think your 710 cap is upside down again.
You are very kind Alan. You are also right about that 710 pac. It didn't seal very well so I replaced it with a blank one.
Congrats on that AC progress. Did they run that ducting in the attic?

As they say in places where Andy Griffith is still part of the civic religion, sometimes you just have to call the man.


(In Aunt Bea's case, it was a failing refrigerator.)

I do like the copper vacuum tubing. I would spray paint it black... but... have you considered polishing it?
@Squankum, I added a DIY Montgomery Ward central A/C system to our house in Wappingers Falls, NY so I know how to do it. Doing it in one day, not so much, so I called the man. They hung a new air handler/evaporator unit in place of the old one and replaced the 34-year-old drain pan (unlike the two previous companies). They built new supply and return plenums at each end of the air handler. The large duct exiting the back of the right side plenum is the new supply duct to the two bedroom/bath wing of the house.
Air Handler.jpg
Along with that 12" supply duct, they installed a new 12" return duct and filter housing to that end of the house.
New Ducts.jpg
The new system works almost too well. It is cooling the air at both ends of the house but Liane complained it was too cold so we set the thermostat to 79°F (two degrees warmer than before). I believe the faster cooling overran the humidity reduction so I expect we'll be returning the thermostat to its former setting when the air dries out. It's at 47% at the moment.
So THAT's what they're called! I sold thousands of them back in my HD parts days. Still have a few as well the HD factory tool. This is from over 40 years ago!!! Even today, I could still tell you the part #'s for them too (now, what did I have for breakfast? :()

HD Clamp Pliers 1 of 3.jpgHD Clamp Pliers 3 of 3.jpg
Roger, the collection I picked up from Amazon called them "ear clamps" and Knipex changed the name of their pliers to match. Had Chevrolet used the lightweight ear clamps, I wouldn't have needed the fancy Knipex tool. The arrow at the top of the photo is pointing to the outrageously expensive clamp in question and it's an order of magnitude beefier than the others. By outrageously expensive, it's $15.89 +tax +shipping from Eckler's. Unfortunately, they are out of stock there so I'd have to try eBay.
Knipex Collection 3.jpg
Did I mention these clamps are hard to find?
Oetiker Clamp.jpg
Looks like the clamp in my collection is turning into an investment. Pretty sure I have another stashed somewhere safe.
 
OP
B

Bob Heine

ALLIANCE MEMBER
Joined
Oct 24, 2009
Messages
10,711
Location
Boca Raton, Florida
Why are you going to run stainless steel, instead of CuNi lines?
Kirk, when I was focused on the '72 (around 2013) I was replacing rubber hoses with flexible braided stainless. A 20-foot length of -8AN was stupid expensive (just like today) but discovered a 25-foot coil of 304 stainless tubing on McMaster-Carr was $53.30, which was aboout the same price as plain copper tubing. Back then I never thought to look for anything else.
So that's what those pliers are for! :D

Bought a pair at an auto parts store decades ago, said they were for CV boot clamps, but they sure didn't crimp the squeezy zone on my German car's CV boot clamps like the axle factory had done, and never could figure out how they, uh, worked, especially the sliding anvil (?) in between the jaws.
@Squankum, I'm sure the German car manufacturers have a fancy hydraulic tool for those clamps but us peasants doing our own repairs feel blessed using the Knipex tool designed to make us feel competent.
 

Wiz02

Well-known member
Joined
Jul 13, 2007
Messages
2,399
Location
Southeastern PA
@Wiz02, I never know what I'm going to need but one of my favorite things is doing exhaust. I bought OBX stainless headers for the car and it wasn't all a bolt-on project. The headers have a thick flange but the original manifold had large bolt bosses so everywhere something mounted on the manifold I had to fabricate thick wall stainless tubing spacers.
Spacers.jpg
Had to fabricate a new alternator brace because the original brace wouldn't clear the #1 cylinder exhaust tube. Decided it needed to be polished stainless because I had the MIG set up with 98/02 Ar/Co2 gas and solid stainless wire. Not a pretty sight but I'm a better grinder/polisher than welder. Don't wait until you're 63 to try welding.
Alternator Brace.jpg
Driver Side Bling.jpg
How did you know about my my evil Master welding plan? 😁
 
OP
B

Bob Heine

ALLIANCE MEMBER
Joined
Oct 24, 2009
Messages
10,711
Location
Boca Raton, Florida
How did you know about my my evil Master welding plan? 😁
@Wiz02, I know there are more than a few folks on the Garage Journal with the same evil plan.

Welding is one of those things I always wanted to try but it was always out of reach (cost first, time second). I started with the $89 HF box, fearing I would fail but willing to gamble that much. Discovering it was a useful tool, I jumped up to an Eastwood MIG (because it came with a spool gun for aluminum) and shielding gas. Suddenly I was certain I needed a TIG and Eastwood's cheap DC unit got added. Being lazy, once the Eastwood MIG was set up for stainless, a HF MIG came home with me and it's set up for carbon steel.

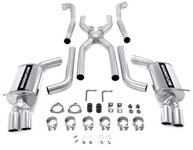
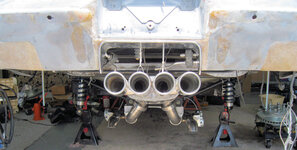
FAIR WARNING: Once you have a welder, you may dream up crazy projects. After installing a complete Magnaflow bolt-on stainless system for the '72 Corvette big block, I changed my mind and converted the system to a center-outlet quad tip Frankenxhaust.
Start with this puzzle:
72 corvette magnaflow exhaust 16841 - Cropped.jpg
Make it into this with your welder:
Exhaust System Final.jpg
 
Last edited:

Wiz02

Well-known member
Joined
Jul 13, 2007
Messages
2,399
Location
Southeastern PA
@Wiz02, I know there are more than a few folks on the Garage Journal with the same evil plan.

Welding is one of those things I always wanted to try but it was always out of reach (cost first, time second). I started with the $89 HF box, fearing I would fail but willing to gamble that much. Discovering it was a useful tool, I jumped up to an Eastwood MIG (because it came with a spool gun for aluminum) and shielding gas. Suddenly I was certain I needed a TIG and Eastwood's cheap DC unit got added. Being lazy, once the Eastwood MIG was set up for stainless, a HF MIG came home with me and it's set up for carbon steel.

FAIR WARNING: Once you have a welder, you may dream up crazy projects. After installing a complete Magnafold bolt-on stainless system for the '72 Corvette big block, I changed my mind and converted the system to a center-outlet quad tip Frankenxhaust.
Start with this puzzle:
72 corvette magnaflow exhaust 16841 - Cropped.jpg
Make it into this with your welder:
Exhaust System Final.jpg
Holy cow Batman! That's some transformation. I hope to follow in your footsteps in the near future.
 

RickP

Well-known member
Joined
Jan 15, 2013
Messages
1,559
Location
Annapolis, MD
Really impressive work getting the '87 back into fighting form -- that's a lot of updates needed for the 35-year-old parts that are slowly degrading. All that polished SS in the engine bay would make me grin every time I looked at it!

I have a small project that I should be able to turn into a major CF. With the dream of bumping the horsepower from the '72 Big Block, I started fabricating a 1/2" stainless hard line for the fuel. Not crazy about a braided line running the full length of the frame but there are some crazy bends if I want to mimic the stock lines. I might be filling the line with sand to keep the bends from kinking.

Wow, that's not an easy project to tackle! Small? Maybe, but definitely not easy.

Did you ever follow NASTYZEN's fabrication thread? He showed off some pretty amazing sand-bending techniques on vintage alloy race car frame tubing. Unfortunately, most of his photos are gone now, but I really think that thread would have fit your interests perfectly. I can't really remember his technique, but I think he'd screw a cap on the end of the tubing in order to get adequate compaction on the sand. He may have used a fair amount of heat as well.
 
OP
B

Bob Heine

ALLIANCE MEMBER
Joined
Oct 24, 2009
Messages
10,711
Location
Boca Raton, Florida
"Servos."
@Squankum, I was bad at arithmetic in school. I got low marks on tests all through grade, middle and high school. In college I had a professor who discovered my incorrect answers were almost always because of transposed numbers (I think he used the divide by 9 rule). It was too late for me to pursue an engineering degree but I loved working with engineers to turn their designs into descriptions. One of my favorite projects at IBM was a servo-hydraulic system for building computer components (chips on pinned substrates).
Did it wake the neighbors?
Kirk, last time I started it, graves were opening up.
Holy cow Batman! That's some transformation. I hope to follow in your footsteps in the near future.
@Wiz02, a couple of posts on CorvetteForum and articles linked to them sent me down a couple of rabbit holes.

An article I've lost track of claimed 3" exhausts were unnecessary for most engines because the volume of exhaust gas shrinks as it cools. The article suggested big pipes a few feet beyond the header collector would be sufficient. Much as I wanted to let the big block breathe through a 3" system, the tubes in the crossmember are 3.5" diameter so a 3" pipe is almost guarangeed to make noise and/or transmit vibration. Undaunted, I set my first pair of 2.5" header adapters aside and built a compromise pipe. Started with a header flange, 3" mandrel u-bend, 3" to 2.5" reducer and a band clamp. Used band clamps with windows to hold the pieces together while fitting the two nun-matching sides together. I built the system in three sections connected with v-band clamps so I could put the system in the car without waiting for help.
Header Adapter.jpg Exhaust System Final Header End.jpg Header Adapters.jpg
Another was about dual mufflers on exhaust systems. Lots of extra weight with no big payback. Ordered a Magnaflow dual inlet/dual outlet muffler with a built-in crossover. Used the original mufflers' dual tips and welded them on because I couldn't find offset tips that would fit (needed to fit in the width of the license plate bezel.
Muffler.jpg Exhaust Outlet.jpg
Really impressive work getting the '87 back into fighting form -- that's a lot of updates needed for the 35-year-old parts that are slowly degrading. All that polished SS in the engine bay would make me grin every time I looked at it!


Wow, that's not an easy project to tackle! Small? Maybe, but definitely not easy.

Did you ever follow NASTYZEN's fabrication thread? He showed off some pretty amazing sand-bending techniques on vintage alloy race car frame tubing. Unfortunately, most of his photos are gone now, but I really think that thread would have fit your interests perfectly. I can't really remember his technique, but I think he'd screw a cap on the end of the tubing in order to get adequate compaction on the sand. He may have used a fair amount of heat as well.
Rick, thank you for the kind words. Growing up reading car magazines I admired all the chrome on the show cars. In my dotage I've sent a few parts to a local chrome plating shop and I've purchased a couple of chromed pieces (A/C compressor cover & alternator). No way I could afford to have all the engine parts chromed. Luckily, the Corvette has a lot of aluminum and even set of magnesium valve covers. Every time something had to be removed or repaired, I polished it before putting it back. Started out with a completely stock engine when I bought it in 1991:
Untouched Engine.jpg
A few hours with files, sanders and polishers (bench and hand-held and it looks like this:
Polished Engine.jpg
I did follow NASTYZEN's shop build (one of them) but I didn't discover his fabrication threads until today. I think I learned about the sand in the tubing from Robert (@MP&C) or someone posting on his Shop Projects thread. I actually made up the end of the 1/2" tube with a flare adapter and added a plug so I could pressure test the flares. Held pressure overnight. I've got some fine sand so it will be used in the bending process.
 
Last edited:

xtremek

Well-known member
Joined
Apr 13, 2012
Messages
11,603
Location
St. Johns, Mi
I can't really remember his technique, but I think he'd screw a cap on the end of the tubing in order to get adequate compaction on the sand. He may have used a fair amount of heat as well.
I learned you don't use a lot of heat, just enough to get it a dull red. And the sand has to be REALLY dry.
 
To avoid these ads, REGISTER NOW!

xtremek

Well-known member
Joined
Apr 13, 2012
Messages
11,603
Location
St. Johns, Mi
Bob, are you the only regular still posting? I follow about 25ish different threads, and everyone seems to have disappeared. Are you...."the sole survivor"?

ps, I've never played that game.
 

Wiz02

Well-known member
Joined
Jul 13, 2007
Messages
2,399
Location
Southeastern PA
@Bob Heine , seeing the '87s engine compartment brought back a lot of fond memories. I made some mods to the intake runners and exhaust but nowhere near yours. You probably have plated resistor pellet ignition keys by now, but when I bought the vette, the factory original keys had contacts that would tarnish and cause the vehicle anti theft system (VATS) to disable starting and make you wait four? minutes before you could try to start the car again. Back then, I was a real electronic engineer, and I pulled the VATS, reverse engineered the circuit and added a bypass activated by a hidden switch. I think that l had 3 or 4 different exhaust systems on it over the years.

I loved the body style but the dash? Meh ! Speaking of the dash, how is yours doing?
 
OP
B

Bob Heine

ALLIANCE MEMBER
Joined
Oct 24, 2009
Messages
10,711
Location
Boca Raton, Florida
I learned you don't use a lot of heat, just enough to get it a dull red. And the sand has to be REALLY dry.
Thanks Kirk, that's good to know. I have propane and MAP torches I can use but I really want to try the Lincoln Oxy-Acetylene kit I picked up before Covid. Need to make a trip to my local welding supply store and have them fill the tanks.
 
OP
B

Bob Heine

ALLIANCE MEMBER
Joined
Oct 24, 2009
Messages
10,711
Location
Boca Raton, Florida
Bob, are you the only regular still posting? I follow about 25ish different threads, and everyone seems to have disappeared. Are you...."the sole survivor"?

ps, I've never played that game.
Kirk, I appreciate you calling me regular but I don't think I'm the only one posting. Could be I'm the only one not outside enjoying the warm summer weather. When I finish the '87 and a couple of other projects I'm going to get back to work on the '72 Corvette and that might **** me into a black hole.
 

xtremek

Well-known member
Joined
Apr 13, 2012
Messages
11,603
Location
St. Johns, Mi
Bob, I can't stress enough to have your sand super dry, if you're going to use heat to help you bend your stuff. When I bent my tubing with heat and sand, I tack welded pieces of sheetmetal over the ends of my tubing, just enough of a seal to keep the sand from leaking out, but definitely not enough for any water/steam to be able to build pressure. I had/have no interest in building pipe bombs
 
OP
B

Bob Heine

ALLIANCE MEMBER
Joined
Oct 24, 2009
Messages
10,711
Location
Boca Raton, Florida
@Bob Heine , seeing the '87s engine compartment brought back a lot of fond memories. I made some mods to the intake runners and exhaust but nowhere near yours. You probably have plated resistor pellet ignition keys by now, but when I bought the vette, the factory original keys had contacts that would tarnish and cause the vehicle anti theft system (VATS) to disable starting and make you wait four? minutes before you could try to start the car again. Back then, I was a real electronic engineer, and I pulled the VATS, reverse engineered the circuit and added a bypass activated by a hidden switch. I think that l had 3 or 4 different exhaust systems on it over the years.

I loved the body style but the dash? Meh ! Speaking of the dash, how is yours doing?
@Wiz02, I saved a lot of money doing the polishing. All that time took me away from some expensive mods to the other cars. I've never had a problem with the pellet but went out a minute ago to check. There was a little brown residue but it came off with a fingernail.

Oh yeah, the dash. I forget when but I had to send mine out to be refurbished and it has held up well since then. I could be wrong but I think I paid around $600 including shipping around 10 years ago. More places are doing it now and it appears the price has come down. I also re-did the information display but did that job myself. It had several open spots in the copper lands. Zip Corvette sells them for about $25.
Information Center.jpg
 
OP
B

Bob Heine

ALLIANCE MEMBER
Joined
Oct 24, 2009
Messages
10,711
Location
Boca Raton, Florida
Bob, I can't stress enough to have your sand super dry, if you're going to use heat to help you bend your stuff. When I bent my tubing with heat and sand, I tack welded pieces of sheetmetal over the ends of my tubing, just enough of a seal to keep the sand from leaking out, but definitely not enough for any water/steam to be able to build pressure. I had/have no interest in building pipe bombs
Kirk, based on that I'll be buying some fresh sand from inside a supplier, either big box or tile outlet. My pipe bomb days are behind me.
 

Wiz02

Well-known member
Joined
Jul 13, 2007
Messages
2,399
Location
Southeastern PA
@Wiz02, I saved a lot of money doing the polishing. All that time took me away from some expensive mods to the other cars. I've never had a problem with the pellet but went out a minute ago to check. There was a little brown residue but it came off with a fingernail.

Oh yeah, the dash. I forget when but I had to send mine out to be refurbished and it has held up well since then. I could be wrong but I think I paid around $600 including shipping around 10 years ago. More places are doing it now and it appears the price has come down. I also re-did the information display but did that job myself. It had several open spots in the copper lands. Zip Corvette sells them for about $25.
Information Center.jpg
Great to hear that your dash is still working. Making the interconnects is pretty straightforward, however, I imagine that finding replacements for 35year old electronic chips is something else entirely. Only good thing is that the electronics are pretty simple compared to what is in today's vehicles.
 

scooterbum46

Well-known member
Joined
Jan 29, 2014
Messages
908
Location
South Central Michigan / ex Gulf Coast Florida
Bob - I started down a rabbit hole, searching for "bizmuth" info, I remembered reading about it's properties and uses in bending tubing, probably in Cycle magazine decades ago. it led me to this info sheet from CS Alloys, I have no idea of cost.. Sounds like a recipe .. double boiler and olive oil.......

A thought on using sand, I'd think foundry sand would be ideal for packing inside tubing.
 

xtremek

Well-known member
Joined
Apr 13, 2012
Messages
11,603
Location
St. Johns, Mi
Bob, I used some play sand I had laying around the shop for a couple of years. Since my project was pretty small, I didn't need a lot. So, I filled up a soup can, set it on my vice with the jaws opened, then heated the sand until I saw it change texture/color.
 

madison069

Well-known member
Joined
Nov 5, 2010
Messages
4,350
Location
Monroeville, PA
Or maybe spread the sand out on a cookie sheet and let it bake in the oven at the lowest setting for some time. I'm not sure how long but I'm sure you would figure it out.
Things like this is why I keep the toaster oven in the garage, it's good to heat bearings or little stuff up without contaminating the kitchen oven!
 

GeddyT

Well-known member
Joined
Jun 17, 2015
Messages
1,245
Location
Bellingham, WA
Bob, with the benefit of hindsight, do you think it would have been easier to have pulled the engine out prior to doing all of this work?
 

tj675

Well-known member
Joined
Apr 9, 2019
Messages
905
Location
The Mitten
Bob,
If you are still looking for clamps, try searching for “stepless” clamps. You might find more options.
 
OP
B

Bob Heine

ALLIANCE MEMBER
Joined
Oct 24, 2009
Messages
10,711
Location
Boca Raton, Florida
Great to hear that your dash is still working. Making the interconnects is pretty straightforward, however, I imagine that finding replacements for 35year old electronic chips is something else entirely. Only good thing is that the electronics are pretty simple compared to what is in today's vehicles.
@Wiz02, from the limited research I did, the Florida sun and my failure to drive the car with the top up fried the displays. It was pretty bad but I was sure I could do the repairs myself. Then I added up the price of the components and letting someone else do it seemed like a good idea. If it needs to be done again, I'll spring the $235 for the DIY kit.
Bob - I started down a rabbit hole, searching for "bizmuth" info, I remembered reading about it's properties and uses in bending tubing, probably in Cycle magazine decades ago. it led me to this info sheet from CS Alloys, I have no idea of cost.. Sounds like a recipe .. double boiler and olive oil.......

A thought on using sand, I'd think foundry sand would be ideal for packing inside tubing.
Gerry, thanks for that. Looks like Amazon has a small ingot of 158-190°F melting bismuth alloy for $23.99 and I can make a double boiler with some tin cans. Not going to use my olive oil but I know where I can get my hand on a bottle of cheap canola oil.

Amazon has a 10 lb bag of 120 mesh silica sand for $25.99. It might be a better material since I can use it to re-grout the Travertine marble on the patio.
You will note that I am saying very little right now.

As this stuff is way too clever for me.

But impressive nonetheless.
Rian, between the Rezin Rocket and the Lonesome Cowboy Roadtrip, I don't expect you have time for much commenting but thanks for stopping by and the kind words.
Bob, I used some play sand I had laying around the shop for a couple of years. Since my project was pretty small, I didn't need a lot. So, I filled up a soup can, set it on my vice with the jaws opened, then heated the sand until I saw it change texture/color.
Kirk, I have a decent size bag of sand but it's been sitting outside in the weather for a long time so cooking it could take quite a while.
Or maybe spread the sand out on a cookie sheet and let it bake in the oven at the lowest setting for some time. I'm not sure how long but I'm sure you would figure it out.
Things like this is why I keep the toaster oven in the garage, it's good to heat bearings or little stuff up without contaminating the kitchen oven!
Cody, on the average sunny day, a cookie sheet of sand sitting on my driveway would probably do a good job. Liane won't allow a toaster oven in the house. She believes it always ends being a mail drop spot and sooner or later starts a fire. At my age I pick my battles carefully.
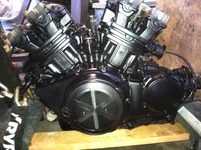
I think kiln-dried sand is what you want. I buy bags of it here in Miami for sandblasting, I have a small HFT pot. Here's a motorcycle engine I did awhile ago.
Philip, kiln dried sand is what I'm looking at. I have the small HF pot as well as their small cabinet. I don't use that much so a 25# box of HF's #80 glass bead media for $40 lasts a long time. I plan to try Northern Tool's Black Beauty one of these days (50# bag for $12).
Blast Cabinet.jpg
Bob, with the benefit of hindsight, do you think it would have been easier to have pulled the engine out prior to doing all of this work?
Tom, the answer is yes and that means I consistently make things hard for myself.

In my youth anything more than an oil or spark plug change justified pulling the engine. Several small issues pushed back on that approach. 1) The clamshell hood would need to come off and it's huge and heavy (three people heavy). 2) I don't have a hoist or engine stand. 3) The garage is full and having the Corvette sitting outside for days on end while the engine rests in its bay is asking for trouble (four cars in the neighborhood have been burgled in the last month).
Bob,
If you are still looking for clamps, try searching for “stepless” clamps. You might find more options.
@tj675, I wasn't still looking but a collection of "stepless" clamps will be delivered on Friday. :rocker:
 

Squankum

Well-known member
Joined
Mar 28, 2011
Messages
7,977
Location
Southeast
What eez thees "pot"? Is it the thing you pour the sand in for sandblasting, are are you talking vibratory tumblers?
 
To avoid these ads, REGISTER NOW!
Top Bottom