To avoid these ads, REGISTER NOW!

Garage / Workbench Photos?

rktinc

Well-known member
Joined
Nov 25, 2007
Messages
385
Location
Midwest/USA
That doesn’t look like food prep or cooking. Wonder if those could have been for heating something like a glue pot.

This is a close up of one of the controllers mounted on the bench front. There are heavy electrical units under each metal pad. The company in St Louis is still in business. "INDEECO"


CF60E569-61F1-4285-B375-3FF3B388E173_1_105_c.jpeg
 
To avoid these ads, REGISTER NOW!

ddurrett896

Well-known member
Joined
Mar 29, 2015
Messages
995
Location
VA
full
 

35k0

Well-known member
Joined
Feb 19, 2020
Messages
621
Location
Minnesota
This is my current setup. Inlaws were getting rid of a business and gave me the cabinets, the countertops came from a business that was closing, free from their cubicle desks. The the left of these cabinets is my welding table with vice and 2x72 grinder.

1666704296943.png
1666704187028.png
 

nolimits76

Well-known member
Joined
Jul 11, 2013
Messages
959
Location
Oklahoma
In the process of building mine out. Pretty much doing what you are asking about, with an emphasis on wood joinery. Toyed with doing a metal bench and welding but I lack the skills and tools to make it happen. Thought I had a deal worked out but that fell through so I am back to using wood and moving the project forward.


1666727984559.png
 

sms1974

Well-known member
Joined
Jul 9, 2014
Messages
210
Location
Grafton Ohio
After several years of working out of a 1 car garage and stashing stuff at everyone I knew’s houses I finally built my own garage. With years of dreaming about what I wanted and how I wanted to do it I’m very happy with what I’ve got.
 

Attachments

  • 247D52B2-593A-4887-AFCD-8F553B6B3654.jpeg
    247D52B2-593A-4887-AFCD-8F553B6B3654.jpeg
    115.2 KB · Views: 486
  • E9F8CF22-2DD3-4722-A397-629027E91026.jpeg
    E9F8CF22-2DD3-4722-A397-629027E91026.jpeg
    639.5 KB · Views: 493
  • 2BC7447B-61FE-48EC-8C92-BB2B0224B060.jpeg
    2BC7447B-61FE-48EC-8C92-BB2B0224B060.jpeg
    779.1 KB · Views: 463
  • 4C17F3D1-6F91-47EA-940B-1434AF0D69FB.jpeg
    4C17F3D1-6F91-47EA-940B-1434AF0D69FB.jpeg
    668.2 KB · Views: 481
Joined
Dec 20, 2017
Messages
13
Location
Northern Nevada
One of mine, welded frame for holding a couple of chests. Includes receiver mounts so I can quickly set up a vise or other accessory. This one is butcher block top as a beater bench. There is another one with a laminate top.
 

Attachments

  • Workbench_Frame_Loaded_1B.jpg
    Workbench_Frame_Loaded_1B.jpg
    146.8 KB · Views: 422
  • Workbench_Completed_3B.jpg
    Workbench_Completed_3B.jpg
    131.1 KB · Views: 432

rsparks64

Well-known member
Joined
Mar 22, 2015
Messages
582
Location
Hill Country Texas
One of mine, welded frame for holding a couple of chests. Includes receiver mounts so I can quickly set up a vise or other accessory. This one is butcher block top as a beater bench. There is another one with a laminate top.


Highdesert, can you post a closeup of the receiver mount or explain how it is attached?
 

Fav Onefour

Well-known member
Joined
Jul 14, 2022
Messages
704
Location
MN cold and hot
I have built a few with this method. One of my goals is keeping the floor easy to clean.
DSC00414.JPG
The lower shelf is primarily used for storage and gets by with less support structure.
DSC00504.JPG
I try to plan ahead with plenty of outlets. I leapfrog circuits on upper and lower runs. I also run a number of switched circuits for saws etc. I try to tie in smaller dust collection systems on the same switch with frequent use saws and cleanup.

The center bench is also the saw outfeed. I used melamine over two 3/4" plywood layers. Plywood is glued and screwed, the melamine is countersunk screws for smooth top. Square and solid is helpful.
20220308_090026.jpg
I would do the wall benches with a harder surface next time. I built this space mostly for wood working. I wanted easy to clean bench tops that still had some aesthetic qualities for a home shop. It works ok, but dents too easy. It also seems like I keep bringing garage projects into this shop. I've been watching for some flat steel to cover the banging section of the work bench.
 

BigGarage

Well-known member
Joined
Jun 5, 2019
Messages
2,346
Location
Just south of Detroit, MI.
Here's my simple yet effective bench. Due to the floor sloping downward from both walls all 6 legs are slightly different in length.
 

Attachments

  • Workbench 1 001.jpg
    Workbench 1 001.jpg
    803.6 KB · Views: 297
  • Workbench 1 002.jpg
    Workbench 1 002.jpg
    758.9 KB · Views: 259
  • Workbench 1 003.jpg
    Workbench 1 003.jpg
    770.4 KB · Views: 228
  • Workbench 1 004.jpg
    Workbench 1 004.jpg
    777.8 KB · Views: 212
  • Workbench 1 005.jpg
    Workbench 1 005.jpg
    743 KB · Views: 207
  • DSC00898.JPG
    DSC00898.JPG
    732.5 KB · Views: 188

gsuty17

Well-known member
Joined
Mar 12, 2018
Messages
119
I am actually building the frame for this bench this weekend. Uses two 26" HF boxes and a 44" box. The reasoning behind the split is the distance between doors in my garage. Does anybody have any good ideas for what to do with the empty cavity in the back? I hate the wasted space but don't have room to leave any gap for shelves or anything.

_CornerWorkbench.jpg
_CornerWorkbenchCavity.jpg
 

Calivet06

New member
Joined
Nov 22, 2017
Messages
3
I got tired of having tool boxes taking up real estate on the floor/wall so I built these. Used HF boxes and fabricated the bench. Bought butcher block from lowes, joined two pieces together and sealed it. It hasn’t been this clean in a long time. Right now it’s covered with new engine parts for my 348ci Chevy Big Block
 

Attachments

  • DF10AB1F-5236-41AF-B086-4D26349EFCA3.jpeg
    DF10AB1F-5236-41AF-B086-4D26349EFCA3.jpeg
    620.8 KB · Views: 261
  • 244E9700-C3D4-4CCA-8ED9-440D2AB2F022.jpeg
    244E9700-C3D4-4CCA-8ED9-440D2AB2F022.jpeg
    878.5 KB · Views: 261
  • 538659BA-A092-4A79-BB82-C4B8734F23A1.jpeg
    538659BA-A092-4A79-BB82-C4B8734F23A1.jpeg
    566.5 KB · Views: 254
  • 6F3DF70C-1045-4E1B-9DB8-551751315546.jpeg
    6F3DF70C-1045-4E1B-9DB8-551751315546.jpeg
    602.5 KB · Views: 256
  • AA49567E-FF4B-4824-A923-6E02EF67217D.jpeg
    AA49567E-FF4B-4824-A923-6E02EF67217D.jpeg
    701.5 KB · Views: 246
  • 32B4C83F-677D-4C24-B600-CC52E27C0CBD.jpeg
    32B4C83F-677D-4C24-B600-CC52E27C0CBD.jpeg
    742 KB · Views: 286
  • E56EC537-4B4D-43CF-9665-76BB54D04341.jpeg
    E56EC537-4B4D-43CF-9665-76BB54D04341.jpeg
    648.4 KB · Views: 330
Joined
Dec 20, 2017
Messages
13
Location
Northern Nevada
Highdesert, can you post a closeup of the receiver mount or explain how it is attached?
Receiver mounts are welded on. I went with 1.5", for 1.25" attachment inserts. For holding attachments, there is a 1/4" pin. For things that need to be snug, there are projection weld nuts. You can also lay a bead on your inserts for a tighter fit. Mounts are handy, have attachments for a rifle arca rail vise, bicycle vise, barrel vise, table extension. Have also made a 90 degree adapter for up/down attachments or orienting to the end of the workbench.
 

Attachments

  • ReceiverMount_1B.jpg
    ReceiverMount_1B.jpg
    49.1 KB · Views: 317
  • BikeVise_2B.jpg
    BikeVise_2B.jpg
    72.8 KB · Views: 281

JIA

Well-known member
Joined
Dec 24, 2020
Messages
51
Location
Augusta, GA
My main workbench is my outfeed table in the wood shop.

Built the mobile cabinet with maple drawer fronts back in 2012. We lived in Hawaii at the time. With the new shop I wanted it all painted white.

Here are some random pics that show the full table at different stages. More pics/info in my thread in the Garage Gallery.

1667091742557.png

1667091754504.png

1667091796419.png

1667091805476.png
 

welder4956

Well-known member
Joined
Apr 8, 2010
Messages
3,068
Location
Birmingham, AL USA
Does anybody have any good ideas for what to do with the empty cavity in the back? I hate the wasted space but don't have room to leave any gap for shelves or anything.
Delete the mitering of the top and frame, and put a door on top to access for storage. The door should be hinged at the wall side and be the same material as the top.
 

nolimits76

Well-known member
Joined
Jul 11, 2013
Messages
959
Location
Oklahoma
I am actually building the frame for this bench this weekend. Uses two 26" HF boxes and a 44" box. The reasoning behind the split is the distance between doors in my garage. Does anybody have any good ideas for what to do with the empty cavity in the back? I hate the wasted space but don't have room to leave any gap for shelves or anything.

_CornerWorkbench.jpg
_CornerWorkbenchCavity.jpg

If you’ve got the room there was a member here who used a side drawer attachment to the 44 and placed on a 45 degree angle in the corner.
 
To avoid these ads, REGISTER NOW!

Cardboard Man

Well-known member
Joined
Aug 30, 2008
Messages
810
Location
NJ
Does anybody have any good ideas for what to do with the empty cavity in the back? I hate the wasted space but don't have room to leave any gap for shelves or anything.

Does it have to be L shaped? Why not just build a straight run? The bench space in the corner is not really usable/reachable anyway and will collect junk. Eliminating the corner will also give you more floor space. Just my opinion.
 

Zeke

Well-known member
Joined
Aug 13, 2009
Messages
17,176
Location
Long Beach CA, the sewer by the sea.
I am actually building the frame for this bench this weekend. Uses two 26" HF boxes and a 44" box. The reasoning behind the split is the distance between doors in my garage. Does anybody have any good ideas for what to do with the empty cavity in the back? I hate the wasted space but don't have room to leave any gap for shelves or anything.
I can see a bunch of small parts bins rising up out of the hole on some kind of lift.
 

gsuty17

Well-known member
Joined
Mar 12, 2018
Messages
119
I had designed a corner that raised up with a 110v screw jack I found on Amazon but that was a lot of extra work for essentially a novelty, but make no mistake I seriously considered it. There are doors on both ends so I had to build the "L" shape to get adequate workspace; I'd have ran a long straight bench if possible. I think it's just going to be dead space, as much as it bugs me. Maybe a revision will take place at a later date. Thanks for the input!

Also, @jaymar_ , have you tried going to google images and searching based on website? I use it often for garagejournal content. Try going to images.google.com and searching for [workbench site:garagejournal.com] but without the brackets, you know.
 

craiger75

Active member
Joined
Sep 7, 2022
Messages
42
Location
Hudson, WI
Reorganized my garage with Gladiator Garage. Picked Up the Mac Tools Edge boxes that fit under the workbench. Used the Toolbox Widget system to organize the drawers. Milwaukee Packouts to organize fasteners and the like. Will add a couple more photos later. This forum led to many of the decisions in this process including the products listed (minus Gladiator because I already had some of their stuff).
 

Attachments

  • 7F58D6B8-6333-40BE-8F37-93174BEC24E2.jpeg
    7F58D6B8-6333-40BE-8F37-93174BEC24E2.jpeg
    904.6 KB · Views: 292
  • E4C344C4-99E5-42EC-8B9B-DD635EC234E1.jpeg
    E4C344C4-99E5-42EC-8B9B-DD635EC234E1.jpeg
    909.7 KB · Views: 283
  • F627C7C4-8531-4667-B9B2-9E0868D5ED66.jpeg
    F627C7C4-8531-4667-B9B2-9E0868D5ED66.jpeg
    897.8 KB · Views: 299
  • 4EB486F0-C0FF-409B-BB72-DD8339128B7D.jpeg
    4EB486F0-C0FF-409B-BB72-DD8339128B7D.jpeg
    885 KB · Views: 305
  • F5AC77A6-89E6-426D-A256-1A45860141A7.jpeg
    F5AC77A6-89E6-426D-A256-1A45860141A7.jpeg
    880.5 KB · Views: 364
Joined
Jun 8, 2022
Messages
6
After several years of working out of a 1 car garage and stashing stuff at everyone I knew’s houses I finally built my own garage. With years of dreaming about what I wanted and how I wanted to do it I’m very happy with what I’ve got.
This is absolutely breathtaking, i love it.
 

rharman

Well-known member
Joined
Apr 22, 2012
Messages
8,799
Location
SoCal
Cluttered but it looks like it has a nice "feel" to it. (y)

I know where everything belongs, so I don’t have to look for a particular too.

By no means am I knocking it. I really do like the look & feel.
Kind of reminds me of my grandfathers workbench. Your pic brought back good memories.
Enjoyed the heck out of hanging out there when I was a kid.

For me, personally, I just like fewer tools exposed - I keep most in the rollaway.
 

Rkcubed

Well-known member
Joined
May 7, 2020
Messages
158
Location
Missouri
By no means am I knocking it. I really do like the look & feel.
Kind of reminds me of my grandfathers workbench. Your pic brought back good memories.
Enjoyed the heck out of hanging out there when I was a kid.

For me, personally, I just like fewer tools exposed - I keep most in the rollaway.
Thanks

The older I get the less moving around to get something is important.
I keep all my wrenches and sockets in a supposed rolling chest, it’s too heavy for me to move now. I’m kind of **** about keeping things simple at my old age.
 

PDang

Member
Joined
Nov 16, 2022
Messages
17
What I am really interested in is how long did it take you gents to plan out your layout, execute, change the design (days/months/years)? And more importantly, how did you get your significant other to allow you to spend so much time and money in the Mancave?


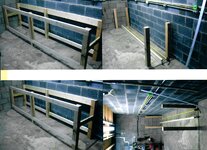
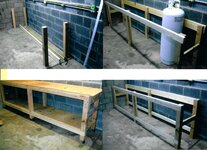
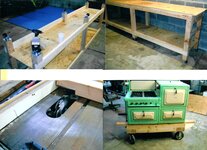
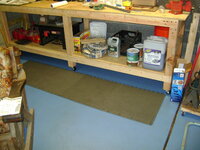
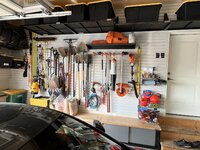
I have a background in Usability research and design, so take alot of time and put in tons of effort to design my layout. Utilizing space, lighting, sound, temperature, potential hazards (welding and chemicals).

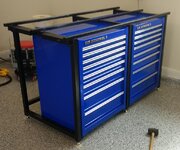
I have been religiously scanning and watching the classifieds for deals. its been a really bad addiction.

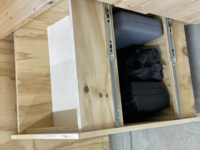
I have changed my layout design more times than I want to remember. And I have just discovered that I am a Organization Freak!

Love seeing everyone’s layout and its given me inspiration. Thank you!
 
To avoid these ads, REGISTER NOW!
Top Bottom