To avoid these ads, REGISTER NOW!

ZMotorsports Shop Projects 2.0

bigdave_185

Well-known member
Joined
Feb 14, 2021
Messages
443
Location
Utah
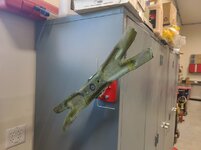
What your saying mike is you use the zoom feature to see what style clamps are hanging on the fab table and if you should buy more or another style then what you currently have?

I do the same!


I tried the 303 on the awful plastics on this new 2023 Silverado and after a week it still looks good. As you instructed I kept it off the paint to avoid making more to clean up, I used a 3” micro polish pad for hand waxing. The pad held the product well, it didn’t streak, and also made short work of the textured portions. Truck was in the dirt lot at the jobsite all week and it didn’t seem to attract anymore dirt then the rest of the painted surfaces did. I’ll keep a steady eye on it
Sorry no before or after pictures. The process went to smooth and I just walked around and finished before I remembered to take a photo or two.
 
To avoid these ads, REGISTER NOW!
OP
Z

zmotorsports

ALLIANCE MEMBER
Joined
Oct 20, 2009
Messages
21,477
Location
Northern Utah
What your saying mike is you use the zoom feature to see what style clamps are hanging on the fab table and if you should buy more or another style then what you currently have?

I do the same!


I tried the 303 on the awful plastics on this new 2023 Silverado and after a week it still looks good. As you instructed I kept it off the paint to avoid making more to clean up, I used a 3” micro polish pad for hand waxing. The pad held the product well, it didn’t streak, and also made short work of the textured portions. Truck was in the dirt lot at the jobsite all week and it didn’t seem to attract anymore dirt then the rest of the painted surfaces did. I’ll keep a steady eye on it
Sorry no before or after pictures. The process went to smooth and I just walked around and finished before I remembered to take a photo or two.


Glad to hear you liked the 303 Protectant Dave.

As for zooming in on photos, yeah, I've done that more than once. What kills me is when I have thoroughly looked over a picture that interested me that another forum member has posted and thought I saw everything, then a few posts later someone else will post up asking about something in the same picture and all I can think to myself is "holy ****, how'd I miss that?" :unsure: So I know others do the same thing but sometimes I must go into a picture with tunnel vision looking at one thing that caught my eye and completely miss something else.
 
OP
Z

zmotorsports

ALLIANCE MEMBER
Joined
Oct 20, 2009
Messages
21,477
Location
Northern Utah
My local Snap-on dealer is freakin' AWESOME!

I contacted him last week inquiring if some of my 12-point sockets qualified for warranty due to their inside ridges being worn so severely that they are starting to chew up the fastener heads and he said he would take care of me. I also didn't have an 8mm 12-point and know I will be needing that as well as a 1/2 drive 12-point 12MM for an upcoming project.

From right to left in the foreground are my 10, 11, 12 and 13 mm 12-points and in the background is my 9/16" that is also damaged to the point it also has a crack. The 12mm isn't terrible and not as worn as the other but it is worn quite a bit more than shows in the picture.
sockets.jpg

He text me this morning informing me that he has all but three of the sockets I need and the others will be here either on tonight's stock order or early next week.

Background is the 11mm, 13mm and 9/16" still needing to be replaced. In the foreground are the 10mm and 12mm in which were warranted and the 8mm as well as the 1/2" drive 12mm that I purchased.
sockets1.jpg


I really hated to having to replace those sockets as the metric set is nearly 30 years old and now the new ones won't match the full set. The SAE set is only about 8 or so years old so it should be a perfect match.

I don't buy a lot of tools these days but it is sure nice to have a local dealer take such good care of me when I do need something. Technically, he didn't have to warranty these as they were merely worn from decades of use and only the 9/16" was actually broken but he was nice enough to do so.
 

gearhead1960

ALLIANCE MEMBER
Joined
Mar 21, 2019
Messages
1,864
Location
Manassas, VA, a small blot in history
Mike, It’s always an education reading this thread. Especially, when you are diagnosing performance issues. I want to thank you for my son because one of your diagnoses saved him about $2500. You had recommended replacing some O2 sensors prior to replacing the Cat on a Buick (I think). My son has a Subaru WRX that the CEL kept coming on. Being 4 hours away it’s tough to help him work on cars so he ends up taking car to the local dealer. They ran the code and told him it needed a Cat. Remembering your diagnoses made me suspicious of the dealer’s. I told him to question them about the diagnoses and get the est. in writing. Sure enough, on the est. along with the Cat. replacement was the 2 O2 sensors. Someone trying to cover their butts. He ordered the sensors from Rockauto for $160 and along with a few tools he had to buy was able to replace the sensors himself. He was able to clear the code and took it on a long test drive. No CEL and he said it ran a lot better than it had in a long time and he had a great sense of accomplishment! Plus, more money in his pocket then someone else!
 
OP
Z

zmotorsports

ALLIANCE MEMBER
Joined
Oct 20, 2009
Messages
21,477
Location
Northern Utah
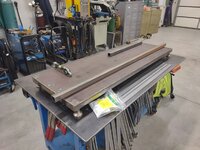
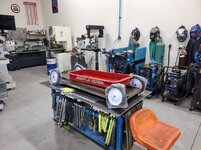
Friday night I dug my small chassis jig out and leveled it up on the fabrication table. This shop built chassis table/jig had made multiple ATV sand drag chassis over the years. You can see some of the markings and misc. placed drilled/tapped holes that were used for various chassis and components. I adjusted the leveling feet to ensure it was leveled in both directions.
jig.jpg

Saturday morning my wife and DIL had a shower to go to so my son brought his car over to give it a once over before their long drive for the Thanksgiving holiday and while he was checking the car over I continued work on the end of season maintenance of the outdoor power equipment. The blade was ever so slightly off balance after cleaning.
eq2.jpg

A little touch up with an angle grinder and file and it was perfectly balanced again and ready to reinstall.
eq3.jpg

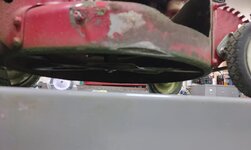
Deck cleaned and blade reinstalled. I do have a small section that has worn through on the lower deck that needs to be replaced/repaired but I think I'll tackle that once the rest of the equipment is completed and put away for the winter.
eq4.jpg


Thanks for looking.
 

OutlawDrifter

Well-known member
Joined
Jan 20, 2015
Messages
3,901
Location
KS
Wait a minute...you're just going to drag out the chassis jig get it all set up and then not tell us why...you know, you can't help an addict when you constantly have them Jonesing :ROFLMAO:
 
OP
Z

zmotorsports

ALLIANCE MEMBER
Joined
Oct 20, 2009
Messages
21,477
Location
Northern Utah
Wait a minute...you're just going to drag out the chassis jig get it all set up and then not tell us why...you know, you can't help an addict when you constantly have them Jonesing :ROFLMAO:

Sorry Marc, I should really check with my son to make sure he's ok with my next project being posted on the forum. ;) I figured it would take more than a few minutes for someone to call me out on setting up the chassis jig without any pictures of the project nor the project overview.:unsure:

I've had an idea bouncing around in my head and I like to set things up even though I won't be working on it for a bit, this way I can look at it while working on other things. This helps me get the creative juices flowing before I actually start cutting and welding things.
 
OP
Z

zmotorsports

ALLIANCE MEMBER
Joined
Oct 20, 2009
Messages
21,477
Location
Northern Utah
Finished the end of season maintenance on the Toro ZTR tonight. Then parked it back in the attached garage and pulled the battery for the winter.

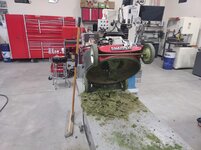
The deck had heavy buildup.
IMG_20221121_170343359.jpg

The blade's edges were actually in pretty good shape and just required a little touch up to bring the edge back and then very little to balance. Just a little heavy on one side.
IMG_20221121_165648767.jpg

Perfectly balanced.
IMG_20221121_170241066.jpg

Deck cleaned.
IMG_20221121_171800372.jpg

Blades reinstalled.
IMG_20221121_172050299.jpg

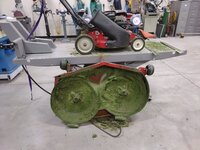
Cleaned the lift table and swept the floor in preparation for the small deck sectioning that I need to do on the Snapper walk-behind.
IMG_20221121_172714591.jpg

Similar wear through like I repaired on the left side a few years ago.
IMG_20221121_174933503.jpg


Thanks for looking.
 
OP
Z

zmotorsports

ALLIANCE MEMBER
Joined
Oct 20, 2009
Messages
21,477
Location
Northern Utah
Any thoughts on a non-stick surface for the business side of the mower decks?

I give the underside of the decks a shot of WD-40 before putting to bed for the winter.

More for corrosion protection however.

I think the main issue was the last few mows of the season were when the grass was wet as I was trying to fit the mows in between trips and rain storms.
 

WoodsTruck

Well-known member
Joined
Jan 12, 2013
Messages
1,028
I give the underside of the decks a shot of WD-40 before putting to bed for the winter.

More for corrosion protection however.

I think the main issue was the last few mows of the season were when the grass was wet as I was trying to fit the mows in between trips and rain storms.
Kind of thought so. Living on the wet side of Oregon that is my mowing schedule too.
 
OP
Z

zmotorsports

ALLIANCE MEMBER
Joined
Oct 20, 2009
Messages
21,477
Location
Northern Utah
The owner of the C10 that I did the rear end work for last week sent me this yesterday.
2 leg.jpg


Looks like he's enjoying powering both rear tires. :ROFLMAO: I was hoping he would have held off just a bit longer before putting the power to it but oh well, looks like he's happy with it.
 
OP
Z

zmotorsports

ALLIANCE MEMBER
Joined
Oct 20, 2009
Messages
21,477
Location
Northern Utah
So I'm shocked. I specifically "staged" a few shots above to give a very, very slight view of what's on the small chassis jig and no one bit. :D I posted the pictures last night to see if anyone would spot anything unique. I did this following the comments last week about zooming in on forum member's pictures to see what's in the background and I'm surprised no one has commented.:unsure: I can see it plain as day.:ROFLMAO:
 

signcrafter

Well-known member
Joined
May 9, 2012
Messages
12,525
Radio flyer!

When you say specifically staged did you mean that lawnmower engine in the picture is going to power the wagon project? Looking forward to the build.
 
To avoid these ads, REGISTER NOW!
OP
Z

zmotorsports

ALLIANCE MEMBER
Joined
Oct 20, 2009
Messages
21,477
Location
Northern Utah
Yep, Radio Flyer wagon project for the grandson. I have some time yet until his birth in the spring so I thought I'd set up the chassis jig and place the parts on it so it is in the background while I'm working on other things and I can solidify the plans in my head.

Some of you may remember the pictures of the one I built for my son from previous posts. I built this one back in 1991 after his birth. I was going for the "Pro Street" look. I didn't see any like it around at the time but nowadays they're all over the place, especially at car shows. Back when I built my son's it was heavily oogled over as they were not common at all.

I did learn a few things on that one though so I plan on going a different route on the new one.
wagon1.jpg

Body was heavily tubbed and tilted to expose the frame but I won't be doing that again.
wagon2.jpg

Here is the blank canvas that I'm starting with. Sitting on some 1.250" x .062" square tubing as the framework.
rf1.jpg

Placed the tires/wheels somewhat in position and added a bit of rake to the wagon.
rf2.jpg

Next I'll establish ride height and begin fabbing to match my sketches but much will be on the fly from what's in my head.

The one I built for my son was quite high off the ground and with the wheel tubs cut in, although it added the "kool" factor, there really wasn't much room in the wagon itself for the child. This one will keep the OE dimensions and even the paint work of the Radio Flyer but I will fabricate a frame in which the body will fasten to. I want to keep this one much lower to prevent getting hurt if he falls out as well as better weight distribution by keeping a bit more weight on the front and placing the rear axle slightly rearward of the body. I will also add a longer handle so it will be more comfortable to pull around. Again, reflecting back on some design flaws from version #1 over 30 years ago.

I'm leaning towards a front end similar to the 29-31 roadsters with the hairpin links. I have some left over Victory Red paint in which I plan on painting the frame and I'm sure I'll add a bit of chrome.

There won't be much going on for a bit as I have some other projects to do but this way I can see it in the background in the shop and work on it as time allows.

Stay tuned for progress.....
 

MadeByMiller

Well-known member
Joined
Dec 29, 2018
Messages
1,230
Location
Rapid City, SD
Very cool project Mike, can't wait to see how it turns out! I had the same question about spraying the underside of the mower deck. I have been spraying mine with Fluid Film and it seems to help with clean outs as well as what you said, rust prevention.

On the wagon project, if you see fit I'd be glad to model something and/or 3D print if that would be useful!
 
OP
Z

zmotorsports

ALLIANCE MEMBER
Joined
Oct 20, 2009
Messages
21,477
Location
Northern Utah
Very cool project Mike, can't wait to see how it turns out! I had the same question about spraying the underside of the mower deck. I have been spraying mine with Fluid Film and it seems to help with clean outs as well as what you said, rust prevention.

On the wagon project, if you see fit I'd be glad to model something and/or 3D print if that would be useful!

Thanks for the offer. I'm still pretty old school and sketch out ideas and then many times they get "tweaked" or altered as they're going from my head to the metal. My son's WJ bumpers pretty much fit that process when we were building them.

I'm sure the ideas or visions in my head will become slightly different as they come to fruition.
 

Finallygotit

ALLIANCE MEMBER
Joined
Jul 6, 2013
Messages
4,103
Location
Tucson, AZ
I'm as normal as they come Marc.
Time out! No, you are not "normal". As far as I'm concerned, you are in the top 10% of fathers out there, your fab skills are crazy good, your mechanical PM's on everything from weed trimmers to diesel pusher coaches is far and above anything I have ever seen.

Normal, sir, I think not.

:beer:
 
OP
Z

zmotorsports

ALLIANCE MEMBER
Joined
Oct 20, 2009
Messages
21,477
Location
Northern Utah
Time out! No, you are not "normal". As far as I'm concerned, you are in the top 10% of fathers out there, your fab skills are crazy good, your mechanical PM's on everything from weed trimmers to diesel pusher coaches is far and above anything I have ever seen.

Normal, sir, I think not.

:beer:

Thanks. But if it's any consolation, in my head I feel normal. :unsure:
 

PugetDude

ALLIANCE MEMBER
Joined
Mar 13, 2013
Messages
22,481
Location
Superstition Mountains, AZ
Wish I was closer, Mike- I have a set of 4 Hoosier racing go-kart tires I'd donate to the hot rod wagon build.
Bought them for a big belt sander build... needed 6" wide so I have a surplus set.

Screenshot 2022-11-22 3.07.04 PM.png
 
Last edited:

signcrafter

Well-known member
Joined
May 9, 2012
Messages
12,525
Since you mentioned your son when referring to the table, does that mean congratulations are in order?
Mike's son has his own thread in the fab forum. Cant remember the name but the details are in there. I just stumbled upon it recently and found out it was Mike's son. But yes, congrats are in order.
 
To avoid these ads, REGISTER NOW!
Top Bottom