To avoid these ads, REGISTER NOW!

Above 1200 Sq/FT The ASYLUM - Happy 40th Birthday to Me! (Est. 2005)

Wokspaces above 1200 squarefeet.
OP
S

shopnut

Well-known member
Joined
Feb 22, 2006
Messages
4,237
Location
Florida
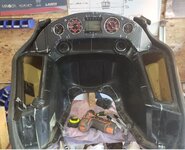
ENTER THE 1985 HONDA NS400R…(Part 3)

I’m going to attempt to catch you up on the latest progress on the Honda project, although I will likely miss many details. Where I left off on the story earlier was bodywork and I made a great leap forward in that area.

Considering the rarity of parts for this bike and my frugal ways (I’m not going to pay $400 for a small pristine plastic body panel as some are offering them for), choices were extremely limited. But my patience paid off again and I found some reasonably priced side body panels in Europe and had them shipped over (shipping was almost as much as the parts!).

The first part to arrive was in pretty good shape overall, but was in need of paint.

5358-453-NS400R-Bodywork-018 (Side-Panel-Right-Ebay).jpg

The opposite side panel, however, was nearly tossed out as junk. In the Ebay pictures, it looked fairly decent, but there were “conveniently” blurry pictures of the really bad sections of the part that I (as an optimist) assumed to be fine.

5359-457-NS400R-Bodywork-001 (Side-Panel-Left-Ebay).jpg

But when it arrived, it was in pieces, despite being packaged very well. Plus, the leading edge was warped, like it was involved in some sort of carb fire or something. The package was taped up really good, but despite searching three times, I could not find all the missing pieces. In this picture, you can really see the warped tip up by the fuel valve hole and also the missing area where the lower mount hole would normally be.

5360-458-NS400R-Bodywork-014 (Side-Panel-Left-Ebay-As-Received).jpg

I sat on it a couple days and then I decided this might be the perfect opportunity to learn a new skill… PLASTIC WELDING!!! So I armed myself with a few inexpensive tools to give it a try.

5361-462-NS400R-Bodywork-117 (Left side panel).jpg

5362-463-NS400R-Bodywork-118 (Left side panel).jpg

A heat gun was used to reform the front flange back to original shape and things were looking up.

5363-465-NS400R-Bodywork-081 (Left side panel).jpg

For the missing pieces, I traced out the profile on some spare ABS sheet and cut it out.

5364-466-NS400R-Bodywork-086 (Left side panel).jpg

And then the filler piece was formed and tacked in place. Again, the situation and my success was looking even brighter.

5365-467-NS400R-Bodywork-090 (Left side panel).jpg
 
To avoid these ads, REGISTER NOW!
OP
S

shopnut

Well-known member
Joined
Feb 22, 2006
Messages
4,237
Location
Florida
ENTER THE 1985 HONDA NS400R…(Part 4)

The lower mount hole recess was completely missing on the left side panel, so I had to completely re-construct it. Here, I have already welded in a C-shaped semi-circle to build up the recess.

5366-469-NS400R-Bodywork-091 (Left side panel).jpg

Then a disk was added with the hole for the mount screw.

5367-472-NS400R-Bodywork-111 (Left side panel).jpg

There were a lot of cracks that needed to be repaired.

5368-473-NS400R-Bodywork-097 (Left side panel).jpg

I used the soldering iron type welder to melt it back together, sort of “stitching” it wherever there was a crack.

5369-474-NS400R-Bodywork-098 (Left side panel).jpg

With all of the rework, I sort of lost my sharp edge, and I didn’t want to rely on body filler to build it back up. So I instead chose to weld in a thin strip of plastic. This was all smoothed out with the soldering iron and sanded to the proper radius.

5370-477-NS400R-Bodywork-103 (Left side panel).jpg

Things were looking very hopeful at this point and I was impressed with the strength of the repair. I occasionally did the “twist test” on the panel to check if any of the welds would crack again.

5371-479-NS400R-Bodywork-114 (Left side panel).jpg

This is jumping ahead pretty far, but I was extremely happy with the weld repair and the durability of the finished parts. The cut off panels on the right came with the used bike and were essentially in great shape (other than missing their lower sections), so they served as a great guide to get my contours back to factory specs on the newly acquired panels from Europe.

5372-744-NS400R-Bodywork-412 (Rear Side Panel  Paint).jpg
 

zmotorsports

ALLIANCE MEMBER
Joined
Oct 20, 2009
Messages
21,360
Location
Northern Utah
Nice save on the plastic Mark. Those can be hit and miss from what I've experienced. Back in the day I repaired quite a few and some welded up and blended better than others. I found the SEM Plastic Repair putty to be a good filler that bit in good and sanded "fair" but it allowed the panels to accept primer and then paint like normal automotive panels. I would always use some flex additive in the clearcoats as well as a little extra protection even if they bolted on fairly rigid.
 
OP
S

shopnut

Well-known member
Joined
Feb 22, 2006
Messages
4,237
Location
Florida
Nice save on the plastic Mark. Those can be hit and miss from what I've experienced. Back in the day I repaired quite a few and some welded up and blended better than others. I found the SEM Plastic Repair putty to be a good filler that bit in good and sanded "fair" but it allowed the panels to accept primer and then paint like normal automotive panels. I would always use some flex additive in the clearcoats as well as a little extra protection even if they bolted on fairly rigid.
Thanks for the tips, Mike! I will have to seek out some of the SEM putty you speak of because I struggled with sanding down the added plastic a bit and also with coating adhesion. I do recall professional painters talking about the flex additive for auto front and rear bummers and it would have been a good idea here too because the panels can flex quite a bit, especially when installing them. I didn't really have the option to add anything to deal with flex, but I'm hoping the paint I used already had something in it. Time will tell, I guess (my inexperience showing through!).
 
Last edited:
OP
S

shopnut

Well-known member
Joined
Feb 22, 2006
Messages
4,237
Location
Florida
ENTER THE 1985 HONDA NS400R…(Part 5)

EVERY body part needed some type of repair and the main upper fairing required a LOT of attention.

The finger that extends out to mount the windshield was snapped off and missing part was long gone, so I needed to make a new patch piece. Luckily the other side served as a good guide. A piece of cardboard served as my template.

5373-516-NS400R-Bodywork-166 (Front Fairing Upper Repair).jpg

After the profile was cut out, the step for the windshield milled in, and a bow added to match the curvature of the upper fairing edge, the part was ready to be welded on. A little welding moved it to this stage of the repair.

5374-524-NS400R-Bodywork-177 (Front Fairing Upper Repair).jpg

There were a couple of cracks that needed repairing. For this one, I used some shims to first get the two top surfaces flush.

5375-525-NS400R-Bodywork-178 (Front Fairing Upper Repair).jpg

With a clamp in place holding the edges flush, I welded most of the joint together.

5376-526-NS400R-Bodywork-179 (Front Fairing Upper Repair).jpg

And then some filler plastic was added to build the section back up.

5377-529-NS400R-Bodywork-182 (Front Fairing Upper Repair).jpg

After a little body filler was added, here are the results. Next time I will need to try the SEM material forum member zmotorsports suggested.

5378-530-NS400R-Bodywork-183 (Front Fairing Upper Repair).jpg

Jumping ahead again, here is a peek of the repaired upper fairing in its pearl blue. I will discuss my painting methods later.

5379-586-NS400R-Bodywork-258 (Front Fairing Upper Paint) (cropped).jpg
 

zmotorsports

ALLIANCE MEMBER
Joined
Oct 20, 2009
Messages
21,360
Location
Northern Utah
Mark, this is the SEM one I used but it now comes in a nice dual dispensing cartridge. I used the older version that just had two separate tubes in a box and you had to manually mix the two parts together. It worked well on the motorcycle, ATV and snowmobile hoods that were plastic and then finished out normally using PPG urethane paints and undercoats.

I have also heard good things about the 3M version but I have not personally used it, yet.

The bike is turning out awesome, great work so far. :thumbup:
 
OP
S

shopnut

Well-known member
Joined
Feb 22, 2006
Messages
4,237
Location
Florida
ENTER THE 1985 HONDA NS400R…(Part 6)

The lower fairing section was an aftermarket unit made out of fiberglass, so repairs differed in it. Like many of the old panels, it had decals on it that needed to be removed to make way for new paint. I tried one of the eraser disks and I highly recommend them.

5380-542-NS400R-Bodywork-160 (Decal Removal).jpg

In this case, there was a heavy clear coat over the decals and it still took the decal off nicely. There was a pretty deep recess once the decal was gone and that needed to dealt with later.

5381-545-NS400R-Bodywork-163 (Decal Removal).jpg

An extension had broken off down near the foot brake and I needed to reconstruct it. Some flexible cardboard was used as my template.

5382-547-NS400R-Bodywork-197 (Front Fairing Lower Repair).jpg

In order to get a slight curve in the new piece matching the base part, I taped in a strip of sheet metal so I could get the curvature perfect.

5383-548-NS400R-Bodywork-199 (Front Fairing Lower Repair).jpg

Here it is with two layers of fiberglass added to the backside. The aluminum foil worked nicely as a “mold release” for this small area.

5384-552-NS400R-Bodywork-203 (Front Fairing Lower Repair).jpg

And then one last layer got added to the front face to prevent cracking. The profile was then trimmed and smoothed out.

5385-555-NS400R-Bodywork-208 (Front Fairing Lower Repair).jpg

Jumping ahead, here is the fairing with its coat of blue paint, better showing the extended wing.

5386-594-NS400R-Bodywork-267 (Front Fairing Lower Paint).jpg
 
OP
S

shopnut

Well-known member
Joined
Feb 22, 2006
Messages
4,237
Location
Florida
Mark, this is the SEM one I used but it now comes in a nice dual dispensing cartridge. I used the older version that just had two separate tubes in a box and you had to manually mix the two parts together. It worked well on the motorcycle, ATV and snowmobile hoods that were plastic and then finished out normally using PPG urethane paints and undercoats.

I have also heard good things about the 3M version but I have not personally used it, yet.

The bike is turning out awesome, great work so far. :thumbup:
Perfect timing to make it on to my last-minute Christmas wish list!! Thanks for the info and the moral support!
 

andyvh1959

Well-known member
Joined
Feb 15, 2020
Messages
2,590
Location
Green Bay WI
Nice work. A lot of motorcycle plastic bodywork parts are made of ABS. I have plastic welded many ABS parts with a soldering iron, and with ABS rod stock I by at Harbor Freight. Also, ABS can be solvent welded with Acetone, or ABS plastic pipe cement (which is mostly Acetone). I also keep a glass jar filled with ABS scraps and Acetone, to have a ready slurry of ABS to fill gaps, form gussets/fillets. I did a lot of mods on a set of old ABS saddlebags for a buddies bike. Once the slurry sets it smoothes out to a nice radius fillet.
 
OP
S

shopnut

Well-known member
Joined
Feb 22, 2006
Messages
4,237
Location
Florida
Nice work. A lot of motorcycle plastic bodywork parts are made of ABS. I have plastic welded many ABS parts with a soldering iron, and with ABS rod stock I by at Harbor Freight. Also, ABS can be solvent welded with Acetone, or ABS plastic pipe cement (which is mostly Acetone). I also keep a glass jar filled with ABS scraps and Acetone, to have a ready slurry of ABS to fill gaps, form gussets/fillets. I did a lot of mods on a set of old ABS saddlebags for a buddies bike. Once the slurry sets it smoothes out to a nice radius fillet.
Thanks! I will have to keep the Acetone welding in mind too. And the slurry idea sounds interesting, to say the least, especially for filling in gaps. Thanks for chiming in!
 

andyvh1959

Well-known member
Joined
Feb 15, 2020
Messages
2,590
Location
Green Bay WI
Here are some pics of mods I made on late 70's vintage Bates ABS saddlebags, to mount on my buddies Kawasaki VN900. I made a lot of mods to hinge the lids out like a modern hard bag, then made cutouts to mount single point locking latches. The views inside the bags around the latch recesses show how the ABS slurry blended in the pieces of ABS plumbing I used to make the recesses.
20220512_122541.jpg20220512_122549.jpg20220512_122617.jpg20220512_122628.jpg20220512_122652.jpg
 
OP
S

shopnut

Well-known member
Joined
Feb 22, 2006
Messages
4,237
Location
Florida
ENTER THE 1985 HONDA NS400R…(Part 7)

I bought two plastic welders and I found myself using the soldering iron version the most for the types of repairs I was doing. I even used it to imbed the wire mesh into the surface of the plastic in a couple places.

The hot staple type does come in handy for certain repairs, however. It worked nicely for this crack at the corner of a side panel.

5387-693-NS400R-Bodywork-381 (Rear Right Side Panel Spare Repair).jpg

You just pull the trigger until the wire staple is hot enough to melt into the plastic. I think it’s my preferred method if you are quickly repairing a cracked panel with good paint remaining on the front side. One BIG caution, however. Once it is hot enough to start embedding itself, apply very little pressure. And have a steady hand after you let off on the trigger since it takes a little time to cool down, or you’ll just pull the staple out of the plastic when you try to pull the gun off the staple. A few tries and you will figure it out. One last tip is putting some notches in the staple prongs if you don’t want the “stubble” sticking up out of the plastic when finished. I notched them right where they make a bend to go into the gun. Later once cooled, you can grab the stubble with a pliers and twist it to have it break off below the surface of the plastic.

5388-695-NS400R-Bodywork-383 (Rear Right Side Panel Spare Repair).jpg

The kit I bought came with different shapes of staples for different repairs. Here I am showing one version that is for inside corners. Since the angle is not 90 degrees, I had to custom bend each one before setting it.

5389-696-NS400R-Bodywork-384 (Rear Right Side Panel Spare Repair).jpg

While I was letting paint dry, I ordered some new chrome fork tubes and rebuilt the forks. Pitted tubes will just tear an oil seal eventually.

5390-365-NS400R-Forks-21 (Fork Tubes Seals).jpg

5391-366-NS400R-Forks-27 (Fork Tubes Seals).jpg

Lower fork sliders also got a fresh coat of black.

5392-379-NS400R-Forks-30 (Fork Tubes Seals).jpg

Before the bodywork was ready to go back on, I also cleaned up the whole dash area. Top fork triple clamp also got a fresh coat of gold.

5393-446-NS400R-Frame-37 (Front Stay).jpg
 
OP
S

shopnut

Well-known member
Joined
Feb 22, 2006
Messages
4,237
Location
Florida
Here are some pics of mods I made on late 70's vintage Bates ABS saddlebags, to mount on my buddies Kawasaki VN900. I made a lot of mods to hinge the lids out like a modern hard bag, then made cutouts to mount single point locking latches. The views inside the bags around the latch recesses show how the ABS slurry blended in the pieces of ABS plumbing I used to make the recesses.
20220512_122541.jpg20220512_122549.jpg20220512_122617.jpg20220512_122628.jpg20220512_122652.jpg
Wow, great job! That whole method would have made my mount screw repair a whole lot easier, I'm guessing. The possibilities might be endless!
 

andyvh1959

Well-known member
Joined
Feb 15, 2020
Messages
2,590
Location
Green Bay WI
I also am working on a VN1700 gauge panel I mounted into a dash panel I formed out of ABS sheet stock that I am bonding into a late 70's vintage Pacifico fairing for my own Kawasaki Classic VN1600 dresser build. I shaped/fabbed the entire panel above the lower two vents and the area where a stereo can mount. The dash panel will be bonded into the fairling, and blended in using the ABS slurry. I thermal formed a top cover panel from ABS sheet stock that screws in place to the dash panel and fairing. I can remove the top panel, and take the gauge set out from the dash panel if I need to access it. All the mounts and location tabs for the gauge panel are Acetone bonded onto the ABS of the fairing. Bunch of mods to go yet to fit the fairing to the wide tank and fork legs of the bike. But I did a similar installation on my buddies VN900 before I got into my own build. The two pics are his VN900 with a similar frame mount fairing, trunk and bags I modified to create a dresser for him. I just have to paint the bags to match the paint sceme on his bike and its done. I did the mods on his bike back in 2016 and everything has held up, no fails, no cracks, so the ABS welding and bonding using Acetone and slurry has proved very durable and adaptable. I don't even consider doing fiberglas work on ABS plastic anymore, which was my process in the past. Plastic welding and Acetone bonding is much easier and stronger.
 

Attachments

  • Gauge panel.JPG
    Gauge panel.JPG
    53.5 KB · Views: 17
  • 20220512_122512.jpg
    20220512_122512.jpg
    1.5 MB · Views: 17
  • 20220512_122521.jpg
    20220512_122521.jpg
    1.4 MB · Views: 18
Last edited:
OP
S

shopnut

Well-known member
Joined
Feb 22, 2006
Messages
4,237
Location
Florida
I also am working on a VN1700 gauge panel I mounted into a dash panel I formed out of ABS sheet stock that I am bonding into a late 70's vintage Pacifico fairing for my own Kawasaki Classic VN1600 dresser build. I shaped/fabbed the entire panel above the lower two vents and the area where a stereo can mount. The dash panel will be bonded into the fairling, and blended in using the ABS slurry. I thermal formed a top cover panel from ABS sheet stock that screws in place to the dash panel and fairing. I can remove the top panel, and take the gauge set out from the dash panel if I need to access it. All the mounts and location tabs for the gauge panel are Acetone bonded onto the ABS of the fairing. Bunch of mods to go yet to fit the fairing to the wide tank and fork legs of the bike. But I did a similar installation on my buddies VN900 before I got into my own build. The two pics are his VN900 with a similar frame mount fairing, trunk and bags I modified to create a dresser for him. I just have to paint the bags to match the paint sceme on his bike and its done. I did the mods on his bike back in 2016 and everything has held up, no fails, no cracks, so the ABS welding and bonding using Acetone and slurry has proved very durable and adaptable. I don't even consider doing fiberglas work on ABS plastic anymore, which was my process in the past. Plastic welding and Acetone bonding is much easier and stronger.
Nice work!! I was out today buy a few other things and decided to grab some acetone so I could give it a try.

My first attempt is going to be fabbing a second connector cover for the NS400R. I have been waiting a year for one of these covers to pop up for sale, and only one did, but is included in a set of other parts that I don’t need. And it's from Australia, so shipping is expensive too.

5394-NS400R-Electrical-069 (Connector Cover).jpg

5395-NS400R-Electrical-070 (Connector Cover).jpg

The new part will not look like the original part because it won’t be contoured as much, but it will function properly by keeping the water off the connectors and, mainly for this “show” bike, hide the connectors.

Here is what I will start with. I will need to cut out the “box” from it and then add some flanges and hooks to allow for its attachment.

5396-NS400R-Electrical-072 (Connector Cover).jpg

5397-NS400R-Electrical-073 (Connector Cover).jpg

Thanks for the idea to get those creative juices flowing!
 
OP
S

shopnut

Well-known member
Joined
Feb 22, 2006
Messages
4,237
Location
Florida
ENTER THE 1985 HONDA NS400R…(Part 8)

Before I could get serious about the painting, I had to pick out my colors. A wanted it as close to Honda factory color codes as possible. One of the side panels had virgin paint underneath a decal, so I used it as my target. I got lucky with one of the Dupli-Color shades matching it almost exactly.

5398-487-NS400R-Bodywork-154 (Blue Paint).jpg

Research showed a Dupli-Color shade of white also closely matched the Honda factory white, so I was all set for a budget paint job that might get spread over several months.

5399-488-NS400R-Paint-01 (Sonic Blue).jpg

5400-490-NS400R-Paint-02 (Arctic White).jpg

Dupli-Color has a clear coat for this paint system and I used it, but was not entirely happy with the shine it gave. Research told me the clear should go on fairly quickly after the base coat flashes over. That same research uncovered that you should never sand on a metallic/pearl base coat before the clear goes on… the sanding will mess up the metallic bits in the paint. I never knew that but it makes sense.

5401-491-NS400R-Paint-03 (Clear coat).jpg

I normally paint everything outside so I don’t have to deal with the overspray on everything inside. By doing so, I have to wait for the perfect days to paint… no or light breeze, no bugs, no rain… the list goes on and on. I struggled to get a decent finish on the first couple parts and realized pretty quickly that outside was no going to work this time. The fairing in this picture looked pretty good right after spraying it, but it dried way to quickly and got dull. And I had a bugs in the finish as well.

5402--NS400R-Bodywork-227 (Front Fairing Upper Paint).jpg

So I rigged up a temporary spray booth under my lift and it worked well enough for my purposes. It held in there for the duration of the paint process, about 2 months. Humidity is also a concern in Florida, so this whole process took place in our typically driest months, Feb-April.

5403-582-NS400R-Bodywork-254 (Paint Booth).jpg

5404-592-NS400R-Bodywork-264 (Front Fairing Lower Paint).jpg
 
To avoid these ads, REGISTER NOW!
OP
S

shopnut

Well-known member
Joined
Feb 22, 2006
Messages
4,237
Location
Florida
ENTER THE 1985 HONDA NS400R…(Part 9)

All the major parts needed both white and blue sprayed, which lengthened the whole process, but I eventually got through it.

5405-636-NS400R-Bodywork-329 (Front Fairing Upper Paint).jpg

Just to give things a more finished look, I spent some time painting the backside of the panels black. In the case of this one, the upper fairing, quite a bit of it is seen around the dash.

5406-673-NS400R-Bodywork-365 (Front Fairing Upper Paint).jpg

The metal tank had a few dents that needed repairing, the results were satisfactory to me.

5407-667-NS400R-Bodywork-358 (Gas Tank Paint).jpg

At least not ALL the parts needed two colors sprayed.

5408-685-NS400R-Bodywork-402 (Front Fender Paint).jpg

5409-688-NS400R-Bodywork-405 (Tail Panel Paint).jpg

And once all the parts had dried sufficiently, it was finally time to see what it all looked like. Next would be decals.

5410-776-NS400R-Bodywork-495 (Back on bike).jpg

5411-777-NS400R-Bodywork-496 (Back on bike).jpg
 
OP
S

shopnut

Well-known member
Joined
Feb 22, 2006
Messages
4,237
Location
Florida
ENTER THE 1985 HONDA NS400R…(Part 10)

With everything painted, it was time for decals to really finish off the bodywork. The overall bike on the other hand, had many more things needing to be done.

Luckily there are several places producing reproduction decal kits for this bike and I chose a company in Canada to keep shipping down. Quality looked decent too.

5412-563-NS400R-Bodywork-035 (Decals).jpg

In the past, I have always applied decals dry, but this time, considering the complexity of the decals, I decided to try a wet method and it worked out fine.

My process was as follows:
1. Trim excess paper from decal to get a nearly net shape.
2. Trim ends of stripe to match body edges (if applicable).
3. Peel off the top masking tape (normally I would leave this on, but I need the extra flexibility to follow slight curves).
4. Clean the body panel.
5. Peel the decal off backing paper and lay down with adhesive side up (wetting fingers helped).
6. Spritz the body panel AND the decal lightly and evenly.
7. Carefully apply decal edge along entire paint reference line. Hold remaining width away.
8. Work the rest of the decal width on while working water out along length. Stretch vinyl or use heat (sparingly) as necessary on wrinkles.
9. Stand back and enjoy!!

The tank was the most difficult one. Not only did I have to make sure I got it centered, but there where difficult surface contours to complicate matters.

5413-811-NS400R-Bodywork-542 (Decals).jpg

The bike looked very finished with just the striping on.

5414-824-NS400R-Bodywork-562 (Decals).jpg

5415-825-NS400R-Bodywork-567 (Decals).jpg

But the fun didn’t stop there. Honda had applied a lot of decals to this bike from the factory and I ended up putting all but two of them back on. The decal application was a mix between apprehension and satisfaction. The with difficult ones, I sort of had to psyche myself up to do it, but then once applied, I was almost giddy with the progress. The wet method eased the process some because I had the ability to peel the decal off and reposition if I wasn’t happy with its placement, and I exercised this option several times.

5416-923-NS400R-Overall-2022-06-26-12.jpg

5417-924-NS400R-Overall-2022-06-26-15.jpg

5418-936-NS400R-Overall-2022-06-26-42.jpg

At this point, you are up-to-date with everything I have reported on in my main NS400R restoration thread. I’ll report back here shortly after I write up the stories on all the latest progress on the bike. I managed to score a stock seat and solo tail cowl, so the bike is taking on a more racier look as the factory intended it to in 1985. There is also a bunch of engine cleanup I want to do yet.
 

racer-john

Well-known member
Joined
Apr 1, 2008
Messages
1,461
Location
Newmarket, ON Canada
ENTER THE 1985 HONDA NS400R…(Part 10)

With everything painted, it was time for decals to really finish off the bodywork. The overall bike on the other hand, had many more things needing to be done.

Luckily there are several places producing reproduction decal kits for this bike and I chose a company in Canada to keep shipping down. Quality looked decent too.

5412-563-NS400R-Bodywork-035 (Decals).jpg

In the past, I have always applied decals dry, but this time, considering the complexity of the decals, I decided to try a wet method and it worked out fine.

My process was as follows:
1. Trim excess paper from decal to get a nearly net shape.
2. Trim ends of stripe to match body edges (if applicable).
3. Peel off the top masking tape (normally I would leave this on, but I need the extra flexibility to follow slight curves).
4. Clean the body panel.
5. Peel the decal off backing paper and lay down with adhesive side up (wetting fingers helped).
6. Spritz the body panel AND the decal lightly and evenly.
7. Carefully apply decal edge along entire paint reference line. Hold remaining width away.
8. Work the rest of the decal width on while working water out along length. Stretch vinyl or use heat (sparingly) as necessary on wrinkles.
9. Stand back and enjoy!!

The tank was the most difficult one. Not only did I have to make sure I got it centered, but there where difficult surface contours to complicate matters.

5413-811-NS400R-Bodywork-542 (Decals).jpg

The bike looked very finished with just the striping on.

5414-824-NS400R-Bodywork-562 (Decals).jpg

5415-825-NS400R-Bodywork-567 (Decals).jpg

But the fun didn’t stop there. Honda had applied a lot of decals to this bike from the factory and I ended up putting all but two of them back on. The decal application was a mix between apprehension and satisfaction. The with difficult ones, I sort of had to psyche myself up to do it, but then once applied, I was almost giddy with the progress. The wet method eased the process some because I had the ability to peel the decal off and reposition if I wasn’t happy with its placement, and I exercised this option several times.

5416-923-NS400R-Overall-2022-06-26-12.jpg

5417-924-NS400R-Overall-2022-06-26-15.jpg

5418-936-NS400R-Overall-2022-06-26-42.jpg

At this point, you are up-to-date with everything I have reported on in my main NS400R restoration thread. I’ll report back here shortly after I write up the stories on all the latest progress on the bike. I managed to score a stock seat and solo tail cowl, so the bike is taking on a more racier look as the factory intended it to in 1985. There is also a bunch of engine cleanup I want to do yet.
Why does the lower panel not cover as much of the frame as the opposite side?
 
OP
S

shopnut

Well-known member
Joined
Feb 22, 2006
Messages
4,237
Location
Florida
Why does the lower panel not cover as much of the frame as the opposite side?
Very observant and good question. One of the many small and unique details Honda added to this bike was a kickstand fairing to help make the bodywork a bit more symmetrical. Of course, it only helps out when the bike is rolling along with the kickstand up, and it was sort of a feeble attempt. But it’s one of those things that make this bike what it is.

5419-497-NS400R-Bodywork-130 (Kickstand fairing).jpg

5420-498-NS400R-Bodywork-131 (Kickstand fairing).jpg

That little fairing wing I reconstructed on the right side essentially matches the kickstand fairing on the left.

5421-881-NS400R-Bodywork-622 (Decals).jpg

5422-878-NS400R-Bodywork-618 (Decals).jpg
 

Bob Heine

ALLIANCE MEMBER
Joined
Oct 24, 2009
Messages
10,705
Location
Boca Raton, Florida
Why does the lower panel not cover as much of the frame as the opposite side?
Mark, I think John was referring to the loop that crosses in front of the fuel tank. I suspect it's just the angle of the photo. I edited the photos in an attempt to point this out but it appears I have made an inappropriate comment, starting with an eggplant. Feel free to report me.... :see: :bitchslap
Mark Honda 2 Frame.jpgMark Honda 1 Frame.jpg
 
OP
S

shopnut

Well-known member
Joined
Feb 22, 2006
Messages
4,237
Location
Florida
Mark, I think John was referring to the loop that crosses in front of the fuel tank. I suspect it's just the angle of the photo. I edited the photos in an attempt to point this out but it appears I have made an inappropriate comment, starting with an eggplant. Feel free to report me.... :see: :bitchslap
Mark Honda 2 Frame.jpgMark Honda 1 Frame.jpg
Great sketches Bob… eggplants and obscenities!!! Haha.

I didn’t even think of the question from that perspective. Yeah, there is an offset in the bodywork from the tank and frame, so any angle will show more or less of the frame. This picture shows the offset better.

5423-013-NS400R-Cleaned-Up-003.jpg

I think Honda was very proud of their new aluminum I-shaped box section frame back then and probably wanted to make sure anyone near the bike saw it, except maybe the worms. It remains in nearly perfect condition to this day despite the rest of the bike being pretty trashed when I got it.

5424-NS400R-Ad-2d.jpg
 

RPageOne

Member
Joined
Apr 20, 2013
Messages
19
Location
DFW
Shopnut, you are unique & very talented. You will never get to retire as your current employer won't let you. That said, retirement may not be for you as you have mastered life on your terms.

Just finished you thread on the last week after being absent for a number of years due to business. You provide great entertainment while offering encouragement in life, in the background. My skills make it unlikely I could offer comments to you are your readers, but I love your thread.

I do want to reinforce the thoughts about the danger of fire & fiberglass. At your post #4598 you commented "I bet there are plenty of Corvettes that have burned up over the years too."
Look at this example, carbon fiber. No one was hurt, engine fire with a rapid forced landing in Space Port Regional in Titusville. Airplanes are not the topic here, so I won't add more of this story, but fires are dangerous for sure.
1672195327082.png
 

TwoBytes

Well-known member
Joined
Mar 14, 2014
Messages
790
Location
Canberra, 'Stralia
Mark, I think John was referring to the loop that crosses in front of the fuel tank. I suspect it's just the angle of the photo. I edited the photos in an attempt to point this out but it appears I have made an inappropriate comment, starting with an eggplant. Feel free to report me.... :see: :bitchslap
Mark Honda 2 Frame.jpgMark Honda 1 Frame.jpg
I think the main difference between these photos (apart from Bob's inappropriate amendments) is the fact that it's on the side stand, so it's leaning toward the camera on the left side, and away from the camera on the right side. If it was on a track stand, like this one...

5423-013-NS400R-Cleaned-Up-003.jpg

It would look even on both sides.
 

TwoBytes

Well-known member
Joined
Mar 14, 2014
Messages
790
Location
Canberra, 'Stralia
Oh, I also just remembered that I'd posted this here 18 months ago. More Rothmans motorsport eye candy...

I agree regarding the looks, I've loved that look since I drooled over the Dakar winning NXR750 in the 80s. I built a Tamiya plastic model of one as a kid and had a poster of one on my bedroom wall (actually, that's probably enough justification to buy one right there! I've wanted one for over 30 years!)

images (8).jpeg


Wow, talk about bringing back old memories!

images (10).jpeg
 

racer-john

Well-known member
Joined
Apr 1, 2008
Messages
1,461
Location
Newmarket, ON Canada
Mark, I think John was referring to the loop that crosses in front of the fuel tank. I suspect it's just the angle of the photo. I edited the photos in an attempt to point this out but it appears I have made an inappropriate comment, starting with an eggplant. Feel free to report me.... :see: :bitchslap
Mark Honda 2 Frame.jpgMark Honda 1 Frame.jpg
This is the area I was referencing, thanks Bob.
 
OP
S

shopnut

Well-known member
Joined
Feb 22, 2006
Messages
4,237
Location
Florida
I reckon this is my favourite motorsport livery of all time.

It looks incredible, seriously great job, Mark!

Brings back good, patriotic, memories of Wayne Gardner...
images (9).jpeg

Not to mention these...
images (11).jpeg

images (12).jpeg
Wow, yeah talk about memories... that 962 really brings back some of my Dad, brother and I at Road America back in the 80's. In fact, when I initially showed my brother the direction I was going with the bike paint, he yelled out "Rothmans!!".

Thanks for the compliments on the bike! It's not quite done yet, but I'll be sharing a bit more on that subject later.
 
OP
S

shopnut

Well-known member
Joined
Feb 22, 2006
Messages
4,237
Location
Florida
SKINNING THE EAST WALL… (Part 1 of 6)…

HAPPY NEW YEAR everyone!


I had a bit of holiday vacation to use so I closed out 2022 with one last project and now I will share all the details.

In the past, I may have called the South Wall the “Last Frontier”, but really, it was the last BIG frontier. There are still a few other small areas that need to be finished off in the ASYLUM, and this next project was one of them. With the stairway done years ago, and now with the South Wall all finished, it’s time to make the wall in between them blend in with its surroundings. This diagram shows what wall I’m talking about.

5425-03-plan.JPG

Here are some pictures of the area.

5426-East-Wall-Mandoor-03.jpg

5427-East-Wall-Mandoor-02.jpg

5428-East-Wall-Mandoor-05.jpg

I needed to skin the wall and door with tileboard, add black trim, hang the trash/recycling bins up off the floor, and install a fire extinguisher cabinet like over on the North Wall.

Probably the biggest thing I struggled with was what to do with the door, and I took the easy way out, as you will see.

5429-East-Wall-Mandoor-04.jpg
 

drivesitfar

Well-known member
Joined
Oct 23, 2013
Messages
36,007
Location
Pacific Northwest
Sorry I haven’t checked in for a while but I’ve been watching even though I’m not a two wheel guy.

Looks like a good project and a lot of fun if you can find roads without the idiots on them.

Happy new year!!
 
OP
S

shopnut

Well-known member
Joined
Feb 22, 2006
Messages
4,237
Location
Florida
drivesitfar - Find roads without idiots on them… in Florida?!?... impossible!!! LOL.

Trapps - I have quite a bit to share and I try to keep it going! I’m glad you like the NS. I never expected to go this far with it, but you know, one thing leads to another! What seemed overwhelming in the beginning can become reality as you get tasks checked off. I’m proud to had brought one back from the dead. Thanks for your kind words.

shortykorte - Consultations are always free… and you don’t even need to use the advice!! Hope you are doing well Shorty. I’ve been up to FSU a few times, but they were always quick trips with tight schedules to visit the daughter. Maybe 2023 will offer a better opportunity to say HI to you when up there again. Nice town!
 
OP
S

shopnut

Well-known member
Joined
Feb 22, 2006
Messages
4,237
Location
Florida
Shopnut, you are unique & very talented. You will never get to retire as your current employer won't let you. That said, retirement may not be for you as you have mastered life on your terms.

Just finished you thread on the last week after being absent for a number of years due to business. You provide great entertainment while offering encouragement in life, in the background. My skills make it unlikely I could offer comments to you are your readers, but I love your thread.

I do want to reinforce the thoughts about the danger of fire & fiberglass. At your post #4598 you commented "I bet there are plenty of Corvettes that have burned up over the years too."
Look at this example, carbon fiber. No one was hurt, engine fire with a rapid forced landing in Space Port Regional in Titusville. Airplanes are not the topic here, so I won't add more of this story, but fires are dangerous for sure.
1672195327082.png
Thanks for stopping in RPageOne and thanks for the kind words. I will likely stick it out until 65 or so for retirement since, for the most part, I'm still enjoying the projects my employer has me working on (a lot of electric vehicle projects these days). But there is no doubt that I will be even busier with my own projects once I retire.

Yikes, nasty plane fire. Wouldn't have wanted to be on that one. Sounds like occupants were okay, however, so that's good.
 
OP
S

shopnut

Well-known member
Joined
Feb 22, 2006
Messages
4,237
Location
Florida
SKINNING THE EAST WALL… (Part 2 of 6)…

One of the things I want to incorporate into this wall is a fire extinguisher cabinet like this one near the other man door.

5430-Fire-Extinguisher-Cabinet-Potter-Roemer-04.jpg

Fortunately, 15 years ago when I bought the first one, I also picked up its twin.

5431-Fire-Extinguisher-Cabinet-Potter-Roemer-05.jpg

5432-Fire-Extinguisher-Cabinet-Potter-Roemer-06.jpg

I remember painting the other one years ago and it was a pain in the **** leaving the door riveted to the frame. So this time I drilled out the rivets so both could be painted separately… much easier!

5433-Fire-Extinguisher-Cabinet-Potter-Roemer-09.jpg

The auto lift always serves as a great place to hang drying parts.

5434-Fire-Extinguisher-Cabinet-Potter-Roemer-10.jpg
 
To avoid these ads, REGISTER NOW!
Top Bottom