
You are using an out of date browser. It may not display this or other websites correctly.
You should upgrade or use an alternative browser.
You should upgrade or use an alternative browser.
Above 1200 Sq/FT Garage build in South West B.C
- Thread starter dmittz
- Start date
Wokspaces above 1200 squarefeet.
![IMG_20230224_075413815[1].jpg](/forum/data/attachments/1681/1681067-b1389543fe655d97e8d387e2c056a336.jpg)
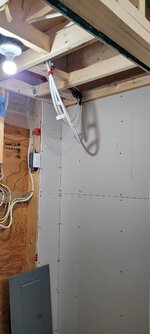
I got started the drywall in the mechanical room


Apprently I severaly underestimated the amount of drywall and sound board I needed (or perhaps it was wishful thinking) and ran out of supplies...

borrowed my dad's truck and made another trip to Home depot. They must love seeing me come through door, $1k in supplies i've bought in the last 7 days. I'm going to have to watch the cashflow a bit going forward.
Anyway got back at it and did a little more drywall in the mechanical room...

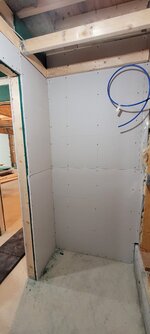
I actually had to add some more ceiling drywall backing in the front wall of the mechincal room, with 3/4in sound board, 1/2in plywood and 5/8 drywall the drayeall backing was flush with the wall, lol. anyway just 'sistered' up the 2x4 and its good to go.
With all those layers i'm hoping that the compressor will seems reasonably muffled from out in the shop.
Apprently I severaly underestimated the amount of drywall and sound board I needed (or perhaps it was wishful thinking) and ran out of supplies...
borrowed my dad's truck and made another trip to Home depot. They must love seeing me come through door, $1k in supplies i've bought in the last 7 days. I'm going to have to watch the cashflow a bit going forward.
Anyway got back at it and did a little more drywall in the mechanical room...
I actually had to add some more ceiling drywall backing in the front wall of the mechincal room, with 3/4in sound board, 1/2in plywood and 5/8 drywall the drayeall backing was flush with the wall, lol. anyway just 'sistered' up the 2x4 and its good to go.
With all those layers i'm hoping that the compressor will seems reasonably muffled from out in the shop.
Attachments


I have gone as far with the drywall in the bathroom as I can for now, the one wall and ceiling will have to be finished later after the plumbing and remaining electrical is done. But At least ita progress even if its incremental.
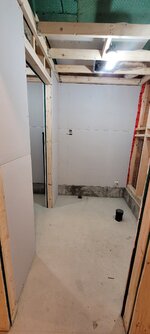
In total I've used about 6.5 sheets of 4x8ft 5/8 Type X drywall in the bath and mechanical rooms so far. I've tried to be fairly effcient and not waste since its fairly expensive and also hard to dispose of. This is how much total drywall waste I have so far...

With the bathroom project as far as it can go for now I turned my attention to the stairs... The stairs have been an issue a few times, and while my contractor did come out and fix the rise/run and out of square issue himself, and I'm greatful he showed the integrity to do it after I had paid him out already. When I was planning out drywall and sound board for the stairwell I found another issue...Sigh.
So normally at least from what i've seen the framers leave a gap on either side of the stairtread so that you can just slip the drywall down and have it rest on a 2x6 that is sandwiched between the wall and the stringer. And I had told both my contractor and his guy that built the stairs the first time to please leave a 1.5in gap from the wall to the side of the stair treads (since I need (1 3/8 min), which they both aknowledged. Well when I measure the gap guess what it was only like 3/8in. I proabbly should have checked earlier but forgot and assumed they would build it as I asked. I imagine I could ask them to correct it but honestly its just easier to fix it myself at this point.
To make matters worse the stairs are all put togther with 3in sprial rails and construction adhesive so there is no taking it apart nicely and triming things then re-assemble.
Anyway its a less than ideal situation i've been left with to solve the problem. So I decided the best solution would be to just measure it out and marke a line then just cut the treads back to the edge of the stringer as best I could with my sawzall. Its Not perfectly pretty but the stairs will have carpet on them if this turns into guest quarters and if it stays part of the shop no one will care if the treads have perfect side edges and at least now I won't have to 'sculpt' the drywall and sound board around all the treads.

My plan worked well on 3 of the 4 areas I had to trim back thr treads on the side.

Sadly the stringer on the one side of the upper stairs after the landing was too close to the wall to get the 1.5in gap I wanted and 3/4in was all I could get but at least I can get 5/8 drywall in there and I'll just double up the sound board on the shop side to retain the sound seperation. (see picture below)

The snow has also returned once again hopefully not too much more will fall today...haha never ending winter again this year.

In total I've used about 6.5 sheets of 4x8ft 5/8 Type X drywall in the bath and mechanical rooms so far. I've tried to be fairly effcient and not waste since its fairly expensive and also hard to dispose of. This is how much total drywall waste I have so far...
With the bathroom project as far as it can go for now I turned my attention to the stairs... The stairs have been an issue a few times, and while my contractor did come out and fix the rise/run and out of square issue himself, and I'm greatful he showed the integrity to do it after I had paid him out already. When I was planning out drywall and sound board for the stairwell I found another issue...Sigh.
So normally at least from what i've seen the framers leave a gap on either side of the stairtread so that you can just slip the drywall down and have it rest on a 2x6 that is sandwiched between the wall and the stringer. And I had told both my contractor and his guy that built the stairs the first time to please leave a 1.5in gap from the wall to the side of the stair treads (since I need (1 3/8 min), which they both aknowledged. Well when I measure the gap guess what it was only like 3/8in. I proabbly should have checked earlier but forgot and assumed they would build it as I asked. I imagine I could ask them to correct it but honestly its just easier to fix it myself at this point.
To make matters worse the stairs are all put togther with 3in sprial rails and construction adhesive so there is no taking it apart nicely and triming things then re-assemble.
Anyway its a less than ideal situation i've been left with to solve the problem. So I decided the best solution would be to just measure it out and marke a line then just cut the treads back to the edge of the stringer as best I could with my sawzall. Its Not perfectly pretty but the stairs will have carpet on them if this turns into guest quarters and if it stays part of the shop no one will care if the treads have perfect side edges and at least now I won't have to 'sculpt' the drywall and sound board around all the treads.
My plan worked well on 3 of the 4 areas I had to trim back thr treads on the side.
Sadly the stringer on the one side of the upper stairs after the landing was too close to the wall to get the 1.5in gap I wanted and 3/4in was all I could get but at least I can get 5/8 drywall in there and I'll just double up the sound board on the shop side to retain the sound seperation. (see picture below)
The snow has also returned once again hopefully not too much more will fall today...haha never ending winter again this year.
Bruce 993 SEA
Well-known member
What is the rise and run on the stairs? There is a ratio or rule for the rise and run. I use the "Rule of 25". It is 2 x rise plus the run should equal 25. So a 7 - 11 stair is (2 x 7) + 11 = 25.
This is why 7 inch rise with a 11 run works and is popular. But it is not the only ratio that makes comfortable stairs.
Cement guys (flatwork guys) can only do 7 - 11 stairs it seems. Even if it messes up the height of the landing. Low rise and long runs are done in building entrances and are quite comfortable. On my decks a couple of houses ago I did 5 1/2 rise and 14 inch run. Made it easy to not spill your drink!
Anyhow, some smart person figured this out and it works with your natural gate. Code may have 7 - 11 and the steepest stairs allowed now.
So curious how yours are going to work out.
This is why 7 inch rise with a 11 run works and is popular. But it is not the only ratio that makes comfortable stairs.
Cement guys (flatwork guys) can only do 7 - 11 stairs it seems. Even if it messes up the height of the landing. Low rise and long runs are done in building entrances and are quite comfortable. On my decks a couple of houses ago I did 5 1/2 rise and 14 inch run. Made it easy to not spill your drink!
Anyhow, some smart person figured this out and it works with your natural gate. Code may have 7 - 11 and the steepest stairs allowed now.
So curious how yours are going to work out.
Just measured the stairs they are in an L-shape with a landing halfway up they measured out at 11in deep treads (run) and 7in rise. The stairwell is currently 42in wide but will likely end up righy around 40in wide once drwall is all done.What is the rise and run on the stairs? There is a ratio or rule for the rise and run. I use the "Rule of 25". It is 2 x rise plus the run should equal 25. So a 7 - 11 stair is (2 x 7) + 11 = 25.
This is why 7 inch rise with a 11 run works and is popular. But it is not the only ratio that makes comfortable stairs.
Cement guys (flatwork guys) can only do 7 - 11 stairs it seems. Even if it messes up the height of the landing. Low rise and long runs are done in building entrances and are quite comfortable. On my decks a couple of houses ago I did 5 1/2 rise and 14 inch run. Made it easy to not spill your drink!
Anyhow, some smart person figured this out and it works with your natural gate. Code may have 7 - 11 and the steepest stairs allowed now.
So curious how yours are going to work out.
The stairs on my 1970's era home are only 36in wide with a steeper rise/run so I think these ones will be fine.
Last edited:
Started to putting the sound board up on the stairwell wall. 


Unfortunatley I ran out of sound board... and with it being a blizzard outside i don't really feel like borrowing my dad's truck and then trying to figure out how to keep the sound board from getting wet on the way home or even just while loading it in the truck!

Starting on the stairwell now proabbly seems out of order, when I still have all the wiring upstairs to do... but the electrical inspectors for the upstairs permits likely wouldn't take kindly to romex sitting exposed in the stairwell so had to get that wall closed up before they come through to stay compliant, since technically I believe walls should be closed up before finished electrical is done.
Unfortunatley I ran out of sound board... and with it being a blizzard outside i don't really feel like borrowing my dad's truck and then trying to figure out how to keep the sound board from getting wet on the way home or even just while loading it in the truck!
Starting on the stairwell now proabbly seems out of order, when I still have all the wiring upstairs to do... but the electrical inspectors for the upstairs permits likely wouldn't take kindly to romex sitting exposed in the stairwell so had to get that wall closed up before they come through to stay compliant, since technically I believe walls should be closed up before finished electrical is done.
Coninuing to pick away at the staiwell wall(s).
Its going slow because i've never done much drywall before, and also because there is a lot of messing around with corners and hard shapes like this one...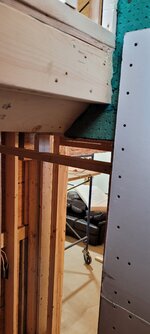


Progress on the other side of the wall...

So the plan at this point is 6in safe and sound rockwool in thr stud cavity, 3/4in sono-panel on both sides of the wall followed by 5/8 Type X drywall on both sides. Should provide a decent bit of sound insulation and a 1 hour fire rating.
I am contimplating a senond sheet of drywall on the shop side of the wall for sound isolation but not sure its worth the extra work/cost.
Its going slow because i've never done much drywall before, and also because there is a lot of messing around with corners and hard shapes like this one...
Progress on the other side of the wall...
So the plan at this point is 6in safe and sound rockwool in thr stud cavity, 3/4in sono-panel on both sides of the wall followed by 5/8 Type X drywall on both sides. Should provide a decent bit of sound insulation and a 1 hour fire rating.
I am contimplating a senond sheet of drywall on the shop side of the wall for sound isolation but not sure its worth the extra work/cost.
Well I had virtually used up all the materials I had on hand so managed to borrow my dad's truck and restock last night with 8 more sheets of drywall, 4 sheets of sound board and 4 more packages of Rockwool safe and sound. Buikding materials aren't cheap these days but should keep things moving along for a couple more weeks.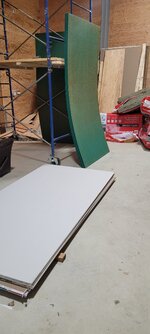
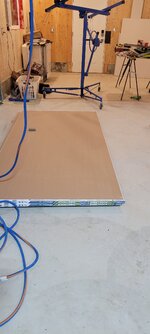
Work is getting a bit busy so my progress may slow down but that's ok work is what pays for the materials!
Also its amazing how fast my shop is filling up with 'stuff' between all the building supplies, a few bags of garbage, scaffold, tractor + implements and storing a couch + love seat temporarily for my parents its feeling pretty full and I haven't even really moved my stuff in yet!!!
Work is getting a bit busy so my progress may slow down but that's ok work is what pays for the materials!
Also its amazing how fast my shop is filling up with 'stuff' between all the building supplies, a few bags of garbage, scaffold, tractor + implements and storing a couch + love seat temporarily for my parents its feeling pretty full and I haven't even really moved my stuff in yet!!!
Last edited:
Just continuing to pick away at the Drywall as I have time...
Filled the stub cavity of the wall by the stair well with 6in of safe and sound Rockwool followed by sono-panel.

Then 5/8in Type X drywall.

Still pondering if a second layer is worthwhile for this wall...
Next up I figured I'd tackle the area under the stairs.
Stuffed lots of rockwool safe and sound in there...
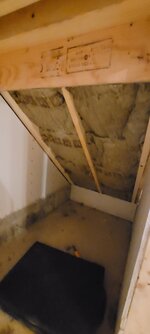
Then Sono-panel...

I ended up doing 2 layers of the 5/8in drywall on the underside of the stairs for better sound and fire seperation...
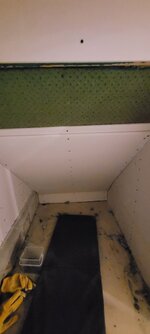

Then onto the landing, 10in of rockwool safe and sound stuffed up there...

Sono-panel...

and 2 layers of 5/8in drywall..

I ran out of drywall screws so that's as far as I got.
Trying to decide if I should put drywall over the 'support' 2x6's for the landing that are exposed...
Filled the stub cavity of the wall by the stair well with 6in of safe and sound Rockwool followed by sono-panel.
Then 5/8in Type X drywall.
Still pondering if a second layer is worthwhile for this wall...
Next up I figured I'd tackle the area under the stairs.
Stuffed lots of rockwool safe and sound in there...
Then Sono-panel...
I ended up doing 2 layers of the 5/8in drywall on the underside of the stairs for better sound and fire seperation...
Then onto the landing, 10in of rockwool safe and sound stuffed up there...
Sono-panel...
and 2 layers of 5/8in drywall..
I ran out of drywall screws so that's as far as I got.
Trying to decide if I should put drywall over the 'support' 2x6's for the landing that are exposed...
I'm continuing to pick away at the stair well etc.. to be honest I am so slow at drywall and soubd board its a bit frusterating but hopefully I will get faster as the project continues.
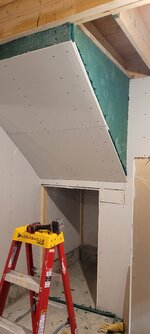
I stuffed 10in of Rockwool safe and sound under the upper part of the stairs, which was followed by a sheet of Sono-panel.

Next was 6in of Rockwool in the upper stair wall and sono-panel on both sides.


Then I did 2 layers of 5/8 Type X drywall on the underside of the stairs.
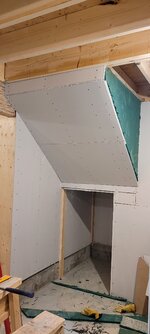
Then a single layer of 5/8 Type X Drywall on the shop side of the uppstairwell wall.
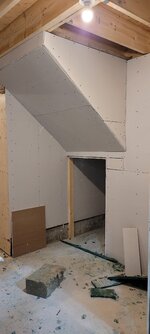
Following that I did filled the outer two stud cavities on the sheer wall in the bathroom with rockwool, followed by sono-panel and drywall.

I did this in the bathroom, because of course I can't finish the center until the plumbing is done, but I had just enough 5/8 drywall left to fill the outer sections with little waste and the remaining unfinished center is 48in wide so I will be able to use materials to effciently finish it later.
I stuffed 10in of Rockwool safe and sound under the upper part of the stairs, which was followed by a sheet of Sono-panel.
Next was 6in of Rockwool in the upper stair wall and sono-panel on both sides.
Then I did 2 layers of 5/8 Type X drywall on the underside of the stairs.
Then a single layer of 5/8 Type X Drywall on the shop side of the uppstairwell wall.
Following that I did filled the outer two stud cavities on the sheer wall in the bathroom with rockwool, followed by sono-panel and drywall.
I did this in the bathroom, because of course I can't finish the center until the plumbing is done, but I had just enough 5/8 drywall left to fill the outer sections with little waste and the remaining unfinished center is 48in wide so I will be able to use materials to effciently finish it later.
Attachments

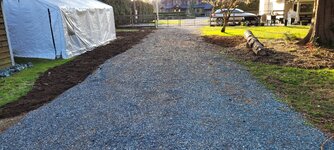
We finally have a few good days of weather, finally! So i have taken a small break from the inside work and used what time I had to begin tacking some of the unfinished yard issues that remain from construction and I was unable to finish due to non-stop snow and/or rain for almost 6 months.
As you may recall back around Novemeber of last year we got some snow followed by a series of heavy rain storms and noticed that the hole I had left against the foundation where the sewage pipe terminated had filled with water, which was running back from the adjacent lawn (well, a mud field actually) that sloped towards it and also from the downspout at the north east corner of the shop. Worse yet this fast rising puddle was right next ro the northwest man door that was only a few inches higher.
Some of the problem i'm sure was due to the whole adjacent area of the lawn having no grass so the water just ran across it easily (towards the north shop wall), even though I had seeded it 6 weeks or more prior.
To temporily fix the drainage problem I filled in the hole around the sewage pipe (will have to it dig out again when I do the septic), added some gravel around the door and then dug a couple of shallow 'ditches' to direct the water out back (east of shop) where it could drain to the south side of my property which has nearly pure sand for soil.
These tempoary solutions worked perfectly. However, I originally planned a complex series of drainage solutions for this summer. And I say complex because there is no ditch on my street nor storm water etc... and I can't knowingly direct a whole bunch of water onto any of my neighbor's properties either, so any drainage would have to be fully contained on my property. The ace in my sleeve is the soil under most of my property is quite Sandy, with the exception of some clay in the back north east corner. I should mention to that my property although it at first looks flat slops north to south and to a lesser extent east to west.
Anyway all that seed I spread last sept and early oct did not amount to much, no rain from july - mid oct and then late oct we had snow and cold weather for a bit etc...


For sure some grass is starting to grow but, not much given how much seed I spread and it being 6 months later. I just re-seeded it all yesterday evening and it rained overnight before getting sunny again today, hope the new seed takes.
After thinking about drainage, I decided that perhaps I could avoid a whole lot of work and expense on drainage by just doing so re-grading. So I carefully hand dug a 'gentle' drainage swail where my temporary ditch had been and made the grade around it very gradual so I can still mow over it then seeded with grass. I think it should work well.

The slope into and out of the swail is more gentle than it appears in the picture and the total depth is no more than 3 or 4in.
Next up I had been 'composting a pile of black berry roots and surrounding top soil since early last summer, hitting it with round-up to kill any new sprouts and then left it alone since oct, took some dirt from there which looks like fantasic rich soil now, and spread it beside the north wall of the shop, with a gentle slope away from the shop, this created a 'low channel' about 6 or 7 feet out from the shop that the yard can drain to which will flow west out into the yard next to the driveway where the soil is almost pure sand and will drain well. I believe this will work well.


I haven't yet seeded the new soil right against the shop because I need to first decide should I add gravel and make it a parking space, put a flower bed for asethics or just turn it into lawn which is cheap and easy...But will decide soon.
Here is hoping my very simple and free drainage solutions actually work as planned.
As you may recall back around Novemeber of last year we got some snow followed by a series of heavy rain storms and noticed that the hole I had left against the foundation where the sewage pipe terminated had filled with water, which was running back from the adjacent lawn (well, a mud field actually) that sloped towards it and also from the downspout at the north east corner of the shop. Worse yet this fast rising puddle was right next ro the northwest man door that was only a few inches higher.
Some of the problem i'm sure was due to the whole adjacent area of the lawn having no grass so the water just ran across it easily (towards the north shop wall), even though I had seeded it 6 weeks or more prior.
To temporily fix the drainage problem I filled in the hole around the sewage pipe (will have to it dig out again when I do the septic), added some gravel around the door and then dug a couple of shallow 'ditches' to direct the water out back (east of shop) where it could drain to the south side of my property which has nearly pure sand for soil.
These tempoary solutions worked perfectly. However, I originally planned a complex series of drainage solutions for this summer. And I say complex because there is no ditch on my street nor storm water etc... and I can't knowingly direct a whole bunch of water onto any of my neighbor's properties either, so any drainage would have to be fully contained on my property. The ace in my sleeve is the soil under most of my property is quite Sandy, with the exception of some clay in the back north east corner. I should mention to that my property although it at first looks flat slops north to south and to a lesser extent east to west.
Anyway all that seed I spread last sept and early oct did not amount to much, no rain from july - mid oct and then late oct we had snow and cold weather for a bit etc...
For sure some grass is starting to grow but, not much given how much seed I spread and it being 6 months later. I just re-seeded it all yesterday evening and it rained overnight before getting sunny again today, hope the new seed takes.
After thinking about drainage, I decided that perhaps I could avoid a whole lot of work and expense on drainage by just doing so re-grading. So I carefully hand dug a 'gentle' drainage swail where my temporary ditch had been and made the grade around it very gradual so I can still mow over it then seeded with grass. I think it should work well.
The slope into and out of the swail is more gentle than it appears in the picture and the total depth is no more than 3 or 4in.
Next up I had been 'composting a pile of black berry roots and surrounding top soil since early last summer, hitting it with round-up to kill any new sprouts and then left it alone since oct, took some dirt from there which looks like fantasic rich soil now, and spread it beside the north wall of the shop, with a gentle slope away from the shop, this created a 'low channel' about 6 or 7 feet out from the shop that the yard can drain to which will flow west out into the yard next to the driveway where the soil is almost pure sand and will drain well. I believe this will work well.
I haven't yet seeded the new soil right against the shop because I need to first decide should I add gravel and make it a parking space, put a flower bed for asethics or just turn it into lawn which is cheap and easy...But will decide soon.
Here is hoping my very simple and free drainage solutions actually work as planned.
Last edited:
I forgot to mention in my last post I was also able to eliminate the last of the leftover dirt from construction and filled some low spots in the yard.
I'm going to need some more grass seed!

Love the Tractor, it makes what would have been a huge project a fairly quick and easy thing for one person to accomplish!
I'm going to need some more grass seed!
Love the Tractor, it makes what would have been a huge project a fairly quick and easy thing for one person to accomplish!
I made a little more headway on the shop's closet drywall work.
Rockwool, Sono-panel and 5/8th drywall on most of the closet.

Before closing in the sheer-wall side, I did some extra cross bracing just for piece of mind, since this wall contains one of the main colomns.

Additionally, since it had been 18months since its installation I figured it was time to do a 'maintance cycle' on my 24kw Generac backup generator.


Did an oil and filter change, battery inspection, air filter and new spark plugs. Perhaps i'm a bit overzelious since its has only logged about 40hours run time thus far.
These things are a piece of cake to do maintance on everything is very straight forward. Tested it all after I was done and ran it for 20min should be good to go for a while now.
I have also been putting some thought into getting the rockpit for my floor drain done as spring is approaching. I was browsing the local classified adds and found a nearly free ($10) plastic 55gal drum and picked it up.

My tennative plan is to drill a whole bunch of 5/8in holes in this drum, fill it with drain rock, wrap it in water permiable landscape fabric and hook it up to the floor drain pipe where it terminates out front of the shop. The whole drum will sit inside a little bit larger hole that will also be filled with drain rock and encased in landscape fabric.
I'm hoping this 2 layered approach will provide good longevity against the rock pit getting 'gumed' up with silt etc... And doing it this way will be inexpensive as i just need maybe a yard of drain rock and a roll or two of landscape fabric.
I'm open to suggestions/ideas if anyone has them???
Rockwool, Sono-panel and 5/8th drywall on most of the closet.
Before closing in the sheer-wall side, I did some extra cross bracing just for piece of mind, since this wall contains one of the main colomns.
Additionally, since it had been 18months since its installation I figured it was time to do a 'maintance cycle' on my 24kw Generac backup generator.
Did an oil and filter change, battery inspection, air filter and new spark plugs. Perhaps i'm a bit overzelious since its has only logged about 40hours run time thus far.
These things are a piece of cake to do maintance on everything is very straight forward. Tested it all after I was done and ran it for 20min should be good to go for a while now.
I have also been putting some thought into getting the rockpit for my floor drain done as spring is approaching. I was browsing the local classified adds and found a nearly free ($10) plastic 55gal drum and picked it up.
My tennative plan is to drill a whole bunch of 5/8in holes in this drum, fill it with drain rock, wrap it in water permiable landscape fabric and hook it up to the floor drain pipe where it terminates out front of the shop. The whole drum will sit inside a little bit larger hole that will also be filled with drain rock and encased in landscape fabric.
I'm hoping this 2 layered approach will provide good longevity against the rock pit getting 'gumed' up with silt etc... And doing it this way will be inexpensive as i just need maybe a yard of drain rock and a roll or two of landscape fabric.
I'm open to suggestions/ideas if anyone has them???
I'm open to suggestions/ideas if anyone has them???
I don't think there is a need to fill drum with rock. I would just line the hole with landscape fabric, then put some rock in the bottom, then set the drum in (with holes drilled), then fill around with rock, then fabric and dirt on top. I have helped install a few 55gal drum septic systems (shops and hunting camp) and this was the way we did them, and they are still running fine.
Those rooms should be super quiet to the rest of your shop. It all really looks great so far.
kj_mustang
Well-known member
Agree, I installed a NDS plastic dry well that holds 50 gallons that is connected to my building's gutters. Instructions for it were no gravel inside and at least 8" soil cover on the top. I would put the fabric around outer hole, then some gravel in the hole, and then fabric around the barrel before setting in the hole, then fill around with gravel, cover top of hole with fabric and then soil.
Thanks for the responses friends.
Ideally, I agree the drum wouldn't need to be filled with rock and that would provide more 'reserve capacity' too.
My Thinking in filling it, is that it will be located under the parking area so I don't want it to collapse if its driven over, and even if I move it to under the lawn, I would still be conerned about a collapse when I drove my tractor over it to mow the lawn. I might instead of filling it with drain rock, fill the barrel itself with some 6 - 9in crushed stones I have left over from a landscaping project, I think they would take up less internal volume and there would be a lot of air-space between them while they still create a weight supporting medium. I would still fill the outer hole with drain rock.
Thanks Kindly, yes I hope the Sound deadening work I did will help to at least have a decent level of sound isolation, especially from the air compressor.I don't think there is a need to fill drum with rock. I would just line the hole with landscape fabric, then put some rock in the bottom, then set the drum in (with holes drilled), then fill around with rock, then fabric and dirt on top. I have helped install a few 55gal drum septic systems (shops and hunting camp) and this was the way we did them, and they are still running fine.
Those rooms should be super quiet to the rest of your shop. It all really looks great so far.
Yes, that is pretty close to my plans.Agree, I installed a NDS plastic dry well that holds 50 gallons that is connected to my building's gutters. Instructions for it were no gravel inside and at least 8" soil cover on the top. I would put the fabric around outer hole, then some gravel in the hole, and then fabric around the barrel before setting in the hole, then fill around with gravel, cover top of hole with fabric and then soil.
Ideally, I agree the drum wouldn't need to be filled with rock and that would provide more 'reserve capacity' too.
My Thinking in filling it, is that it will be located under the parking area so I don't want it to collapse if its driven over, and even if I move it to under the lawn, I would still be conerned about a collapse when I drove my tractor over it to mow the lawn. I might instead of filling it with drain rock, fill the barrel itself with some 6 - 9in crushed stones I have left over from a landscaping project, I think they would take up less internal volume and there would be a lot of air-space between them while they still create a weight supporting medium. I would still fill the outer hole with drain rock.
TurnipTruck
Well-known member
Maybe he will chime in here, but a friend of mine buried a plastic drum under his 50x50 shop slab for the snowmelt gutter.
He plumbed the boiler condensate drains, bathroom floor drain, snowmelt trench, and central shop floor drain all to a 4” pvc through the center of the lid of a plastic drum down to the floor of the drum. He drilled holes in the pipe in the drum and in the drum itself. The drum was surrounded by drain rock, and to prevent collapsing, the drum was also filled with sewer rock.
The idea with the influent pipe reaching to the floor of the drum was to shop vac out the inevitable sand that goes down the drain, something he has already had to do at least once.
His slab was exposed for several years as he built out of pocket, and that sump could handle every bit of the several feet of snow melting each Spring.
Since your floor is already poured, you are obviously planning to put the drum somewhere outside the shop, so I would highly recommend the drain lateral enter a tee in the lid, with an upright pipe from the tee to above ground (and vented!) for shop vac access.
At my former shop, I buried a ten foot tall chunk of holey 12” pipe and ran a 1” drain lateral from a tiny slop sink into it. It drained poorly or not at all cuz the air couldn’t exit the drywell as the water tried to gravity in.
He plumbed the boiler condensate drains, bathroom floor drain, snowmelt trench, and central shop floor drain all to a 4” pvc through the center of the lid of a plastic drum down to the floor of the drum. He drilled holes in the pipe in the drum and in the drum itself. The drum was surrounded by drain rock, and to prevent collapsing, the drum was also filled with sewer rock.
The idea with the influent pipe reaching to the floor of the drum was to shop vac out the inevitable sand that goes down the drain, something he has already had to do at least once.
His slab was exposed for several years as he built out of pocket, and that sump could handle every bit of the several feet of snow melting each Spring.
Since your floor is already poured, you are obviously planning to put the drum somewhere outside the shop, so I would highly recommend the drain lateral enter a tee in the lid, with an upright pipe from the tee to above ground (and vented!) for shop vac access.
At my former shop, I buried a ten foot tall chunk of holey 12” pipe and ran a 1” drain lateral from a tiny slop sink into it. It drained poorly or not at all cuz the air couldn’t exit the drywell as the water tried to gravity in.
You know having a clean-out for the drain pipe into the barrel is a fantastic idea, I will try to incoporate that, thank you!Maybe he will chime in here, but a friend of mine buried a plastic drum under his 50x50 shop slab for the snowmelt gutter.
He plumbed the boiler condensate drains, bathroom floor drain, snowmelt trench, and central shop floor drain all to a 4” pvc through the center of the lid of a plastic drum down to the floor of the drum. He drilled holes in the pipe in the drum and in the drum itself. The drum was surrounded by drain rock, and to prevent collapsing, the drum was also filled with sewer rock.
The idea with the influent pipe reaching to the floor of the drum was to shop vac out the inevitable sand that goes down the drain, something he has already had to do at least once.
His slab was exposed for several years as he built out of pocket, and that sump could handle every bit of the several feet of snow melting each Spring.
Since your floor is already poured, you are obviously planning to put the drum somewhere outside the shop, so I would highly recommend the drain lateral enter a tee in the lid, with an upright pipe from the tee to above ground (and vented!) for shop vac access.
At my former shop, I buried a ten foot tall chunk of holey 12” pipe and ran a 1” drain lateral from a tiny slop sink into it. It drained poorly or not at all cuz the air couldn’t exit the drywell as the water tried to gravity in.
When the plumbers put the piping for the floor drain in before the slab was poured I did ask them about a vent. What they told me, was that it would not be required if draining into a rock pit because, there are no sewer gases and also since the drain has no trap and is 3in diameter (I think) air would have no trouble escaping since the pipe itself will proabbly never be full of water.
I think in an ideal world, the 'proper way' to do this would be for the drain to first go into a unfilled concrete sump that would have the top open to the parking area with a grate and that would then drain into this barrel/rock pit. And I am still considering that but, I don't want to sink a whole bunch of money into the floor drain either, so I may skip the sump.
So I've now turned my plastic barrel into a holy barrel, so holy you could take it to church, lol. I Hand drilled approximately 1,300 5/16' holes.


It was another beautiful day today and that gave me some more opportunity to accomplish another item on my yard work list. As you will recall when I purchased this place the back 45 or 50 feet of my entire property was like 7feet high in invasive blackerries and english Ivy, with garbage barried underneath, which I steady worked to clear in the lead up to building the shop. I also kept the land all cleared all last summer and have been trying hard to get the grass to grow so that any regrowth of ivy and blackberries can be dealt with by mowing.
However, I also wanted to add in some trees in the corner to provide privacy from the neigbor's shop with a coach house, that overlooks the back corner of my yard.
I picked, 2 stika spruce, 2 coastal douglas firs and 1 coastal western Hemlock tree. All of which are native to this ecological biome so they should be hardy and fast growing.


I also took the time to prevent a future problem on the south east corner of the shop, there was a small walnut sapling their, which would be ok except that in 20 years it would be far to large for the space and endanger the shop. So I cut it down and replaced it with Green arrow head weeping Alaskan cypress. It will grow to about 25ft at maturity but only spread 3 or 4 feet wide which should be perfect for where it is planted.

However, I also wanted to add in some trees in the corner to provide privacy from the neigbor's shop with a coach house, that overlooks the back corner of my yard.
I picked, 2 stika spruce, 2 coastal douglas firs and 1 coastal western Hemlock tree. All of which are native to this ecological biome so they should be hardy and fast growing.
I also took the time to prevent a future problem on the south east corner of the shop, there was a small walnut sapling their, which would be ok except that in 20 years it would be far to large for the space and endanger the shop. So I cut it down and replaced it with Green arrow head weeping Alaskan cypress. It will grow to about 25ft at maturity but only spread 3 or 4 feet wide which should be perfect for where it is planted.
jollygreengiant
Well-known member
Man seeing newly planted trees is really making me ready for spring! I need to do some tree planting around my place this year too.
kj_mustang
Well-known member
Drove my Gravely Lawn tractor over mine many times. According to Tractor data it weighs 800+ lbs.
yes, it might seem a little funny to be excited about but planting trees in this corner of the property is something i've been wanting to do since we moved in, but took this long to finally get the ground ready for it. It certainly has been nice to finally start getting some nice days I could work outside after the second year in a row of unusually cold winters.Man seeing newly planted trees is really making me ready for spring! I need to do some tree planting around my place this year too.
Now its time to sit back and let all the wet, temperate west coast weather growth these little trees into large ones!
Yes, I think filled with rocks the barrel should be fine...Drove my Gravely Lawn tractor over mine many times. According to Tractor data it weighs 800+ lbs.
My tractor in its heaviest configuration is around 6,000lbs and that is without a load in the bucket or grapple and without operator weight. In lawn mowing configuration (no 3pt ballast/attachment, no loader, 62in mid-mount mower deck) would be about 4,200lbs not including operator weight. So I do try to be mindful of the weight, then again I mow over my septic field without issue...so maybe i worry to much.
chevy3100truck
Member
- Joined
- Sep 30, 2013
- Messages
- 20
Looks really good!
When I lived out in Chilliwack we used Windsor Plywood for all the custom width doors in our house (1948 house - nothing - and I mean nothing - was any sort of standard lol) Pricing & lead times were very good - not much different than the big box stores on "standard" pre hung doors.
I also used the buried barrel approach for drainage with sandy soil out that way. Worked good to drain the gutters from the house - I had used a 1/2" or 3/4" bit, drilled a bunch of holes, lined the barrel with landscape fabric and filled with drain rock. We lived there for about 6 more years and never had a drainage issue again.
When I lived out in Chilliwack we used Windsor Plywood for all the custom width doors in our house (1948 house - nothing - and I mean nothing - was any sort of standard lol) Pricing & lead times were very good - not much different than the big box stores on "standard" pre hung doors.
I also used the buried barrel approach for drainage with sandy soil out that way. Worked good to drain the gutters from the house - I had used a 1/2" or 3/4" bit, drilled a bunch of holes, lined the barrel with landscape fabric and filled with drain rock. We lived there for about 6 more years and never had a drainage issue again.
yes, windsor plywood is pretty great I have used them for a lot of finishing items at my last house.Looks really good!
When I lived out in Chilliwack we used Windsor Plywood for all the custom width doors in our house (1948 house - nothing - and I mean nothing - was any sort of standard lol) Pricing & lead times were very good - not much different than the big box stores on "standard" pre hung doors.
I also used the buried barrel approach for drainage with sandy soil out that way. Worked good to drain the gutters from the house - I had used a 1/2" or 3/4" bit, drilled a bunch of holes, lined the barrel with landscape fabric and filled with drain rock. We lived there for about 6 more years and never had a drainage issue again.
Ya I think the barrel infiltration pit for the floor drain Will work pretty decently. I have actually located a small very inexpensive used concrete sump with iron grate to put in front of the barrel to. Only problem is its somehow in the sellers basement.... so i will only be getting it if I can carry it up their strairs. lol.
So I haven't been out in the shop much in the last couple weeks, due to being busy with work, family and also watching my cash outflow. Not to mention we have had a number of days with great weather 
However I did manage to get a couple small items done.
I had been held up on electrical because I needed to get some space saver 20 amp breakers, it was like a 6 week backorder but my 2 finally came in.

They allowed me to wire the bath baseboard heater circuit and mechnical room ceiling heater circuit into the panel.
Mighty crowded 200 amp panel, but almost done with it, then will be onto the upstairs sub-panel.
I still have to actually wire the heaters and thermostats in the bath and mechnaical rooms, so just have the breakers left 'off' for now.
Also, i managed to score a drainage basin on FB market place for $50 CAD.
Its 12in wide by 24in deep and came with a studry cast iron grate, just got it today.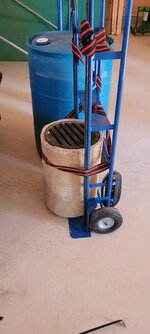
So the idea now is the floor drain will drain into the basin/sump where any sediments will fall to the bottom for easy clean out and the 'clean' water will then drain into the 'infiltration barrel' filled with drain rock. I think this system should work great and be problem free long term. And the best part is I think I can have it all done for about $100 total, maybe a little more if I don't have enough left over landscape fabric.
However I did manage to get a couple small items done.
I had been held up on electrical because I needed to get some space saver 20 amp breakers, it was like a 6 week backorder but my 2 finally came in.
They allowed me to wire the bath baseboard heater circuit and mechnical room ceiling heater circuit into the panel.
Mighty crowded 200 amp panel, but almost done with it, then will be onto the upstairs sub-panel.
I still have to actually wire the heaters and thermostats in the bath and mechnaical rooms, so just have the breakers left 'off' for now.
Also, i managed to score a drainage basin on FB market place for $50 CAD.
Its 12in wide by 24in deep and came with a studry cast iron grate, just got it today.
So the idea now is the floor drain will drain into the basin/sump where any sediments will fall to the bottom for easy clean out and the 'clean' water will then drain into the 'infiltration barrel' filled with drain rock. I think this system should work great and be problem free long term. And the best part is I think I can have it all done for about $100 total, maybe a little more if I don't have enough left over landscape fabric.
So not to much to report works been busy etc... But a few small things have happened.
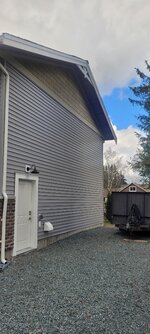
My contractor sent one of his guys by to finish up a few loose ends. The most noticable of which is my trim in both gable ends is now finally installed. And to be fair to my contractor, i told him back in decemeber, not to bother during the winter, since I didn't want anyone taking a fall on a very tall latter installing it in the cold/wet/snow etc...so that's why the trim was delayed.

I also dug around and found enough left over landscale fabric for my upcoming floor drain project. Additionally I got some of that fabric secured to the outside of my infiltration barrel and I cut and 'access hole' on the top so it can be filled with rocks.
There will also be some more rocks outside the barrel with another layer of landscape fabric around them too.
As you guys may recall a month or so ago I got some well weathered wood out of my local rona lumberyard for a nice discount, and to me it looked like barnwood which was perfect. so let the wood dry out for around a month and also monitored it closely for any signs of pest infestations and did not see any.
Now of course I don't want anything reposible for causing that nice 'barnwood' look (like mold) to cause any air quality problems etc... so I figured sealing all 4 sides of each board up with a few coats of satin polyurethane would be a good idea, and it will also make the boards easier to clean if anything gets spayed on them or something.

This is the 1st of 3 batches of boards in process. (I only have 4 sawhorses so have to do 3 batches)
Also the ceiling fan and cold air vent work pretty awesome for keeping fumes to a minimum, doing this kind of thing which is really great!
Also while I was at the paint store getting the polyurethane, they had a clearence specal on primer (70% off) so I bought 10 gallons. I'm m not ready for paint but for the price it made sense to pick it up in advance.

My contractor sent one of his guys by to finish up a few loose ends. The most noticable of which is my trim in both gable ends is now finally installed. And to be fair to my contractor, i told him back in decemeber, not to bother during the winter, since I didn't want anyone taking a fall on a very tall latter installing it in the cold/wet/snow etc...so that's why the trim was delayed.
I also dug around and found enough left over landscale fabric for my upcoming floor drain project. Additionally I got some of that fabric secured to the outside of my infiltration barrel and I cut and 'access hole' on the top so it can be filled with rocks.
There will also be some more rocks outside the barrel with another layer of landscape fabric around them too.
As you guys may recall a month or so ago I got some well weathered wood out of my local rona lumberyard for a nice discount, and to me it looked like barnwood which was perfect. so let the wood dry out for around a month and also monitored it closely for any signs of pest infestations and did not see any.
Now of course I don't want anything reposible for causing that nice 'barnwood' look (like mold) to cause any air quality problems etc... so I figured sealing all 4 sides of each board up with a few coats of satin polyurethane would be a good idea, and it will also make the boards easier to clean if anything gets spayed on them or something.
This is the 1st of 3 batches of boards in process. (I only have 4 sawhorses so have to do 3 batches)
Also the ceiling fan and cold air vent work pretty awesome for keeping fumes to a minimum, doing this kind of thing which is really great!
Also while I was at the paint store getting the polyurethane, they had a clearence specal on primer (70% off) so I bought 10 gallons. I'm m not ready for paint but for the price it made sense to pick it up in advance.
Last edited:
So I completed the polyurethane varnish on the 1st of 3 batches of 'barnwood' and holy smokes this varnish is great stuff! Only 2 brushed on coats and the boards are smooth to the touch and have a really nice finish. I haven't done a huge amount of wood working before,but this is by far the best varnish i've used so far.


So my father in-law had kindly been storing my $200 well used 2 post lift we found on craigslist in his parking area since last spring, so it wouldn't be in the way while I was building the shop. i'm not quite ready to install it as I want to paint the inside of the shop first but at least with the major construction done now, I can store it in front of my trailer until i'm ready to install it.

It worked good when we got it, will it be ok after a year of outdoor storage??? who knows, i've got to pick up a new cable for it (to be safe) and after that it can be installed and we'll find out.
If not I can likely get most of my money back scraping it. I did at least store the hydralic motor/resivour/electrical components inside.
It worked good when we got it, will it be ok after a year of outdoor storage??? who knows, i've got to pick up a new cable for it (to be safe) and after that it can be installed and we'll find out.
If not I can likely get most of my money back scraping it. I did at least store the hydralic motor/resivour/electrical components inside.
jollygreengiant
Well-known member
So my father in-law had kindly been storing my $200 well used 2 post lift we found on craigslist in his parking area since last spring, so it wouldn't be in the way while I was building the shop. i'm not quite ready to install it as I want to paint the inside of the shop first but at least with the major construction done now, I can store it in front of my trailer until i'm ready to install it.
It worked good when we got it, will it be ok after a year of outdoor storage??? who knows, i've got to pick up a new cable for it (to be safe) and after that it can be installed and we'll find out.
If not I can likely get most of my money back scraping it. I did at least store the hydralic motor/resivour/electrical components inside.
With my luck I'd have to use that trailer next week lol.
How old is that lift? I've never heard of that brand, then again I don't know a lot about lifts either.
Zengineer
Well-known member
Ford Smith went out of business in the 90's I believe. Used to have their lifts in all sorts of places, they were a very well known brand back in the day.With my luck I'd have to use that trailer next week lol.
How old is that lift? I've never heard of that brand, then again I don't know a lot about lifts either.
Yes, Ford Smith was a Canadian made brand (even says on this kift made in Canada), this is a 9,000lbs model from roughly the early 1980's. There is a company that bought the rights to produce replacement parts for them when Ford Smith went bankrupt and from what I can tell they make a decent amount of repacement parts for this model. I think all it needs is just a new cable (I wouldn't trust the 40yr old one it came with).
But we will see if outdoor storage caused any issues, when it comes time to install it.
But we will see if outdoor storage caused any issues, when it comes time to install it.
So the varnishing of the 'barn wood' is all finished now. I have 26 1x6x8' boards to work with.

Considering they were actually just inexpensive pieces of wood left sitting outside too long at a local lumber yard i'm pretty happy with how they turned out.
I also finally got the last wall inside the foyer closet for the upstairs done.

I also got one section of the bath ceiling up

And after thinking about it, i've decided to learn and do my own plumbing, so I bought some tools as supplies.
Ran the supply line for the shop toilet tonight, I don't know much so hoping it is ok.
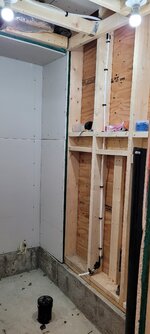
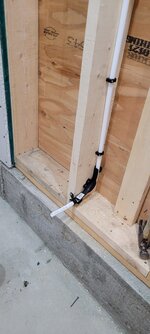
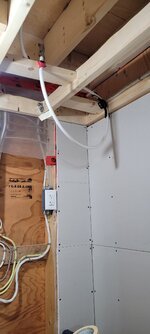
This end of the supply line won't go into place until I mud the drywall and get a plumbing manifold.
Due to being a novice i'm going to shoot for all 'end run' plumbing to minimize the chances of mistakes/ problems...we'll see how it goes.
Considering they were actually just inexpensive pieces of wood left sitting outside too long at a local lumber yard i'm pretty happy with how they turned out.
I also finally got the last wall inside the foyer closet for the upstairs done.
I also got one section of the bath ceiling up
And after thinking about it, i've decided to learn and do my own plumbing, so I bought some tools as supplies.
Ran the supply line for the shop toilet tonight, I don't know much so hoping it is ok.
This end of the supply line won't go into place until I mud the drywall and get a plumbing manifold.
Due to being a novice i'm going to shoot for all 'end run' plumbing to minimize the chances of mistakes/ problems...we'll see how it goes.
I've now completed the supply lines for the shop bathroom. Made sure to use lots of pex braces and brackets so nothing ever moves. These are all 'end runs' so no joints in the walls (as I am a novice).

For now the supply lines are just terminating in the mechanical room as I still need to do the mud/tape on the drywall once the weather is warmer and after that I will get some hot and cold supply manifolds to hook them up to.
All in all so far working with pex seems pretty quick and easy, I wouldn't want to take this job on if I had to do it all in copper!
For now the supply lines are just terminating in the mechanical room as I still need to do the mud/tape on the drywall once the weather is warmer and after that I will get some hot and cold supply manifolds to hook them up to.
All in all so far working with pex seems pretty quick and easy, I wouldn't want to take this job on if I had to do it all in copper!
coldh2o
Well-known member
I've now completed the supply lines for the shop bathroom. Made sure to use lots of pex braces and brackets so nothing ever moves. These are all 'end runs' so no joints in the walls (as I am a novice).
For now the supply lines are just terminating in the mechanical room as I still need to do the mud/tape on the drywall once the weather is warmer and after that I will get some hot and cold supply manifolds to hook them up to.
All in all so far working with pex seems pretty quick and easy, I wouldn't want to take this job on if I had to do it all in copper!
Pex is the best, I've done my house, shop and cottage. Very DYI friendly and almost impossible to mess up (although I have
 ).
).You'll get grief from the pro-fectionists for not using copper el's for the through wall terminations. I've used those in the house, but for a shop think it's fine.
jollygreengiant
Well-known member
One thing to keep in mind with PEX is that it will expand and contract a bit with changing temperatures, so be sure to leave a bit of slack in the lines. At least that was the case with the PEX pipe I've been using.
Interesting, aside from fairly old homes I can't see i have seen much copper in through wall or floor terminations.Pex is the best, I've done my house, shop and cottage. Very DYI friendly and almost impossible to mess up (although I have
You'll get grief from the pro-fectionists for not using copper el's for the through wall terminations. I've used those in the house, but for a shop think it's fine.
I think these will be plenty sturdy though they have a ton of pex support brackets so I can't see the pex ever being broken due to movement.
Great tip thank you!One thing to keep in mind with PEX is that it will expand and contract a bit with changing temperatures, so be sure to leave a bit of slack in the lines. At least that was the case with the PEX pipe I've been using.
So I did a little more work on that bathroom wall...
Added Rockwool:

Then sono-panel:

Then 5/8 drywall and shut off's:

I had to cut down the ABS sink drain rough-in because it was in the way for the drywall...(4ft tall)
Apprently the plumbers who did the underslab rough-in must have leak tested the system by just filling it up to the top with water and then cementing the cap(s) on and left it like that. So when I cut it off I was suprised by a minature flood! worse yet all the other interconnected rough-in were filled to the top also so water kept coming out for a bit. Not ideal when your doing drywall! Also given that we had a lot of freezing cold weather this last winter its darn lucky the pipes did not crack, but since its full of water oviously they didn't.
Kind of sloppy work by the plumbers to leave it full full for the next guy (me) and not even say anything IMO. But that just makes me want to learn plumbing more so I don't have to hire trades anymore.
SilverJimmy
Well-known member
One of my true regrets in life is that I didn’t work in more of the home building trades, because I really HATE being held hostage by their knowledge and expertise! And they seem to really want a lot of loot for their work! My apologies to those of you in those trades, nothing personal.
I was just doing some research on this and your right about the copper elbow's, although my pex cannot move as it has lots of brackets and an elbow holding it in place right behjnd the drywall, pex isn't UV rated which is the other reason for copper elbow's. However, in this instance my shop bathroom and mechanical room have no windows so it shouldn't be a concern at all.Pex is the best, I've done my house, shop and cottage. Very DYI friendly and almost impossible to mess up (although I have
You'll get grief from the pro-fectionists for not using copper el's for the through wall terminations. I've used those in the house, but for a shop think it's fine.
Intersting it must not be a code requirment here as i've done lots of reno's in the past where I hired plumbers and had it inspected by the city and they always just had the pex poking out of the floor or wall. But Your were correct in that ideally pex shouldn't be expose to UV light even if its just from a bathroom window.