
You are using an out of date browser. It may not display this or other websites correctly.
You should upgrade or use an alternative browser.
You should upgrade or use an alternative browser.
Above 1200 Sq/FT Garage build in South West B.C
- Thread starter dmittz
- Start date
Wokspaces above 1200 squarefeet.

Cdubu52
Well-known member
D, Just catching up on your progress. Of course, I will offer my 2 cents. I have been looking at a similar project and have done a little bit of research, but have made zero progress. The rainwater system would not be that difficult and could really help you with your water situation. If you use the plastic drums, you can put in the overflow release about 4-6 inches down from the top and if there is a freeze warning, just turn on the overflow and make room at the top. I know you are in Canada and a world away from me in regards to a freeze and thaw cycle, but it would have to be really cold for a while to freeze all 55 gallons right? Im assuming this would only be an issue in the early spring right? Also if you use the plastic barrels, you can drain and store them inside over the winter since you likely would not be using them at that point. A friend of mine has a chicken house that he built for his flock, and he installed gutters and plastic barrels on the inside for rain gathering, and plumbed it all in as a self sufficient water source for them. Another idea, since Im telling you how to spend your money, ha ha, would be to build a small structure, or use another structure on your property, just to gather the water. I bet it would be cheaper than the underground version. Obviously you could go down a very expensive rabbit hole, but you could start with just one barrel under a gutter and see how it works. I know they sell a rain water diverter that would mount inline with the gutter downspout. Even if its just enough to keep you from having to go fill up the portable tank a few less times a month, it may be worth it. Again, my 2 cents, but I think you could start small and as you learn what is needed, adapt in the future.Its funny you mention that, because I was just thinking about that.
I could probbably rig up a couple 55 gallon drums to hold rain water, although i'd have to figure out a way to ensure freezing in the winter didn't split them.
My dad suggested plumbing all the gutters into concrete underground septic tank dedicated for rainwater with its own 'leach field' overflow, but that would be big $$$ so I won't be doing that.
I use about 1,000 gallons of water per week for watering and it doesn't rain much here in the summer so i'm not sure what would be the best route, in theory all my gutter do 'refill' the aquifer my well draws from as there is no storm water here but that doesn't mitgate thw risk of using to much water in the late summer.
My current gutter setup is:
My house gutters all go into a rock pit somewhere on the property, all of which was done before my time with the exception of the civered deck gutter that goes into a rock pit I built.
On the shop the city required 'splash pads', I hate those things...As you saw on the one downspout I created and underground sump and rock pit for the gutter so the splash pad wouldn't cross the back sidewalk. On the second downspout I graded the ground to drain the water where I know the ground will absorb it and will monitor how that works this winter. My third down spout comes out at the one front corner of the shop and has a splash pad onto the gravel parking area. The water drains fine there but the splash pad is stupid because it get run over and broken from time to time so I need to proabbly do another sump and rock pit there at some point.
Interestingly where I live the aquifer has two levels the top one which is high quality water runs about 12ft down to 42ft down but you have to watch as the aquifer level and recharge rate drops in the summer. Then there is a lower aquifer that is about 150ft to 250ft down which has very little water supply concerns but my neighbors tell me the water quality in poorer than the higher aquifer so it requires a lot more water treatment. My well is in the higher aquifer.
captain14
Well-known member
A co worker installed an extra septic tank at his house when it was being built and channeled all his gutter downspouts to the septic tank. He used a small pump to irrigate all his plantings outside throughout the season.
Granted he was in well water.
Since we are helping to spend your money, try a 55 gallon food grade barrel and install a gutter diverter for a test.
Granted he was in well water.
Since we are helping to spend your money, try a 55 gallon food grade barrel and install a gutter diverter for a test.
jollygreengiant
Well-known member
I'd lean towards a 275 gallon IBC tote over the 55 gallon barrels myself. The totes hold a bunch more water and already have a valve built in for getting water out of them.
But yeah, If you're looking at collecting rainwater I'd look at routing all your downspouts to one spot and filling a large tank. You can get large (3,000) gallon upright plastic tanks that you can place on level ground behind the shop, though you'd have to drain them in the winter.
But yeah, If you're looking at collecting rainwater I'd look at routing all your downspouts to one spot and filling a large tank. You can get large (3,000) gallon upright plastic tanks that you can place on level ground behind the shop, though you'd have to drain them in the winter.
Thanks for all the replies and ideas guys, lots to consider for the future.
In regards to things freezing it really depends on the year some years here the winter can be quite mild and we only have a few scattered days of slightly below zero temps and perhaps a few brief dustings of snow. Other years (like the last 2 years) It can get pretty cold. This last winter I think it was below 0C (32f) for 6 or 8 weeks straight with about half that time being below -10C and several days were hitting -20C plus there was a ton of snow as we get lots of percipitation in the winter (and very, very little in the summer).
I like the idea of a rain collection system, the majn problems I see are we get very little if any rain all summer and I use about 1000 gallon per week for watering, so a really big tank would be needed to allow for more than a weeks watering and make it worth while. And of course I don't want the cost to get to out of line since drilling a deeper well is always a option too. Although i'd rather not since I haven't actually had it ever run dry i'm just being cautious/mindful of how much I use.
Lots to consider for sure, at least for the moment I actually don't mind filling the 200gallon water tank 5 times a week and its free but the down side is all that messing around is time consuming during the end of the summer.
In regards to things freezing it really depends on the year some years here the winter can be quite mild and we only have a few scattered days of slightly below zero temps and perhaps a few brief dustings of snow. Other years (like the last 2 years) It can get pretty cold. This last winter I think it was below 0C (32f) for 6 or 8 weeks straight with about half that time being below -10C and several days were hitting -20C plus there was a ton of snow as we get lots of percipitation in the winter (and very, very little in the summer).
I like the idea of a rain collection system, the majn problems I see are we get very little if any rain all summer and I use about 1000 gallon per week for watering, so a really big tank would be needed to allow for more than a weeks watering and make it worth while. And of course I don't want the cost to get to out of line since drilling a deeper well is always a option too. Although i'd rather not since I haven't actually had it ever run dry i'm just being cautious/mindful of how much I use.
Lots to consider for sure, at least for the moment I actually don't mind filling the 200gallon water tank 5 times a week and its free but the down side is all that messing around is time consuming during the end of the summer.
Last edited:
Quick update for you all.
I have work to do this afternoon but my little guy and I went out to southern drip irrigation first thing this morning which is about a 1 hour trip each way and picked up my septic tank, distribution box, risers, effluent filter, piping and everything else needed for the septic field. It was definetly nice to have a truck and use of a flat deck trailer for this kind of stuff. And I was laughing as once again I was towing stuff around when I never thought i'd be towing before I got the truck, haha.


The septic excavting will be happing tomorrow.
I opted to do the septic with permits from the regional health authority (I had a choice of the city or the health authority and I don't like dealing with the city).
Since I'm doing the install as a 'homeowner' I have to get 3 inspections to ensure I am properly following the septic design plan that the waste water engineer I hired, made.
-First inspection is after excavting...
-Second inspection is after some of the clear crushed and washed gravel is in place and all the piping is done.
-The final inspection is to take place after final backfill grading and the grass seed is in place over the field.
Assuming I pass all the inspections the permit will be satisfied with the local health authority and they also will send a copy to the city and it becomes equivlent in the city records to if it was done through the city (but I don't have to deal with the city this way!) Happily that will also satisfy the city's demand that a permitted septic field be installed withing 2 years of the shop getting its final (last fall) in exchange for allowing plumbing in the shop.
I have work to do this afternoon but my little guy and I went out to southern drip irrigation first thing this morning which is about a 1 hour trip each way and picked up my septic tank, distribution box, risers, effluent filter, piping and everything else needed for the septic field. It was definetly nice to have a truck and use of a flat deck trailer for this kind of stuff. And I was laughing as once again I was towing stuff around when I never thought i'd be towing before I got the truck, haha.
The septic excavting will be happing tomorrow.
I opted to do the septic with permits from the regional health authority (I had a choice of the city or the health authority and I don't like dealing with the city).
Since I'm doing the install as a 'homeowner' I have to get 3 inspections to ensure I am properly following the septic design plan that the waste water engineer I hired, made.
-First inspection is after excavting...
-Second inspection is after some of the clear crushed and washed gravel is in place and all the piping is done.
-The final inspection is to take place after final backfill grading and the grass seed is in place over the field.
Assuming I pass all the inspections the permit will be satisfied with the local health authority and they also will send a copy to the city and it becomes equivlent in the city records to if it was done through the city (but I don't have to deal with the city this way!) Happily that will also satisfy the city's demand that a permitted septic field be installed withing 2 years of the shop getting its final (last fall) in exchange for allowing plumbing in the shop.
Last edited:
captain14
Well-known member
Before the little guy arrived on the scene, you would never have thought you’d be carrying a bag of toys or kids sports equipment in The trunk either.
haha very true!!!Before the little guy arrived on the scene, you would never have thought you’d be carrying a bag of toys or kids sports equipment in The trunk either.
Ok guys its been quite the day. So my friend who has the excavting company showed up first thing this morning with a couple of his guys and his excavtor. And Just like he is a good friend he is also great at what he does and did a fantastic job.

First up was to unload the septic tank, handy to have a tractor haha....

And that is where the day became interesting. I had talked with the wastewater engineer and told him, I thought given the depth of the sewer pipe the tank and the entire field needed to be lower I was assured twice that they had it all figured out and it would work out...
Well It did not they were off by about 12 inches. To make matters worse when I tried to call the engineer today to sort out what to do he was taking a few days off. Might have been nice if he mentioned that when I talked to him on tuesday afternoon and said I might be calling with questions. I tried every extension at his office and got another engineer who I told the situation to and he agreed to come out and help me figure it out. He took some measurements, had us dig a 10ft deep test hole and calculated a bunch of stuff on his laptop and re-designed the field on site to sit approximatley 12inches lower on site.
He said the soil where I live was the best of anywhere due to it being pure sand and this wouldn't work anywhere else but everything calculated out and basically the whole thing just got about 12inches deeper. That means 12inches more clear crushed gravel I have to buy but it could have been worse.
There was also some concern that the tank could not be burried deeper than 24inches (we are around 30 deep to the top of the tank but after the engineer talked to the manufacturer on the phone he said up to 48inches is allowed. Phew! all good, I will just need to buy more risers.
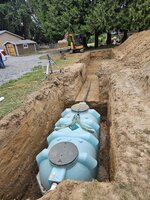
This hole for the tank was almost 7ft deep to the bottom!


The next issue that came up was I had a whole list of fittings etc... that I ordered and picked up from southern irrigation. They told me all the fitting were inside the distribution box which was wrapped in packing tape, great...well my bad I was in a hurry yesterday and did not take the time to check over all the fittings...I asked for 4in ABS couolere they gave me 3in, I asked for 45 degree elbows I got 90's, I asked for ABS to PVC adapter and I got nothing, I needed 3in caps for the septic lines I was given 4in caps...Wonderful!
Well thankfully a quick run to homedepot solved that and I can return all the wrong stuff when I get my risers, but gosh there must have been some sort of miscommunication that so much stuff was messed up.
Anyway my friend and his guys were great, they said this happens to them everyday, and after I got the fitting we did all the plumbing into and out of the septic tank and the engineer looked it all over and approved it.
Since the hole was deeper than anticipated my friend suggested that even though its all sun in the forecast we should at least backfill up to the pipe level around the tank to prevent any sort of unplanned cave-in. so we did that and compacted it and then I added 200 gallons of water...I need to add more but will do that tomorrow as I only had time for one run with the water tank.

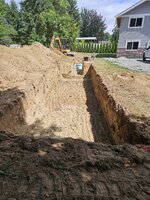
Anyway there was a little time left at the end of the day so I figured there would never be a better time than now to excavate my planned drainage basins.
This one is in a low spot just north of the shop, The basin is 2ft wide×3ft deep and 6ft long, I'll wrap it with fabric and put some clear crushed or drain rock in it and a sump. should get rid of the small amount of standing water that was in this area during very heavy rains.

I also had a spot excavated on the south side so that I can drain the downspout into it and eliminate the splash pad that tends to get driven over.

This one is 3ft wide, 5ft deep and 7ft long. I'll put a sump and infiltration barrell surrounded by clear crushed in this basin.
Anyway. That's all for now but more updates to come as i'll be busy working to finish all this outdoor stuff the next few weeks.
First up was to unload the septic tank, handy to have a tractor haha....
And that is where the day became interesting. I had talked with the wastewater engineer and told him, I thought given the depth of the sewer pipe the tank and the entire field needed to be lower I was assured twice that they had it all figured out and it would work out...
Well It did not they were off by about 12 inches. To make matters worse when I tried to call the engineer today to sort out what to do he was taking a few days off. Might have been nice if he mentioned that when I talked to him on tuesday afternoon and said I might be calling with questions. I tried every extension at his office and got another engineer who I told the situation to and he agreed to come out and help me figure it out. He took some measurements, had us dig a 10ft deep test hole and calculated a bunch of stuff on his laptop and re-designed the field on site to sit approximatley 12inches lower on site.
He said the soil where I live was the best of anywhere due to it being pure sand and this wouldn't work anywhere else but everything calculated out and basically the whole thing just got about 12inches deeper. That means 12inches more clear crushed gravel I have to buy but it could have been worse.
There was also some concern that the tank could not be burried deeper than 24inches (we are around 30 deep to the top of the tank but after the engineer talked to the manufacturer on the phone he said up to 48inches is allowed. Phew! all good, I will just need to buy more risers.
This hole for the tank was almost 7ft deep to the bottom!
The next issue that came up was I had a whole list of fittings etc... that I ordered and picked up from southern irrigation. They told me all the fitting were inside the distribution box which was wrapped in packing tape, great...well my bad I was in a hurry yesterday and did not take the time to check over all the fittings...I asked for 4in ABS couolere they gave me 3in, I asked for 45 degree elbows I got 90's, I asked for ABS to PVC adapter and I got nothing, I needed 3in caps for the septic lines I was given 4in caps...Wonderful!
Well thankfully a quick run to homedepot solved that and I can return all the wrong stuff when I get my risers, but gosh there must have been some sort of miscommunication that so much stuff was messed up.
Anyway my friend and his guys were great, they said this happens to them everyday, and after I got the fitting we did all the plumbing into and out of the septic tank and the engineer looked it all over and approved it.
Since the hole was deeper than anticipated my friend suggested that even though its all sun in the forecast we should at least backfill up to the pipe level around the tank to prevent any sort of unplanned cave-in. so we did that and compacted it and then I added 200 gallons of water...I need to add more but will do that tomorrow as I only had time for one run with the water tank.
Anyway there was a little time left at the end of the day so I figured there would never be a better time than now to excavate my planned drainage basins.
This one is in a low spot just north of the shop, The basin is 2ft wide×3ft deep and 6ft long, I'll wrap it with fabric and put some clear crushed or drain rock in it and a sump. should get rid of the small amount of standing water that was in this area during very heavy rains.
I also had a spot excavated on the south side so that I can drain the downspout into it and eliminate the splash pad that tends to get driven over.
This one is 3ft wide, 5ft deep and 7ft long. I'll put a sump and infiltration barrell surrounded by clear crushed in this basin.
Anyway. That's all for now but more updates to come as i'll be busy working to finish all this outdoor stuff the next few weeks.
Last edited:
I had 39 yards of Clear crushed 45mm-63mm rock delivered this afternoon. I have a friend that works at a local gravel company and he always manages to get my gravel quickly and at an amazing price.
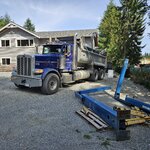

I've been instruted both by the wastewater engineer and my friend at the gravel pit that although this is 'clear crushed' I need to also manually 'wash it' with a hose before use to ensure its clean enough for septic use.
If your wondering why not use rounded drain rock, basically its simply not readilly avaliable locally due to it all going to local concrete production.
Due to the engineer's miscalculation I will now have to use 30inches of this gravel in the field rather than 18in, with most of that going ontop of the leech pipes since they won't allow more than 18in of native soil ontop of the gravel, but that's just life, at least things should all work out now.
I also managed to make 3 more runs with the water tank today so my 1000 gallon septic tank now has 800 gallons of fresh water in it, which should eliminate any risk of it collapsing.
I've been instruted both by the wastewater engineer and my friend at the gravel pit that although this is 'clear crushed' I need to also manually 'wash it' with a hose before use to ensure its clean enough for septic use.
If your wondering why not use rounded drain rock, basically its simply not readilly avaliable locally due to it all going to local concrete production.
Due to the engineer's miscalculation I will now have to use 30inches of this gravel in the field rather than 18in, with most of that going ontop of the leech pipes since they won't allow more than 18in of native soil ontop of the gravel, but that's just life, at least things should all work out now.
I also managed to make 3 more runs with the water tank today so my 1000 gallon septic tank now has 800 gallons of fresh water in it, which should eliminate any risk of it collapsing.
Last edited:
SilverJimmy
Well-known member
Around here if you don’t fill your new plastic septic tank with water, when we get our really wet summer monsoon rain storms God pops it right out of the ground! Pretty impressive too!
yep, i've heard people say that also. Don't worry we are all good its got 800 gallons of water in it, which is about all I can fill it up until the field is finished. The weather forecast is for good weather for at least a week so i'm hoping to get it all finished before we see any rain at all.Around here if you don’t fill your new plastic septic tank with water, when we get our really wet summer monsoon rain storms God pops it right out of the ground! Pretty impressive too!
I got to work on the septic field today, I had a extended family function to attend in the afternoon, but I at least got a good start prior to that...
First up was to get the location and height of the distribution box set and level it, which also involved making sure the 4in sewer pipe had the specified 1/4in per foot slope.

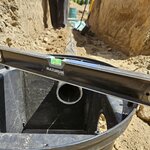
I did install the seal around the 4in pipe in the D-box you just can't really see it in the picture for some reason.
I suspect this field will have no drainage troubles, this is the native soil below the field (60im depth), basically pure sand!

Next up I had to dig a small 42in deep pit in the bottom of the field to install the 'observation port' basically a 4in perferated pipe wrapped in landscape fabric with a threaded cap on top of it. I don't see the purpose, or need for it but the engineer said it helps future technicans acess the 'health of the field'. Here it was as I was in the process of wrapping it in fabric, the whole thing goes almost 9ft into the ground!

Following that I spent a spent a solid hour hoseing down the clear crushed 1.5in gravel pile to ensure there were no crusher fines, then I washed and drained each bucket load as best I could before dumping it into the field. I used some left over plywood to help get gravel to the far side of the field...and that's as far as I got today.
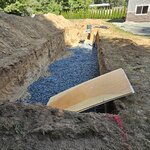

First up was to get the location and height of the distribution box set and level it, which also involved making sure the 4in sewer pipe had the specified 1/4in per foot slope.
I did install the seal around the 4in pipe in the D-box you just can't really see it in the picture for some reason.
I suspect this field will have no drainage troubles, this is the native soil below the field (60im depth), basically pure sand!
Next up I had to dig a small 42in deep pit in the bottom of the field to install the 'observation port' basically a 4in perferated pipe wrapped in landscape fabric with a threaded cap on top of it. I don't see the purpose, or need for it but the engineer said it helps future technicans acess the 'health of the field'. Here it was as I was in the process of wrapping it in fabric, the whole thing goes almost 9ft into the ground!
Following that I spent a spent a solid hour hoseing down the clear crushed 1.5in gravel pile to ensure there were no crusher fines, then I washed and drained each bucket load as best I could before dumping it into the field. I used some left over plywood to help get gravel to the far side of the field...and that's as far as I got today.
Last edited:
I spent a few hours working on the septic today. Its pretty scorching hot out so didn't want to spend a full day in the heat.
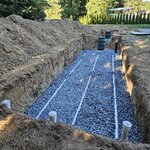
Its fairly slow work because I have to thoughtly rince and drain the crushed 1.5in rock to ensure it has no fines in it and will drain well. Anyways I managed to get a uniform 12inches of gravel in the field and got it all fairly level. So what you see is what will be below the level of the drainage pipes.

I can't help but feel this field is massive overkill given the soil conditions but I guess that means should never have a problem with it either.
Next up will be to add all the drain piping and risers then I can call for the next inspection.
Its fairly slow work because I have to thoughtly rince and drain the crushed 1.5in rock to ensure it has no fines in it and will drain well. Anyways I managed to get a uniform 12inches of gravel in the field and got it all fairly level. So what you see is what will be below the level of the drainage pipes.
I can't help but feel this field is massive overkill given the soil conditions but I guess that means should never have a problem with it either.
Next up will be to add all the drain piping and risers then I can call for the next inspection.
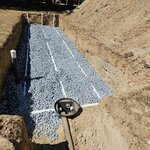
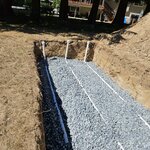
Ok, so all the piping is now done on the spetic field. It may not look like it but a lot of work went into positioning and getting the correct level/slopes on all the piping. There was also a significant amount of work that went into ensuring the clear crushed gravel was 'washed clean' as I installed it. (used 800gallons of water so far washing).
With the engineer and inspectors permission I also added clean-outs to the ends of each run to make future maintance/repairs easier.
Drain field:
Distribution box:
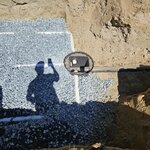
'Observation port'
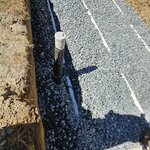
Clean outs:

Riser(s) fitted to the one side of the tank to verify access 'at grade':

As instructed I have left the risers off the other side of the tank so the inspector can more easily look 'inside the tank' and examine the effluent filter. Once that's done I have been instructed to make a T-handle for the effluent filter for easier removal from grade and then install the risers.
The risers are not yet installed on the D-box so the inspector can more easily verift I used the seals around the pipes and put all the pipes in the correct holes.
Risers on the D-box will be added after my next inspection.
I've called for inspection, so hopefully the inspector likes what they see!
With the engineer and inspectors permission I also added clean-outs to the ends of each run to make future maintance/repairs easier.
Drain field:
Distribution box:
'Observation port'
Clean outs:
Riser(s) fitted to the one side of the tank to verify access 'at grade':
As instructed I have left the risers off the other side of the tank so the inspector can more easily look 'inside the tank' and examine the effluent filter. Once that's done I have been instructed to make a T-handle for the effluent filter for easier removal from grade and then install the risers.
The risers are not yet installed on the D-box so the inspector can more easily verift I used the seals around the pipes and put all the pipes in the correct holes.
Risers on the D-box will be added after my next inspection.
I've called for inspection, so hopefully the inspector likes what they see!
Hey Guys so, the health authority septic inspector came out to inspect the septic system today. I asked quite a few questions and tried to thoughly describe how I had done everything.
He said normally they frown on 'homeowners' doing their own septic systems...However, in my case he said he was pleasantly suprised as it was one of the best installation jobs he had seen and was on par with a top notch professional installer. So I passed the piping and drainage field inspection.
Basically now I just need to backfill the rest of the gravel add non-woven fabric, take a few pictures, then backfill with dirt, add grass seed and call for the final inspection. They just want to ensure all the risers are above grade on the final inspection and that the ground does not direct water towards the risers so that should be a pretty easy inspection.
Once that's done I just have to wait to recieve a letter of certification and registration with the health authority and the septic permit will be satisfied/completed and I can start using it.
Here is the field as it sits:
risers all on, and effluent filter extension added, sent the health inspector pictures shortly after he left and they are all approved now by him as well

He said normally they frown on 'homeowners' doing their own septic systems...However, in my case he said he was pleasantly suprised as it was one of the best installation jobs he had seen and was on par with a top notch professional installer. So I passed the piping and drainage field inspection.
Basically now I just need to backfill the rest of the gravel add non-woven fabric, take a few pictures, then backfill with dirt, add grass seed and call for the final inspection. They just want to ensure all the risers are above grade on the final inspection and that the ground does not direct water towards the risers so that should be a pretty easy inspection.
Once that's done I just have to wait to recieve a letter of certification and registration with the health authority and the septic permit will be satisfied/completed and I can start using it.
Here is the field as it sits:
risers all on, and effluent filter extension added, sent the health inspector pictures shortly after he left and they are all approved now by him as well
Thanks i'm trying my best to do a good job!That's sweet install... Good Job.
I am going to be building in a few years and will be referencing your install. Thanks
As part of my profession i've been present at a lot of septic inspections and gained a working knowledge of the basics but i've never done any sort of installation work so I wasn't really sure how my septic install would turn out or if i'd have problems getting it passed.
Thankfully the wastewater engineer that designed the system and also the health authority inspectors have been very good about answer my questions and giving guidence which was a big help. Although I will say it it clear that there are some strict rules and principles that must be followed and they do check everything over with fine toothed comb.
Last edited:
Since I had to increase the depth of the field (with approval), I have to fill the extra depth that was added with additional 'clean' clear crushed gravel as I am told that there is a maximum of 18in of fill allowed and more than that can reduce the 'microbial' action of the field since to much fill prevents oxygenation/evaporation in the field. I was told by the inspector today that since there is going to be a lot of gravel ontop. That although i'm only required to put non-woven fabric ontop of the gravel before backfilling the dirt, in my case it would be benfically to add it to the 'sides' of the field (above the level of the leach pipes only) to prevent soil slowly working its way into the field from the sides given the overall depth of the gravel, so i've opted to do that.

I made a bit of a start backfilling the remaing gravel over the pipes. Again its slow work since I have to throughly rinse and drain each bucket load of clear crushed rock. I sure am glad I'm doing this with a tractor and not a wheel barrow.
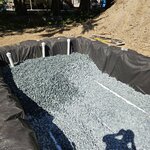
I have a fair of gravel left, but its not going to be enough so I have another truck coming Monday.
I have a fair of gravel left, but its not going to be enough so I have another truck coming Monday.
Ok Guys, so I wanted a little change of pace so I figured I'd tackle the drianage basin on the southwest corner of the shop. I thought with the hole already excavated this would be a really quick and easy project to knock out. Infact it kinda kicked my **** and took a lot longer than expected.
First step was to turn a 55 gallon pastic barrel into an 'inflitration barrel'

wraped in fabric:

Top cut-out, so rocks can be added.

So the drajnage pit is a little over 5 ft deep maybe 30in wide and 7ft long. I lined it with fabric, put about 4in rock in the bottom, then placed the barrel in.

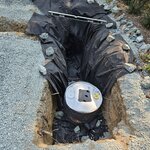
I filled about 2ft.of rock around the barrel and then covered with fabric.
Then I added the sump, there is a 3in pipe going from about 8in above the bottom of the sump into the barrel.


and of course the 3in ABS pipe from the gutter to the sump was added.

Finally I got the dirt backfilled in the hole. (the sump had landscap fabric held down by rocks on top of it if your wondering).
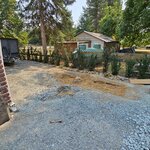
I still have to add gravel over the dirt and do the final grading but at least this drainage project is 95% complete now.
First step was to turn a 55 gallon pastic barrel into an 'inflitration barrel'
wraped in fabric:
Top cut-out, so rocks can be added.
So the drajnage pit is a little over 5 ft deep maybe 30in wide and 7ft long. I lined it with fabric, put about 4in rock in the bottom, then placed the barrel in.
I filled about 2ft.of rock around the barrel and then covered with fabric.
Then I added the sump, there is a 3in pipe going from about 8in above the bottom of the sump into the barrel.
and of course the 3in ABS pipe from the gutter to the sump was added.
Finally I got the dirt backfilled in the hole. (the sump had landscap fabric held down by rocks on top of it if your wondering).
I still have to add gravel over the dirt and do the final grading but at least this drainage project is 95% complete now.
PhantomEB
Well-known member
Medicine Hat here, middle of the Alberta desert…..you can be rest assured we have rain barrels at every downspout short of one. Made every one of them elevated so my girl can use her watering cans. Funny thing is she don’t know that I put a dash of farm grade fertilizer in each rain barrel…..
Ok Guys, finished off the grading around the drainage basin, so no more worries about driving over the splash pad.
Although sometimes I think it would be nice to have basic city services like storm water or even a ditch to drain into. I guess From and enviromental perspective doing it this way ensures the water from the gutters goes directly back into the aquifer to recharge it rather than causing floods in nearby water courses.
Anyway here's the southwest gutter drainage basin completed.

Also I washed and spread all the gravel I had remaining into the septic field. lots of work but i'm getting there, I'm still a bit short on gravel so I have another gravel truck scheduled to bring me more tomorrow so I can ensure I have no more than 18in of fill over any part of the septic field.


Although sometimes I think it would be nice to have basic city services like storm water or even a ditch to drain into. I guess From and enviromental perspective doing it this way ensures the water from the gutters goes directly back into the aquifer to recharge it rather than causing floods in nearby water courses.
Anyway here's the southwest gutter drainage basin completed.
Also I washed and spread all the gravel I had remaining into the septic field. lots of work but i'm getting there, I'm still a bit short on gravel so I have another gravel truck scheduled to bring me more tomorrow so I can ensure I have no more than 18in of fill over any part of the septic field.
yep some rain barrels are proobably on the longer term list of projects.Medicine Hat here, middle of the Alberta desert…..you can be rest assured we have rain barrels at every downspout short of one. Made every one of them elevated so my girl can use her watering cans. Funny thing is she don’t know that I put a dash of farm grade fertilizer in each rain barrel…..
Had another load of clear crushed gravel delivered today for the septic field.

i managed to finish filling the septic drain field with gravel and coved with non-woven filter fabric. Should end up with about 12in of dirt on top of the gravel which is right in the middle of the 6in-12in that the design allowed.
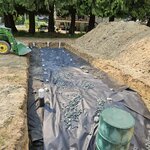

Sent the inspector some pictures and will just await the ok to backfill with dirt.
My Dad also used my tractor and started backfilling around my septic tank, although didn't have enough time to finish. Here's a couple action shots for you tractor fans:


i managed to finish filling the septic drain field with gravel and coved with non-woven filter fabric. Should end up with about 12in of dirt on top of the gravel which is right in the middle of the 6in-12in that the design allowed.
Sent the inspector some pictures and will just await the ok to backfill with dirt.
My Dad also used my tractor and started backfilling around my septic tank, although didn't have enough time to finish. Here's a couple action shots for you tractor fans:
I got an email back from the inspector confirming i'm good to backfill the field.
So I've completed backfilling and sent pictures to the inspector but they said I need to call for inspection as a final in person grading inspection is required. So i'll await the final inspection.

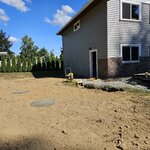
i've still got a big pile of dirt to deal with. But its beautiful sandy loam so shouldn't be to hard to get rid of. Just hoping the inspector doesn't want it gone prior to giving me a pass on the final septic inspection.
So I've completed backfilling and sent pictures to the inspector but they said I need to call for inspection as a final in person grading inspection is required. So i'll await the final inspection.
i've still got a big pile of dirt to deal with. But its beautiful sandy loam so shouldn't be to hard to get rid of. Just hoping the inspector doesn't want it gone prior to giving me a pass on the final septic inspection.
Ok Guys so while I was waiting for the inspector, I installed some landscape irriagtion boxes around the end of run septic clean-outs and the 'observation port. Should protect them from damage by lawn equipment and make them easily accessible.


I also knocked out the drainage basin by the shop's north man door. Basically lots of drainage rock covered in fabric with a dranage sump.

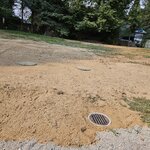

I thought this final septic inspection was just a 'grading inspection', and the grading passed no issue, but the inspector wanted to look inside the distribution box, and had me add water to it. Because I had carfully leveled it the water was already almost perfectly entering each drainage line at the same water level. However after checking the plans the inspector said D-box 'speed levers were required. In my opinion they are kind of a band-aid solution to if you did not level the D-box, but I was told they are required. Luckily I had them on hand and just climed down into the 4ft deep D-box, installed them for the inspector and was given a final Pass.

I'm told it takes about 30 days to register the septic system and after that I will recieve a 'certificate to operate' my septic system and at that point I will be allowed to start using it.
Anyway glad that is all out of the way now all that is left is to deal with the pile of dirt in my yard and then re-seed the lawn.
I also knocked out the drainage basin by the shop's north man door. Basically lots of drainage rock covered in fabric with a dranage sump.
I thought this final septic inspection was just a 'grading inspection', and the grading passed no issue, but the inspector wanted to look inside the distribution box, and had me add water to it. Because I had carfully leveled it the water was already almost perfectly entering each drainage line at the same water level. However after checking the plans the inspector said D-box 'speed levers were required. In my opinion they are kind of a band-aid solution to if you did not level the D-box, but I was told they are required. Luckily I had them on hand and just climed down into the 4ft deep D-box, installed them for the inspector and was given a final Pass.
I'm told it takes about 30 days to register the septic system and after that I will recieve a 'certificate to operate' my septic system and at that point I will be allowed to start using it.
Anyway glad that is all out of the way now all that is left is to deal with the pile of dirt in my yard and then re-seed the lawn.
Cdubu52
Well-known member
D, I know you are glad that headache is almost over. Nice Job


yep, I sure am. Its been interesting to learn how to do a septic field but I totally understimated the amount of work required to get it done!D, I know you are glad that headache is almost over. Nice Job
Well guys I have now pretty much offically finished up the shop septic project. The finishing touches were to add a little flower bed over the tank so I don't accidentally drive over it with the tractor. A few flowers and a little mulch was all that was required, should make the pollinators happy too.


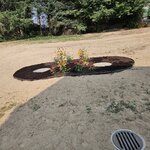
I've also just seeded the lawn as we are suppose to get a few days of rain this week, which is good as it has not rained here in quite a long time.
As August is coming to a close I am trying to work through my list of weather dependant projects knowing that fall is approaching. Next on my list was to extend the hedge the whole length of my shop parking area...So i've now made a bed to plant the hedges.
My neighbor is a nice guy and I talk with him often when i'm working in the yard, but his yard isn't the best view so some hedges should fix that. I'm going to wait just a little longer to plant them as i've heard the best time to plant trees around here is mid-september as it minimizes the amount of watering required.
I've also just seeded the lawn as we are suppose to get a few days of rain this week, which is good as it has not rained here in quite a long time.
As August is coming to a close I am trying to work through my list of weather dependant projects knowing that fall is approaching. Next on my list was to extend the hedge the whole length of my shop parking area...So i've now made a bed to plant the hedges.
My neighbor is a nice guy and I talk with him often when i'm working in the yard, but his yard isn't the best view so some hedges should fix that. I'm going to wait just a little longer to plant them as i've heard the best time to plant trees around here is mid-september as it minimizes the amount of watering required.
So I finally finished running all my plumbing supply lines. My mechanical room is looking quite chaotic with all the plumbing lines!

Also my Dad brought over the 'sound insulated' doors he built for me.
They are double 18in doors, that are 3inches thick, each door is about 75lbs. I think they will do a pretty good job of muffling the sound of the compressor. They latch at the top, I still have to add the handles and stain them.


Also, thus far I have tried to displine myself to work on finishing the shop before decorating, however a family friend that owns a local antique shop, has been in business since 1966 and his business is sort of a local landmark. He is retiring and liquidating his inventory so I figured it was now or never to buy few things from him to decorate the shop.

So I picked up these signs:

I will have to take them down when I paint, but wanted to put the signs up just to see what they would look like... So far I like the look!

Also my Dad brought over the 'sound insulated' doors he built for me.
They are double 18in doors, that are 3inches thick, each door is about 75lbs. I think they will do a pretty good job of muffling the sound of the compressor. They latch at the top, I still have to add the handles and stain them.
Also, thus far I have tried to displine myself to work on finishing the shop before decorating, however a family friend that owns a local antique shop, has been in business since 1966 and his business is sort of a local landmark. He is retiring and liquidating his inventory so I figured it was now or never to buy few things from him to decorate the shop.
So I picked up these signs:
I will have to take them down when I paint, but wanted to put the signs up just to see what they would look like... So far I like the look!
Last edited:
nadogail
Well-known member
The Grass and flowers always grows better over the Septic Tank.
SilverJimmy
Well-known member
I think I’d slather boiled linseed oil all over that bare wood and let the beauty shine thru!
I've made some progress on the door.
I had some left over stain, so I stained the mechnical room door and door frame and then applied about 20 coats of polyurethane, I think over gallon of poly when onto this door and the frame!

'barn style' handles added:

i've still got to put up and stain some 1x4's for the door frame but i'm pretty happy with how the mechanical room door looks.
I had some left over stain, so I stained the mechnical room door and door frame and then applied about 20 coats of polyurethane, I think over gallon of poly when onto this door and the frame!
'barn style' handles added:
i've still got to put up and stain some 1x4's for the door frame but i'm pretty happy with how the mechanical room door looks.
Ok Guys, so I've been just messing around with drywall in the mechanical room. Although I was able to achieve a decent end result I've determined that i'm too slow at doing mud/tape for it to make sense for me to do much more of it and i'll likely hire out most of the future drywall work. But Anyway here is where i'm at:


The walls have also been primed and had 2 coats of gloss 'artic white' paint. I was going to do the same paint theme as the rest of the shop, but being this is such a small room and soon to be full of stuff I'm thinking I may just leave it white for better visability and so it doesn't feel as small.
If you wondering about the open strip on the ceiling I still have to install the wire to the sub panel and have it inspected so that stip of drywall will be added later, but I want to clean up all my pex lines and arrange them on the manifolds with shut offs before I call the electrical inspector and couldn't do that until the rest of the drywall was done.
I also go started on some trim for the mechanical room. So I bought some cheap 1x3 boards and also one 1x8. But man after some stain and 10 coats of gloss polyurethane I think they look great. Maybe overkill for a shop mechanical room but whatever, lol.


The 1x3's will be used for all the trim in the mechanical room and the 1x8 I will mount the copper plumbing manifolds too.
The walls have also been primed and had 2 coats of gloss 'artic white' paint. I was going to do the same paint theme as the rest of the shop, but being this is such a small room and soon to be full of stuff I'm thinking I may just leave it white for better visability and so it doesn't feel as small.
If you wondering about the open strip on the ceiling I still have to install the wire to the sub panel and have it inspected so that stip of drywall will be added later, but I want to clean up all my pex lines and arrange them on the manifolds with shut offs before I call the electrical inspector and couldn't do that until the rest of the drywall was done.
I also go started on some trim for the mechanical room. So I bought some cheap 1x3 boards and also one 1x8. But man after some stain and 10 coats of gloss polyurethane I think they look great. Maybe overkill for a shop mechanical room but whatever, lol.
The 1x3's will be used for all the trim in the mechanical room and the 1x8 I will mount the copper plumbing manifolds too.
I managed to make some progress on the plumbing manifolds.
Its kind of OCD but I polished them, because why not have shiny plubing manifolds in your shop.
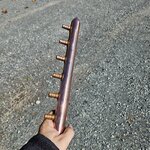


Of course there is still lots more work to do here, such as adding straps above and below the cold shut off's but Its nice to see this starting to take shape as I had envisioned it.
Its kind of OCD but I polished them, because why not have shiny plubing manifolds in your shop.
Of course there is still lots more work to do here, such as adding straps above and below the cold shut off's but Its nice to see this starting to take shape as I had envisioned it.
nadogail
Well-known member
Very Impressive!!
Thank you. This project is the first time i've done any plumbing work so I hope i'm doing it right!Very Impressive!!
Also the missing straps have now been added, I ran out of screws before.
