To avoid these ads, REGISTER NOW!

11b30b4’s Craftsman 103.22500 6” Belt Disc Sander Rebuild

11b30b4

Well-known member
Joined
Jul 16, 2020
Messages
1,029
Location
GA
11b30b4’s Craftsman 103.22500 6” Belt Disc Sander Rebuild


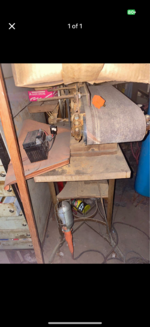
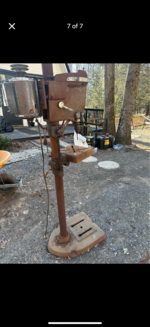
I picked this sander up at an estate sale this morning for $110.00. I normally would not spend that much on a sander but in my quest to fill my shop with classic Craftsman/ King Seeley tools on pedestal stands and given the scarcity of pedestal stands here in Georgia, I had to buy it.
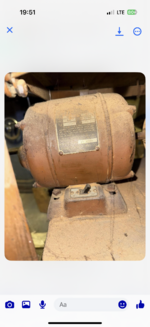
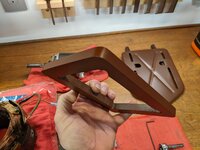


full


full


full


full


This 6” sander has a Craftsman 1/5 HP 3450 CS ball bearing motor (397.19827) Craftsman 1/2 HP 3450 CS ball bearing motor (397.19821) and looks to be complete except for the smaller belt table fence (38224). I am guessing this sander was manufactured in the mid 50s but the data on the motor is not that helpful. The original power bronze paint looks good but sadly, I prefer the hammered gold so it will get a repaint. I will be rebuilding this sander in the future as I work it into my que.


Thanks for the interest.
 
Last edited:
To avoid these ads, REGISTER NOW!

JG Owens

Well-known member
Joined
Apr 13, 2020
Messages
81
Location
Lehigh Valley, PA
I don't think $110 is out of line for a sander on a pedestal with a Craftsman motor. I would have paid that given how infrequently these pop up. There are a few tools for which Craftsman offered pedestals that you rarely see.....alien head planers and jig saws come to mind. Either they are being given away or the owner thinks they're made of gold.
 

driftpin

Well-known member
Joined
Dec 22, 2016
Messages
11,218
Location
Miami-Dade/Broward Co. Florida
JG Owens I know who is your avatar: https://www.gq-magazine.co.uk/culture/article/bill-hickman-stunt-driver There are some good links after the article, too, Hollywood car chases. Bill Hickman was following James Dean's Porsche 550 to the racetrack, when Dean had his fatal accident.

I don't really do that-much woodwork to devote that much floorspace to that tool (though I have a Powermatic 66) but that should be a good one to use, once it's done. I have a benchtop Craftsman belt sander-6" disc sander which does what I need, when I need it.

Craftsman belt sander 6 amps.jpg
 
Last edited:
OP
1

11b30b4

Well-known member
Joined
Jul 16, 2020
Messages
1,029
Location
GA
JG Owens, thank you and I agree for the 110 with all things considered, it was a good deal, not a you **** deal, but a good deal.

driftpin, I really dont do that much wood work either. I do use my sanders on metal all the time and I think this 6" sander will come in hand resurfacing drill press tables and other projects.
 
OP
1

11b30b4

Well-known member
Joined
Jul 16, 2020
Messages
1,029
Location
GA
Update,

I started working on the pedestal mount. While I was cleaning up some columns for other machines, I used my redneck lathe to clean the column on this mount. Here you can see the thinner and taller column for the sander next to the column for my table saw.

full


Also, I placed the cast iron pedestal parts in a simple green bath for 24 hours, rinsed, then placed them in a citric acid bath for another 24 hours. Once rinsed off and dry, I primed them with metal etching primer.

full


full


Unfortunately, there seems to be a shortage of Rust-o-leum Hammered Gold in the Atlanta area. Literally, no Home Depot, Lowes, or Ace Hardware have any cans in stock within a 60-mile radius. I ordered some online and I should have the cans next later this week. This has put a stop to my progress on several projects.

I should be starting on the rest of the sander soon. I did order replacement 6” x 48” belts in various grits. I still need to get some replacement discs.

Thanks for the interest.
 
OP
1

11b30b4

Well-known member
Joined
Jul 16, 2020
Messages
1,029
Location
GA
Pharmerphil, the redneck lathe is a very simple lathe setup with cobbled parts.

full


For my lathe, I used four 2” caster wheels that are bolted to a surface. Next, I use a piece of 3/8” all thread with four nuts and two flat washers. Also, I use two wooden furniture legs from Home Depot that are tapered. Lastly, I use a hand drill with variable speed control.

First, I drill two centered holes in the wooden furniture legs. Next, I clamp the caster mounted surface to a work bench. Next, I fabricate a mount for the hand drill put of foam, zip ties etc… Lastly, I insert the wooden furniture legs into each end of the column, run the all thread through the legs and bolt it all together then chuck the all thread and go to town.

There are a million variations of this setup, but this works for me.

full
 

driftpin

Well-known member
Joined
Dec 22, 2016
Messages
11,218
Location
Miami-Dade/Broward Co. Florida
I admire your ingenious redneck lathe. It appears that it has done a fine job for you. I normally don't have much to turn in that fashion but I'm going to try it on some motorcycle fork down tubes that are corroded. Of course it won't fix pits in the chrome but it may work to clean it up. The liquids you use appear to have done a good job for cleaning up the metal. For ferrous metals like old tools, I like 6% vinegar which is what I have used in the past with good results. I also use it on old motorcycle parts. It's inexpensive easy to obtain it works well and it's easily disposed of.
 
OP
1

11b30b4

Well-known member
Joined
Jul 16, 2020
Messages
1,029
Location
GA
Driftpin, thank you. Yes, vinegar works well. I used it extensively on one rust magnet of a drill press and the two- one gallon packs from Sam’s are very inexpensive. For chrome, I have tried to use coke and aluminum foil, but it really has not done anything impressive for me. If the chrome is too bad, I normally just strip the chrome off and polish the metal to a high shine.

Update,

My hammered gold spray paint arrived, and I finished the pedestal stand.

full


Next, I fully disassembled the sander and no real surprises here.

full


Once everything was disassembled, I removed the badges and placed all the parts in a simple green bath for 24 hours. I did not soak the idler bearing. I just cleaned it up on the lathe. The other bearings will be replaced.

After the bath, all the parts were rinsed and scrubbed with a wire brush to remove all the paint and grit.

full


Next, all the parts were placed in a citric acid bath for 24 hours.

Any of the cylindrical parts that could be cleaned in the lathe were cleaned in the lathe. This included the idler bearing, work table support rod, drive shaft, tool pulley, belt adjustment knobs and both drum pulleys. here are the parts after cleaning them on the lathe.

full


Oddly, unlike most other Craftsman King Selley product, this sander does not have chrome knobs? all the knobs on this machine are blued steel. Anyway, as you can see with the belt adjustment knobs, I rectified this by polishing the steel.

Lastly, I tested the motor and it did not work. This is a capacitor start motor so there were a few things that could be wrong. The capacitor, the thermal cutoff switch, and the actual on/off switch. However, once I cracked open the motor, I noticed two bare wires.

full


I am hoping that is all that’s wrong with it so I will splice these lead wires and clean up the motor and test it again. If it runs then cleaning and painting will be next.

Thanks for the interest.
 
OP
1

11b30b4

Well-known member
Joined
Jul 16, 2020
Messages
1,029
Location
GA
Update,

First, I have been searching for information on this motor and coming up with nothing. Apparently, I made two typos. Originally, I was calling this motor the Craftsman 1/5 HP 3450 CS ball bearing motor 397.19827 when actually it is the Craftsman 1/2 HP 3450 CS ball bearing motor 397.19821. Once I got that sorted, I found a parts diagram and part numbers. Here is what I put together.

full


I spliced in new lead wires for the stator and will assemble the motor tonight to test it. If it works then this will be one of my favorite motor designs sold by sears. It is so well designed. I love the capacitor is inside the housing and not the typical bump on the stator band that we normally see in CS motors. Everything about this motor is economical in design. Anyway, I will no more once I get it back together.

full


The original bearings were Hoover 77203 40x17x12mm. I am fairly certain they are not 5/8 bore and even the rotor shaft is 17mm or actually 16.98mm. I ordered replacement bearings from McMaster Carr.

full


That’s it for the update so far.

Thanks for the interest.
 
OP
1

11b30b4

Well-known member
Joined
Jul 16, 2020
Messages
1,029
Location
GA
Just a quick update,

This is a sander parts in the citric acid bath.

full


I pulled the parts out and rinsed them off then towel dried the parts. Tonight, I will be masking the parts and priming them. Also, today the bearings for the motor should arrive so I hope to test my repair.

Thanks for the interest.
 
OP
1

11b30b4

Well-known member
Joined
Jul 16, 2020
Messages
1,029
Location
GA
Update,

Well the bearings arrived, and I assembled the motor to test the repair and nothing. The motor failed to do anything as if there was no power getting to the motor. I posted a thread for some help on the general tool discussion and it was suggested I bypass the Klixon thermal protector and the on/ off switch and see what happens. Presto the motor worked and through later testing it was determined that the Klixon was bad.

full


I ordered a replacement Klixon from carbonbrush.com. I highly recommend them, the sales person I spoke with helped me find a replacement that would work for my motor and the shipped it same day. Because they are located in California and I am in Georgia, I expected the delivery to take a few days but the next day I received the Klixon and I did not pay any special few for the quick delivery. Anywho, the Klixon worked perfectly.

So, next came the priming and painting.

full


full


full


I have been in contact with Mattblast about remaking the motor decal. My attempt to remove the decal without damaging it failed so a new one will be needed. here is a pic of what Matt has printed for me.

full


Guys if you are rebuilding anything and need replacement badges and decals, Mattblast here on the forum is the guy to go with.

So, after the paint cured, it was time to reassemble the sander.

full


full


full


Next, I cleaned up the Craftsman crown logo and model number badges and applied them with panel screws. These were in good shape, so I did not need to replace them. Then, I added the motor mount, motor, table, and belt then it was time to power this thing up test it out. It runs great and will be put to good use. Here are the final pics.

full


full


full


full


The decal from Matt will arrive soon and that will be the final detail to complete the rebuild. I am still mossing the small rest for the belt but I do not plan on using it in the horizontal position and if I do, I will fabricate a rest out of some 1” angle steel.


And that should complete the sander rebuild. Thanks for the interest.
 
OP
1

11b30b4

Well-known member
Joined
Jul 16, 2020
Messages
1,029
Location
GA
JoCoSawdust, thank you. I believe I will need to consider a dust collection system with this addition. Until now, I have just vacuumed after sanding/ grinding but this thing will sling a lot of dust so I will be on the look out for one at an estate sale.
 

Hoorn

Well-known member
Joined
May 19, 2020
Messages
1,140
Location
Glendora, CA
And that should complete the sander rebuild. Thanks for the interest.
11b, how would you describe the difference in working on the 1940/50s Craftsman bullet style motor and the late 50s style (still with the rectangular capacitor in the base) to the type of motor on this belt sander? The type motors we have endlessly worked on that came on the King-Seeley DPs.

Having worked on a few Delta repulsion motors, I have grown frustrated with the amount of wiring found in the end cap of the Craftsman. Once you got past the experience of the Klixon malfunction, how was this motor in comparison? Better or worse, same? Very unique capacitor location.
 

larry4406

Well-known member
Joined
Jan 27, 2006
Messages
19,118
Location
Northern Virginia
Nice restoration!

I see the motor is dual ended (shafts both sides). Can you fab some sort of impeller for a dust collector on the unused shaft end?
 
OP
1

11b30b4

Well-known member
Joined
Jul 16, 2020
Messages
1,029
Location
GA
Hoorn, great questions. Comparing these two motors, the 397 motor and the 115 standard motor typically on KS DPs would be interesting and probably help some people in future rebuilds. I will put something together this week to compare these two motors and post it in the vintage tool section. I need to have pics some metrics for comparison. Until then, I should say that I love the 115 motor and feel it is an amazing motor. The ability to change the bearings without opening the entire motor is awesome and the compactness of placing the capacitor in the base is a great design. I am sure no one in the 40/50s expected the sardine can capacitor to become obsolete; however, it has and if you must use a modern capacitor on this motor you will need to get creative to with how ad where you put that capacitor. The 397 motor does not have any legacy issues (such as the capacitor) that you have with the 115 motor. The overall design of the 397 demonstrates a well-considered organization of the motor and how the parts were assembled. I noted before the “economical” design of the 397 motor. An example of this is how the terminal board is attached to the motor. There are metal prongs that are bent to hold the board in place, on a 115 motor this is accomplished with screws. This small difference translates to larger weight differences and the incorporation of stamped metal parts over cast parts. I will explore these and many more differences in the designs in the comparison later this week. Hoorn, thank you for the suggestion.

Jayman17, thank you and yes, it is. One day I will own all the pedestal mounted shop tools.

Larry4406, Now we are talking! That is a fantastic suggestion and one I need to take some serious time to consider. If I were to do something like this, I would have three requirements:

First, it would need to be effective and efficient.

Second, it would need to look period correct.

Third, it would need to be somewhat cost effective.

I was simply spit balling when I mentioned the dust collection system since I have numerous tools that would benefit form a dust collection system and this sander does produce a significant amount of dust. I honestly never wanted to mess with a dust collection system but this sander and ow your suggestion has me tossing around ideas; although, I suspect that since I need to put a collection system on 6 or more tools, that a shop sized collection system will be the most efficient. Regardless, I like the recommendation of putting the other end of the motor to use for this purpose. That is one hell of a “out of the box” suggestion.

Ok so once I knock out the motor comparison, I will post a link here.

As always, thank you all.
 

Hoorn

Well-known member
Joined
May 19, 2020
Messages
1,140
Location
Glendora, CA
11b, as always thank you for your thorough answers. Always a great read.

Regarding "getting creative" to hide the capacitor, like you I try to keep things as period correct as possible and when I ran into a capacitor issue (the issue being there was no capacitor in the base at all) I had to figure out a way of putting a round peg in a square hole. I don't like the look of the capacitor mounted on the side of the motor, so I snuck it in to the base and cut a piece of hardwood the same outside diameter of the base. I painted it with red oxide primer and then gave it a couple coats with hammered paint to give it a "cast iron texture". Then I painted it the same color as the base and I was done.

I don't have this setup anymore; since I made this in January I have since had at least 10 Craftsman DPs run through my workshop and I was able to use a proper sardine can capacitor I pulled from one of the other motors and now have a reserve.

But for any GJ'er that has to replace their sardine can with a modern one this is a fairly easy solution.
 

Attachments

  • 64766.jpeg
    64766.jpeg
    321.5 KB · Views: 37
  • 64768.jpeg
    64768.jpeg
    477.5 KB · Views: 39
  • 64764.jpeg
    64764.jpeg
    420.8 KB · Views: 35
  • 64760.jpeg
    64760.jpeg
    313.8 KB · Views: 42
OP
1

11b30b4

Well-known member
Joined
Jul 16, 2020
Messages
1,029
Location
GA
Hoorn, I remember these pic in the DP thread and I recall discussing you solution with Frank on one of our many phone calls. We were both impressed with the solution you came up with and how good it looked. completely hidden and perfectly executed. I remember when I got my first 100 series DP, I was concerned that the sardine can would be bad and started looking at that time for a replacement capacitor only to learn that they were no longer produced. I thought to myself that I would need to come up with a spacer for the base to cover the thicker round capacitor. Luekly, I have not had to do this yet but once you did yours, I was very impressed and glad you didnt opt to simply slap a capacitor hump on the stator band. Frank told me that he had to use a round capacitor at one time and he just extended the wired and rested the capacitor inside the headstock but he and I were very impressed with your solution, and yes it is out of the box thinking with a trend towards the "period correct" look.

There have been many great rebuilds of DP on Franks thread but I believe you and JoCoSawdust are the leaders in rebuilding a damn nice drill press.
 
To avoid these ads, REGISTER NOW!

JoCoSawdust

Well-known member
Joined
Nov 19, 2018
Messages
2,416
Location
Eastern NC
Thanks for the kudos 11B, but I've been surpassed many, many times in the DP rebuild arena, including your fantastic work.

I've become somewhat of an electric motor nut as of late, having rebuilt about a dozen 115s and only one 397. As such, I know a lot more about the 115s than I do the 397s. My one experience with a 397 wasn't a bad one, but as 11B noted, I could definitely see the attempts to economize the power plant. The flat caps can be an issue as they're not available anymore but, knock on wood, I've yet to find a bad one. The 115s are readily available on the second hand market, cheap, and absolutely bullet proof. I've actually bought machines (or gotten them curbside pickup for free) just to get the motors and have them back to the 1930s. All but one has started up once I've un-F'd the old wiring. Haven't found a bad flat cap yet (and.....I just cursed myself). I pick up motors with cracked bases, cracked end bells etc...pull parts and scrap the rest. I've got 5 or 6 flat caps in my "just in case" bin now. I'm a big fan of the 115s.

As far as incorporating the other spindle into dust collection, I don't think that'd have a happy ending. I picked up a "Sani-grinder" (a similar model pictured below), about 20 years ago. It was cheap and weird. They're still on the market today, intended for dental use. Mine is a 1/2hp and can be ran at 1725 or 3450 rpm with the flip of a switch. That oddball set up on the left side is a turbine for dust collection. The intent is to **** debris through that flex hose and into a collection bag. I dragged this thing out about 6 months ago (after it sat in a shed forever) to play with it. I did some minor wood sanding with the drum. This must work fine for dental dust (whatever that is) but wood clogs it nearly immediately, just using a 3 inch drum. That belt/disc combo would, in my opinion, really do a number on a small turbine under 1/2 hp power (or even larger for that matter).

I stripped all the dentist **** off the Sani-grinder motor, put some arbor extensions on it and run 3M radial discs on it now. It's a strong, quality motor and it's great to choose rpm with a switch. If you ever have a chance to grab one of these things for cheap, I highly recommend them for polishing work.

I learned the hard way that cutting costs on dust collection is a foolish and expensive mistake. 30 years ago when I decided to stop breathing in ALL the sawdust in my shop, I started with a chintzy 1hp floor model and quickly outgrew it. With all those machines you intend to have 11B, a quality 5hp set up with proper ducting would be the way to go right from the starting line.
 

Attachments

  • Screen Shot 2021-07-19 at 5.56.27 PM.png
    Screen Shot 2021-07-19 at 5.56.27 PM.png
    291.2 KB · Views: 37

Hoorn

Well-known member
Joined
May 19, 2020
Messages
1,140
Location
Glendora, CA
11b, thank you for that, it means a lot to me, and like JoCo stated so well, I too have seen some jaw dropping DP restorations -yours among them. Not to mention every other machine you lay your hands on.

JoCo, sound advice as always.
 
OP
1

11b30b4

Well-known member
Joined
Jul 16, 2020
Messages
1,029
Location
GA
JoCoSawdust, thank you for the information. It will be some time before I make a decision on dust collection, but I will consider what you have said here.

Hoorn, thank you and because you asked for it…

I did it, well I may have over did it. Anyway, it’s a work in progress.

 
OP
1

11b30b4

Well-known member
Joined
Jul 16, 2020
Messages
1,029
Location
GA
Thank you JZiggy, I look forward to that skunkworks project you have going on.
 

Hoorn

Well-known member
Joined
May 19, 2020
Messages
1,140
Location
Glendora, CA
That came out looking like it's the featured tool on the Craftsman floor at my local Sears circa 1960. Bravo 11b.
 
OP
1

11b30b4

Well-known member
Joined
Jul 16, 2020
Messages
1,029
Location
GA
JZiggy, ;)
Hoorn, thank you brother. Perhaps my next shop will even have the 40s era checkered floor.
 

qballq

New member
Joined
Sep 27, 2022
Messages
1
I have a 3/4 HP sander that I am looking to sell if anyone is interested. Its a beast so I don't think shipping is an option. Live in NJ
JZiggy, ;)
Hoorn, thank you brother. Perhaps my next shop will even have the 40s era checkered floor.

sander1.jpgsander2.jpgsander3.jpg
 

Porkis

Active member
Joined
Oct 9, 2022
Messages
26
Location
Utah
Can anyone tell me what that hole is for? Is it threaded? Does something attach there? IMG_3399.jpeg
 
OP
1

11b30b4

Well-known member
Joined
Jul 16, 2020
Messages
1,029
Location
GA
That is where you attach the table for the disc sander. The table can be mounted for the belt or the disc.
full
 

Porkis

Active member
Joined
Oct 9, 2022
Messages
26
Location
Utah
Thank you!!! I may try my hand at building a pedestal for mine. Too expensive to ship the real McCoy to me.
 
OP
1

11b30b4

Well-known member
Joined
Jul 16, 2020
Messages
1,029
Location
GA
Not unless I find another one to rebuild. I did not start my YouTube channel until June of 2022.
 

Porkis

Active member
Joined
Oct 9, 2022
Messages
26
Location
Utah
Does anyone know where one can find dimensions of the stand? I know the top is offset from the bottom.
 

DDOPWD23

Well-known member
Joined
Jul 8, 2024
Messages
148
Location
Glen Rock, NJ
Ever since I saw one of these in your videos I’ve wanted one. I just found one and I was going to pick it up but unfortunately my opportunity to get it has been change because of work. I will see if the woman will hold it for me until I get back but that’s going to be at least 10 days. I hope she does hold it. It’s rough but they just don’t come up for sale all that much by me. There is another one for sale with the pedestal base and the belt guard as well but the sell wants to sell all the tools as a package set for $1000. All 50s king Seleey machines. Table saw (already have one), band saw (will take), belt/disc sander (will take), radial arm saw (only one that seems newer, don’t need) and 100 drill press with Altas table lift (I’ll take the lift. All of it is in very rough condition and looks like it was stored in a shed but not well since everything is rusted. I’ll see if they budge on their price in a few weeks as it’s been for sale for quite a while. Wish me luck. The only pictures I have from the first seller. Also let me know what you think. Are they too far gone?
 

Attachments

  • IMG_4056.png
    IMG_4056.png
    2.4 MB · Views: 15
  • IMG_4057.png
    IMG_4057.png
    2.8 MB · Views: 12
  • IMG_4058.png
    IMG_4058.png
    3.3 MB · Views: 11
  • IMG_4050.png
    IMG_4050.png
    3.5 MB · Views: 12
  • IMG_4051.png
    IMG_4051.png
    3 MB · Views: 13
  • IMG_4052.png
    IMG_4052.png
    3.1 MB · Views: 14
  • IMG_4053.png
    IMG_4053.png
    3 MB · Views: 12
  • IMG_4054.png
    IMG_4054.png
    3.6 MB · Views: 11
To avoid these ads, REGISTER NOW!
Top Bottom