To avoid these ads, REGISTER NOW!

Between 265 & 485 SQ/FT The EuroSpekGarage Garage (2 Car in Houston, TX)

Workspaces sized between 265 and 485 squarefeet.

eurospekgarage

Active member
Joined
Nov 21, 2023
Messages
38
Hey all,

I am an avid car (Audi/VW) enthusiast based out of Houston, Texas. With being an avid car enthusiast comes tools, cars, and, of course, a space to put them all in.

I have a small youtube channel with a few documented builds. Feel free to check them out to get an idea of the kind of space I used to work out of.

2014 Jetta Sportwagen TDI 4-motion swap:
2018 Tiguan Rebuild and R-line Conversion:

and my latest project
Audi S3 Cabrio build:

Within the last month, I have moved to my first house (I am 29 years old) with a detached 2 car garage. As you can imagine, the garage was a large part of my home-buying decision.

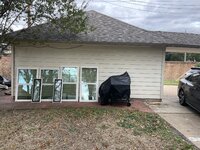
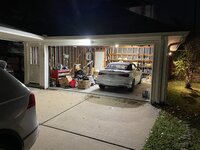
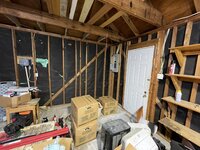
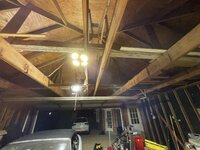
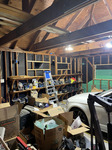
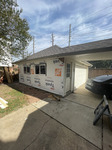
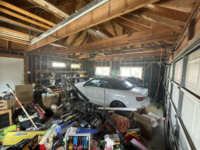
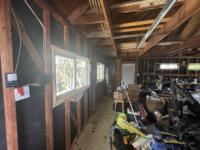
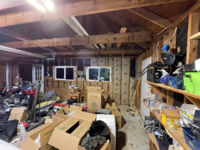
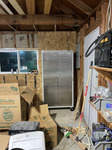
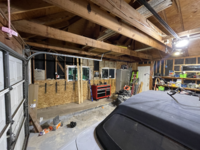
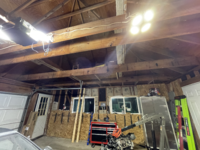
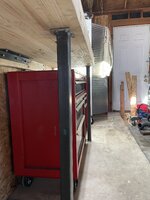
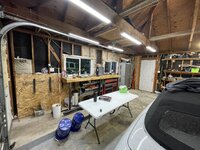
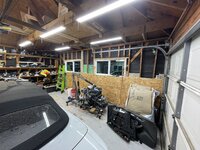
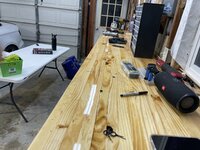
So, now that we are caught up, let me introduce you to the new garage space (pics below, sorry for the first pic being sideways).

I had to move in here in relatively short order hence why there is so much stuff, but the plan is to have a space for two cars with nothing on the floor.

The Plan

1. Lighting

This place is a dungeon! In the short time i've been here, I have replaced the one central and garage door motor bulbs with 1600 lumen LED units which help a bit, but this is certainly not my long term plan.

The first thing going in are windows! Nothing beats natural daytime light, in my opinion. So I picked up 6 double paned vinyl windows to be installed on the East, West, and North walls (south is the garage door). While I am huge on DIY, I have decided to hire out this work due to my day job, and to get this part knocked out so I can get to organizing.

The West side wall will receive the two biggest windows, as they face away from the sun and into my yard. The East side wall will receive the two smaller windows, this is where the sun hits. I am not sure if I want the windows to be installed horizontally or vertically for best utilization. Any advice would be appreciated! Also not sure if these windows are designed to be installed in a specific orientation. The two long and skinny windows will go high up on the North side wall. My neighbor is pushing me to install a skylight due to the tall roof, any advice on skylights would also be very appreciated!

As far as electrical lighting. I have used LED strips (fluorescent tube style) in the past and I am a huge fan. So I plan to line the support beams with LED strips on one bank, and the same LEDs on above on a separate bank. Will definitely be reading up on electrical on this thread for that upgrade. I want this garage to light up like a science experiment at night, I am sick of dark spots in the garage!

2. Insulation/Temperature Regulation
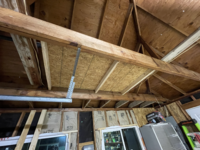
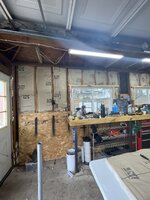
If you can tell from the photos, this garage is basically a roof with studs, and some siding tacked on on the outside. There are spots where you can see daylight from the inside. This, of course, is not a great solution for insulation. Why insulation, you might ask? Houston summers is why. I am tired of sweating and tripping over extension cables powering box fans all around me in the summers.

The contractor that I hired to install the windows will remove the siding, replace it with plywood, frame out the windows, wrap the plywood with house wrap, and reattach the siding. This is only step one of my insulation goal. After he is done with that, I will go in and install insulation between the studs, and top it off with plywood on the inside walls, and drywall on the ceilings. This will not only insulate the space, but should tremendously help with the structure.

To get some airflow in the garage, I plan to install a large fan in the attic area of the garage. A split AC unit is also the plan.

3. Storage
As you can probably tell, I have a ton of parts, tools, wiring - I need as much storage as I can get. I plan to use the attic space as storage. To do that, I will cut some 2x4s as supports, and lay plywood down on the perimeter of the support beams of the roof. I plan to have the central space above the garage open so I can get up there with a ladder when needed.

I also like the concept of the existing shelving on the north side of the garage, I might keep a similar style, with a storage container system there.

I plan to install cabinets on the walls between the windows on the East and West side of the walls for additional storage.

4. Work bench
It's probably hard to see, but the west side of the garage is step elevated about 4 inches above the car floor. This strip is about 4 feet wide and runs the entire length of the garage. My concept for now is to build a thick wooden work bench that will run along that wall beneath the windows. I want it to be working height, with enough space underneath to roll my toolbox under it. I'd like a spot for a stool where I can do my wiring and soldering, and the rest of the space to have storage underneath, preferably with rolling chests so that I can sweep under them when needed. And electrical outlets, of course.

5. Floor and paint
I've looked into DIY epoxy kits for the floor and found results to be sub par. I know that to do it properly, the cement floor must be sanded. I might go this route, but it will certainly be one of the last steps of this garage renovation.

Based on some other threads on this site, I liked how some of y'all painted the top of the walls white, with a darker color below the waist for kick and smear marks. I think I will do the same. The more light the better!

I know this list is very aspirational, and I acknowledge that it will take quite some time to achieve. But I am super excited to have a dedicated space for my hobby, and I hope y'all can provide me with some advice and expertise on the list of things I am trying to achieve. Please drop some similar threads down below, if you know of any!

I look forward to keeping this updated with garage related updates, thanks for reading!

tempImageK5OOpN.jpg

tempImageo95tms.jpgtempImageb1ZbZD.jpgtempImage5aRgz7.jpgtempImageqlzlPv.jpgtempImagejQn6f3.jpgtempImageDM9Gdy.jpgtempImagexwUCt0.jpgtempImagehSPR9A.jpgtempImage4z69w0.jpg
 
To avoid these ads, REGISTER NOW!

ScottW

Well-known member
Joined
Mar 9, 2021
Messages
109
Location
WA State
Nice garage with a lot of potential. I think you determine window orientation by where the drain holes are?
 

545_days

Well-known member
Joined
Oct 30, 2016
Messages
602
Location
Texas
Hurricane Ike removed several skylights in my neighborhood (Pearland) south of Houston followed by high volumes of wind driven rain. I recommend you not penetrate your roof on the Gulf Coast
 

loganb

ALLIANCE MEMBER
Joined
Dec 29, 2011
Messages
5,675
Location
Omaha, NE
Great looking space! Very similar construction to my last garage in Chicago area

Couple comments:

For the windows, it appears that the (4) operable units are all hung windows intended to have the lower sash travel vertically. Upper sash may be operable(making them a double hung) or may be fixed(making them single hungs). As the glass in the upper sash is wider/taller than the lower sash, this indicates the upper is fixed making these single hungs based on standard designs

You could install them horizontally, but they won't work well. The operable sash will want to "spring" home and it'll likely leak water as the designed drainage method won't work thanks to gravity. So the recommendation would be to install those oriented like you show them as single hungs. The framer will need to probably cut out (1) stud for each opening, put an appropriately sized header in, sill etc then do proper flashing/integration with the surrounding materials

For the ceiling, you're going to need to put a fair amount of "strapping" or other framing in there to be able to properly support a drywall ceiling. 5/8" in a ceiling I believe is 24" on center for support, your rafter ties look to be 48 to 60" on center maybe? So review what the plan is there. I finished my garage ceiling like that with drywall, had I been smarter at the time I would've done metal liner panel and saved a lot of work. You'll need to look up the span distances on the metal liner panel(think like metal paneling but for interior applications) and see what you've got to determine what additional support it would require based on your ceiling framing center to center dimensions

Would also recommend framing in an attic hatch for access down the road...any plans to insulate the ceiling or walls?
 
OP
E

eurospekgarage

Active member
Joined
Nov 21, 2023
Messages
38
Hey all, thanks for your comments. All good ones, I might add. Taking a closer look at the windows, you were correct, the draw holes are all at the bottom (where the window slides). BUT, i have decided to install them horizontally. The spring loading definitely makes them difficult to close, but they do all work. As far as the drain holes go, I have drilled pin holes on the lower sections to mimic the original draining. I will monitor them kick that can down the road. As far as skylights, i have decided against them. Seems like too much trouble.

Thanks for the advice on the ceiling drywall! I will look into it but it will likely wait until later this "winter."

On to the updates!
tempImage7uvRoQ.jpgtempImageEdp7ok.jpgtempImagebC4rXL.jpgtempImageT84OFc.jpgtempImageg4lZlY.jpgtempImagefqVL8S.jpgtempImageF9qkWr.jpgtempImagetLC4rt.pngtempImageT6lpZh.pngtempImageBKojbq.png
 
OP
E

eurospekgarage

Active member
Joined
Nov 21, 2023
Messages
38
So far I am blown away by how much bigger the space feels, it's exactly what I was going for. This weekend I will be installing insulation and plywood on the inside walls, and also putting ply wood on top of the cross beams above to start putting boxes away. I may also begin work on my work bench this weekend. Very excited!!
 

TX4runner

Well-known member
Joined
Mar 9, 2014
Messages
310
Location
Houston, TX
Nice start! It looks like 1 stud was doubled up to add some support back in for cutting the other studs? Did he do the same on the other wall? Not an engineer, just wondering.
 
OP
E

eurospekgarage

Active member
Joined
Nov 21, 2023
Messages
38
Nice start! It looks like 1 stud was doubled up to add some support back in for cutting the other studs? Did he do the same on the other wall? Not an engineer, just wondering.
Yes he did! Only a few that he thought needed it.
 
OP
E

eurospekgarage

Active member
Joined
Nov 21, 2023
Messages
38
My guy finished the siding! He tried to reuse as much of the original stuff as possible, but it was nailed and and the majority of the planks broke off. He did manage to reuse some of it though. Next up on the exterior is caulking and paint!
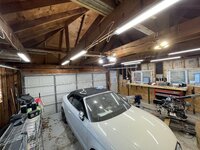
I'd say it looks well done.

tempImageAnCGDn.jpgtempImageY0dgkj.jpgtempImagerWuqrD.jpgtempImageojvxrX.jpg
 
OP
E

eurospekgarage

Active member
Joined
Nov 21, 2023
Messages
38
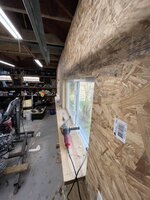
More updates! I am building a work bench with my neighbor this weekend to go on the west wall. I began to insulate and add OSB to the wall in preparation for the bench. As you can see, I spray painted the stud location so it would be easier to locate them.

Another thing i did today was get some stuff of the ground. Namely, I added some 2x4 supports, and threw on a OSB board to use as an attic space. I just did the one for now, but I plan to line each side with this "loft" setup. The only thing is it's pretty high up, so i'm gonna have to think about a permanent folding ladder solution to get up there easier.

Oh, and Christmas came early! Assembled a metal locker for my flammable liquids (spray cans, oils, brake clean, etc).


tempImage13Zzbx.jpgtempImageaiszTX.pngtempImageWhu7Gv.jpgtempImageSkRMKh.pngtempImageaFKS16.pngtempImagePb3qBu.pngtempImagemDMLks.png
 
OP
E

eurospekgarage

Active member
Joined
Nov 21, 2023
Messages
38
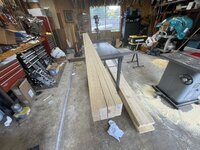
Got the work bench going! Went and found some wood at my local Lowe’s, and began the glue up process. My neighbor has a similar bench that he build out of 2x4s and I was always impressed with the sturdiness and mass of his bench. He helped me tremendously in putting this together.

I needed about 22” of bench and I want to have the bench span the space between under the two windows. Initial thoughts were to build two 6 foot slabs, but we settled on a single 10ft slab. To do this, I got 8 2x10x10 boards. We planed one side to have a straight reference point, and then ripped them to 4 inches. Then glued it all up and clamped it. Should be ready to plane in a day or two.

The end result should be a sturdy 10ft by 22.5” by 4” hunk o wood, can’t wait!

IMG_7436.jpegIMG_7437.jpegIMG_7438.jpegIMG_7439.jpeg
 

Attachments

  • IMG_7441.jpeg
    IMG_7441.jpeg
    907 KB · Views: 11
OP
E

eurospekgarage

Active member
Joined
Nov 21, 2023
Messages
38
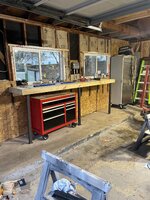
Workbench is at home base! Huge thank you to my neighbor who supervised and directed this process.

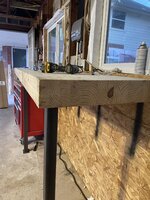
We got the bench to the house and began working to mount it to the wall. For the legs, I went to a metal store and picked up some 14 gauge 2x2 square tubing, and had them cut it square and to length. I mounted a stringer to use as the wall support and then did my best to measure the height of the legs. From there, I had some 1/8” plates laying around from a previous project to use as the legs. I used my trusty harbor freight diy welder to weld these puppies up! We made sure to attach the legs while the bench was upside down to ensure squareness, although we had to do some fine tuning with a chisel to square the legs as I am not a pro welder. After that, we carefully flipped it and walked it to the wall. I immediately found that the wall was not perfectly straight as compared to the edge of the bench.

To solve this issue, I cut some angle iron to fit between the stud lag bolts against the stringer. I measured the gap between the wall and screwed it the angle iron offset by the gap. Then I zipped in the lag bolts against the stringer and pulled the wall perfectly up to the bench.

Lastly, for the bottom of the legs, I drilled a hole through the footing, and used a cement bit to make a further hole. I then used a cement screw with my impact to drive in the screw. When I did that the screw broke clean off. So I decided to whip out my welder again and weld the broken screw to the leg. This thing is now officially permanent.

I think I need a second tool box!

IMG_7448.jpegIMG_7453.jpegIMG_7454.jpegIMG_7457.jpegIMG_7460.jpegIMG_7455.jpeg
 
OP
E

eurospekgarage

Active member
Joined
Nov 21, 2023
Messages
38
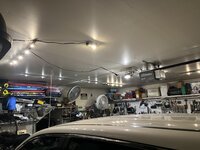
Well, I’d say the lighting chapter of this garage build is about 95% complete. I went ahead and installed Amazon shop lights. Got a pack of 10 for like $120. These can daisy chain together and mount really easily.

To connect them, I found two unused switches on the wall with wiring that lead nowhere. This was perfect as I wanted to have dedicated banks of lights. I made sure to test each wire before touching it to ensure I was not about to die of electric shock.

10 lights are in, and I’m very happy that I will not have dark spots at night.

I think I will grab another pair of these lights and point them up into the ceiling area both for being able to see up there when I need to grab stuff, and also to provide some volume to the space.

We’re getting there!!

IMG_7462.jpegIMG_7463.jpegIMG_7466.jpegIMG_7464.jpegIMG_7465.jpeg
 

nicholam77

Well-known member
Joined
Dec 18, 2016
Messages
2,680
Location
Minneapolis, MN
Nice. This reminds me of my space when I first started out, similar size and situation (1st house, 28 yrs old etc). Exciting times... keep at it and you should be able to turn it into something really nice! You're on the right site for inspiration.

I like the windows over the workbench. I am an Audi/VW fan as well.

🍻
 
OP
E

eurospekgarage

Active member
Joined
Nov 21, 2023
Messages
38
Nice. This reminds me of my space when I first started out, similar size and situation (1st house, 28 yrs old etc). Exciting times... keep at it and you should be able to turn it into something really nice! You're on the right site for inspiration.

I like the windows over the workbench. I am an Audi/VW fan as well.

🍻
I read through your thread on your garage, I was inspired. Man your woodworking skills are something to behold! Thanks for checking out mine
 
OP
E

eurospekgarage

Active member
Joined
Nov 21, 2023
Messages
38
IMG_7479.jpegIMG_7480.jpegIMG_7481.jpegIMG_7482.jpegIMG_7483.jpegIMG_7484.jpegIMG_7485.jpegI’m finally getting somewhere with this garage, at least I can finally see my tools and parts, and 90% of the floor is clear of junk. In the last couple of days I began to put up the east wall, built an attic shelf for storage, and wired up some more lights to light up the attic. That was sketchy because it was like 20 ft off the ground.

I also coated the bench with epoxy. It’s not perfect but it’s a work bench after all.

I really need to get an electrician up in here to wire up some more outlets so I can finish out the walls and build overhead storage!

I think I’m finally in a place to continue buttoning up the Audi S3 cabrio project.

For now, enjoy the pics:
 
OP
E

eurospekgarage

Active member
Joined
Nov 21, 2023
Messages
38
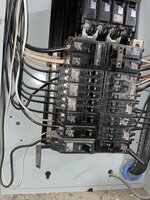
Did some research and mustered up the courage to tackle adding a circuit and 3 extra outlets. This took just over 100ft of 12/2 romex, one breaker, and 3 outlets and boxes, totaling somewhere around $160 or so.

Before I began I mapped out the garage on paper to get an idea on wire length. I then ran the wire and hooked up the outlets in series, and finally shut off the main power and swapped to a double 20A breaker since I had no extra space in the panel.

It all worked out in the end so now it’s time to install the upper halves of the walls and mount some overhead storage!


IMG_7513.jpegIMG_0031.jpegIMG_0029.jpegIMG_0030.jpegIMG_0032.jpegIMG_0033.jpegIMG_7519.jpeg
 
OP
E

eurospekgarage

Active member
Joined
Nov 21, 2023
Messages
38
IMG_7523.jpegIMG_7525.jpegIMG_7526.jpegIMG_7527.jpegIMG_7528.jpegAfter installing the outlets, it was time to finish off the west wall. I knew I needed overhead storage above the bench, so I came up with a solution that used left over OBS from the wall. I went to the store and picked up some shelf brackets and inverted them, and cut a 12” board to span the space above the bench. I know OBS is not great shelf material so we will see how long it lasts before sagging. I also don’t have a lot of weight up there so my hope is that it’s gonna be fine.

Next up is finish off the east side wall paneling, and then paint!

For now, enjoy the updates:
 

Xti04

Well-known member
Joined
Nov 11, 2016
Messages
2,398
Good job! I was terrified of ac electrical for years and finally started my ac power journey last year with adding circuits to my former garage now my wifes hair salon. I have been wiring my new garage as it has come together. Slow and steady gets it done. Keep after it!
 
To avoid these ads, REGISTER NOW!
OP
E

eurospekgarage

Active member
Joined
Nov 21, 2023
Messages
38
Good job! I was terrified of ac electrical for years and finally started my ac power journey last year with adding circuits to my former garage now my wifes hair salon. I have been wiring my new garage as it has come together. Slow and steady gets it done. Keep after it!
Thank you! Electrical is something i've (and i'm sure many others) always been wary of, but developing this know how is very beneficial. I appreciate you reading my thread!
 
OP
E

eurospekgarage

Active member
Joined
Nov 21, 2023
Messages
38
IMG_7529.jpegIMG_7530.jpegIMG_7531.jpegIMG_7532.jpegIMG_7533.jpegIMG_7534.jpegIMG_7577.jpegSome more updates. I finished off the east side wall with insulation and OBS. I could have left the wall as is, but I knew that I needed some use out of it so I added a window sill with some boards I had left over. I had a 10’ 2x10x10 left over from the bench glue up that we didn’t use, and a 2x6x8. Added a stringer with a 2x4 along the bottom, ensuring level ness. And the cut the boards with appropriate offsets to slide into the window voids. I then secured them with lag bolts I had left over. The though process for this window sill is to be able to put things when working on that side of the garage. I also shaved the window sill for a smooth transition between the two boards. Eventually I’ll put up a shelf above the windows like I did above the tool box for some extra storage. For now, I’d say it’s a workable space and I’m done making any huge updates. I might throw on some paint here soon to brighten up the space. And likely next year I will clear off the shelves on the north wall and finish the insulation and wall off, as well as add in an AC unit. So far I am super thrilled with this space! And I’m in a place where I can continue assembling my cabrio project.

Enjoy the pics!
 

TX4runner

Well-known member
Joined
Mar 9, 2014
Messages
310
Location
Houston, TX
Nice progress and ledge. That first picture looks like the car is on the other side of the window as if you have a 4 car garage with a wall separating the two. I was like, wait I didn't think he had that much garage space. lol. By this summer you are going to want that insulation and A/C unit.
 
OP
E

eurospekgarage

Active member
Joined
Nov 21, 2023
Messages
38
Nice progress and ledge. That first picture looks like the car is on the other side of the window as if you have a 4 car garage with a wall separating the two. I was like, wait I didn't think he had that much garage space. lol. By this summer you are going to want that insulation and A/C unit.
HA don't we all wish we had a 4 car garage? Maybe one day when i win the lottery...

And i agree, AC is something i will be heavily researching and prepping for in a few short months. That and I want to install an areal fan in the attic space to move some air around.

I'm wondering though, since heat rises, should i orient the fan to pull upward and out the heat chimney on my roof? or is it better to push air down? let me know if you have any suggestions or expertise in this area.
 

TX4runner

Well-known member
Joined
Mar 9, 2014
Messages
310
Location
Houston, TX
I put up fans for air flow. I think Ideal flow would be to extract hot air from the top. I just bought these two fans and used some spare wood to create a a hanger so that I could theoretically reposition it on the rafter depending on there the cars/projects were occurring as well as move from wall rafter to further up rafter. Honestly, I think I moved them once, but they are mobile if I needed to move. I also have a big Home Depot 4 ft fan now that moved a lot of air when it's really hot or mosquitos are out and I want to make it hard for them to land on me. lol Granted that also means tools often blow away and I can't hear anyone.


IMG_3215.jpg
 
OP
E

eurospekgarage

Active member
Joined
Nov 21, 2023
Messages
38
Looking good!

I waited a long time to paint my plywood. Too long. Paint will brighten the space and be worth it, imo.

What are the details on the cabrio build?
The cabrio is 99% back together. Struggling with some electrical issues right now, the car is deciding to throw a fit every time i accelerate. The other issue is stumbling after engine is warmed up. I have the injectors out right now and im gonna get them tested and seals replaced. I also have an intake cam positioning code so im taking that valve body out to clean and replace. I'm concerned about the electrical issues, not gonna lie.
 
OP
E

eurospekgarage

Active member
Joined
Nov 21, 2023
Messages
38
I put up fans for air flow. I think Ideal flow would be to extract hot air from the top. I just bought these two fans and used some spare wood to create a a hanger so that I could theoretically reposition it on the rafter depending on there the cars/projects were occurring as well as move from wall rafter to further up rafter. Honestly, I think I moved them once, but they are mobile if I needed to move. I also have a big Home Depot 4 ft fan now that moved a lot of air when it's really hot or mosquitos are out and I want to make it hard for them to land on me. lol Granted that also means tools often blow away and I can't hear anyone.


IMG_3215.jpg
I appreciate that, I like how you have two smaller fans instead of one big one for mobility. Love all the BMW stuff too!
 

Xti04

Well-known member
Joined
Nov 11, 2016
Messages
2,398
The cabrio is 99% back together. Struggling with some electrical issues right now, the car is deciding to throw a fit every time i accelerate. The other issue is stumbling after engine is warmed up. I have the injectors out right now and im gonna get them tested and seals replaced. I also have an intake cam positioning code so im taking that valve body out to clean and replace. I'm concerned about the electrical issues, not gonna lie.
What electrical issues are you having? I know the first gens would get water into the comfort control module/ bcm under the drivers seat and could cause all kinds of weird electrical issues.
 
OP
E

eurospekgarage

Active member
Joined
Nov 21, 2023
Messages
38
What electrical issues are you having? I know the first gens would get water into the comfort control module/ bcm under the drivers seat and could cause all kinds of weird electrical issues.
well i entirely swapped the electrical system so these issues are related to CAN networks. I suspect that i have a loose wire somewhere because i'll start it up with zero codes, and as soon as i put it in Drive and pull away I immediately get errors relating to electric steering, suspension, headlights, and a host of others just going berzerk. Gonna take some time to locate the can network that connects those systems and then trace the wires to find the issue.
 
OP
E

eurospekgarage

Active member
Joined
Nov 21, 2023
Messages
38
In other car related news, I was having an issue with the car starting up fine but then stumbling and dying once it reached operating temp. Codes showed low fuel pressure and intake cam over advanced.

I took apart the manifold and cleaned the manifold from carbon build up, as well as pulled the injectors. I took the injectors to get ultrasonically cleaned and flow tested. It was found that two of the injectors were down nearly 20% on flow! Quite shocking for only 60k miles.

These direct injection engines are horrible for carbon build up so I installed a catch can system to separate the crank case mix into air and water. I hope this helps in the long run. Threw in some fresh plugs and now she purrs like a kitten, with zero codes and no stumbles at operating temp. It’s a win!


IMG_7610.jpegIMG_7607.jpegIMG_7600.jpegIMG_7601.jpeg
 

mattthemuppet

Well-known member
Joined
Dec 9, 2023
Messages
245
Location
San Antonio TX/ Spartanburg SC
I love the progress on the garage, you’re going to love that come summer. I’d second painting the walls, it makes a huge difference in light levels. I’d also suggest insulating your garage door. I did mine and it helps both ways - keeps the garage cooler in summer and warmer in winter
 
OP
E

eurospekgarage

Active member
Joined
Nov 21, 2023
Messages
38
I love the progress on the garage, you’re going to love that come summer. I’d second painting the walls, it makes a huge difference in light levels. I’d also suggest insulating your garage door. I did mine and it helps both ways - keeps the garage cooler in summer and warmer in winter
Noted! I do plan on painting the walls soon, I agree that it would bounce some more light into the space.

Regarding garage door insulation, do you have a recommendation on how to do it?

My neighbor has precut boards of Styrofoam that fit nicely in the panes, i havent gotten around to sourcing those. Did you have something in else in mind?
 

mattthemuppet

Well-known member
Joined
Dec 9, 2023
Messages
245
Location
San Antonio TX/ Spartanburg SC
One thing I found with LED lighting is that it can cast some sharp shadows, so white walls and ceilings bounce the light around a bit and smooth the light coverage out.

I did my garage door ghetto style with some R15 and R13 batts. Just R13 would have been better in hindsight as it's lighter, but I ended up strapping the batts in with some cargo strap and sheet metal screws. The difference was amazing, easily 10F cooler in summer (90F instead of 100F!), especially as it gets a fair bit of morning sun. Price was about 1/2 of the prepackaged kits you can get from HD and Lowes. Friend of mine went with that and it works well too. Another option would be that pink EPS board and some contact cement, would be alot neater.
 
OP
E

eurospekgarage

Active member
Joined
Nov 21, 2023
Messages
38
One thing I found with LED lighting is that it can cast some sharp shadows, so white walls and ceilings bounce the light around a bit and smooth the light coverage out.

I did my garage door ghetto style with some R15 and R13 batts. Just R13 would have been better in hindsight as it's lighter, but I ended up strapping the batts in with some cargo strap and sheet metal screws. The difference was amazing, easily 10F cooler in summer (90F instead of 100F!), especially as it gets a fair bit of morning sun. Price was about 1/2 of the prepackaged kits you can get from HD and Lowes. Friend of mine went with that and it works well too. Another option would be that pink EPS board and some contact cement, would be alot neater.
Thanks for that! Got any pics? curious what you mean when you say EPS is neater.

Weight is definitely a factor i'm considering for this.
 

mattthemuppet

Well-known member
Joined
Dec 9, 2023
Messages
245
Location
San Antonio TX/ Spartanburg SC
Told you it was janky :)
IMG_0835.jpegIMG_0834.jpeg
Here’s what I mean about the lights. They’re not very bright individually but make for pretty even light
IMG_0837.jpegIMG_0836.jpeg
As for the foam boards, I imagine it would be pretty straightforward to cut out pieces with a box cutter and then glue them into the recesses of the door
 

TX4runner

Well-known member
Joined
Mar 9, 2014
Messages
310
Location
Houston, TX
Here is picture of the insulation you cut into the voids you can buy online or I think HD. For even better insulation I should tape the edges to create a better seal, but it definitely reduces the head especially after painting the house and garage door dark blue a few years ago compared to off white.
Found this in my old thread here that hasn't been updated since 2019. Found a better side picture of the fan also.

img_2692-jpg.805928

img_1184-jpg.691754
 
OP
E

eurospekgarage

Active member
Joined
Nov 21, 2023
Messages
38
Hello again, it's been a while. I decided to start from scratch on my 2-car garage as seen in previous posts. After many sleepless nights dreaming of the ultimate garage with 4 bays, skylights, lifts and the rest, reality hit when I started shopping for quotes. In the end, I decided to do a modest upgrade which maximizes the 2 car layout and fits the neighborhood I live in.

Design
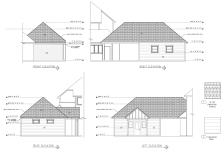
I met with an architect and we designed a better space - taking my existing 22 x 21 slab, and lengthening it by 2 feet. This would allow my tools and bench to live at the end of the garage, rather than on the side like it was before while giving space at the hoods of the cars. I also wanted a flat floor to make the driven part of the floor space to be wider and so that I can space the cars further apart when parked inside. The existing slab had a sunken area for parking that is to be filled in with concrete. The flat floor is also better for using a maxjax lift.

This garage will remain detached, but now the area leading up to the garage door will be covered. This serves three purposes: shaded parking , cooling for the inside, and lofted storage above the parking area. I will be installing two mini splits inside the garage with an exhaust fan in the roof. The cooling operation is as follows: open the garage door, turn on the exhaust fan in the roof to purge hot air at the top (the open garage door will bring in "cooler" air from the shaded parking area) for a couple of minutes, then close the garage door and and the exhaust fan and fire up the AC mini splits. In my mind, this would purge hot air from the garage and allow the AC to cool the space faster. For days where i want a draft without AC, i will simply run the exhaust fan with the garage door open. This of course means that the garage will be insulated.

I think this approach is budget friendly and will add to the value of the home without going too much overboard and giving up some of the money invested when it comes time to sell and move. I have some swap plans in the future and I am really excited about the shaded parking while i have a big project in the garage.

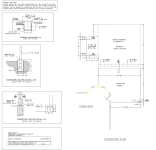
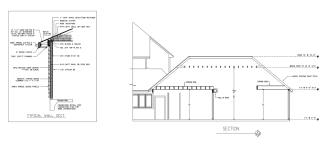
Plans:
Garage floor plan
Garage Floor Plan.png
Elevations
Elevations.png
Framing
Framing.png
Foundation
Foundation Plan.png

Section view
Section view.png

Electrical Plan
Electrical layout.png
 
Last edited:
OP
E

eurospekgarage

Active member
Joined
Nov 21, 2023
Messages
38
Work has begun! Foundation was filled in and added to. The existing foundation had a good 8 inches of concrete in the center before the pour, and now we are a good 10 to 12 inches of concrete. Not shown is the rebar that was dowelled into the existing slab.

I initially wanted some channel drains to run the perimeter of the new pour, but decided against it in the end. I did have them add some edging at the joint so that the inevitable shrinking of the new pour will have a natural path to follow. I also had then smooth in a 4 foot slope for the drive in which should be plenty. Super excited! This coming week is when the framing will start.image1.jpeg
image0.jpeg
image2.jpeg

Stay tuned for further updates!
 
To avoid these ads, REGISTER NOW!
Top Bottom